


tensorflow保存模型有很多的方式,究竟每一种方式适合干什么呢?
我大致的一个理解是:
ckpt模型适合的是tf_serving部署
.pb文件是轻量级的,适合手机端的移植,其中,tf.saved_model.builder.SavedModelBuilder的保存的.pb文件不知道是否已经将变量转换为了常量???可留言解释,谢谢。
一点不了解tf_serving部署,所以找了一下资料看了看,还是比较模糊。如下:
2016年,机器学习在 Alpha Go 与李世石的世纪之战后变得更加炙手可热。Google也在今年推出了 TensorFlow Serving 又加了一把火。
TensorFlow Serving 是一个用于机器学习模型 serving 的高性能开源库。它可以将训练好的机器学习模型部署到线上,使用 gRPC 作为接口接受外部调用。更加让人眼前一亮的是,它支持模型热更新与自动模型版本管理。这意味着一旦部署 TensorFlow Serving 后,你再也不需要为线上服务操心,只需要关心你的线下模型训练。
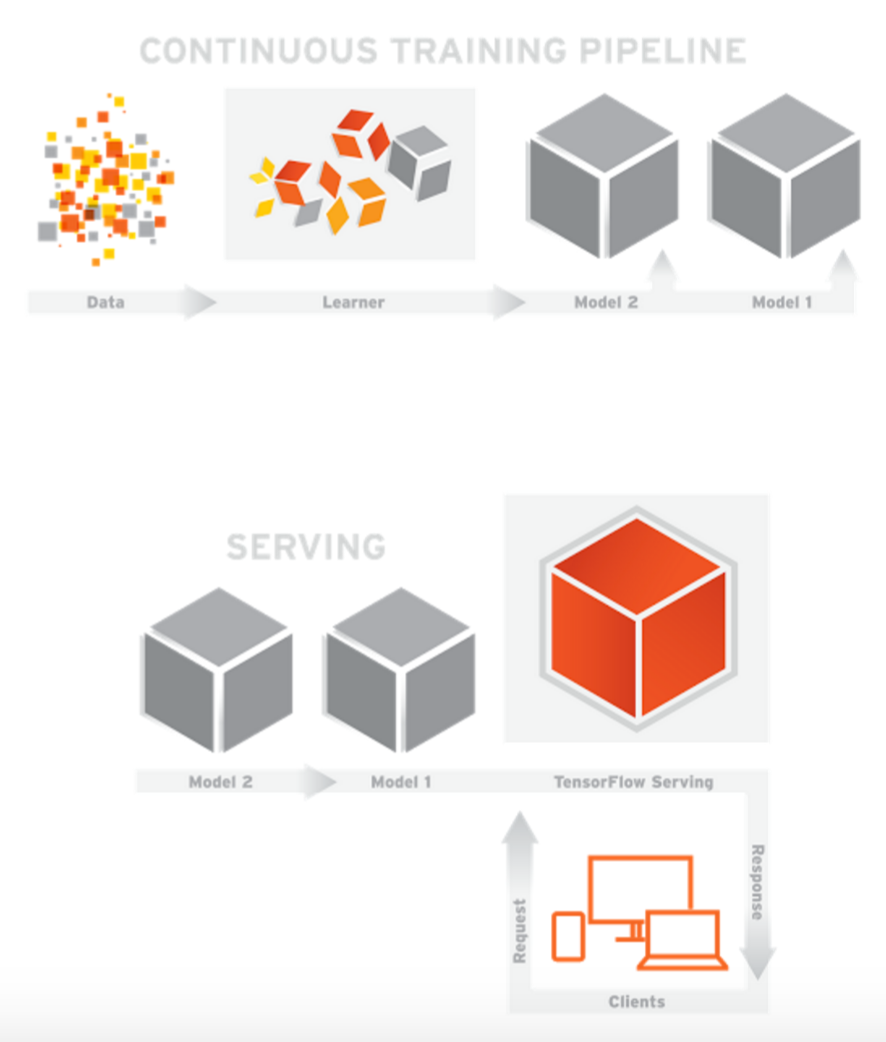
今天我就带大家来用 TensorFlow Serving 部署一个简单的 Linear Regression 模型。
以下演示运行在 Ubuntu 16.04 LTS 之上。
TensorFlow Serving 处于快速迭代期。如果本文内容与官方文档矛盾,请以官方文档为参考。
环境
TensorFlow Serving 目前依赖 Google 的开源编译工具 Bazel。Bazel 是 Google 内部编译工具 Blaze 的开源版本,功能与性能基本一致。具体的安装可以参考官方文档。此外还需要安装 gRPC (Google 又一个内部工具的开源版)。
之后请参考官方安装指南完成。值得注意的是,最后的 bazel build 将会需要大约30分钟时间并占用约5-10G的空间(时间取决于机器性能)。配合使用 -c opt 能一定程度加快 build。
模型训练
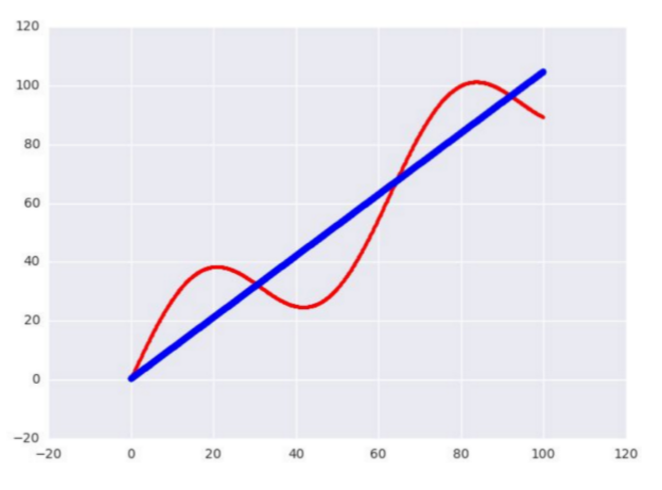
接下来我们用 TensorFlow 写一个简单的测试用 Linear Regression 模型。数据的话我就使用正弦函数生成 1000 个点,尝试用一条直线去拟合。
样本数据生成如下:
# Generate input data
x_data = np.arange(100, step=.1)
y_data = x_data + 20 * np.sin(x_data / 10)

# Reshape data
x_data = np.reshape(x_data, (n_samples, 1))
y_data = np.reshape(y_data, (n_samples, 1))
然后用一个简单的 y = wx + b 来做一个训练,使用 Adam 算法。简单调整了下参数:
sample = 1000, learning_rate = 0.01, batch_size = 100, n_steps = 500
# Placeholders for batched input
x = tf.placeholder(tf.float32, shape=(batch_size, 1))
y = tf.placeholder(tf.float32, shape=(batch_size, 1))

# Do training
with tf.variable_scope('test'):
    w = tf.get_variable('weights', (1, 1), initializer=tf.random_normal_initializer())
    b = tf.get_variable('bias', (1,), initializer=tf.constant_initializer(0))

    y_pred = tf.matmul(x, w) + b
    loss = tf.reduce_sum((y - y_pred) ** 2 / n_samples)

    opt = tf.train.AdamOptimizer(learning_rate=learning_rate).minimize(loss)

    with tf.Session() as sess:
        sess.run(tf.initialize_all_variables())

        for _ in range(n_steps):
            indices = np.random.choice(n_samples, batch_size)
            x_batch = x_data[indices]
            y_batch = y_data[indices]
            _, loss_val = sess.run([opt, loss], feed_dict={x:x_batch, y:y_batch})

        print w.eval()
        print b.eval()
        print loss_val
大致把 loss 收敛在 15.8 左右。精度应该足够了,毕竟只是一个简单的测试用模型。
模型导出
接下来的就是本文的重点:导出模型。
tf.train.Saver
用于保存和恢复Variable。它可以非常方便的保存当前模型的变量或者倒入之前训练好的变量。一个最简单的运用:
saver - tf.train.Saver()
# Save the variables to disk.
saver.save(sess, "/tmp/test.ckpt")
# Restore variables from disk.
saver.restore(sess, "/tmp/test.ckpt")
tf.contrib.session_bundle.exporter.Exporter
导出模型还需要这个 Exporter 的协助。令人尴尬的是这个 Exporter 太新了,还没有 API 文档支持,只能参考 Github 的代码实现。
Exporter 的基本使用方式是
传入 saver 构造一个实例
调用 init 定义模型的 graph 和 input/output
使用 export 导出为文件
model_exporter = exporter.Exporter(saver)
model_exporter.init(
    sess.graph.as_graph_def(),
    named_graph_signatures={
        'inputs': exporter.generic_signature({'x': x}),
        'outputs': exporter.generic_signature({'y': y_pred})})
model_exporter.export(FLAGS.work_dir,
                      tf.constant(FLAGS.export_version),
                      sess)
大功告成!编译!我们成功导出了一个可以部署在 TensorFlow Serving 上的模型。它接受一个 x 值然后返回一个 y 值。导出的文件夹以 version 命名,包含用于部署的 meta 文件, 模型 checkpoint 文件和序列化的模型 graph:
/tmp/test/00000001
checkpoint export-00000-of-00001 export.meta
模型部署
部署的方式非常简单,只需要以下两步:
$ bazel build //tensorflow_serving/model_servers:tensorflow_model_server
$ bazel-bin/tensorflow_serving/model_servers/tensorflow_model_server --port=9000 --model_name=test --model_base_path=/tmp/test/
我们看到 TensorFlow Serving 成功加载了我们刚刚导出的 model。并且还在不断尝试 poll 新的 model:
客户端
接下来我们写一个简单的 Client 来调用下我们部署好的 Model。这里我们需要用到 TensorFlow Serving 的 Predict API 和 gRPC 的 implementations.insecure_channel 来construct 一个 request。特别要注意的是 input 的 signature 和数据必须和之前 export 的模型匹配。本例中为 名称为 x, float32类型,大小为 [100, 1] 的 Tensor。
from grpc.beta import implementations
import numpy as np
import tensorflow as tf

from tensorflow_serving.apis import predict_pb2
from tensorflow_serving.apis import prediction_service_pb2

tf.app.flags.DEFINE_string('server', 'localhost:9000',
                           'PredictionService host:port')
FLAGS = tf.app.flags.FLAGS

n_samples = 100

host, port = FLAGS.server.split(':')
channel = implementations.insecure_channel(host, int(port))
stub = prediction_service_pb2.beta_create_PredictionService_stub(channel)

# Generate test data
x_data = np.arange(n_samples, step=1, dtype=np.float32)
x_data = np.reshape(x_data, (n_samples, 1))

# Send request
request = predict_pb2.PredictRequest()
request.model_spec.name = 'test'
  request.inputs['x'].CopyFrom(tf.contrib.util.make_tensor_proto(x_data, shape=[100, 1]))
result = stub.Predict(request, 10.0)  # 10 secs timeout
别忘了配置一下 bazel 的 BUILD 文件:
py_binary(
    name = "test_client",
    srcs = [
        "test_client.py",
    ],
    deps = [
        "//tensorflow_serving/apis:predict_proto_py_pb2",
        "//tensorflow_serving/apis:prediction_service_proto_py_pb2",
        "@org_tensorflow//tensorflow:tensorflow_py",
    ],
)
最后编译运行,就能看到在线预测结果啦!
bazel build //tensorflow_serving/test:test_client && ./bazel-bin/tensorflow_serving/test/test_client
延伸
TensorFlow 封装了众多常用模型成为 Estimator,帮助用户避免了冗长易错的算法实现部分。比如以上的例子就可以完全用 LinearRegressor 来替换。只需要几行代码简单地调用 fit() 函数就能轻松得到收敛的模型。唯一不足的是目前与 TensorFlow Serving 还不能 100% 兼容。虽然 Google 还在全力完善 TensorFlow Serving,但是距离完善还需要一定的时间。
如果既想要使用方便快捷的的 Estimator ,又想线上部署呢?当然也是有办法的,笔者钻研了一下后,实现了一个用 Estimator 训练数据,导出模型后再部署上线的方法。最后用这个线上部署的模型实现一个在线评估房屋价值的系统。


 3万+
3万+


 被折叠的 条评论
为什么被折叠?
被折叠的 条评论
为什么被折叠?
 到【灌水乐园】发言


