


一.综述:
人体骨骼关键点检测已经非常成熟了,参考曹哲大神的论文,可以知道其论文中的采用自下而上的方式,检测人体骨骼关键点。
采用的方式与自顶向下的方式的区别比较大,自定向下的方式首先是检测人体,在人体区域内回归出人体的骨骼关键点坐标。
而自下而上的方式采用的关键点热图和关键点矢量图的方式。如,一共有19个关键点,就会生成19个通道的热图,每一个通道为某个关节的热图分布(也就是概率图)。同时会生成19*2个通道的矢量图,为什么是19*2呢?因为矢量图分为两个方向,一个是X方向、一个是Y方向。(具体的操作可以参考论文,这里只是简单的介绍一下)
二. 如何生成关键点热图(概率图)
如下图所示如果右侧图中红色十字为一个关键点,假设生成的热图大小与原图像大小一致,生成的热图会在相应的坐标处生成一个成高斯分布的概率区域,区域的中心值最大,最接近1,越向四周,概率越小。
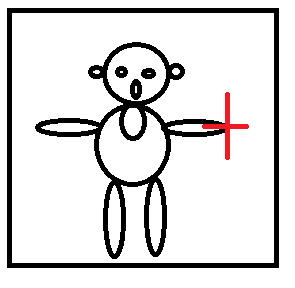
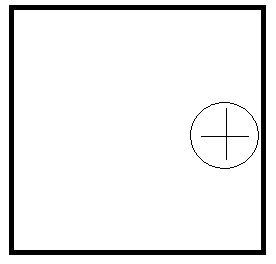


如图中间区域的概率最大,基本上接近于1,边缘逐渐减小
代码:(参考openpose)
def get_heatmap(annos, height, width):
    """

    Parameters
    - annos: 关键点列表 [
                            [[12,10],[10,30],....19个],#某一个人的
                            [[xx,xx],[aa,aa],....19个],#另外一个人的
                        ]
    - heigth:图像的高
    - width: 图像的宽

    Returns
    - heatmap: 热图
    """

    # 19 for coco, 15 for MPII
    num_joints = 19

    # the heatmap for every joints takes the maximum over all people
    joints_heatmap = np.zeros((num_joints, height, width), dtype=np.float32)

    # among all people
    for joint in annos:
        # generate heatmap for every keypoints
        # loop through all people and keep the maximum

        for i, points in enumerate(joint):
            if points[0] < 0 or points[1] < 0:
                continue
            joints_heatmap = put_heatmap(joints_heatmap, i, points, 8.0)

    # 0: joint index, 1:y, 2:x
    joints_heatmap = joints_heatmap.transpose((1, 2, 0))

    # background
    joints_heatmap[:, :, -1] = np.clip(1 - np.amax(joints_heatmap, axis=2), 0.0, 1.0)

    mapholder = []
    for i in range(0, 19):
        a = cv2.resize(np.array(joints_heatmap[:, :, i]), (height, width))
        mapholder.append(a)
    mapholder = np.array(mapholder)
    joints_heatmap = mapholder.transpose(1, 2, 0)

    return joints_heatmap.astype(np.float16)


def put_heatmap(heatmap, plane_idx, center, sigma):
    """

    Parameters
    -heatmap: 热图(heatmap)
    - plane_idx:关键点列表中第几个关键点(决定了在热图中通道)
    - center: 关键点的位置
    - sigma: 生成高斯分布概率时的一个参数

    Returns
    - heatmap: 热图
    """

    center_x, center_y = center  #mou发
    _, height, width = heatmap.shape[:3]

    th = 4.6052
    delta = math.sqrt(th * 2)

    x0 = int(max(0, center_x - delta * sigma + 0.5))
    y0 = int(max(0, center_y - delta * sigma + 0.5))

    x1 = int(min(width - 1, center_x + delta * sigma + 0.5))
    y1 = int(min(height - 1, center_y + delta * sigma + 0.5))

    exp_factor = 1 / 2.0 / sigma / sigma

    ## fast - vectorize
    arr_heatmap = heatmap[plane_idx, y0:y1 + 1, x0:x1 + 1]
    y_vec = (np.arange(y0, y1 + 1) - center_y)**2  # y1 included
    x_vec = (np.arange(x0, x1 + 1) - center_x)**2
    xv, yv = np.meshgrid(x_vec, y_vec)
    arr_sum = exp_factor * (xv + yv)
    arr_exp = np.exp(-arr_sum)
    arr_exp[arr_sum > th] = 0
    heatmap[plane_idx, y0:y1 + 1, x0:x1 + 1] = np.maximum(arr_heatmap, arr_exp)
    return heatmap
三、如何生成矢量图(概率图)
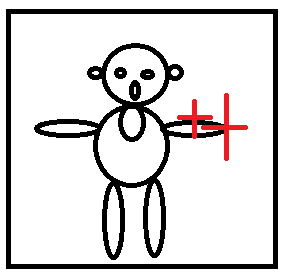
矢量图的生成与热图的生成思想基本一致,都是输出概率图,矢量分为x,y 两个方向,每个方向占一个通道。
如下图所示,假设两个红色十字为两个关键点,会在下右图中的红色区域生成矢量概率。
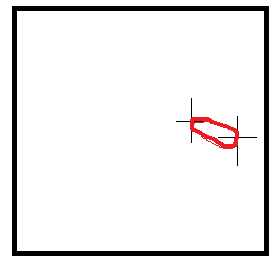
下图为测试结果,矢量的概率图。


参考代码:
def get_vectormap(annos, height, width):
    """

    Parameters
    -----------


    Returns
    --------


    """
    num_joints = 19

    limb = list(
        zip([2, 9, 10, 2, 12, 13, 2, 3, 4, 3, 2, 6, 7, 6, 2, 1, 1, 15, 16],
            [9, 10, 11, 12, 13, 14, 3, 4, 5, 17, 6, 7, 8, 18, 1, 15, 16, 17, 18]))

    vectormap = np.zeros((num_joints * 2, height, width), dtype=np.float32)
    counter = np.zeros((num_joints, height, width), dtype=np.int16)

    for joint in annos:
        if len(joint) != 19:
            print('THE LENGTH IS NOT 19 ERROR:', len(joint))
        for i, (a, b) in enumerate(limb):
            a -= 1
            b -= 1

            v_start = joint[a]
            v_end = joint[b]
            # exclude invisible or unmarked point
            if v_start[0] < -100 or v_start[1] < -100 or v_end[0] < -100 or v_end[1] < -100:
                continue
            vectormap = cal_vectormap(vectormap, counter, i, v_start, v_end)

    vectormap = vectormap.transpose((1, 2, 0))
    # normalize the PAF (otherwise longer limb gives stronger absolute strength)
    nonzero_vector = np.nonzero(counter)

    for i, y, x in zip(nonzero_vector[0], nonzero_vector[1], nonzero_vector[2]):

        if counter[i][y][x] <= 0:
            continue
        vectormap[y][x][i * 2 + 0] /= counter[i][y][x]
        vectormap[y][x][i * 2 + 1] /= counter[i][y][x]

    mapholder = []
    for i in range(0, 19 * 2):
        a = cv2.resize(np.array(vectormap[:, :, i]), (height, width), interpolation=cv2.INTER_AREA)
        mapholder.append(a)
    mapholder = np.array(mapholder)
    vectormap = mapholder.transpose(1, 2, 0)

    return vectormap.astype(np.float16)


def cal_vectormap(vectormap, countmap, i, v_start, v_end):
    """

    Parameters
    -----------


    Returns
    --------


    """
    _, height, width = vectormap.shape[:3]

    threshold = 8
    vector_x = v_end[0] - v_start[0]
    vector_y = v_end[1] - v_start[1]
    length = math.sqrt(vector_x**2 + vector_y**2)
    if length == 0:
        return vectormap

    min_x = max(0, int(min(v_start[0], v_end[0]) - threshold))
    min_y = max(0, int(min(v_start[1], v_end[1]) - threshold))

    max_x = min(width, int(max(v_start[0], v_end[0]) + threshold))
    max_y = min(height, int(max(v_start[1], v_end[1]) + threshold))

    norm_x = vector_x / length
    norm_y = vector_y / length

    for y in range(min_y, max_y):
        for x in range(min_x, max_x):
            bec_x = x - v_start[0]
            bec_y = y - v_start[1]
            dist = abs(bec_x * norm_y - bec_y * norm_x)

            # orthogonal distance is < then threshold
            if dist > threshold:
                continue
            countmap[i][y][x] += 1
            vectormap[i * 2 + 0][y][x] = norm_x
            vectormap[i * 2 + 1][y][x] = norm_y

    return vectormap
记录仅为自己回忆,不足之处,请多关照!!!


 5639
5639


 被折叠的 条评论
为什么被折叠?
被折叠的 条评论
为什么被折叠?
 到【灌水乐园】发言


