


1.概述
转载:异步请求知识点与使用姿势小结 这是一个感觉有用,但是又没有用的知识点。
本篇博文作为异步请求的扫盲和使用教程,将包含以下知识点
什么是异步请求,有什么特点,适用场景
四种使用姿势:
AsyncContext方式
Callable
WebAsyncTask
DeferredResult
2. 异步请求
异步对于我们而言,应该属于经常可以听到的词汇了,在实际的开发中多多少少都会用到,那么什么是异步请求呢
2.1. 异步请求描述
先介绍一下同步与异步:
一个正常调用,吭哧吭哧执行完毕之后直接返回,这个叫同步;
接收到调用,自己不干,新开一个线程来做,主线程自己则去干其他的事情,等后台线程吭哧吭哧的跑完之后,主线程再返回结果,这个就叫异步
异步请求:
我们这里讲到的异步请求,主要是针对web请求而言,后端响应请求的一种手段,同步/异步对于前端而言是无感知、无区别的
同步请求,后端接收到请求之后,直接在处理请求线程中,执行业务逻辑,并返回
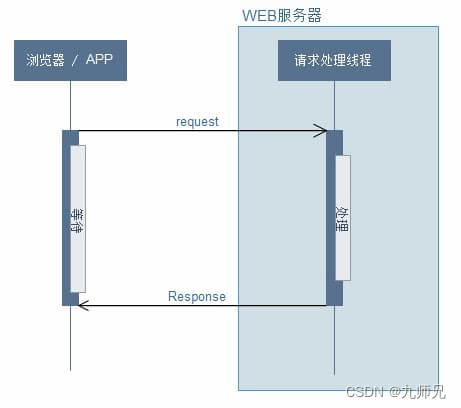
异步请求,后端接收到请求之后,新开一个线程,来执行业务逻辑,释放请求线程,避免请求线程被大量耗时的请求沾满,导致服务不可用
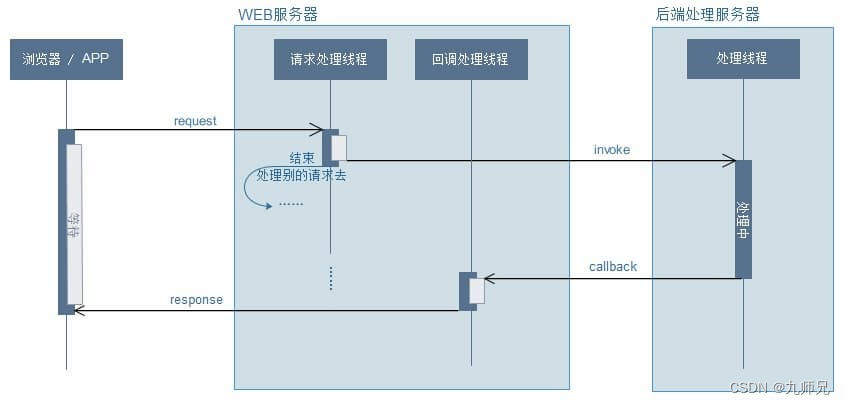
2.2. 特点
通过上面两张图,可以知道异步请求的最主要特点
业务线程,处理请求逻辑
请求处理线程立即释放,通过回调处理线程返回结果
2.3. 场景分析
从特点出发,也可以很容易看出异步请求,更适用于耗时的请求,快速的释放请求处理线程,避免web容器的请求线程被打满,导致服务不可用
举一个稍微极端一点的例子,比如我以前做过的一个多媒体服务,提供图片、音视频的编辑,这些服务接口有同步返回结果的也有异步返回结果的;同步返回结果的接口有快有慢,大部分耗时可能<10ms,而有部分接口耗时则在几十甚至上百
3.使用姿势
接下来介绍四种异步请求的使用姿势,原理一致,只是使用的场景稍有不同
3.1. AsyncContext
在Servlet3.0+之后就支持了异步请求,第一种方式比较原始,相当于直接借助Servlet的规范来实现,当然下面的case并不是直接创建一个servlet,而是借助AsyncContext来实现
package com.spring.async;

import org.springframework.web.bind.annotation.GetMapping;
import org.springframework.web.bind.annotation.RequestMapping;
import org.springframework.web.bind.annotation.RestController;

import javax.servlet.AsyncContext;
import javax.servlet.AsyncEvent;
import javax.servlet.AsyncListener;
import javax.servlet.http.HttpServletRequest;
import java.io.IOException;

@RestController
@RequestMapping(path = "servlet")
public class ServletRest {

   /**
    *todo: 2023/4/25 22:39 九师兄
    * 界面执行:http://localhost:8082/servlet/get?sleep=10000
    * 可以看到后端先打印
    *
    * 主线程over!!! http-nio-8082-exec-4
    * 超时返回!!!
    *
    * 然后界面如下
    * Whitelabel Error Page
    * This application has no explicit mapping for /error, so you are seeing this as a fallback.
    *
    * Tue Apr 25 22:39:52 CST 2023
    * There was an unexpected error (type=Internal Server Error, status=500).
    *
    * 然后后端日志打印
    *
    * 操作完成:http-nio-8082-exec-6
    * 内部线程:http-nio-8082-exec-5
    * java.lang.IllegalStateException: The request associated with the AsyncContext has already completed processing.
    * 	at org.apache.catalina.core.AsyncContextImpl.check(AsyncContextImpl.java:489)
    *
    **/
    @GetMapping(path = "get")
    public void get(HttpServletRequest request) {
        AsyncContext asyncContext = request.startAsync();
        asyncContext.addListener(new AsyncListener() {
            @Override
            public void onComplete(AsyncEvent asyncEvent) throws IOException {
                System.out.println("操作完成:" + Thread.currentThread().getName());
            }

            @Override
            public void onTimeout(AsyncEvent asyncEvent) throws IOException {
                System.out.println("超时返回!!!");
                asyncContext.getResponse().setCharacterEncoding("utf-8");
                asyncContext.getResponse().setContentType("text/html;charset=UTF-8");
                asyncContext.getResponse().getWriter().println("超时了!!!!");
            }
            @Override
            public void onError(AsyncEvent asyncEvent) throws IOException {
                System.out.println("出现了m某些异常");
                asyncEvent.getThrowable().printStackTrace();

                asyncContext.getResponse().setCharacterEncoding("utf-8");
                asyncContext.getResponse().setContentType("text/html;charset=UTF-8");
                asyncContext.getResponse().getWriter().println("出现了某些异常哦!!!!");
            }

            @Override
            public void onStartAsync(AsyncEvent asyncEvent) throws IOException {
                System.out.println("开始执行");
            }

        });

        asyncContext.setTimeout(3000L);
        asyncContext.start(new Runnable() {
            @Override
            public void run() {
                try {
                    Thread.sleep(Long.parseLong(request.getParameter("sleep")));
                    System.out.println("内部线程:" + Thread.currentThread().getName());
                    asyncContext.getResponse().setCharacterEncoding("utf-8");
                    asyncContext.getResponse().setContentType("text/html;charset=UTF-8");
                    asyncContext.getResponse().getWriter().println("异步返回!");
                    asyncContext.getResponse().getWriter().flush();
                    // 异步完成,释放
                    asyncContext.complete();
                } catch (Exception e) {
                    e.printStackTrace();
                }
            }
        });

        System.out.println("主线程over!!! " + Thread.currentThread().getName());
    }
}
完整的实现如上,简单的来看一下一般步骤
javax.servlet.ServletRequest#startAsync()获取AsyncContext
添加监听器 asyncContext.addListener(AsyncListener)(这个是可选的)
用户请求开始、超时、异常、完成时回调
设置超时时间 asyncContext.setTimeout(3000L) (可选)
异步任务asyncContext.start(Runnable)
3.2. Callable
相比较于上面的复杂的示例,SpringMVC可以非常easy的实现,直接返回一个Callable即可
package com.spring.async;

import org.springframework.web.bind.annotation.GetMapping;
import org.springframework.web.bind.annotation.RequestMapping;
import org.springframework.web.bind.annotation.RestController;

import java.util.concurrent.Callable;

@RestController
@RequestMapping(path = "call")
public class CallableRest {

    /**
     *todo: 2023/4/25 22:42 九师兄
     *
     * 执行 http://localhost:8082/call/get
     * 正常返回
     * 打印如下
     * do some thing
     * 执行完毕,返回!!!
     **/
    @GetMapping(path = "get")
    public Callable<String> get() {
        Callable<String> callable = new Callable<String>() {
            @Override
            public String call() throws Exception {
                System.out.println("do some thing");
                Thread.sleep(1000);
                System.out.println("执行完毕,返回!!!");
                return "over!";
            }
        };

        return callable;
    }

    /**
     *todo: 2023/4/25 22:42 九师兄
     * 执行这个 http://localhost:8082/call/exception
     * 前后端都报错
     * 2023-04-25 22:42:31,622 [http-nio-8082-exec-6] ERROR o.a.c.c.C.[.[.[.[dispatcherServlet].log(DirectJDKLog.java:175) - Servlet.service() for servlet [dispatcherServlet] threw exception
     * java.lang.RuntimeException: some error!
     * 	at com.spring.async.CallableRest$2.call(CallableRest.java:36)
     **/
    @GetMapping(path = "exception")
    public Callable<String> exception() {
        Callable<String> callable = new Callable<String>() {
            @Override
            public String call() throws Exception {
                System.out.println("do some thing");
                Thread.sleep(1000);
                System.out.println("出现异常,返回!!!");
                throw new RuntimeException("some error!");
            }
        };

        return callable;
    }
}
请注意上面的两种case,一个正常返回,一个业务执行过程中,抛出来异常
3.3. WebAsyncTask
callable的方式,非常直观简单,但是我们经常关注的超时+异常的处理却不太好,这个时候我们可以用WebAsyncTask,实现姿势也很简单,包装一下callable,然后设置各种回调事件即可
package com.spring.async;

import org.springframework.web.bind.annotation.GetMapping;
import org.springframework.web.bind.annotation.RequestMapping;
import org.springframework.web.bind.annotation.RestController;
import org.springframework.web.context.request.async.WebAsyncTask;

import java.util.concurrent.Callable;

@RestController
@RequestMapping(path = "task")
public class WebAysncTaskRest {

    /**
     *todo: 2023/4/25 22:45 九师兄
     *
     * http://localhost:8082/task/get?sleep=10000
     *
     * Request URI: '/task/get'
     * !!!
     * do some thing
     * over!!!
     **/
    @GetMapping(path = "get")
    public WebAsyncTask<String> get(long sleep, boolean error) {
        Callable<String> callable = () -> {
            System.out.println("do some thing");
            Thread.sleep(sleep);

            if (error) {
                System.out.println("出现异常,返回!!!");
                throw new RuntimeException("异常了!!!");
            }

            return "hello world";
        };

        // 指定3s的超时
        WebAsyncTask<String> webTask = new WebAsyncTask<>(3000, callable);
        webTask.onCompletion(() -> System.out.println("over!!!"));

        webTask.onTimeout(() -> {
            System.out.println("超时了");
            return "超时返回!!!";
        });
        webTask.onError(() -> {
            System.out.println("出现异常了!!!");
            return "异常返回";
        });

        System.out.println("返回");
        return webTask;
    }
}
3.4. DeferredResult
DeferredResult与WebAsyncTask最大的区别就是前者不确定什么时候会返回结果,
DeferredResult的这个特点,可以用来做实现很多有意思的东西,如后面将介绍的SseEmitter就用到了它
下面给出一个实例
package com.spring.async;

import org.springframework.web.bind.annotation.GetMapping;
import org.springframework.web.bind.annotation.RequestMapping;
import org.springframework.web.bind.annotation.RestController;
import org.springframework.web.context.request.async.DeferredResult;

import java.util.Map;
import java.util.concurrent.ConcurrentHashMap;

@RestController
@RequestMapping(path = "defer")
public class DeferredResultRest {

    private Map<String, DeferredResult> cache = new ConcurrentHashMap<>();

    /**
     *todo: 2023/4/25 22:51 九师兄
     *
     * 先执行 http://localhost:8082/defer/pub?id=10000&content=lcc
     * 然后执行 http://localhost:8082/defer/get?id=10000
     * 可以看到界面打印 lcc
     * 否则会卡着
     **/
    @GetMapping(path = "get")
    public DeferredResult<String> get(String id) {
        DeferredResult<String> res = new DeferredResult<>();
        cache.put(id, res);

        res.onCompletion(new Runnable() {
            @Override
            public void run() {
                System.out.println("over!");
            }
        });
        return res;
    }

    @GetMapping(path = "pub")
    public String publish(String id, String content) {
        DeferredResult<String> res = cache.get(id);
        if (res == null) {
            return "no consumer!";
        }

        res.setResult(content);
        return "over!";
    }
}
那么这个可以设置超时么,如果一直把前端挂住,貌似也不太合适吧
在构造方法中指定超时时间: new DeferredResult<>(3000L)
设置全局的默认超时时间
@Configuration
@EnableWebMvc
public class WebConf implements WebMvcConfigurer {

    @Override
    public void configureAsyncSupport(AsyncSupportConfigurer configurer) {
        // 超时时间设置为60s
        configurer.setDefaultTimeout(TimeUnit.SECONDS.toMillis(10));
    }
}


 1119
1119


 被折叠的 条评论
为什么被折叠?
被折叠的 条评论
为什么被折叠?
 到【灌水乐园】发言


