


一、学习目标
- 掌握Spring Boot项目中的JUnit单元测试
- 掌握Spring Boot项目中类型安全的配置
- 掌握多环境配置
- 理解Spring Boot的自动配置
- 掌握Spring Boot项目整合JSP进行数据展示
- 掌握Spring Boot项目中读取XML配置的方法
- 掌握使用LogBack记录日志的方法
二、整合JUnit 测试
-
代码测试是开发工作中一个非常重要的环节
-
spring-boot-starter-test依赖会为项目引入相关的测试组件 -
支持多种测试框架:
JUnit、AssertJ、Hamcrest等
用于测试类的注解
- @RunWith(SpringRunner.class):使
@SpringBootTest注解生效 - @SpringBootTest:创建Spring 的 ApplicationContext,并将其注入到测试类中
@Before、@Test、@After等
使用JUnit测试两位数的加法算法示例:
1.pom.xml
 <dependencies>
     <!-- web场景启动器 -->
     <dependency>
         <groupId>org.springframework.boot</groupId>
         <artifactId>spring-boot-starter-web</artifactId>
     </dependency>
     <!-- springboot单元测试 -->
     <dependency>
         <groupId>org.springframework.boot</groupId>
         <artifactId>spring-boot-starter-test</artifactId>
         <scope>test</scope>
         <!-- 剔除依赖 -->
         <exclusions>
             <exclusion>
                 <groupId>org.junit.vintage</groupId>
                 <artifactId>junit-vintage-engine</artifactId>
             </exclusion>
         </exclusions>
     </dependency>
     <dependency>
         <groupId>junit</groupId>
         <artifactId>junit</artifactId>
     </dependency>
 </dependencies>
2.加法工具类Addition
package com.aiden.teachingspringboot.utils;
/**
 * 加法工具类
 */
@Component
public class Addition {
   /**
    * 实现两个数的加法
    */
   public int add(int a, int b){
       int sum = a + b;
       return sum;
   }
}
3.TeachingSpringbootApplicationTests测试类
package com.aiden.teachingspringboot;

import com.aiden.teachingspringboot.utils.Addition;
import org.junit.Assert;
import org.junit.Before;
import org.junit.jupiter.api.Test;
import org.junit.runner.RunWith;
import org.springframework.boot.test.context.SpringBootTest;
import org.springframework.test.context.junit4.SpringRunner;

import javax.annotation.Resource;
@RunWith(SpringRunner.class)
@SpringBootTest
class TeachingSpringbootApplicationTests {

    //加法工具类
    @Resource
    private Addition addition;

    @Test
    void contextLoads() {
        int result = addition.add(5, 10);
        System.out.println(result);
        Assert.assertEquals("计算结果:",result,15);
    }
}
三、加载配置文件中的参数
3.1@Value获取配置文件中的参数
问题: 如何获取application.yml(或application.properteis)文件中的配置信息?
分析: 使用@Value注解。
application.yaml配置示例:
#application.yaml:
user:
   userName: 张三 #可不加双引号
   password: 123456
用户信息实体类中
@Value注解使用示例:
package com.aiden.teachingspringboot.pojo;

import org.springframework.beans.factory.annotation.Value;
import org.springframework.stereotype.Component;

/**
* 用户信息实体类
* @author Aiden
*/
@Component
public class User {

   @Value("${user.userName}")
   private String userName;
   @Value("${user.password}")
   private String password;

   @Override
   public String toString() {
       return "User{" +
               "userName='" + userName + '\'' +
               ", password='" + password + '\'' +
               '}';
   }
}
控制器代码示例:
package com.aiden.teachingspringboot.controller;

import com.aiden.teachingspringboot.pojo.User;
import org.springframework.web.bind.annotation.GetMapping;
import org.springframework.web.bind.annotation.RequestMapping;
import org.springframework.web.bind.annotation.RestController;

import javax.annotation.Resource;

/**
 * @author Aiden
 */
@RestController
@RequestMapping("user")
public class UserController {

    @Resource
    private User user;

    @GetMapping("/getUser")
    public String getUserInfo() {
        return user.toString();
    }
}
运行结果:

3.2@ConfigurationProperties获取配置文件中的参数
问题: 真实的项目开发中,所需配置的信息往往比较多,需要不断配置==@Value==注解,且容易出错
分析: 使用 @ConfigurationProperties 注解将YAML文件中的属性和Bean的属性进行关联
注意: 需要在Bean 类中为YAML中的属性创建对应的setter方法
使用@ConfigurationProperties注解将YAML文件中的属性和Bean的属性进行关联示例:
package com.aiden.teachingspringboot.pojo;
import org.springframework.boot.context.properties.ConfigurationProperties;
import org.springframework.stereotype.Component;
import java.util.Date;
import java.util.List;
import java.util.Map;
/**
* 学生信息实体类
* @author Aiden
*/
@Component
@ConfigurationProperties(prefix = "student")
public class Student {
   private Integer stuNo;//学号
   private String stuName;//姓名
   private String gender;//性别
   private Date birthDay;//出生日期
   private Grade grade;//所属年级
   private List<String> hobby;//爱好
   private Map<String, Object> address;//收货地址
   //省略getter/setter/toString...
}
package com.aiden.teachingspringboot.pojo;
import org.springframework.stereotype.Component;
/**
 * 年级信息实体类
 * @author Aiden
 */
@Component
public class Grade {
    private Integer gradeId;//年级编号
    private String gradeName;//年级名称
    //省略getter/setter/toString...
}
application.yaml配置示例:
student:
 stuNo: 10001
 stuName: "骆文豪"
 gender: 男
 birthDay: 2003/01/02
 grade:
   gradeId: 3
   gradeName: Y2
 hobby:
   - 音乐
   - 电影
   - 编程
 address: {province: '湖南省',city: '株洲市',area: '醴陵孙家湾'}
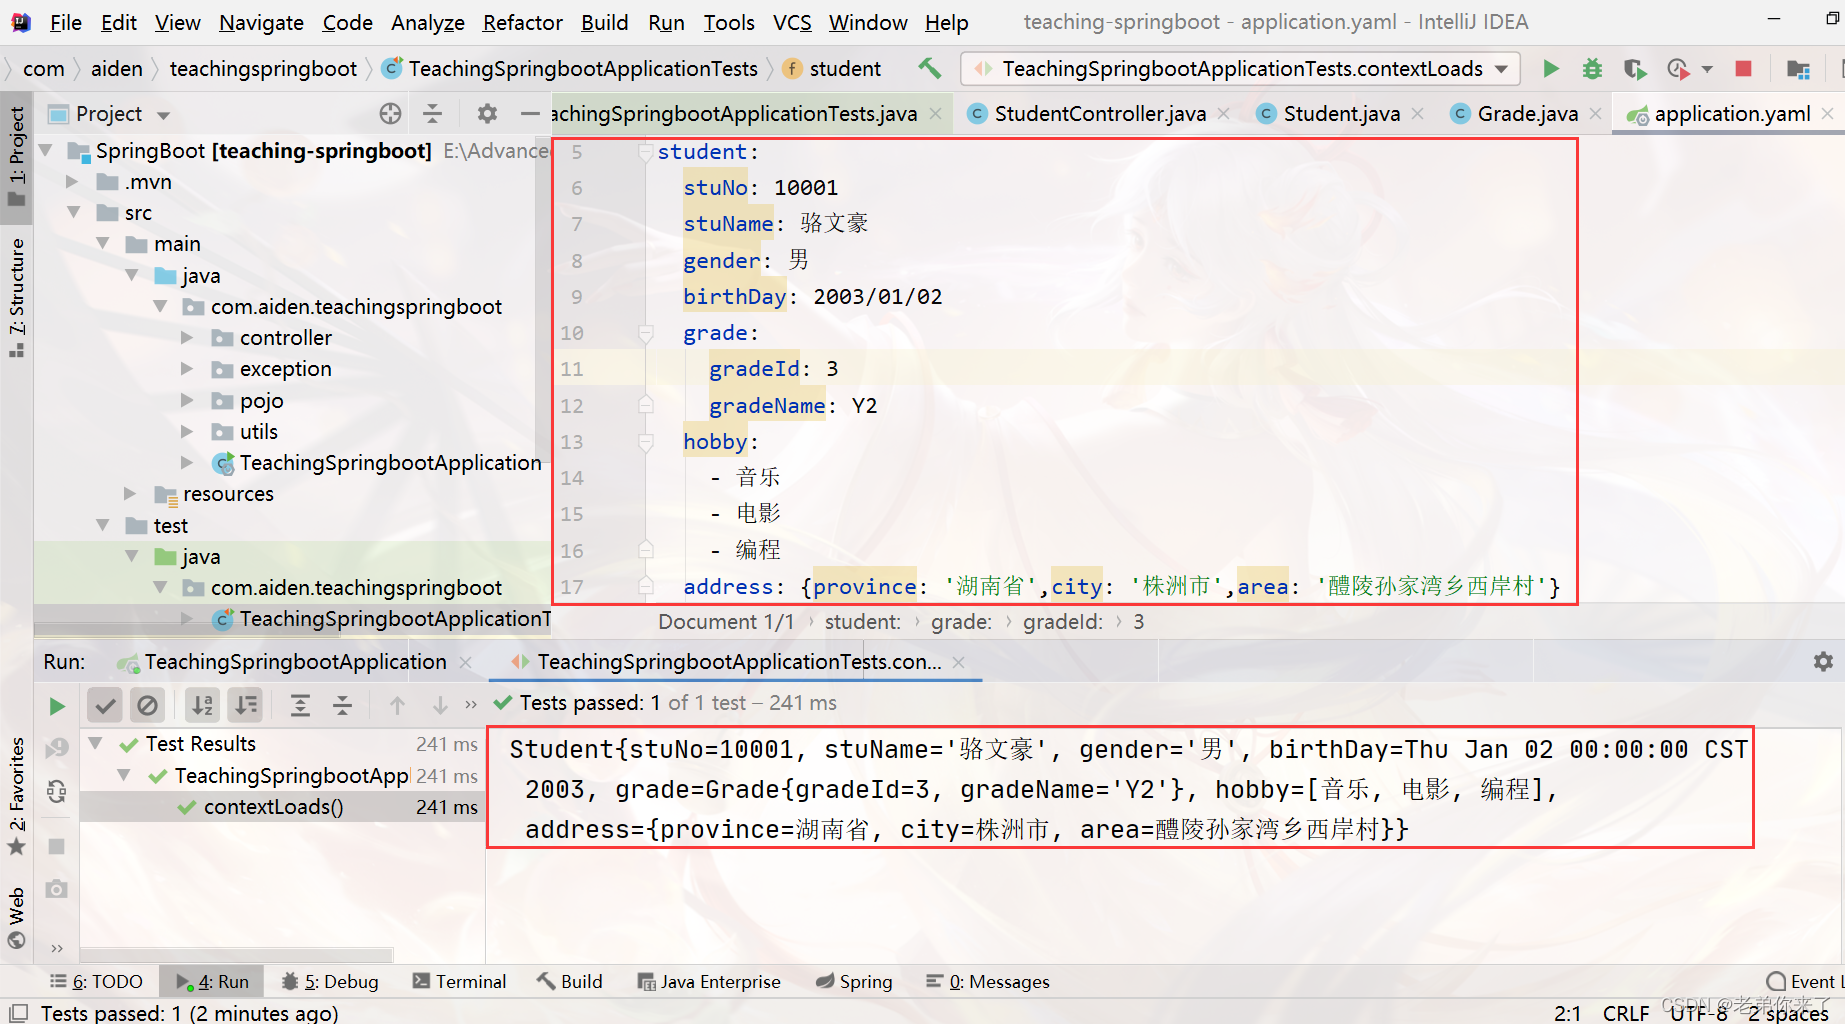
TeachingSpringbootApplicationTests 测试类:
@RunWith(SpringRunner.class)
@SpringBootTest
class TeachingSpringbootApplicationTests {
    @Resource
    private Student student;

    @Test
    void contextLoads() {
        System.out.println(student.toString());
    }
}
测试运行结果:
四、多环境配置
问题: 在实际的项目开发过程中,往往会有多套运行环境,在项目开发、测试、上线过程中,开发者需要不断修改项目的配置信息,使得项目的开发及部署很容易出错。
实际的项目开发过程中的环境:
- 开发环境
- 测试环境
- 生产环境
分析: Spring Boot提供了一种多环境配置的解决方案,例如properties文件和YAML文件两种方式。
多环境配置的解决方案
		1. 为项目提供多套环境配置
		2. 在不同运行环境中为项目加载不同的配置文件
五、使用properties文件实现多环境配置
1.每个环境都需要有单独的properties文件,以环境名区分
- 开发环境配置文件:
application-dev.properties - 测试环境配置文件:
application-test.properties
2.在applicaton.properties文件中指定当前环境启用哪个配置文件
spring.profiles.active=test

编写配置:
application.properties 配置示例代码:
spring.profiles.active=test
application-dev.properties配置示例代码:
#开发环境配置
server.port=8081
application-test.properties配置示例代码:
#测试环境配置
server.port=8082
HomeController 关键代码:
@RestController
public class HomeController {
    @RequestMapping(value = "hello")
    public String hello() {
        return "Hello SpringBoot";
    }
}
运行测试:
设置
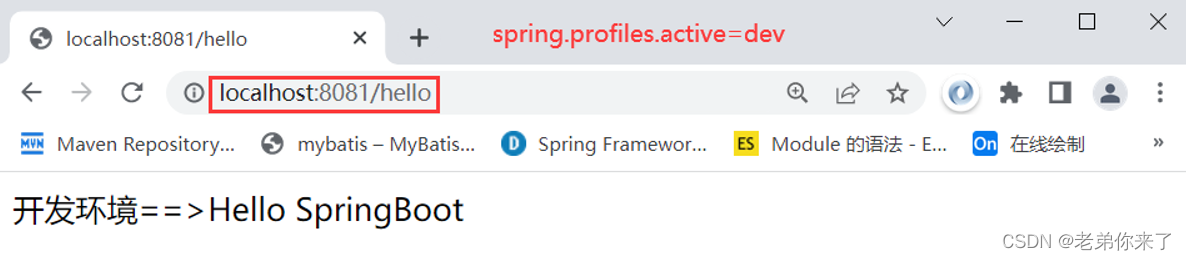
application.properties文件中spring.profiles.active=dev运行测试:
@RestController
public class HomeController {
    @RequestMapping(value = "hello")
    public String hello() {
         return "开发环境==>Hello SpringBoot";
    }
}
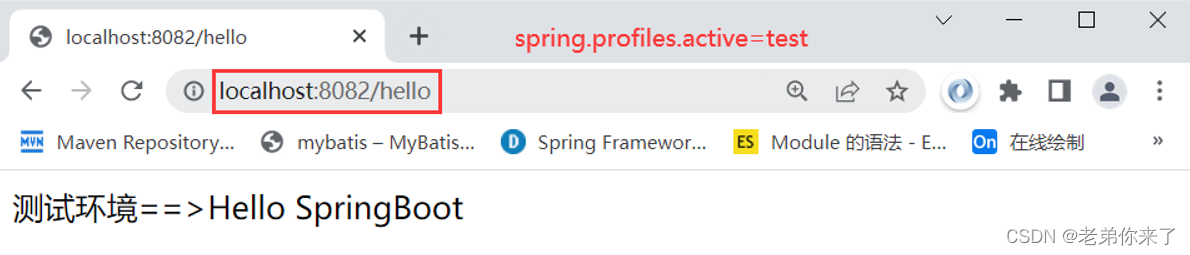
设置
application.properties文件中spring.profiles.active=test运行测试:
@RestController
public class HomeController {
    @RequestMapping(value = "hello")
    public String hello() {
         return "测试环境==>Hello SpringBoot";
    }
}
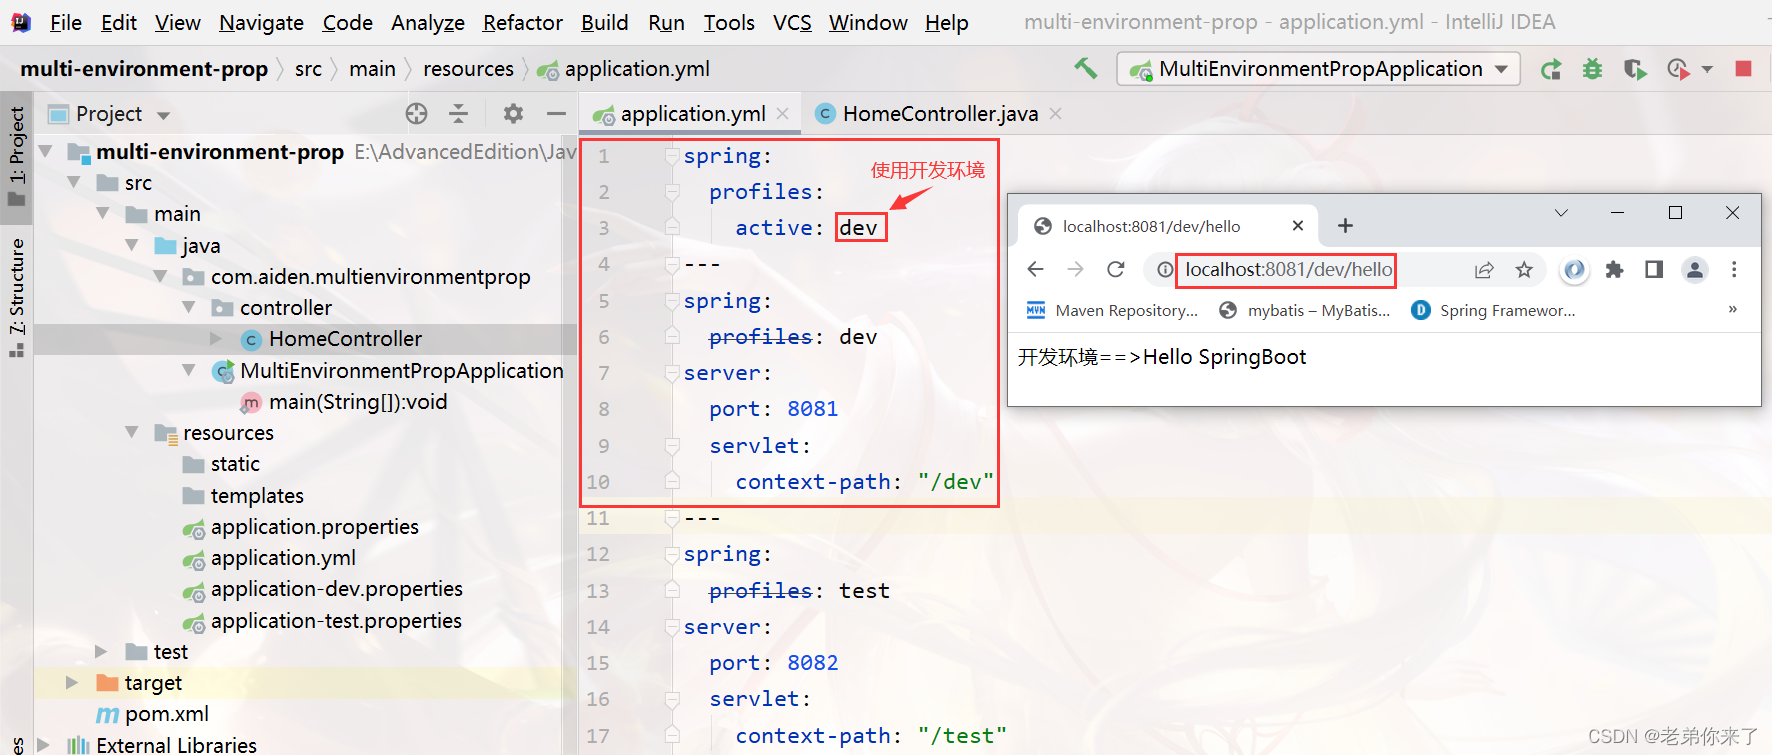
六、使用YAML文件实现多环境配置
只需一个配置文件即可,所有配置信息均放在application.yml中,注意:两套配置信息之间需要使用---隔开。
通过spring.profiles.active配置当前启用的环境。
spring:
 profiles:
   active: dev
---
spring:
 profiles: dev
server:
 port: 8081
 servlet:
   context-path: "/dev"
---
spring:
 profiles: test
server:
 port: 8082
 servlet:
   context-path: "/test"
开发环境配置示例:
测试环境配置示例:

七、静态资源配置
7.1默认配置
在我们开发web应用的时候,需要引用大量的 js、css、图片等静态资源。
Spring Boot默认提供静态资源目录位置需置于classpath下,目录名需符合如下规则
-
classpath: /static -
classpath: /public -
classpath: /resources -
classpath:/META-INF/resources
静态资源访问示例:
我们在src/main/resources目录下新建public、resources、static、META-INF/resources四个目录,并分别放入1.jpg 2.jpg 3.jpg 4.jpg 四张图片。然后通过浏览器分别访问:

- http://localhost:8080/1.jpg
- http://localhost:8080/2.jpg
- http://localhost:8080/3.jpg
- http://localhost:8080/4.jpg
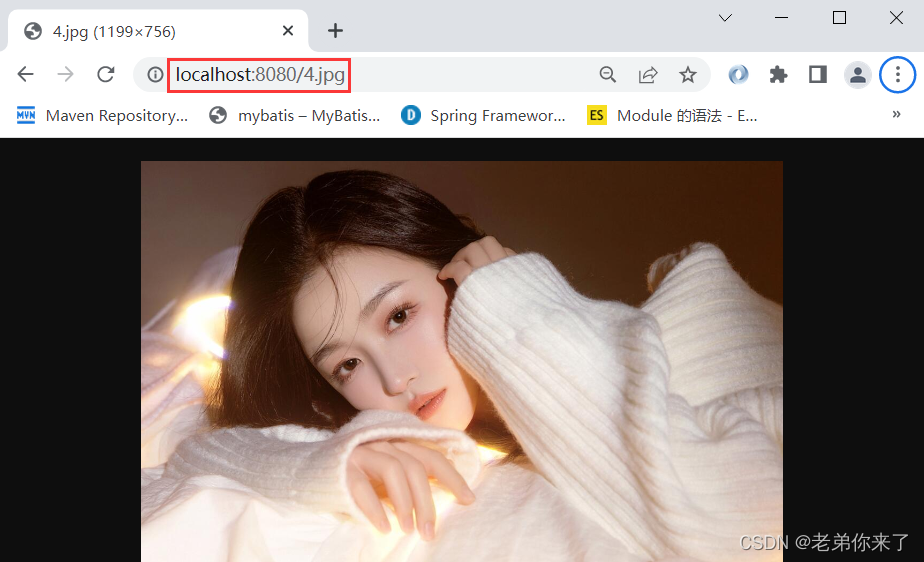
测试发现以上地址均可以正常访问,Spring Boot默认会从 public、 resources、 static、 /META-INF/resources 四个目录里面查找是否存在相应的资源。
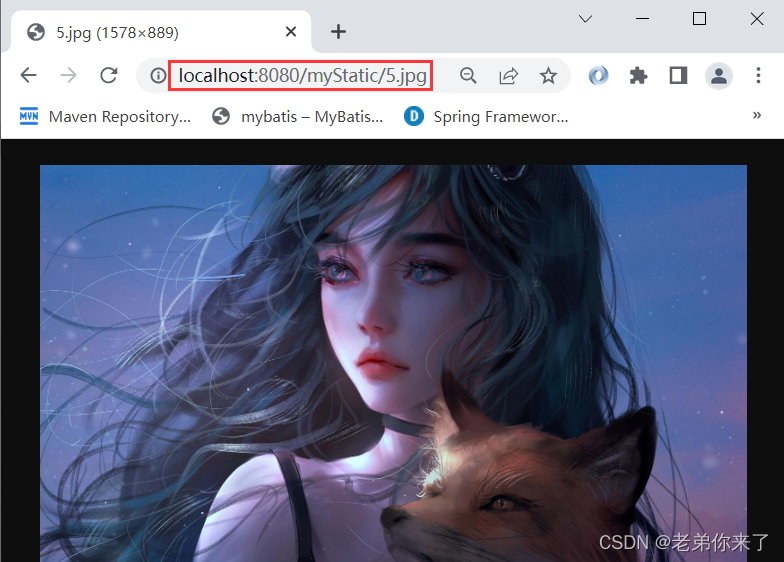
7.2在application.properties配置
配置中配置了静态模式为
/myStatic/**,访问时候就只能通过/myStatic/xx来访问。
#静态文件请求匹配方式:
spring.mvc.static-path-pattern=/myStatic/**
#修改默认的静态寻址资源目录多个使用逗号分隔,自定义的属性,指定了一个路径,注意要以/结尾
spring.web.resources.static-locations = classpath:/META-meta-INF/resources/,classpath:/resources/,classpath:/static/,classpath:/public/,classpath:/mytest/
如图所示在/resources/目录下创建mytest目录,并将5.jpg添加到目录中

打开浏览器测试访问:访问地址: http://localhost:8080/myStatic/5.jpg
7.3自定义静态资源地址
通过代码在java类中指定,一般不推荐,配置文件指定更加简单高效。
import org.springframework.context.annotation.Configuration;
import org.springframework.web.servlet.config.annotation.InterceptorRegistry;
import org.springframework.web.servlet.config.annotation.ResourceHandlerRegistry;
import org.springframework.web.servlet.config.annotation.WebMvcConfigurerAdapter;

@Configuration
public class MyWebMvcConfig implements WebMvcConfigurer{
	 @Override
    public void addResourceHandlers(ResourceHandlerRegistry registry) {
        WebMvcConfigurer.super.addResourceHandlers(registry);
        registry.addResourceHandler("/static/**");
        registry.addResourceHandler("classpath:/static/");
    }
}
八、Spring Boot 的自动配置
Spring Boot 的自动配置
使用Spring Boot开发项目时,很多配置都是Spring Boot默认配置好的,接下来我们通过在maven项目pom.xml文件中引入spring-boot-starter-jdbc依赖来探索springboot的自动装配原理。
首先在pom.xml文件中引入依赖:
<dependency>
	<groupId>org.springframework.boot</groupId>
	<artifactId>spring-boot-starter-jdbc</artifactId>
</dependency>
当运行项目是发现引入JDBC依赖时的自动配置出现的问题:
从错误提示中不难发现由于未配置DataSance:“URL”属性未指定,导致无法配置嵌入式数据源。

问题分析:
为什么Spring Boot 会自动地寻找数据库连接的地址呢?
Spring Boot 项目中引入了spring-boot-starter-web 和spring-boot-starter-test 这两个依赖之后,会添加两个与自动配置相关的Jar包:

从上图中可以发现两个Jar 包下面都包含名为spring.factories的文件,打开spring.factories 文件,会看到很多自动配置的类

其中包括DataSourceAutoConfiguration自动配置类
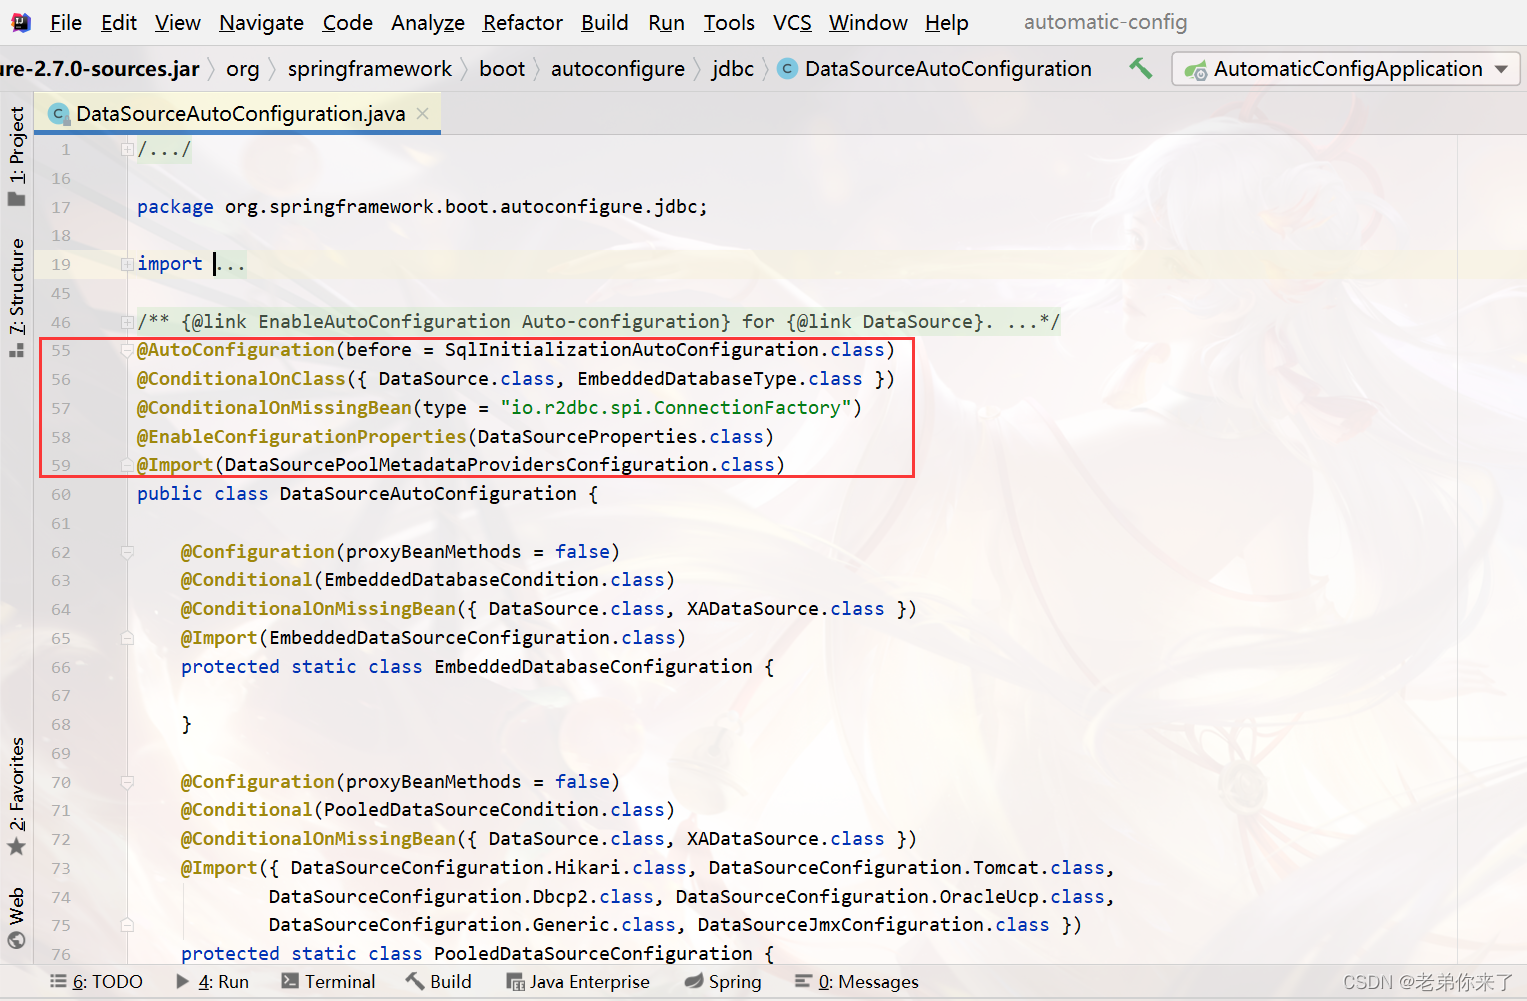
深入分析:
-
@Configuration:让一个类成为配置类,拥有与Spring的配置文件相同的功能 -
@ConditionalOnClass:条件注解,是@Conditional的扩展注解,若项目中DataSource.class和EmbeddedDatabaseType.class同时存在,执行@EnableConfigurationProperties注解的操作。 -
@EnableConfigurationProperties:为某个类中的属性赋值
为DataSourceProperties的属性赋值 -
@Import:将某个类的实例引入Spring的IoC容器
1、项目中未添加spring-boot-starter-jdbc依赖时,项目中只有DataSource.class,没有EmbeddedDatabaseType.class,不满足执行@EnableConfigurationProperties的条件
2、引入spring-boot-starter-jdbc依赖之后,由于此依赖中包含EmbeddedDatabaseType.class,满足@EnableConfigurationProperties的操作条件,为DataSourceProperties的属性进行赋值
3、赋值需要url属性,Spring Boot会去application.yml文件中寻找,未找到故引发异常

问题: 这些自动配置类是如何被Spring Boot读取到的呢?
下面代码中Spring Boot项目启动类上添加的复合注解@SpringBootApplication中包含名为@EnableAutoConfiguration的注解:
@Target(ElementType.TYPE)
@Retention(RetentionPolicy.RUNTIME)
@Documented
@Inherited
@AutoConfigurationPackage
@Import(AutoConfigurationImportSelector.class)
public @interface EnableAutoConfiguration {

   /**
    * Environment property that can be used to override when auto-configuration is
    * enabled.
    */
   String ENABLED_OVERRIDE_PROPERTY = "spring.boot.enableautoconfiguration";

   /**
    * Exclude specific auto-configuration classes such that they will never be applied.
    * @return the classes to exclude
    */
   Class<?>[] exclude() default {};

   /**
    * Exclude specific auto-configuration class names such that they will never be
    * applied.
    * @return the class names to exclude
    * @since 1.3.0
    */
   String[] excludeName() default {};

}
通过@Import 注解引入的AutoConfigurationImportSelector类会去所有的自动配置包中查找spring.factories 文件,进而加载所有的自动配置类。
九、实现Spring Boot自动配置
实现Spring Boot自动配置 示例1:
在Spring Boot项目启动时,判断项目中是否存在名为SayHello的类。如果存在,则实例化此类并给其属性赋值。
主要组件:
- SayHello :业务类,不添加任何注解,默认情况下不会被Spring框架识别和实例化
- SayHelloProperties :读取配置信息,以便赋值给SayHello类的属性
@ConfigurationProperties(prefix = "hello")
public class SayHelloProperties {
	private String helloMsg = "spring boot";
	public void setHelloMsg(String helloMsg) { … }
}
实现Spring Boot自动配置 示例2:
主要组件
SayHelloAutoConfiguration :判断是否满足自动配置的条件,如果满足,则完成自动配置
@Configuration
@ConditionalOnClass({SayHello.class})
@EnableConfigurationProperties({SayHelloProperties.class})
@ConditionalOnProperty(prefix = "hello", value = "helloMsg",matchIfMissing = true)
public class SayHelloAutoConfigration {
	@Resource
	private SayHelloProperties sayHelloProperties;
	@Bean
	@ConditionalOnMissingBean({SayHello.class})
	public SayHello sayHello(){
		// 创建SayHello实例,赋值并返回
	}
}
实现Spring Boot自动配置 示例3
- 在项目的
resources/META-INF目录中添加spring.factories文件
org.springframework.boot.autoconfigure.EnableAutoConfiguration=\
com.aiden.automaticconfig.SayHelloAutoConfigration
-
将项目打包安装到本地仓库
-
创建测试项目,在pom文件中添加对自动配置项目的依赖
-
创建测试代码,测试SayHello组件的创建和赋值
-
在测试项目的application.yml 文件中修改SayHello配置,再次测试
HelloController
@Controller
public class HelloController {
	@Autowired
	private SayHello sayHello;

	@RequestMapping("/hello")
	@ResponseBody
	public String hello ( ) {
		return sayHello.sayHello();
	}
}
application.yml:
hello:
    helloMsg: mybatis
自动转配小结:
实现Spring Boot 自动配置的关键在于:
- @EnableAutoConfiguration 注解开启Spring Boot 的自动配置
- 条件判断注解可以根据项目的当前条件,根据需要进行Bean 的管理和属性的配置
十、关闭Spring Boot 的自动配置
注解方式
在启动类的@SpringBootApplication 注解上通过配置exclude 属性进行指定,如需关闭多个类的自动配置,可以用逗号隔开。
@SpringBootApplication( exclude={ DataSourceAutoConfiguration.class } )
配置文件方式
在application.yml中配置:
spring:
    autoconfigure:
        exclude: org.springframework.boot.autoconfigure.jdbc.DataSourceAutoConfiguration
十一、Spring Boot 整合JSP
Spring Boot 整合JSP
Spring Boot 默认支持的模板引擎有4 种,分别为FreeMarker、Groovy、Thymeleaf和Mustache,不包括 JSP 模板引擎,可以通过引入相关依赖来整合JSP 模板引擎。
<dependency>
   <groupId>javax.servlet</groupId>
   <artifactId>javax.servlet-api</artifactId>
   <scope>provided</scope>
</dependency>
<!-- JSTL 标签库 -->
<dependency>
   <groupId>javax.servlet</groupId>
   <artifactId>jstl</artifactId>
</dependency>
<!-- tomcat 支持 -->
<dependency>
  <groupId>org.springframework.boot</groupId>
  <artifactId>spring-boot-starter-tomcat</artifactId>
  <!-- <scope>provided</scope>-->
</dependency>
<dependency>
  <groupId>org.apache.tomcat.embed</groupId>
  <artifactId>tomcat-embed-jasper</artifactId>
</dependency>
在application.yml 文件中配置视图解析器
spring:
    mvc:
        view:
            prefix: /WEB-INF/jsp/
            suffix: .jsp
编写控制器和JSP页面,进行访问测试
使用XML 的配置
- 在Spring Boot 项目中,除了application.yml 文件,一般很少添加其他配置文件
- 但是在实际开发中为了集成其他框架或者配置一些中间件,也会不得不添加XML 配置文件
- 在Spring Boot 项目中,可以使用@ImportResource 注解读取XML 配置文件
- 将@ImportResource 注解标注到启动类上,或者某个配置类上
语法:
@ImportResource( value="配置文件的位置" )
十二、使用LogBack 日志
LogBack和Log4j2都是Log4j 的升级版,LogBack 在性能上比Log4j 更加高效- Spring Boot 把LogBack 作为首选的日志记录框架,
spring-boot-starter-web依赖默认包含了LogBack 的相关依赖 - 通过
application.yml文件,可以实现部分日志配置
| 属性 | 作用 |
|---|---|
| logging.config | 加载指定位置的日志配置文件 |
| logging.file.max-history | 要保留的存档日志文件的最大数目 |
| logging.file.max-size | 日志文件的最大占用空间,单位为M |
| logging.level.* | 设置某个范围下的日志级别,比如logging.level.org.springframework=DEBUG |
| logging.pattern.console | 设置在控制台输出的日志的格式 |
| logging.pattern.dateformat | 设置在控制台输出的日志的日期格式 |
| logging.pattern.file | 定义输出到日志文件的日志格式 |
| logging.pattern.level | 定义日志的输出级别 |
经验:
如果需要更详细的日志配置,可以使用单独的日志配置文件,application.yml 中可以通过logging.config 属性指定自定义日志配置文件的位置配置语法如下:
logging.config=日志配置文件的位置和名称
默认情况下,Spring Boot 项目可以读取resources 资源目录中特定名字的日志配置文件,如:logback-spring.xml、logback.xml;
Spring Boot 推荐使用带有-spring 的文件名作为日志配置,即使用logback-spring.xml
十三、配置独立的日志配置文件
配置独立的日志配置文件5-1
<configuration>配置文件的根元素节点。包含3 个属性
scan:当此属性设置为true 时表示如果配置文件发生改变,将被重新加载,反之则不对配置文件是否发生改变进行检测。默认为true
scanPeriod:监测日志配置文件是否有修改的时间间隔,默认是1分钟
debug:当此属性设置为true 时,将输出LogBack 默认日志信息。默认值为false
日志的上下文名称。用于区分不同程序的日志
<contextName>estLogback</contextName>
<!--输出日志到控制台-->
<appender name="consoleLog" class="ch.qos.logback.core.ConsoleAppender">
	<layout>
		<pattern>
			[%-5level]%d - %contextName - %msg%n
		</pattern>
	</layout>
</appender>
配置独立的日志配置文件5-2
<property>:设置变量值,在日志配置文件中使用。有两个属性:name 和value。定义的变量值可以通过==“${}”==调用<appender>:配置日志输出的策略。有两个属性:name 和classclass用来指定具体采用的输出策略ConsoleAppender控制台输出策略RollingFileAppender文件输出策略
<root>:设置日志输出级别和采用哪种日志输出策略level属性,用来指定日志的输出级别<appender-ref>子元素,用来设置日志输出策略- 可以配置多个
<appender>,并指定让这些<appender>同时生效
- 可以配置多个
配置独立的日志配置文件5-3
-
<appender>的子元素-
<layout>:指定日志格式,在ConsoleAppender策略中使用配置 含义 %d{HH: mm:ss.SSS} 日志输出时间 %thread 输出日志的进程名称 %-5level 日志级别,并且使用5个字符靠左对齐 %logger{36} 日志输出者的名字 %msg 日志的信息内容 %n 换行符 -
<encoder>:指定日志格式,和layout 的格式化方式相同,在RollingFileAppender策略中使用- 采用RollingFileAppender 策略则必须指定该属性,否则日志将输出不到文件中
-
配置独立的日志配置文件5-4
-
<appender>的子元素<filter>:日志过滤器,如可以过滤指定级别的日志等- 一个
<appender>可以有多个过滤器,按照配置顺序执行
<filter class="ch.qos.logback.classic.filter.LevelFilter"> <!--过滤Error 级别的日志--> <level>RROR</level> <!--匹配到Error 级别的日志就禁止--> <onMatch>ENY</onMatch> <!--没有匹配到就允许--> <onMismatch>CCEPT</onMismatch> </filter><file>:当输出日志到文件时,指定文件的路径和文件名- 没有默认值
- 相对路径、绝对路径均可
- 上级目录不存在会自动创建
- 反斜杠\需要转义
配置独立的日志配置文件5-5
- < appender>子元素
<rollingPolicy>:日志输出时的循环策略。常用的循环策略为TimeBasedRollingPolicy
<rollingPolicy class="ch.qos.logback.core.rolling.TimeBasedRollingPolicy">
	<!--定义把每一天的日志归档到一个文件中,其中用到了property 定义的变量
		logback.dir 和logback.projname-->
	<fileNamePattern>
		${logback.dir}/info.${logback.projname}.%d{yyyy-MM-dd}.log
	</fileNamePattern>
	<!--只保留最近90 天的日志-->
	<maxHistory>0</maxHistory>
	<!--用来指定日志文件的上限大小,到了这个值,就会删除旧的日志-->
	<totalSizeCap>GB</totalSizeCap>
</rollingPolicy>
配置rollingPolicy注意事项:
- maxHistory 的时间单位由fileNamePattern 决定。当fileNamePattern 中的日期精确到天时,maxHistory 的单位即为天;当fileNamePattern中的时间精确到小时,maxHistory 的时间单位为小时
- 日期的最小单位为小时
- 当fileNamePattern 和file 同时存在时,只有file 会生效
十四、全局错误配置
配置步骤:
-
定义全局错误配置类
GlobalHandlerException,并在类上添加@ControllerAdvice注解 -
编写错误处理方法,添加注解
ExceptionHandler、@ResponseBody -
定义测试动作方法
testException -
分别模拟 算术运算异常、空指针异常、索引越界异常。
package com.aiden.teachingspringboot.exception;

import lombok.extern.slf4j.Slf4j;
import org.springframework.web.bind.annotation.ControllerAdvice;
import org.springframework.web.bind.annotation.ExceptionHandler;
import org.springframework.web.bind.annotation.ResponseBody;

import java.util.HashMap;
import java.util.Map;

/**
 * @author Aiden
 */
@ControllerAdvice
@Slf4j
public class GlobalHandlerException {

    @ExceptionHandler(Exception.class)
    @ResponseBody
    public Map exception(Exception e) {
        Map<String, Object> errorMap = new HashMap<>();
        if (e instanceof ArithmeticException) {
            errorMap.put("errorCode", "201");
            errorMap.put("errorMsg", "算术运算异常:" + e.getMessage());
        } else if (e instanceof NullPointerException) {
            errorMap.put("errorCode", "202");
            errorMap.put("errorMsg", "空指针异常:" + e.getMessage());
        } else if (e instanceof ArrayIndexOutOfBoundsException) {
            errorMap.put("errorCode", "203");
            errorMap.put("errorMsg", "索引越界异常:" + e.getMessage());
        } else {
            errorMap.put("errorCode", "204");
            errorMap.put("errorMsg", "程序出现未知异常:" + e.getMessage());
        }
        return errorMap;
    }

    @ExceptionHandler(ArithmeticException.class)
    @ResponseBody
    public String arithmeticException(ArithmeticException e) {
        return "算术运算异常:" + e.getMessage();
    }

    @ExceptionHandler(NullPointerException.class)
    @ResponseBody
    public String nullPointerException(NullPointerException e) {
        return "空指针异常:" + e.getMessage();
    }
}
测试算术运算异常:
@GetMapping("test")
public String testException(){
    int i=1/0    //测试算术运算异常
    return "OK";
}

测试空指针异常:
@GetMapping("test")
public String testException(){
    String name=null;
    name.toString();//测试空指针
    return "OK";
}

测试索引越界异常:
@GetMapping("test")
public String testException(){
    Integer [] numbers={1,2,3};
    int result=numbers[5];
    return "OK";
}

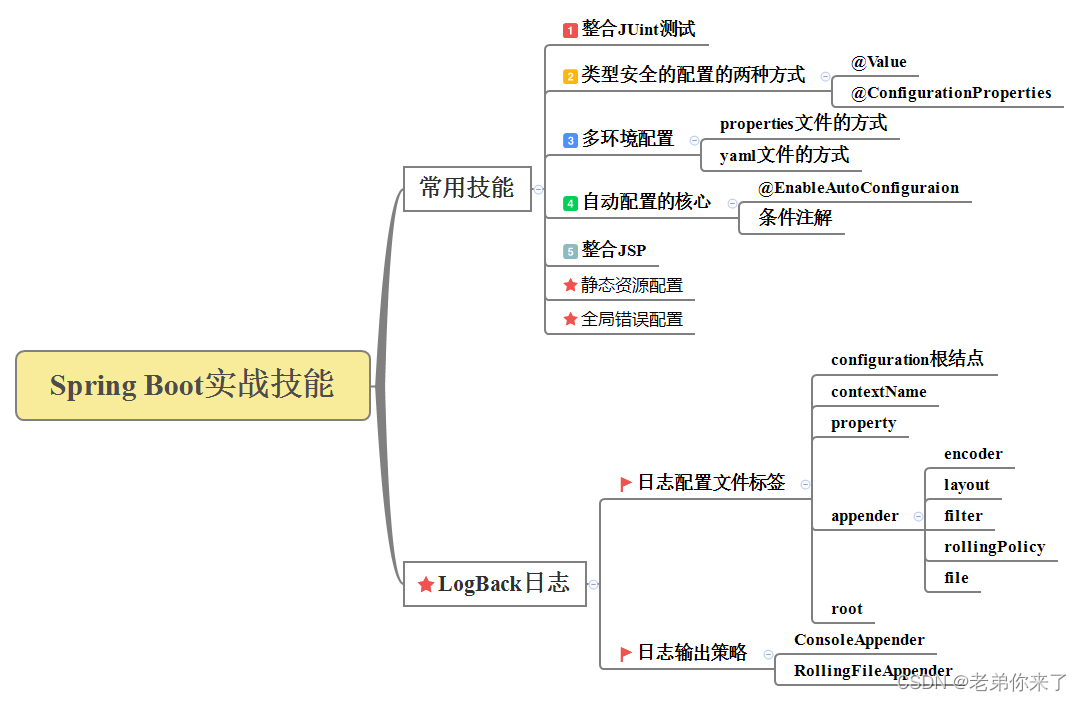
十五、本章总结
思维导图
需要资料和完整源码请加群:821596752


 192
192


 被折叠的 条评论
为什么被折叠?
被折叠的 条评论
为什么被折叠?
 到【灌水乐园】发言


