


练习六:支持向量机
目录
1.包含的文件。
2.支持向量机。
3.垃圾邮件分类。
1.包含的文件。

| 文件名 | 含义 |
| ex6.py | 支持向量机主程序(第一个实验) |
| ex6data1.mat | 实验1的数据集1 |
| ex6data2.mat | 实验1的数据集2 |
| ex6data3.mat | 实验1的数据集3 |
| plotData.py | 数据集可视化 |
| visualizeBoundary.py | 决策边界可视化 |
| gaussianKernel.py | 高斯核函数 |
| ex6_spam.py | 垃圾邮件分类主程序(第二个实验) |
| spamTrain.mat | 邮件训练集 |
| spamTest.mat | 邮件测试集 |
| spamSample1.txt | 垃圾邮件事例1 |
| spamSample2.txt | 垃圾邮件事例2 |
| vocab.txt | 词汇表 |
| emailSample1.txt | 邮件事例1 |
| emailSample2.txt | 邮件事例2 |
| processEmail.py | 邮件预处理 |
| emailFeatures.py | 从邮件中提取特征 |
红色部分需要自己填写。
2.支持向量机
- 加载需要的包和初始化:
import matplotlib.pyplot as plt
import numpy as np
import scipy.io as scio
from sklearn import svm
import plotData as pd
import visualizeBoundary as vb
import gaussianKernel as gk

plt.ion()
np.set_printoptions(formatter={'float': '{: 0.6f}'.format})
2.1绘制数据
- 编写plotData.py,可视化数据:
import matplotlib.pyplot as plt
import numpy as np

def plot_data(X, y):
    plt.figure()

    # ===================== Your Code Here =====================
    # Instructions : Plot the positive and negative examples on a
    #                2D plot, using the marker="+" for the positive
    #                examples and marker="o" for the negative examples
    #
    count = 0
    for i in y:
        if i == 1:
            plt.scatter(X[count,0],X[count,1],marker='+',color = 'b')
        else:
            plt.scatter(X[count,0],X[count,1],marker='o',color = 'r')
        count = count+1
- 测试代码:
# ===================== Part 1: Loading and Visualizing Data =====================
# We start the exercise by first loading and visualizing the dataset.
# The following code will load the dataset into your environment and
# plot the data

print('Loading and Visualizing data ... ')

# Load from ex6data1:
data = scio.loadmat('ex6data1.mat')
X = data['X']
y = data['y'].flatten()
m = y.size

# Plot training data
pd.plot_data(X, y)

input('Program paused. Press ENTER to continue')- 测试结果:

2.2训练SVM
- 可视化决策边界visualizeBoundary.py:
def visualize_boundary(clf, X, x_min, x_max, y_min, y_max): #x,y轴的取值范围
    h = .02
    xx, yy = np.meshgrid(np.arange(x_min, x_max, h), np.arange(y_min, y_max, h))#在x,y轴上以0.02为间隔,生成网格点
    Z = clf.predict(np.c_[xx.ravel(), yy.ravel()])#预测每个网格点的类别0/1
    Z = Z.reshape(xx.shape) #转型为网格的形状
    plt.contour(xx, yy,Z, level=[0],colors='r')  #等高线图 将0/1分界线(决策边界)画出来
- 训练线性SVM:
# ===================== Part 2: Training Linear SVM =====================
# The following code will train a linear SVM on the dataset and plot the
# decision boundary learned
#

print('Training Linear SVM')

# You should try to change the C value below and see how the decision
# boundary varies (e.g., try C = 1000)

c = 1
clf = svm.SVC(c, kernel='linear', tol=1e-3)
clf.fit(X, y)

pd.plot_data(X, y)
vb.visualize_boundary(clf, X, 0, 4.5, 1.5, 5)

input('Program paused. Press ENTER to continue')- 测试结果:
C的取值大小会影响分类结果,C太小可能欠拟合(高偏差),C太大可能会过拟合(高方差)。
C=1时:

C=100时:

2.3实现高斯核
- 高斯核定义为:

- 编写高斯核实现gaussianKernel.py:
import numpy as np


def gaussian_kernel(x1, x2, sigma):
    x1 = x1.flatten()
    x2 = x2.flatten()

    sim = 0

    # ===================== Your Code Here =====================
    # Instructions : Fill in this function to return the similarity between x1
    #                and x2 computed using a Gaussian kernel with bandwith sigma
    #
    sim = np.exp(-((x1 - x2)*(x1 - x2)/(2 * sigma * sigma)).sum())

    # ==========================================================

    return sim
- 测试程序:
# ===================== Part 3: Implementing Gaussian Kernel =====================
# You will now implement the Gaussian kernel to use
# with the SVM. You should now complete the code in gaussianKernel.py
#

print('Evaluating the Gaussian Kernel')

x1 = np.array([1, 2, 1])
x2 = np.array([0, 4, -1])
sigma = 2
sim = gk.gaussian_kernel(x1, x2, sigma)

print('Gaussian kernel between x1 = [1, 2, 1], x2 = [0, 4, -1], sigma = {} : {:0.6f}\n'
      '(for sigma = 2, this value should be about 0.324652'.format(sigma, sim))

input('Program paused. Press ENTER to continue')- 测试结果:
Evaluating the Gaussian Kernel
Gaussian kernel between x1 = [1, 2, 1], x2 = [0, 4, -1], sigma = 2 : 0.324652
(for sigma = 2, this value should be about 0.324652
2.3基于RBF核的SVM训练
- 可视化数据集2:
# ===================== Part 4: Visualizing Dataset 2 =====================
# The following code will load the next dataset into your environment and
# plot the data
#

print('Loading and Visualizing Data ...')

# Load from ex6data1:
data = scio.loadmat('ex6data2.mat')
X = data['X']
y = data['y'].flatten()#提取标签  转换为1维数组
m = y.size

# Plot training data
pd.plot_data(X, y)

input('Program paused. Press ENTER to continue')
- 可视化结果:

数据集线性不可分,使用带高斯核的SVM进行非线性分类。
- 训练带高斯核的SVM:
# ===================== Part 5: Training SVM with RBF Kernel (Dataset 2) =====================
# After you have implemented the kernel, we can now use it to train the
# SVM classifier
#
print('Training SVM with RFB(Gaussian) Kernel (this may take 1 to 2 minutes) ...')

c = 1
sigma = 0.1


#调用自己写的高斯核函数  返回新的特征向量矩阵
def gaussian_kernel(x_1, x_2):
    n1 = x_1.shape[0]
    n2 = x_2.shape[0]
    result = np.zeros((n1, n2))

    for i in range(n1):
        for j in range(n2):
            result[i, j] = gk.gaussian_kernel(x_1[i], x_2[j], sigma)

    return result

clf = svm.SVC(c, kernel=gaussian_kernel)#使用自己写的高斯核
#clf = svm.SVC(c, kernel='rbf', gamma=np.power(sigma, -2))#使用封装好的高斯核函数 rbf
clf.fit(X, y)

print('Training complete!')

pd.plot_data(X, y)
vb.visualize_boundary(clf, X, 0, 1, .4, 1.0)

input('Program paused. Press ENTER to continue')- 测试结果:

- 可视化数据集3,并训练:
# ===================== Part 6: Visualizing Dataset 3 =====================
# The following code will load the next dataset into your environment and
# plot the data
#

print('Loading and Visualizing Data ...')

# Load from ex6data3:
data = scio.loadmat('ex6data3.mat')
X = data['X']
y = data['y'].flatten()
m = y.size

# Plot training data
pd.plot_data(X, y)

input('Program paused. Press ENTER to continue')

# ===================== Part 7: Visualizing Dataset 3 =====================

clf = svm.SVC(c, kernel='rbf', gamma=np.power(sigma, -2))
clf.fit(X, y)

pd.plot_data(X, y)
vb.visualize_boundary(clf, X, -.5, .3, -.8, .6)

input('ex6 Finished. Press ENTER to exit')
- 测试结果:


3.垃圾邮件分类
- 加载需要的包和初始化:
import matplotlib.pyplot as plt
import numpy as np
import scipy.io as scio
from sklearn import svm

import processEmail as pe
import emailFeatures as ef

plt.ion()
np.set_printoptions(formatter={'float': '{: 0.6f}'.format})
3.1邮件预处理
- 编写邮件预处理processEmail.py:
import numpy as np
import re
import nltk, nltk.stem.porter


def process_email(email_contents):
    vocab_list = get_vocab_list()

    word_indices = np.array([], dtype=np.int64)

    # ===================== Preprocess Email =====================

    email_contents = email_contents.lower()

    email_contents = re.sub('<[^<>]+>', ' ', email_contents)

    # Any numbers get replaced with the string 'number'
    email_contents = re.sub('[0-9]+', 'number', email_contents)

    # Anything starting with http or https:// replaced with 'httpaddr'
    email_contents = re.sub('(http|https)://[^\s]*', 'httpaddr', email_contents)

    # Strings with "@" in the middle are considered emails --> 'emailaddr'
    email_contents = re.sub('[^\s]+@[^\s]+', 'emailaddr', email_contents)

    # The '$' sign gets replaced with 'dollar'
    email_contents = re.sub('[$]+', 'dollar', email_contents)

    # ===================== Tokenize Email =====================

    # Output the email
    print('==== Processed Email ====')

    stemmer = nltk.stem.porter.PorterStemmer()

    # print('email contents : {}'.format(email_contents))

    tokens = re.split('[@$/#.-:&*+=\[\]?!(){\},\'\">_<;% ]', email_contents)

    for token in tokens:
        token = re.sub('[^a-zA-Z0-9]', '', token)
        token = stemmer.stem(token)

        if len(token) < 1:
            continue

        # ===================== Your Code Here =====================
        # Instructions : Fill in this function to add the index of token to
        #                word_indices if it is in the vocabulary. At this point
        #                of the code, you have a stemmed word frome email in
        #                the variable token. You should look up token in the
        #                vocab_list. If a match exists, you should add the
        #                index of the word to the word_indices nparray.
        #                Concretely, if token == 'action', then you should
        #                look up the vocabulary list the find where in vocab_list
        #                'action' appears. For example, if vocab_list[18] == 'action'
        #                then you should add 18 to the word_indices array.
        for i in range(1, len(vocab_list) + 1):
            if vocab_list[i] == token:
                word_indices = np.append(word_indices, i)

        # ==========================================================

        print(token)

    print('==================')

    return word_indices

def get_vocab_list(): #得到词汇列表
    vocab_dict = {}     #新建空字典 并以字典形式获取
    with open('vocab.txt') as f:
        for line in f:
            (val, key) = line.split()  #读取每一行的键和值
            vocab_dict[int(val)] = key  key #存放到字典中

    return vocab_dict
- 测试代码:
# ===================== Part 1: Email Preprocessing =====================
# To use an SVM to classify emails into spam v. non-spam, you first need to
# convert each email into a vector of features. In this part, you will
# implement the preprocessing steps for each email. You should
# complete the code in processEmail.py to produce a word indices vector
# for a given email.

print('Preprocessing sample email (emailSample1.txt) ...')

file_contents = open('emailSample1.txt', 'r').read()
word_indices = pe.process_email(file_contents)

# Print stats
print('Word Indices: ')
print(word_indices)

input('Program paused. Press ENTER to continue')- 测试结果:
获取到的邮件在词汇列表中所处的序号(ID)
Word Indices:
[ 86 916 794 1077 883 370 1699 790 1822 1831 883 431 1171 794 1002
1893 1364 592 1676 238 162 89 688 945 1663 1120 1062 1699 375 1162
479 1893 1510 799 1182 1237 810 1895 1440 1547 181 1699 1758 1896 688
1676 992 961 1477 71 530 1699 531]
3.2从电子邮件中提取特征
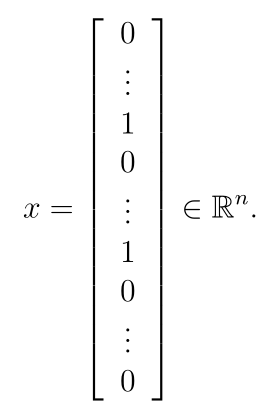
将实现将每个电子邮件转换为一个向量的特征提取。也就是说,如果电子邮件中有第i个单词,则x i = 1;如果电子邮件中没有第i个单词,则x i = 0。就好像:
- 编写邮件特征提取函数emailFeatures.py:
import numpy as np


def email_features(word_indices):
    # Total number of words in the dictionary
    n = 1899

    # You need to return the following variables correctly.
    # Since the index of numpy array starts at 0, to align with the word indices we make n + 1 size array
    features = np.zeros(n + 1)

    # ===================== Your Code Here =====================
    # Instructions : Fill in this function to return a feature vector for the
    #                given email (word_indices). To help make it easier to
    #                process the emails, we have already pre-processed each
    #                email and converted each word in the email into an index in
    #                a fixed dictionary (of 1899 words). The variable
    #                word_indices contains the list of indices of the words
    #                which occur in one email.
    #
    #                Concretely, if an email has the text:
    #
    #                   The quick brown fox jumped over the lazy dog.
    #
    #                Then, the word_indices vector for this text might look
    #                like:
    #
    #                   60  100   33  44  10      53  60  58  5
    #
    #                where, we have mapped each word onto a number, for example:
    #
    #                   the     --  60
    #                   quick   --  100
    #                   ...
    #
    #                Your task is take one such word_indices vector and construct
    #                a binary feature vector that indicates whether a particular
    #                word occurs in the email. That is, features[i] = 1 when word i
    #                is present in the email. Concretely, if the word 'the' (say,
    #                index 60) appears in the email, then features[60] = 1. The feature
    #                vector should look like:
    #
    #                features = [0, 0, 0, 0, 1, 0, 0, 0, ... 0, 0, 0, 1, ... 0, 0, 0, 1, 0]
    #
    #
    for i in word_indices:
        features[i] =  1

    # ==========================================================

    return features
- 测试代码:
# ===================== Part 2: Feature Extraction =====================
# Now, you will convert each email into a vector of features in R^n.
# You should complete the code in emailFeatures.py to produce a feature
# vector for a given mail

print('Extracting Features from sample email (emailSample1.txt) ... ')

# Extract features
features = ef.email_features(word_indices)

# Print stats
print('Length of feature vector: {}'.format(features.size))
print('Number of non-zero entries: {}'.format(np.flatnonzero(features).size))

input('Program paused. Press ENTER to continue')- 测试结果:
Extracting Features from sample email (emailSample1.txt) ...
Length of feature vector: 1900
Number of non-zero entries: 45
3.3训练SVM进行垃圾邮件分类
- 测试代码:
# ===================== Part 3: Train Linear SVM for Spam Classification =====================
# In this section, you will train a linear classifier to determine if an
# email is Spam or Not-spam.

# Load the Spam Email dataset
# You will have X, y in your environment
data = scio.loadmat('spamTrain.mat')
X = data['X']
y = data['y'].flatten()

print('Training Linear SVM (Spam Classification)')
print('(this may take 1 to 2 minutes)')

c = 0.1
clf = svm.SVC(c, kernel='linear')
clf.fit(X, y)

p = clf.predict(X)

print('Training Accuracy: {}'.format(np.mean(p == y) * 100))- 测试结果:
Training Linear SVM (Spam Classification)
(this may take 1 to 2 minutes)
Training Accuracy: 99.825
- 测试训练结果:
# ===================== Part 4: Test Spam Classification =====================
# After training the classifier, we can evaluate it on a test set. We have
# included a test set in spamTest.mat

# Load the test dataset
data = scio.loadmat('spamTest.mat')
Xtest = data['Xtest']
ytest = data['ytest'].flatten()

print('Evaluating the trained linear SVM on a test set ...')

p = clf.predict(Xtest)

print('Test Accuracy: {}'.format(np.mean(p == ytest) * 100))

input('Program paused. Press ENTER to continue')
- 测试结果:
Evaluating the trained linear SVM on a test set ...
Test Accuracy: 98.9
- 测试垃圾邮件最长(top)出现的词汇:
# ===================== Part 5: Top Predictors of Spam =====================
# Since the model we are training is a linear SVM, we can inspect the w
# weights learned by the model to understand better how it is determining
# whether an email is spam or not. The following code finds the words with
# the highest weights in the classifier. Informally, the classifier
# 'thinks' that these words are the most likely indicators of spam.
#

vocab_list = pe.get_vocab_list()
indices = np.argsort(clf.coef_).flatten()[::-1]
print(indices)

for i in range(15):
    print('{} ({:0.6f})'.format(vocab_list[indices[i]], clf.coef_.flatten()[indices[i]]))

input('ex6_spam Finished. Press ENTER to exit')
- 测试结果:
[1190 297 1397 ..., 1764 1665 1560]
otherwis (0.500614)
clearli (0.465916)
remot (0.422869)
gt (0.383622)
visa (0.367710)
base (0.345064)
doesn (0.323632)
wife (0.269724)
previous (0.267298)
player (0.261169)
mortgag (0.257298)
natur (0.253941)
ll (0.253467)
futur (0.248297)
hot (0.246404)
注:所有代码及说明PDF在全部更新完后统一上传


 498
498


 被折叠的 条评论
为什么被折叠?
被折叠的 条评论
为什么被折叠?
 到【灌水乐园】发言


