


文章目录
一、refresh方法
Spring容器启动时会创建IOC容器,在创建容器时会调用refresh()方法,整个容器就是通过该方法完成所有bean的创建以及初始化。
@Override
public void refresh() throws BeansException, IllegalStateException {
    synchronized (this.startupShutdownMonitor) {

        StartupStep contextRefresh = this.applicationStartup.start("spring.context.refresh");
        // 激活开启容器
        prepareRefresh();
        // 创建DefaultListableBeanFactory(真正生产和管理bean的容器)
        // 加载BeanDefinition并注册到BeanDefinitionRegistry
        // 通过NamespaceHandler解析自定义标签的功能(比如:context标签、aop标签、tx标签)
        ConfigurableListableBeanFactory beanFactory = obtainFreshBeanFactory();
        // 对获取到的beanFactory做预处理设置
        prepareBeanFactory(beanFactory);
        try {
            // beanFactory准备工作完成后进行的后置处理工作
            // 在 beanFactory 创建并且有准备完成后需要执行某些操作,可以提供子类重写这个方法来实现
            postProcessBeanFactory(beanFactory);
            // 以上为 beanFactory 的创建及预准备工作
            StartupStep beanPostProcess = this.applicationStartup.start("spring.context.beans.post-process");
            // 执行beanFactory后置处理器(实现了BeanFactoryPostProcessors接口)的方法
            invokeBeanFactoryPostProcessors(beanFactory);
            // 获取所有的后置处理器,随后按照order进行注册
            registerBeanPostProcessors(beanFactory);
            beanPostProcess.end();
            // 初始化 MessageSource 组件
            // 在 SpringMVC 中用来做国际化功能,消息解析,消息绑定,MessageSource中有getMessage()方法,一般用来取出国际化配置文件中的key的值,能按照区域信息去获取
            initMessageSource();
            // 初始化事件派发器,多播器
            initApplicationEventMulticaster();
            // 初始化特定上下文子类中的其他特殊bean,默认是空方法
            onRefresh();
            // 注册监听器
            registerListeners();
            // 此处才是完成单例Bean的初始化
            finishBeanFactoryInitialization(beanFactory);
            // 完成ben的创建初始化工作,完成 IOC 容器的创建
            finishRefresh();
      	}
     	// 省略
   	}
}
spring有四种作用域:
- singleton (单例): 唯一 bean 实例,Spring 中的 bean 默认都是单例的。
- prototype (原型): 每次请求都会创建一个新的 bean 实例。
- request : 每一次 HTTP 请求都会产生一个新的 bean,该 bean 仅在当前 HTTP request 内有效。
- session : 每一次 HTTP 请求都会产生一个新的 bean,该 bean 仅在当前 HTTP session 内有效。
对于singleton作用域下的Bean将在上述流程中的finishBeanFactoryInitialization()方法中完成创建,创建的主要流程如下:
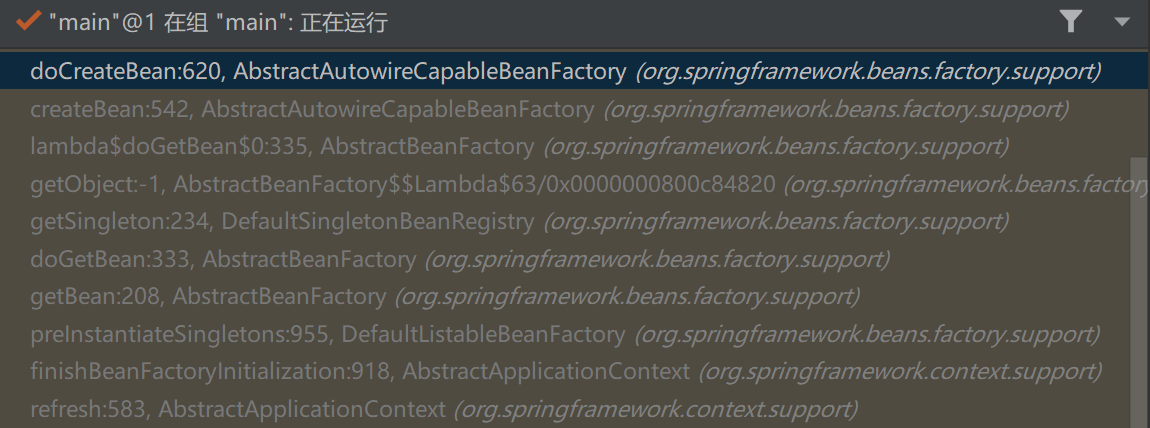
在preInstantiateSingletons()方法中会循环调用AbstractBeanFactory.getBean(beanName),可以看到Bean的创建过程从IOC容器(BeanFactory)的getBean()方法开始(实际逻辑在doGetBean()方法中),首先尝试从缓存中获取bean,如果获取不到就调用createBean()方法(实际逻辑在doCreateBean()方法中)进行创建工作。以下是createBean()和doCreateBean()方法的部分代码:
protected Object createBean(String beanName, RootBeanDefinition mbd, @Nullable Object[] args)
      throws BeanCreationException {

   // 省略

   try {
      // 判断执行InstantiationAwareBeanPostProcessor.postProcessBeforeInstantiation的方法实现;
      Object bean = resolveBeforeInstantiation(beanName, mbdToUse);
      // 返回值不为空则说明修改了bean对象,直接结束bean的创建,其他方法不再调用
      if (bean != null) {
         return bean;
      }
   }
   catch (Throwable ex) {
      throw new BeanCreationException(mbdToUse.getResourceDescription(), beanName,
            "BeanPostProcessor before instantiation of bean failed", ex);
   }

   try {
      // 如果所有InstantiationAwareBeanPostProcessor接口的实现类都返回null或postProcessAfterInitialization方法返回null才执行doCreateBean方法
      Object beanInstance = doCreateBean(beanName, mbdToUse, args);
      if (logger.isTraceEnabled()) {
         logger.trace("Finished creating instance of bean '" + beanName + "'");
      }
      return beanInstance;
   }

   // 省略
}
protected Object doCreateBean(String beanName, RootBeanDefinition mbd, @Nullable Object[] args)
      throws BeanCreationException {

   // Instantiate the bean.
   BeanWrapper instanceWrapper = null;
   if (mbd.isSingleton()) {
      // 如果是单例则尝试从缓存中获取并删除
      instanceWrapper = this.factoryBeanInstanceCache.remove(beanName);
   }
   if (instanceWrapper == null) {
      // 缓存中获取不到则实例化(在堆中创建)Bean
      instanceWrapper = createBeanInstance(beanName, mbd, args);
   }

   // 省略

   // Initialize the bean instance.
   Object exposedObject = bean;
   try {
      // 属性赋值
      populateBean(beanName, mbd, instanceWrapper);
      // 初始化
      exposedObject = initializeBean(beanName, exposedObject, mbd);
   }

   // 省略
}
可以看到Bean的实际创建过程中大概包括以下流程:
- 实例化(Instantiation)
- 属性赋值(Populate)
- 初始化(Initialiazation)
- 销毁(Destruction)
以下对各个步骤分别进行展开。
通过BeanDefinition使用反射拿到Bean的构造器函数
二、实例化——createBeanInstance()
从上文createBean()方法中可以看到,如果resolveBeforeInstantiation()方法(该方法做了什么将在下文中进行解释)最后返回的是null,则会进入doCreateBean()方法
在这个方法中首先便会执行createBeanInstance()方法进行bean的实例化,如下:
protected BeanWrapper createBeanInstance(String beanName, RootBeanDefinition mbd, @Nullable Object[] args) {
   Class<?> beanClass = resolveBeanClass(mbd, beanName);

   // 确保class不为空,并且访问权限为public
   if (beanClass != null && !Modifier.isPublic(beanClass.getModifiers()) && !mbd.isNonPublicAccessAllowed()) {
      throw new BeanCreationException(mbd.getResourceDescription(), beanName,
            "Bean class isn't public, and non-public access not allowed: " + beanClass.getName());
   }

   // 配置的一种特殊的回调方法,通过这个callback创建bean
   Supplier<?> instanceSupplier = mbd.getInstanceSupplier();
   if (instanceSupplier != null) {
      return obtainFromSupplier(instanceSupplier, beanName);
   }

   // 通过工厂方法创建
   if (mbd.getFactoryMethodName() != null) {
      return instantiateUsingFactoryMethod(beanName, mbd, args);
   }

   // 已经创建过相同bean的情况
   boolean resolved = false;
   boolean autowireNecessary = false;
   if (args == null) {
      synchronized (mbd.constructorArgumentLock) {
         if (mbd.resolvedConstructorOrFactoryMethod != null) {
            resolved = true;
            // 表示已经找到了创建对象的方法
            autowireNecessary = mbd.constructorArgumentsResolved;
         }
      }
   }
   // 直接用找的创建对象的方式来创建对象
   if (resolved) {
      if (autowireNecessary) {
         return autowireConstructor(beanName, mbd, null, null);
      }
      else {
         return instantiateBean(beanName, mbd);
      }
   }

   // 调用 SmartInstantiationAwareBeanPostProcessor#determineCandidateConstructors 方法来筛选构造函数
   // 如果只有默认构造函数则返回null,则直接跳过以下两个条件分支,执行无参构造进行实例化
   Constructor<?>[] ctors = determineConstructorsFromBeanPostProcessors(beanClass, beanName);
   // 有候选构造函数 || 自动装配模式为构造注入 || 有构造函数入参 || 用于构造函数或工厂方法调用的显式参数args不为null则调用 autowireConstructor 方法
   if (ctors != null || mbd.getResolvedAutowireMode() == AUTOWIRE_CONSTRUCTOR ||
         mbd.hasConstructorArgumentValues() || !ObjectUtils.isEmpty(args)) {
      // 默认情况(没有进行配置)下自动装配模式为no(不自动装配),不会显式向构造函数和工厂方法传入参数
      // 所以默认不会走进这里,是走下面的无参构造
      return autowireConstructor(beanName, mbd, ctors, args);
   }

   // Preferred constructors for default construction?
   ctors = mbd.getPreferredConstructors();
   if (ctors != null) {
      return autowireConstructor(beanName, mbd, ctors, null);
   }

   // No special handling: simply use no-arg constructor.
   return instantiateBean(beanName, mbd);
}
大概逻辑可以概括为:
- 回调方法创建
- 工厂方法创建
- 缓存创建
- 构造函数创建
其中逻辑较为复杂,也可以不必深入了解
1、回调方法实例化
如果 RootBeanDefinition 中存在 Supplier 供应商接口,则使用 Supplier 的回调来创建bean。 Supplier是用来替代声明式指定的工厂,指定一个用于创建bean实例的回调,以替代声明式指定的工厂方法(主要是考虑反射调用目标方法不如直接调用目标方法效率高)
可以通过bean工厂后置处理器来设置这个Supplier:
@Component
public class MyBeanFactoryPostProcessor implements BeanFactoryPostProcessor {
    @Override
    public void postProcessBeanFactory(ConfigurableListableBeanFactory beanFactory) throws BeansException {
        GenericBeanDefinition userController = (GenericBeanDefinition) beanFactory.getBeanDefinition("userController");
        userController.setInstanceSupplier((Supplier<UserController>) () -> {
            System.out.println("通过回调函数构造");
            return new UserController();
        });
    }
}
2、工厂方法实例化
如果 RootBeanDefinition 中存在 factoryMethodName 属性(配置文件中配置了factory-method),Spring会尝试使用 instantiateUsingFactoryMethod 方法,根据RootBeanDefinition 中的配置生成bean实例(如果一个类中的方法被 @Bean注解修饰,那么Spring则会将其封装成一个 ConfigurationClassBeanDefinition,此时 factoryMethodName 也被赋值)。随后调用instantiateUsingFactoryMethod 方法通过反射完成方法的调用,并将结果注入Spring容器中
- 在 xml配置中,可以使用 factory-bean 和 factory-method 两个标签可以指定一个类中的方法,Spring会将这个指定的方法的返回值作为bean返回(如果方法是静态方法,则可以不创建factorybean就直接调用,否则需要先将factorybean注入到Spring中)
- 对@Bean 注解的解析。在 ConfigurationClassPostProcessor 后处理器中,会对被 @Bean 注解修饰的方法进行解析,生成一个 ConfigurationClassBeanDefinition 的 BeanDefinition。此时BeanDefinition 的 factoryMethodName 正是 @Bean修饰的方法本身。所以这里会调用 instantiateUsingFactoryMethod 方法,通过回调的方式调用 @Bean修饰的方法,并将返回结果注入到Spring容器中
@Configuration
public class MyConfig {

    @Bean
    public UserController userController() {
        System.out.println("@Bean修饰的方法会被识别为工厂方法");
        return new UserController();
    }
}
3、缓存实例化
当以上两种都没有配置时,Spring则打算通过bean的构造函数来创建bean。首先会判断是否有缓存,即构造函数是否已经被解析过了, 因为一个bean可能会存在多个构造函数,这时候Spring会根据参数列表的来判断使用哪个构造函数进行实例化。但是判断过程比较消耗性能,所以Spring将判断好的构造函数缓存到RootBeanDefinition 中的 resolvedConstructorOrFactoryMethod 属性中。
如果存在缓存,则不需要再次解析筛选构造函数,直接调用 autowireConstructor 或者 instantiateBean 方法创建bean。有参构造调用 autowireConstructor 方法,无参构造调用 instantiateBean 方法。
在创建完Bena之后会将构造方法缓存,如果bean再一次想要进行实例化,那么就可以直接从这个缓存中拿出构造方法实例化bean
4、构造方法实例化
如果不存在缓存则需要进行解析,这里通过 determineConstructorsFromBeanPostProcessors 方法调用了 SmartInstantiationAwareBeanPostProcessor.determineCandidateConstructors 的后处理器方法来进行解析(Spring 默认的实现在AutowiredAnnotationBeanPostProcessor.determineCandidateConstructors 方法中)。通过 determineCandidateConstructors 方法获取到了候选的构造函数(因为满足条件的构造函数可能不止一个,需要进行进一步的选择),随后开始调用 autowireConstructor 或者 instantiateBean 方法创建bean。
1)获取适合的构造函数
AutowiredAnnotationBeanPostProcessor# determineCandidateConstructors:
public Constructor<?>[] determineCandidateConstructors(Class<?> beanClass, final String beanName)
      throws BeanCreationException {

   checkLookupMethods(beanClass, beanName);

   Constructor<?>[] candidateConstructors = this.candidateConstructorsCache.get(beanClass);
   if (candidateConstructors == null) {
      synchronized (this.candidateConstructorsCache) {
         candidateConstructors = this.candidateConstructorsCache.get(beanClass);
         if (candidateConstructors == null) {
            Constructor<?>[] rawCandidates;
            try {
               // 获得所有构造函数
               rawCandidates = beanClass.getDeclaredConstructors();
            }
            catch (Throwable ex) {
               throw new BeanCreationException(beanName,
                     "Resolution of declared constructors on bean Class [" + beanClass.getName() +
                     "] from ClassLoader [" + beanClass.getClassLoader() + "] failed", ex);
            }
            // 创建一个集合放构造方法
            List<Constructor<?>> candidates = new ArrayList<>(rawCandidates.length);
            // 存放必要构造方法(加上了@Autowired注解)
            Constructor<?> requiredConstructor = null;
            // 存放默认构造方法
            Constructor<?> defaultConstructor = null;
            Constructor<?> primaryConstructor = BeanUtils.findPrimaryConstructor(beanClass);
            int nonSyntheticConstructors = 0;
            // 遍历所有的构造器
            for (Constructor<?> candidate : rawCandidates) {
               if (!candidate.isSynthetic()) {
                  nonSyntheticConstructors++;
               }
               else if (primaryConstructor != null) {
                  continue;
               }
               // 这个方法会拿到构造方法上的注解中的属性
               MergedAnnotation<?> ann = findAutowiredAnnotation(candidate);
               /*
                * 如果我们在构造方法中加上了@Autowired,会拿到其中的required属性
                * 下面如果没有注解会进入第一个if语句
                * 如果加了注解会进入第二个if语句,而且加上了@Autowired
                * 那么会构造方法赋值给requiredConstructor,并且将构造方法加入candidates集合
                * 注意如果存在两个带有@Autowired注解且存在required属性值为true的构造方法会直接报错
                */
               if (ann == null) {
                  // 不是必要构造方法
                  Class<?> userClass = ClassUtils.getUserClass(beanClass);
                  if (userClass != beanClass) {
                     // 如果是代理,则判断原始类的构造函数
                     try {
                        Constructor<?> superCtor =
                              userClass.getDeclaredConstructor(candidate.getParameterTypes());
                        ann = findAutowiredAnnotation(superCtor);
                     }
                     catch (NoSuchMethodException ex) {
                        // Simply proceed, no equivalent superclass constructor found...
                     }
                  }
               }
               if (ann != null) {
                  // 出现两个@Autowired且存在一个或一个以上required属性值为true
                  // 即如果有两个或以上的必要构造方法只能都是required=false
                  if (requiredConstructor != null) {
                     throw new BeanCreationException(beanName,
                           "Invalid autowire-marked constructor: " + candidate +
                           ". Found constructor with 'required' Autowired annotation already: " +
                           requiredConstructor);
                  }
                  boolean required = determineRequiredStatus(ann);
                  if (required) {
                     if (!candidates.isEmpty()) {
                        throw new BeanCreationException(beanName,
                              "Invalid autowire-marked constructors: " + candidates +
                              ". Found constructor with 'required' Autowired annotation: " +
                              candidate);
                     }
                     requiredConstructor = candidate;
                  }
                  candidates.add(candidate);
               }
               else if (candidate.getParameterCount() == 0) {
                  // 没有被@Autowired注解标记的无参构造函数则视为默认构造函数
                  defaultConstructor = candidate;
               }
            }
            // 如果集合中不为空,存在必要的构造方法(有@Autowired)
            // 会其中的构造方法赋值给candidateConstructors
            // 这里如果只有一个构造方法(无默认构造方法)且@Autowired的参数required为false的情况下会有日志提示
            if (!candidates.isEmpty()) {
               // Add default constructor to list of optional constructors, as fallback.
               // 没有required=true的构造方法
               if (requiredConstructor == null) {
                  // 如果有默认构造方法则加入
                  if (defaultConstructor != null) {
                     candidates.add(defaultConstructor);
                  }
                  // 没有默认构造方法,且只有一个required为false的构造方法则会有提示
                  else if (candidates.size() == 1 && logger.isInfoEnabled()) {
                     logger.info("Inconsistent constructor declaration on bean with name '" + beanName +
                           "': single autowire-marked constructor flagged as optional - " +
                           "this constructor is effectively required since there is no " +
                           "default constructor to fall back to: " + candidates.get(0));
                  }
               }
               candidateConstructors = candidates.toArray(new Constructor<?>[0]);
            }
            // 以下为没有必要构造函数(不存在被autowired标记的构造方法)的情况
            else if (rawCandidates.length == 1 && rawCandidates[0].getParameterCount() > 0) {
               // 如果只有一个构造方法则返回(参数大于0,即非默认构造函数)
               candidateConstructors = new Constructor<?>[] {rawCandidates[0]};
            }
            else if (nonSyntheticConstructors == 2 && primaryConstructor != null &&
                  defaultConstructor != null && !primaryConstructor.equals(defaultConstructor)) {
               // 如果有两个构造器(含默认构造器)且存在primary设置的构造器就返回此构造器和默认构造方法
               candidateConstructors = new Constructor<?>[] {primaryConstructor, defaultConstructor};
            }
            else if (nonSyntheticConstructors == 1 && primaryConstructor != null) {
               // 如果有一个构造器且存在primary设置的构造器就返回此构造器
               candidateConstructors = new Constructor<?>[] {primaryConstructor};
            }
            else {
               // 如果进入此语句代表最终将返回null
               // 也就是使用默认构造器初始化bean
               candidateConstructors = new Constructor<?>[0];
            }
            // 加入缓存
            this.candidateConstructorsCache.put(beanClass, candidateConstructors);
         }
      }
   }
   return (candidateConstructors.length > 0 ? candidateConstructors : null);
}
整体逻辑如下(这里的默认构造函数指代的就是无参构造函数):
- 如果只存在一个用@Autowired注解标记的构造函数,若其required属性为true(默认为true)则只会返回该构造函数,若required属性为false则如果还有默认构造函数也会一起返回(没有的话自然还是只返回该被标记的构造函数)
- 如果存在多个用@Autowired注解标记的构造函数,则需要要求它们的required属性全部为false(若有一个为true则会报错),这种情况下这些被@Autowired注解标记的构造函数都会返回,如果有默认构造函数也会一起返回
- 如果不存在@Autowired注解标记的构造函数,若只有一个非无参的构造函数则直接返回,若拥有无参构造函数之外还有其他没有设置primary的构造函数则或只有无参构造函数,都返回null(这样后续流程就会直接走无参构造来进行实例化),没有无参构造函数但有其他多个没有设置primary的构造函数是不被允许的(报错)。如果有且只有一个设置primary的构造函数则会将其返回(此时如果还有无参构造也会一起返回)。多个设置primary的构造函数同样返回null
2)有参构造
在 autowireConstructor 中,进行了候选构造函数的选举,选择最合适的构造函数来构建bean,如果缓存已解析的构造函数,则不用选举,直接使用解析好的构造来进行bean的创建
ConstructResolver# autowireConstructor:
public BeanWrapper autowireConstructor(String beanName, RootBeanDefinition mbd,
      @Nullable Constructor<?>[] chosenCtors, @Nullable Object[] explicitArgs) {

   BeanWrapperImpl bw = new BeanWrapperImpl();
   this.beanFactory.initBeanWrapper(bw);

   // 最终使用的构造方法
   // Spring会通过一个for循环来遍历构造器, 每找到一个更加合适的构造器时, 都会覆盖这个变量的值
   Constructor<?> constructorToUse = null;
   // 存储原始的参数以及转换后的参数
   ArgumentsHolder argsHolderToUse = null;
   // 存储真正用来创建对象的参数,由argsHolderToUse中得到的
   Object[] argsToUse = null;

   // 1. 解析构造函数参数
   // explicitArgs  参数是通过 getBean 方法传入
   // 如果 getBean在调用时传入了参数,那么直接使用即可。
   if (explicitArgs != null) {
      argsToUse = explicitArgs;
   }
   else {
      // 否则尝试从 BeanDefinition 中加载缓存的bean构造时需要的参数
      Object[] argsToResolve = null;
      synchronized (mbd.constructorArgumentLock) {
         constructorToUse = (Constructor<?>) mbd.resolvedConstructorOrFactoryMethod;
         if (constructorToUse != null && mbd.constructorArgumentsResolved) {
            // Found a cached constructor...
            // 从缓存中获取。这里如果不能获取到完全解析好的参数,则获取尚未解析的参数,进行解析后再赋值给 argsToUse
            // resolvedConstructorArguments 是完全解析好的构造函数参数
            argsToUse = mbd.resolvedConstructorArguments;
            if (argsToUse == null) {
               // 配置构造函数参数
               // preparedConstructorArguments 是尚未完全解析的构造函数参数
               argsToResolve = mbd.preparedConstructorArguments;
            }
         }
      }
      //  如果缓存中存在尚未完全解析的参数列表,则进行进一步的解析
      if (argsToResolve != null) {
         // 解析参数类型,如给定的参数列表为(int,int),这时就会将配置中的("1", "1") 转化为 (1,1)
         // 缓存中的值可能是最终值,也可能是原始值,因为不一定需要类型转换
         argsToUse = resolvePreparedArguments(beanName, mbd, bw, constructorToUse, argsToResolve);
      }
   }

   // 如果构造函数 和 构造函数入参都不为空,则可以直接生成bean。否则的话,需要通过一定的规则进行筛选
   if (constructorToUse == null || argsToUse == null) {
      // Take specified constructors, if any.
      // chosenCtors 是候选的构造函数,如果存在候选的构造函数,则跳过这里,否则通过反射获取bean的构造函数集合
      // 2. 获取候选的构造参数列表
      Constructor<?>[] candidates = chosenCtors;
      if (candidates == null) {
         Class<?> beanClass = mbd.getBeanClass();
         try {
            // 反射获取bean的构造函数集合
            candidates = (mbd.isNonPublicAccessAllowed() ?
                  beanClass.getDeclaredConstructors() : beanClass.getConstructors());
         }
         catch (Throwable ex) {
            throw new BeanCreationException(mbd.getResourceDescription(), beanName,
                  "Resolution of declared constructors on bean Class [" + beanClass.getName() +
                  "] from ClassLoader [" + beanClass.getClassLoader() + "] failed", ex);
         }
      }
      // 如果构造函数只有一个 && getBean 没有传参 && 构造参数无参
      // 满足上述三个条件,则无需继续筛选构造函数,直接使用唯一一个构造函数创建 BeanWrapper 并返回即可。
      if (candidates.length == 1 && explicitArgs == null && !mbd.hasConstructorArgumentValues()) {
         Constructor<?> uniqueCandidate = candidates[0];
         if (uniqueCandidate.getParameterCount() == 0) {
            synchronized (mbd.constructorArgumentLock) {
               mbd.resolvedConstructorOrFactoryMethod = uniqueCandidate;
               mbd.constructorArgumentsResolved = true;
               mbd.resolvedConstructorArguments = EMPTY_ARGS;
            }
            // 调用 instantiate 方法创建对象实例并保存到 bw中
            bw.setBeanInstance(instantiate(beanName, mbd, uniqueCandidate, EMPTY_ARGS));
            return bw;
         }
      }

      // Need to resolve the constructor.
      // 待选构造函数列表不为null || 需要构造注入,则需要解析。
      // mbd.getResolvedAutowireMode() 是针对 xml 注入的
      boolean autowiring = (chosenCtors != null ||
            mbd.getResolvedAutowireMode() == AutowireCapableBeanFactory.AUTOWIRE_CONSTRUCTOR);
      ConstructorArgumentValues resolvedValues = null;

      // 3. 解析出来的构造函数的个数
      int minNrOfArgs;
      // 如果explicitArgs  不为空,直接使用它作为参数,毕竟是传入的参数,没必要再从进一步解析。
      if (explicitArgs != null) {
         minNrOfArgs = explicitArgs.length;
      }
      else {
         // 获取xml配置文件中的配置的构造函数参数
         ConstructorArgumentValues cargs = mbd.getConstructorArgumentValues();
         // 用于承载解析后的构造函数参数的值
         resolvedValues = new ConstructorArgumentValues();
         // 确定解析到的构造函数参数个数并进行类型转换匹配。在下面有详细解读
         minNrOfArgs = resolveConstructorArguments(beanName, mbd, bw, cargs, resolvedValues);
      }

      // 4. 寻找最匹配的构造函数
      // 对构造函数列表进行排序: public 构造函数优先参数数量降序,非public构造函数参数数量降序
      AutowireUtils.sortConstructors(candidates);
      int minTypeDiffWeight = Integer.MAX_VALUE;
      Set<Constructor<?>> ambiguousConstructors = null;
      Deque<UnsatisfiedDependencyException> causes = null;

      for (Constructor<?> candidate : candidates) {
         int parameterCount = candidate.getParameterCount();
         // 如果已经找到选用的构造函数 (argsToUse != null) 或者需要的构造函数的参数个数小于当前构造函数参数个数则终止
         // constructorToUse != null 说明找到了构造函数
         // argsToUse != null 说明参数已经赋值
         // argsToUse.length > parameterCount
         // 即已经找到适配的构造函数(可能不是最终的,但参数数量一定相同), 预选构造函数的参数数量大于当前构造函数的数量,可以直接break,因为按照参数数量降序排序,之前确定的构造函数肯定要比后面的更合适,如果参数数量相等还有判断差异性的必要,如果已经小于了那么从这往后的构造器显然都没有之前的合适
         if (constructorToUse != null && argsToUse != null && argsToUse.length > parameterCount) {
            // Already found greedy constructor that can be satisfied ->
            // do not look any further, there are only less greedy constructors left.
            break;
         }
         if (parameterCount < minNrOfArgs) {
            // 参数数量小于最小限制,跳过
            continue;
         }

         // 到这里说明尚未找到构造函数,且目前的构造函数和需要的构造函数参数个数相同,下面要对类型进行比较。
         ArgumentsHolder argsHolder;
         Class<?>[] paramTypes = candidate.getParameterTypes();
         // 如果构造函数存在参数,resolvedValues 是上面解析后的构造函数,有参则根据值构造对应参数类型的参数
         if (resolvedValues != null) {
            try {
               // 去拿到参数列表的名称,如果构造方法上加入了ConstructorProperties注解,那么说明我们参数名称数组,如果没有这个注解,那么次数paramNames为空的
               String[] paramNames = ConstructorPropertiesChecker.evaluate(candidate, parameterCount);
               if (paramNames == null) {
                  // 这里为空则代表我们没有通过注解去自定义参数名称,则通过ParameterNameDiscoverer去解析拿到构造器的参数名称列表
                  ParameterNameDiscoverer pnd = this.beanFactory.getParameterNameDiscoverer();
                  if (pnd != null) {
                     // 解析拿到参数名称列表
                     paramNames = pnd.getParameterNames(candidate);
                  }
               }
               // 此处会去获取这些参数名称的参数值,如果是自动注入的就会通过getBean获取,当前这种构造器注入的情况如果循环依赖则会报错的. 这里我们只需要知道,此处将构造器需要的参数值拿出来后并封装到了argsHolder中去.当然如果你构造器里面给个Integer的参数,那肯定是会报错的,因为这里面会去Spring容器中拿这个Integer,结果呢,肯定是NoSuchBeanDefinitionException了
               argsHolder = createArgumentArray(beanName, mbd, resolvedValues, bw, paramTypes, paramNames,
                     getUserDeclaredConstructor(candidate), autowiring, candidates.length == 1);
            }
            catch (UnsatisfiedDependencyException ex) {
               // 当一个bean依赖于其他bean或bean工厂定义中未指定的简单属性时,抛出异常,尽管启用了依赖项检查。
               if (logger.isTraceEnabled()) {
                  logger.trace("Ignoring constructor [" + candidate + "] of bean '" + beanName + "': " + ex);
               }
               // Swallow and try next constructor.
               if (causes == null) {
                  causes = new ArrayDeque<>(1);
               }
               causes.add(ex);
               continue;
            }
         }
         else {
            // Explicit arguments given -> arguments length must match exactly.
            // 如果构造函数为默认构造函数,没有参数,如果参数不完全一致则跳过
            if (parameterCount != explicitArgs.length) {
               continue;
            }
            // 构造函数没有参数的情况
            argsHolder = new ArgumentsHolder(explicitArgs);
         }

         // 当到达这里的时候,至此我们拿到了构造器和构造器需要的参数和值,在这里去结算前面定义的那个差异值
         // isLenientConstructorResolution意思是是否为宽松的模式,为true的时候是宽松,false的时候是严格
         // 这个差异值越小越那就说明越合适
         int typeDiffWeight = (mbd.isLenientConstructorResolution() ?
               argsHolder.getTypeDifferenceWeight(paramTypes) : argsHolder.getAssignabilityWeight(paramTypes));
         // 如果本次计算到的差异值比上一次获取到的差异值小,那么就需要做这几件事
         // 1.设置constructorToUse为当前的这个构造器
         // 2、设置参数和参数值
         // 3、给差异值赋值为当前计算出来的差异值
         // 4、清空有歧义的集合(因为此时我们已经得到了更合适的构造器,所以有歧义的构造器里面保存的构造器已经没有存在的意义了)
         if (typeDiffWeight < minTypeDiffWeight) {
            constructorToUse = candidate;
            argsHolderToUse = argsHolder;
            argsToUse = argsHolder.arguments;
            minTypeDiffWeight = typeDiffWeight;
            ambiguousConstructors = null;
         }
         else if (constructorToUse != null && typeDiffWeight == minTypeDiffWeight) {
            // 如果已经找到候选构造函数,且当前这个构造函数也有相同类似度则保存到 ambiguousConstructors 中。后面用于抛出异常
            if (ambiguousConstructors == null) {
               ambiguousConstructors = new LinkedHashSet<>();
               ambiguousConstructors.add(constructorToUse);
            }
            ambiguousConstructors.add(candidate);
         }
      }

      // 如果 constructorToUse 构造函数为 null,则查找构造函数失败,抛出异常
      if (constructorToUse == null) {
         if (causes != null) {
            UnsatisfiedDependencyException ex = causes.removeLast();
            for (Exception cause : causes) {
               this.beanFactory.onSuppressedException(cause);
            }
            throw ex;
         }
         throw new BeanCreationException(mbd.getResourceDescription(), beanName,
               "Could not resolve matching constructor on bean class [" + mbd.getBeanClassName() + "] " +
               "(hint: specify index/type/name arguments for simple parameters to avoid type ambiguities)");
      }
      // 如果ambiguousConstructors 不为空说明有多个构造函数可适配,并且 如果不允许多个存在,则抛出异常
      else if (ambiguousConstructors != null && !mbd.isLenientConstructorResolution()) {
         throw new BeanCreationException(mbd.getResourceDescription(), beanName,
               "Ambiguous constructor matches found on bean class [" + mbd.getBeanClassName() + "] " +
               "(hint: specify index/type/name arguments for simple parameters to avoid type ambiguities): " +
               ambiguousConstructors);
      }

      // 将解析的构造函数加入缓存
      if (explicitArgs == null && argsHolderToUse != null) {
         argsHolderToUse.storeCache(mbd, constructorToUse);
      }
   }

   Assert.state(argsToUse != null, "Unresolved constructor arguments");
   // 将构建的实例加入BeanWrapper 中
   bw.setBeanInstance(instantiate(beanName, mbd, constructorToUse, argsToUse));
   return bw;
}
整体逻辑如下:
- 确定参数
- 如果getBean调用的时候传入了构造器参数,那么argsToUse的值就被赋值为传入的构造器参数
- 尝试从缓存(当bean不是原型的时候实例化时找到的合适的构造器等参数)里面拿constructorToUse和argsToUse(如果是第一次进来或者bean是单例的,那么此缓存中肯定没有这个bean相关的构造器数据),如果缓存里面有则直接实例化bean后放到wrapper中并return
- 缓存中不存在则首先定义resolvedValues,这个是后续循环里面需要使用到的构造器使用的参数列表,定义minNrOfArgs,这个是最小参数个数(用来后面在循环构造器的时候筛选用的)。如果getBean传入了构造器参数,那么此值就是传入构造参数的长度,没有传入则尝试看我们有没有配置使用某个构造器(xml文件中),如果都没有则值为0。
- 筛选构造函数
- 根据函数入参chosenCtors(上一个函数的返回结果)来确定此时参与筛选的构造方法,如果它为空则根据权限获取类中的构造器(isNonPublicAccessAllowed属性意为是否允许访问非public的构造器,如果为true则去获取所有的构造器,否则只获取public的)
- 如果只有一个默认构造方法, 则会直接调用这个方法来完成对象的创建(创建对象的捷径)
- 对构造器进行一定规则的排序,比如public - protected - default - private权限排序,同权限的情况下再对参数个数进行排序,参数多的排前面。之所以排序是因为Spring认为public方法优先以及参数多的优先。
- 确定最合适的构造器
- 轮询构造器列表,同时查找参数,判断当前构造器所有参数是否在容器中都可以找到匹配的bean对象,如果不能找到,那么就会跳过这个构造器,继续采用同样的方式匹配下一个构造器。如果可以找到就根据构造器和查找出来的参数计算出一个差异值。(如果有两个都是只有一个参数的构造器,第一个构造器的参数为A类实例,第二个构造器的参数为B类实例。在遍历的时候如果查找到的参数为A类实例,那么第一个构造器得到的差异值自然就小于第二个构造器了,Spring也会利用第一个构造器来创建对象)
- 当两个构造器计算出来的差异大小一模一样的时候,Spring就认为此时是歧义的,不知道采用哪个构造器来创建对象了。此时这两个构造器会放入到ambiguousConstructors这个Set中。如果是在宽松模式下,Spring就会采用第一个找出来的构造器,如果在严谨的模式下,Spring就抛出了一个错误。(一个bean处于宽松还是严谨可以通过beanDefinition.setLenientConstructorResolution方法来设置)
- 如果找得到合适的构造器则创建实例,否则抛出异常
3)无参构造
instantiateBean()方法逻辑较为简单,只是多了进行是否代理的判断
AbstractAutowiredCapableBeanFactory# instantiateBean
protected BeanWrapper instantiateBean(String beanName, RootBeanDefinition mbd) {
   try {
      Object beanInstance = getInstantiationStrategy().instantiate(mbd, beanName, this);
      BeanWrapper bw = new BeanWrapperImpl(beanInstance);
      initBeanWrapper(bw);
      return bw;
   }
   catch (Throwable ex) {
      throw new BeanCreationException(mbd.getResourceDescription(), beanName, ex.getMessage(), ex);
   }
}
主要关注其中的getInstantiationStrategy().instantiate(mbd, beanName, this);方法
// SimpleInstantiationStrategy#instantiate
@Override
public Object instantiate(RootBeanDefinition bd, @Nullable String beanName, BeanFactory owner) {
   // Don't override the class with CGLIB if no overrides.
   // 如果没有需要覆盖的方法,通过反射直接创建
   if (!bd.hasMethodOverrides()) {
      Constructor<?> constructorToUse;
      synchronized (bd.constructorArgumentLock) {
         // 尝试从缓存中获取构造函数
         constructorToUse = (Constructor<?>) bd.resolvedConstructorOrFactoryMethod;
         if (constructorToUse == null) {
            final Class<?> clazz = bd.getBeanClass();
            // 如果需要实例化的类是接口,则抛出异常
            if (clazz.isInterface()) {
               throw new BeanInstantiationException(clazz, "Specified class is an interface");
            }
            try {
               // 直接通过反射获取无参构造函数
               constructorToUse = clazz.getDeclaredConstructor();
               // 将构造函数缓存起来
               bd.resolvedConstructorOrFactoryMethod = constructorToUse;
            }
            catch (Throwable ex) {
               throw new BeanInstantiationException(clazz, "No default constructor found", ex);
            }
         }
      }
      // 实例化bean
      return BeanUtils.instantiateClass(constructorToUse);
   }
   else {
      // Must generate CGLIB subclass.
      // 使用动态代理覆盖方法
      return instantiateWithMethodInjection(bd, beanName, owner);
   }
}
5、实例化前后
在Bean实例化的前后(跨越实例化和属性赋值两个阶段),会调用InstantiationAwareBeanPostProcessor接口(BeanPostProcessor扩展的子接口)的几个方法
- 实例化前:postProcessBeforeInstantiation()
- 实例化后:
- postProcessAfterInstantiation()
- postProcessPropertyValues()
1)postProcessBeforeInstantiation()
Object postProcessBeforeInstantiation(Class<?> beanClass, String beanName):最先执行的方法,它在目标对象实例化之前调用(即doCreateBean()之前)。该方法的返回值类型是Object,可以返回任何类型的值。由于这个时候目标对象还未实例化,所以这个返回值可以用来代替原本该生成的目标对象的实例,如代理对象等。如果该方法的返回值代替原本该生成的目标对象,后续只有postProcessAfterInitialization()方法会调用,其它方法不再调用;返回null则按照正常的流程走(即返回null才会去调用doCreateBean()方法)
以下追溯该方法调用的时机:
protected Object createBean(String beanName, RootBeanDefinition mbd, @Nullable Object[] args)
      throws BeanCreationException {

   // 省略

   try {
      // 判断执行InstantiationAwareBeanPostProcessor.postProcessBeforeInstantiation的方法实现;
      Object bean = resolveBeforeInstantiation(beanName, mbdToUse);
      // 返回值不为空则说明修改了bean对象,直接结束bean的创建,其他方法不再调用
      if (bean != null) {
         return bean;
      }
   }
   catch (Throwable ex) {
      throw new BeanCreationException(mbdToUse.getResourceDescription(), beanName,
            "BeanPostProcessor before instantiation of bean failed", ex);
   }

   try {
      // 如果所有InstantiationAwareBeanPostProcessor接口的实现类都返回null或postProcessAfterInitialization方法返回null才执行doCreateBean方法
      Object beanInstance = doCreateBean(beanName, mbdToUse, args);
      if (logger.isTraceEnabled()) {
         logger.trace("Finished creating instance of bean '" + beanName + "'");
      }
      return beanInstance;
   }

   // 省略
}
可以看到在调用doCreateBean()之前,还先执行了resolveBeforeInstantiation方法,只有其返回值为null才会进入后面逻辑去执行上文的实例化流程
resolveBeforeInstantiation方法如下:
protected Object resolveBeforeInstantiation(String beanName, RootBeanDefinition mbd) {
   Object bean = null;
   // 如果beforeInstantiationResolved还没有设置或者是false(说明还没有需要在实例化前执行的操作)
   if (!Boolean.FALSE.equals(mbd.beforeInstantiationResolved)) {
      // 判断是否有注册过InstantiationAwareBeanPostProcessor类型的bean
      if (!mbd.isSynthetic() && hasInstantiationAwareBeanPostProcessors()) {
         Class<?> targetType = determineTargetType(beanName, mbd);
         if (targetType != null) {
            // 执行InstantiationAwareBeanPostProcessor接口的postProcessBeforeInstantiation()方法
            // 遇到第一个返回非null的方法即中断循环直接返回,不再执行后续的后置处理器
            bean = applyBeanPostProcessorsBeforeInstantiation(targetType, beanName);
            if (bean != null) {
               // 实例化完成则执行初始化方法,中间的实例化之后和初始化之前方法都不执行
               bean = applyBeanPostProcessorsAfterInitialization(bean, beanName);
            }
         }
      }
      mbd.beforeInstantiationResolved = (bean != null);
   }
   return bean;
}
protected Object applyBeanPostProcessorsBeforeInstantiation(Class<?> beanClass, String beanName) {
   for (InstantiationAwareBeanPostProcessor bp : getBeanPostProcessorCache().instantiationAware) {
      Object result = bp.postProcessBeforeInstantiation(beanClass, beanName);
      // 只要有一个result不为null;后面的所有后置处理器的方法就不执行了,直接返回(所以执行顺序很重要)
      if (result != null) {
         return result;
      }
   }
   return null;
}
以下是实现了该方法的类

可以看到该接口方法一般是用来生成代理类的
2)postProcessAfterInstantiation()
postProcessAfterInstantiation(Object bean, String beanName):在目标对象实例化之后调用,这个时候对象已经被实例化,但是该实例的属性还未被设置,都是null(当然构造函数里相关的属性则已经完成赋值,由上文讲的实例化流程可以看到)。它的返回值是决定要不要调用postProcessPropertyValues方法的其中一个因素(因为还有一个因素是mbd.getDependencyCheck)。如果该方法返回false并且不需要check,那么postProcessPropertyValues就会被忽略不执行;如果返回true,postProcessPropertyValues就会被执行。
以下追溯该方法的调用时机:
protected void populateBean(String beanName, RootBeanDefinition mbd, @Nullable BeanWrapper bw) {

   // 省略

   // 执行postProcessAfterInstantiation方法
   if (!mbd.isSynthetic() && hasInstantiationAwareBeanPostProcessors()) {
      for (InstantiationAwareBeanPostProcessor bp : getBeanPostProcessorCache().instantiationAware) {
         if (!bp.postProcessAfterInstantiation(bw.getWrappedInstance(), beanName)) {
            return;
         }
      }
   }

   // 省略

   // 容器是否注册了InstantiationAwareBeanPostProcessors
   boolean hasInstAwareBpps = hasInstantiationAwareBeanPostProcessors();
   // 是否进行依赖检查,默认为false
   boolean needsDepCheck = (mbd.getDependencyCheck() != AbstractBeanDefinition.DEPENDENCY_CHECK_NONE);

   if (hasInstAwareBpps) {
      if (pvs == null) {
         pvs = mbd.getPropertyValues();
      }
      for (InstantiationAwareBeanPostProcessor bp : getBeanPostProcessorCache().instantiationAware) {
         // 执行postProcessProperties方法
         PropertyValues pvsToUse = bp.postProcessProperties(pvs, bw.getWrappedInstance(), beanName);
         if (pvsToUse == null) {
            return;
         }
         pvs = pvsToUse;
      }
   }

}
可以看到postProcessAfterInstantiation方法是在populateBean方法中调用的,即实例化后进行属性赋值时调用

CommonAnnotationBeanPOstProcessor类中直接return true,让postProcessProperties方法可以执行
3)postProcessPropertyValues()
PropertyValues postProcessPropertyValues(PropertyValues pvs, Object bean, String beanName):对属性值进行修改,如果postProcessAfterInstantiation()方法返回false,该方法可能不会被调用。可以在该方法内对属性值进行修改。

可以看到AutowiredAnnotationBeanPostProcessor实现了这个方法,其实@Autowired、@Value、@Inject、@Resource注解标记的属性的值便是在这个时候进行注入
三、属性赋值——populateBean()
属性赋值逻辑在populateBean方法中执行,在该方法中其中除了执行上文讲到的postProcessAfterInstantiation()方法和postProcessPropertyValues()之外,还定义了以下方法:
protected void populateBean(String beanName, RootBeanDefinition mbd, @Nullable BeanWrapper bw) {

   // 省略

   // 执行postProcessAfterInstantiation方法

   PropertyValues pvs = (mbd.hasPropertyValues() ? mbd.getPropertyValues() : null);

   int resolvedAutowireMode = mbd.getResolvedAutowireMode();
   // 根据Bean配置的依赖注入方式完成注入,默认是0(不自动注入),即不走以下逻辑,所有的依赖注入都需要在xml文件中有显式的配置
   // 如果设置了相关的依赖装配方式,会遍历Bean中的属性,根据类型或名称来完成相应注入,无需额外配置
   if (resolvedAutowireMode == AUTOWIRE_BY_NAME || resolvedAutowireMode == AUTOWIRE_BY_TYPE) {
      MutablePropertyValues newPvs = new MutablePropertyValues(pvs);
      // Add property values based on autowire by name if applicable.
      if (resolvedAutowireMode == AUTOWIRE_BY_NAME) {
         autowireByName(beanName, mbd, bw, newPvs);
      }
      // Add property values based on autowire by type if applicable.
      if (resolvedAutowireMode == AUTOWIRE_BY_TYPE) {
         autowireByType(beanName, mbd, bw, newPvs);
      }
      pvs = newPvs;
   }

   // 省略,执行postProcessPropertyValues()方法

   // 检查是否满足相关依赖关系,对应的depends-on属性,需要确保所有依赖的Bean先完成初始化
   if (needsDepCheck) {
       PropertyDescriptor[] filteredPds = filterPropertyDescriptorsForDependencyCheck(bw, mbd.allowCaching);
       checkDependencies(beanName, mbd, filteredPds, pvs);
   }

   if (pvs != null) {
      // 通过反射真正将属性赋值
      applyPropertyValues(beanName, mbd, bw, pvs);
   }
}
这部分的主要逻辑如下:
- 执行InstantiationAwareBeanPostProcessor实现类的postProcessAfterInstantiation()方法
- 解析依赖注入的方式,将属性装配到PropertyValues中: resolvedAutowireMode
- 执行InstantiationAwareBeanPostProcessor实现类的postProcessProperties()方法: 对@AutoWired等注解标记的属性进行依赖注入
- 依赖检查: checkDependencies,确保所有依赖的Bean先完成初始化
- 将解析的值用BeanWrapper进行包装: applyPropertyValues
注意事项:
即对Bean进行自动装配,不过一般以注解的形式,默认都解析为0(即AUTOWIRE_NO),也就是没有显式配置自动装配策略。通常是在XML配置文件中显式指定了
autowired或者在Java配置类中@Bean上,声明autowired属性才会执行这部分逻辑需要注意的是@Autowired等注解所对应的属性填充并不在
autowireByName和autowireByType中,而是在AutowiredAnnotationBeanPostProcessor这个后置处理器的postProcessProperties中。@Autowired在进行自动装配的过程中,默认按照"byType"的方式进行Bean加载,如果出现无法挑选出合适的Bean的情况,再将属性名与候选Bean名单中的beanName进行对比正确地声明
@Primary和@Order等注解让Bean在多态的选举中优选胜出(否则对于一个接口的多个实现将无法确定注入哪一个实现)做属性填充时,如果当前的Bean实例依赖的成员(另一个Bean)未被加载,会进入选举候选名单的逻辑中进行各种判断后,选出最适合的Bean实例进行
getBean操作
四、初始化——initializeBean()
populateBean() 方法执行完成之后,Bean中的依赖就都填充好了,而 initializeBean() 方法是进一步对Bean进行扩展和增强:
protected Object initializeBean(String beanName, Object bean, @Nullable RootBeanDefinition mbd) {
   invokeAwareMethods(beanName, bean);

   Object wrappedBean = bean;
   if (mbd == null || !mbd.isSynthetic()) {
      wrappedBean = applyBeanPostProcessorsBeforeInitialization(wrappedBean, beanName);
   }

   try {
      invokeInitMethods(beanName, wrappedBean, mbd);
   }
   catch (Throwable ex) {
      throw new BeanCreationException(
            (mbd != null ? mbd.getResourceDescription() : null), beanName, ex.getMessage(), ex);
   }
   if (mbd == null || !mbd.isSynthetic()) {
      wrappedBean = applyBeanPostProcessorsAfterInitialization(wrappedBean, beanName);
   }

   return wrappedBean;
}
可以看到该方法分别调用了以下几个方法:
- invokeAwareMethods()
- applyBeanPostProcessorsBeforeInitialization()
- invokeInitMethods()
- applyBeanPostProcessorsAfterInitialization()
1、invokeAwareMethods()
Aware 是一个空接口,具体的接口定义由子类实现,通常用于属性设置。如BeanNameAware接口则用于设置beanName属性(该接口要求实现一个setBeanName()方法),ApplicationContextAware接口则用于设置ApplicationContext属性(该接口要求实现一个seApplicationContext()方法)。功能的实现主要就是在invokeAwareMethods方法中
private void invokeAwareMethods(String beanName, Object bean) {
   if (bean instanceof Aware) {
      if (bean instanceof BeanNameAware) {
         ((BeanNameAware) bean).setBeanName(beanName);
      }
      if (bean instanceof BeanClassLoaderAware) {
         ClassLoader bcl = getBeanClassLoader();
         if (bcl != null) {
            ((BeanClassLoaderAware) bean).setBeanClassLoader(bcl);
         }
      }
      if (bean instanceof BeanFactoryAware) {
         ((BeanFactoryAware) bean).setBeanFactory(AbstractAutowireCapableBeanFactory.this);
      }
   }
}
这部分的逻辑非常简单,其实就是判断bean是否实现了这些相关的aware接口,如果实现了就调用对应的set方法进行相关属性的赋值
2、applyBeanPostProcessorsBeforeInitialization()
实例化前后我们调用了InstallationAwareBeanPostProcessor接口的三个方法,而在初始化过程前后我们也有相应的接口方法需要调用,这个接口便是BeanPostProcessor——Bean的后置处理器
BeanPostProcessor定义了两个方法,分别是postProcessorsBeforeInitialization()和postProcessorsAfterInitialization()
public interface BeanPostProcessor {

	@Nullable
	default Object postProcessBeforeInitialization(Object bean, String beanName) throws BeansException {
		return bean;
	}

	@Nullable
	default Object postProcessAfterInitialization(Object bean, String beanName) throws BeansException {
		return bean;
	}

}
该接口允许在bean初始化的前后对bean做定制化的修改,最常见的应用就是AOP的实现。
除了AOP的实现,@PostConstruct和@PreDestroy注解的处理也是定义在后置处理器中(CommonAnnotationBeanPostProcessor的父类InitDestroyAnnotationBeanPostProcessor),分别定义在postProcessBeforeInitialization方法中和postProcessBeforeDestruction()方法中
如果想在生成对象时完成某些初始化操作,而偏偏这些初始化操作又依赖于依赖注入,那么就无法在构造函数中实现(因为@Autowired注入是发生在构造方法执行完之后的)。为此,可以使用@PostConstruct注解一个方法来完成初始化,@PostConstruct注解的方法将会在依赖注入完成后调用。即Constructor -> @Autowired -> @PostConstruct
而applyBeanPostProcessorsBeforeInitialization方法便是用于调用这个后置处理器中的postProcessorsBeforeInitialization()
public Object applyBeanPostProcessorsBeforeInitialization(Object existingBean, String beanName)
      throws BeansException {

   Object result = existingBean;
   for (BeanPostProcessor processor : getBeanPostProcessors()) {
      Object current = processor.postProcessBeforeInitialization(result, beanName);
      if (current == null) {
         return result;
      }
      result = current;
   }
   return result;
}
可以看到它遍历了所有的后置处理器(在refresh方法中可以看到后置处理器是在前面已经完成注册了),随后便是将当前bean传入进去调用其中的postProcessorsBeforeInitialization()方法对bean进行修改。
3、invokeInitMethods()
InitializingBean是Spring提供的拓展性接口,InitializingBean接口为bean提供了属性初始化后的处理方法,它只有一个afterPropertiesSet方法,凡是继承该接口的类,在bean的属性初始化后都会执行该方法。
protected void invokeInitMethods(String beanName, Object bean, @Nullable RootBeanDefinition mbd)
      throws Throwable {

   boolean isInitializingBean = (bean instanceof InitializingBean);
   if (isInitializingBean && (mbd == null || !mbd.hasAnyExternallyManagedInitMethod("afterPropertiesSet"))) {
      if (logger.isTraceEnabled()) {
         logger.trace("Invoking afterPropertiesSet() on bean with name '" + beanName + "'");
      }
      ((InitializingBean) bean).afterPropertiesSet();
   }

   if (mbd != null && bean.getClass() != NullBean.class) {
      String[] initMethodNames = mbd.getInitMethodNames();
      if (initMethodNames != null) {
         for (String initMethodName : initMethodNames) {
            if (StringUtils.hasLength(initMethodName) &&
                  !(isInitializingBean && "afterPropertiesSet".equals(initMethodName)) &&
                  !mbd.hasAnyExternallyManagedInitMethod(initMethodName)) {
               // 进一步查看该方法的源码,可以发现init-method方法中指定的方法是通过反射实现
               invokeCustomInitMethod(beanName, bean, mbd, initMethodName);
            }
         }
      }
   }
}
可以看到该方法中便是检查了Bean是否实现InitializingBean接口,如果实现则调用其中的afterPropertiesSet()方法
随后又判断了Bean是否指定init-method方法(定义在xml配置文件中),如果指定了init-method方法,则再调用指定的init-method
4、applyBeanPostProcessorsAfterInitialization()
public Object applyBeanPostProcessorsAfterInitialization(Object existingBean, String beanName)
      throws BeansException {

   Object result = existingBean;
   for (BeanPostProcessor processor : getBeanPostProcessors()) {
      Object current = processor.postProcessAfterInitialization(result, beanName);
      if (current == null) {
         return result;
      }
      result = current;
   }
   return result;
}
可以看到此处其实也是同理遍历所有后置处理器,调用其中的postProcessorsAfterInitialization方法对bean进行修改
五、销毁——Destruction
经过以上的工作以后,Bean的初始化就结束了,Bean将一直驻留在应用上下文中给应用使用,知道应用上下文被销毁。
销毁阶段是在容器关闭时调用的,在ConfigurableApplicationContext类的close()中
AbstractApplicationContext# close
public void close() {
   synchronized (this.startupShutdownMonitor) {
      doClose();
      // If we registered a JVM shutdown hook, we don't need it anymore now:
      // We've already explicitly closed the context.
      if (this.shutdownHook != null) {
         try {
            Runtime.getRuntime().removeShutdownHook(this.shutdownHook);
         }
         catch (IllegalStateException ex) {
            // ignore - VM is already shutting down
         }
      }
   }
}
protected void doClose() {
   // Check whether an actual close attempt is necessary...
   // 检查上下文是否处于激活状态
   if (this.active.get() && this.closed.compareAndSet(false, true)) {
      if (logger.isDebugEnabled()) {
         logger.debug("Closing " + this);
      }

      // 发布上下文已关闭事件 ContextClosedEvent
      try {
         // Publish shutdown event.
         publishEvent(new ContextClosedEvent(this));
      }
      catch (Throwable ex) {
         logger.warn("Exception thrown from ApplicationListener handling ContextClosedEvent", ex);
      }

      // Stop all Lifecycle beans, to avoid delays during individual destruction.
      // 调用生命周期管理器的 onClose() 方法,终止对容器中各个bean的生命周期管理
      if (this.lifecycleProcessor != null) {
         try {
            this.lifecycleProcessor.onClose();
         }
         catch (Throwable ex) {
            logger.warn("Exception thrown from LifecycleProcessor on context close", ex);
         }
      }

      // Destroy all cached singletons in the context's BeanFactory.
      // 销毁容器中所有的(单例)bean
      destroyBeans();

      // Close the state of this context itself.
      // 关闭内置的beanFactory
      closeBeanFactory();

      // Let subclasses do some final clean-up if they wish...
      // 预留的扩展点,在关闭beanFactory后做一些额外操作
      onClose();

      // Reset local application listeners to pre-refresh state.
      // 重置存储监听器的2个成员变量
      if (this.earlyApplicationListeners != null) {
         this.applicationListeners.clear();
         this.applicationListeners.addAll(this.earlyApplicationListeners);
      }

      // Switch to inactive.
      // 设置上下文的激活状态为false
      this.active.set(false);
   }
}
主要逻辑如下:
- 检查上下文是否处于激活状态,激活才会执行后续操作
- 移除上下文的注册
- 发布上下文已关闭事件
- 终止对容器中各个bean的生命周期的管理
- 销毁容器中的所有单例bean:destroyBeans() -> getBeanFactory().destroySingletons()
- 关闭内置beanFactory
- 执行预留的onClose方法,在关闭beanFactory后做一些额外操作
- 充值存储监听器的两个成员变量
- 设置上下文的激活状态为已关闭
主要关注其中关于销毁容器中所有单例bean的方法destroyBeans(),方法中调用了getBeanFactory().destroySingletons()
public void destroySingletons() {
   if (logger.isTraceEnabled()) {
      logger.trace("Destroying singletons in " + this);
   }
   synchronized (this.singletonObjects) {
      this.singletonsCurrentlyInDestruction = true;
   }

   String[] disposableBeanNames;
   synchronized (this.disposableBeans) {
      disposableBeanNames = StringUtils.toStringArray(this.disposableBeans.keySet());
   }
   for (int i = disposableBeanNames.length - 1; i >= 0; i--) {
      // 对所有实现了DisposableBean接口的Bean调用该方法
      destroySingleton(disposableBeanNames[i]);
   }

   this.containedBeanMap.clear();
   this.dependentBeanMap.clear();
   this.dependenciesForBeanMap.clear();

   clearSingletonCache();
}
在其中主要关注destroySingleton()方法
public void destroySingleton(String beanName) {
   // Remove a registered singleton of the given name, if any.
   removeSingleton(beanName);

   // Destroy the corresponding DisposableBean instance.
   DisposableBean disposableBean;
   synchronized (this.disposableBeans) {
      disposableBean = (DisposableBean) this.disposableBeans.remove(beanName);
   }
   destroyBean(beanName, disposableBean);
}
在其中主要关注destroyBean()方法
protected void destroyBean(String beanName, @Nullable DisposableBean bean) {

   // 省略

   // Actually destroy the bean now...
   if (bean != null) {
      try {
         // 真正销毁的地方,会调用到DisposableBeanAdapter中的destroy()方法
         bean.destroy();
      }
      catch (Throwable ex) {
         if (logger.isWarnEnabled()) {
            logger.warn("Destruction of bean with name '" + beanName + "' threw an exception", ex);
         }
      }
   }

   // 省略
}
来到DisposableBeanAdapter# destroy()
public void destroy() {
   if (!CollectionUtils.isEmpty(this.beanPostProcessors)) {
      // 遍历所有DestructionAwareBeanPostProcessor后置处理器
      for (DestructionAwareBeanPostProcessor processor : this.beanPostProcessors) {
         // 调用其中的方法postProcessBeforeDestruction方法
         // InitDestroyAnnotationBeanPostProcessor是其中一个实现,其定义了对@PreDestroy注解的处理
         processor.postProcessBeforeDestruction(this.bean, this.beanName);
      }
   }

   if (this.invokeDisposableBean) {
      if (logger.isTraceEnabled()) {
         logger.trace("Invoking destroy() on bean with name '" + this.beanName + "'");
      }
      try {
         // 调用DisposableBean接口的destroy方法
         ((DisposableBean) this.bean).destroy();
      }
      catch (Throwable ex) {
         String msg = "Invocation of destroy method failed on bean with name '" + this.beanName + "'";
         if (logger.isDebugEnabled()) {
            logger.warn(msg, ex);
         }
         else {
            logger.warn(msg + ": " + ex);
         }
      }
   }

   if (this.invokeAutoCloseable) {
      if (logger.isTraceEnabled()) {
         logger.trace("Invoking close() on bean with name '" + this.beanName + "'");
      }
      try {
         ((AutoCloseable) this.bean).close();
      }
      catch (Throwable ex) {
         String msg = "Invocation of close method failed on bean with name '" + this.beanName + "'";
         if (logger.isDebugEnabled()) {
            logger.warn(msg, ex);
         }
         else {
            logger.warn(msg + ": " + ex);
         }
      }
   }
   else if (this.destroyMethods != null) {
      // 如果配置了destroyMethod,则调用
      for (Method destroyMethod : this.destroyMethods) {
         invokeCustomDestroyMethod(destroyMethod);
      }
   }
   else if (this.destroyMethodNames != null) {
      // 设置了destroyMethodNames,则通过name找到方法进行调用
      for (String destroyMethodName: this.destroyMethodNames) {
         Method destroyMethod = determineDestroyMethod(destroyMethodName);
         if (destroyMethod != null) {
            invokeCustomDestroyMethod(
                  ClassUtils.getInterfaceMethodIfPossible(destroyMethod, this.bean.getClass()));
         }
      }
   }
}
到这里我们终于开始真正的逻辑处理
- 首先会调用所有DestructionAwareBeanPostProcessor后置处理器的postProcessBeforeDestruction方法,主要是用来处理@PreDestroy注解标注的方法
- 对于实现了DisposableBean接口的Bean,会调用其中的destroy方法
- 调用自定义销毁方法
- XML中配置的destroy-method
- @Bean注解中定义的destroy属性
- AbstractBeanDefinition类中的setDestroyMethodNames(String)方法
至此完成Bean的全部生命周期
六、测试与总结
Bean的定义
public class MyBean implements InitializingBean, BeanNameAware, DisposableBean {

    private UserService userService;

    private String beanName;

    private String normalAttribute;

    public MyBean(UserService userService, String beanName, String normalAttribute) {
        System.out.println("调用有参构造函数,传入的userService为" + userService);
        this.userService = userService;
        this.beanName = beanName;
        this.normalAttribute = normalAttribute;
    }

    public MyBean() {
        System.out.println("调用无参构造函数");
    }

    @PostConstruct
    public void postConstruct() {
        System.out.println("调用@PostConstruct注解标记的方法");
    }

    @PreDestroy
    public void preDestroy() {
        System.out.println("调用@PreDestroy注解标记的方法");
    }

    @Override
    public void afterPropertiesSet() throws Exception {
        System.out.println("调用InitializingBean接口中定义的afterPropertiesSet方法");
    }

    public void initMethod() {
        System.out.println("调用xml配置文件中定义的initMethod方法");
    }

    public void destroyMethod() {
        System.out.println("调用xml配置文件中定义的destroyMethod方法");
    }

    public void setUserService(UserService userService) {
        System.out.println("为userService属性赋值为" + userService);
        this.userService = userService;
    }

    public void setNormalAttribute(String normalAttribute) {
        System.out.println("为normalAttribute属性赋值为" + normalAttribute);
        this.normalAttribute = normalAttribute;
    }

    @Override
    public void setBeanName(@NotNull String name) {
        System.out.println("调用BeanNameAware接口中定义的setBeanName方法,将beanName属性赋值为" + name);
        this.beanName = name;
    }

    @Override
    public void destroy() throws Exception {
        System.out.println("调用DisposableBean接口中的destroy方法");
    }

    @Override
    public String toString() {
        return "MyBean{" +
                "userService=" + userService +
                ", beanName='" + beanName + '\'' +
                ", normalAttribute='" + normalAttribute + '\'' +
                '}';
    }
}
BeanFactory的后置处理器
@Component
public class MyBeanFactoryPostProcessor implements BeanFactoryPostProcessor {

    public MyBeanFactoryPostProcessor() {
        System.out.println("创建BeanFactoryPostProcessor");
    }

    @Override
    public void postProcessBeanFactory(ConfigurableListableBeanFactory beanFactory) throws BeansException {
        System.out.println("调用BeanFactoryPostProcessor接口定义的postProcessBeanFactory方法");
        System.out.println("当前容器中bean:" + Arrays.toString(beanFactory.getSingletonNames()));
    }
}
定制实例化前后修改Bean的后置处理器
@Component
public class MyInstantiationAwareBeanPostProcessor implements InstantiationAwareBeanPostProcessor {

    public MyInstantiationAwareBeanPostProcessor() {
        System.out.println("创建InstantiationAwareBeanPostProcessor");
    }

    @Override
    public Object postProcessBeforeInstantiation(Class<?> beanClass, String beanName) throws BeansException {
        System.out.println("调用InstantiationAwareBeanPostProcessor接口中定义的postProcessBeforeInstantiation方法");
        return InstantiationAwareBeanPostProcessor.super.postProcessBeforeInstantiation(beanClass, beanName);
    }

    @Override
    public boolean postProcessAfterInstantiation(Object bean, String beanName) throws BeansException {
        if (bean instanceof MyBean) {
            System.out.println("调用InstantiationAwareBeanPostProcessor接口中定义的postProcessAfterInstantiation方法");
        }
        return InstantiationAwareBeanPostProcessor.super.postProcessAfterInstantiation(bean, beanName);
    }

    @Override
    public PropertyValues postProcessProperties(PropertyValues pvs, Object bean, String beanName) throws BeansException {
        if (bean instanceof MyBean) {
            System.out.println("调用InstantiationAwareBeanPostProcessor接口中定义的postProcessProperties方法");
        }
        return InstantiationAwareBeanPostProcessor.super.postProcessProperties(pvs, bean, beanName);
    }
}
定制初始化前后修改Bean的后置处理器
@Component
public class MyBeanPostProcessor implements BeanPostProcessor {

    public MyBeanPostProcessor() {
        System.out.println("创建MyBeanPostProcessor");
    }

    @Override
    public Object postProcessBeforeInitialization(Object bean, String beanName) throws BeansException {
        if (bean instanceof MyBean) {
            System.out.println("调用BeanPostProcessor接口中定义的postProcessBeforeInitialization方法");
        }
        return BeanPostProcessor.super.postProcessBeforeInitialization(bean, beanName);
    }

    @Override
    public Object postProcessAfterInitialization(Object bean, String beanName) throws BeansException {
        if (bean instanceof MyBean) {
            System.out.println("调用BeanPostProcessor接口中定义的postProcessAfterInitialization方法");
        }
        return BeanPostProcessor.super.postProcessAfterInitialization(bean, beanName);
    }
}
定制Bean销毁方式的后置处理器
@Component
public class MyDestructionAwareBeanPostProcessor implements DestructionAwareBeanPostProcessor {

    public MyDestructionAwareBeanPostProcessor() {
        System.out.println("创建MyDestructionAwareBeanPostProcessor");
    }

    @Override
    public void postProcessBeforeDestruction(Object bean, String beanName) throws BeansException {
        if (bean instanceof MyBean) {
            System.out.println("调用DestructionAwareBeanPostProcessor接口中定义的postProcessBeforeDestruction方法");
        }
    }
}
依赖的另一个对象
public interface UserService {

}
依赖的另一个对象的一个实现
public class UserServiceImpl implements UserService {

    public UserServiceImpl() {
        System.out.println("创建UserServiceImpl");
    }
}
public class ExerciseApplication {

    public static void main(String[] args) {
        System.out.println("----------------开启容器初始化----------------");
        ClassPathXmlApplicationContext context = new ClassPathXmlApplicationContext("spring.xml");
        System.out.println("----------------容器初始化完毕----------------");
        System.out.println("当前容器中bean:" + Arrays.toString(context.getBeanDefinitionNames()));
        MyBean myBean = context.getBean("myBean", MyBean.class);
        System.out.println(myBean);
        System.out.println("----------------开始关闭容器----------------");
        context.destroy();
    }
}
输出结果
<?xml version="1.0" encoding="UTF-8"?>
<beans xmlns="http://www.springframework.org/schema/beans"
       xmlns:xsi="http://www.w3.org/2001/XMLSchema-instance"
       xmlns:context="http://www.springframework.org/schema/context"
       xsi:schemaLocation="http://www.springframework.org/schema/beans http://www.springframework.org/schema/beans/spring-beans.xsd http://www.springframework.org/schema/context https://www.springframework.org/schema/context/spring-context.xsd">

    <bean class="cn.ken.exercise.lifecycle.MyBean" name="myBean" destroy-method="destroyMethod" init-method="initMethod">

    </bean>

    <bean class="cn.ken.exercise.service.impl.UserServiceImpl" id="userService"/>

    <context:component-scan base-package="cn.ken.exercise"/>

</beans>
----------------开启容器初始化----------------
创建BeanFactoryPostProcessor
调用BeanFactoryPostProcessor接口定义的postProcessBeanFactory方法
创建MyBeanPostProcessor
创建MyDestructionAwareBeanPostProcessor
创建InstantiationAwareBeanPostProcessor
调用InstantiationAwareBeanPostProcessor接口中定义的postProcessBeforeInstantiation方法
调用无参构造函数
调用InstantiationAwareBeanPostProcessor接口中定义的postProcessAfterInstantiation方法
调用InstantiationAwareBeanPostProcessor接口中定义的postProcessProperties方法
调用BeanNameAware接口中定义的setBeanName方法,将beanName属性赋值为myBean
调用BeanPostProcessor接口中定义的postProcessBeforeInitialization方法
调用@PostConstruct注解标记的方法
调用InitializingBean接口中定义的afterPropertiesSet方法
调用xml配置文件中定义的initMethod方法
调用BeanPostProcessor接口中定义的postProcessAfterInitialization方法
调用InstantiationAwareBeanPostProcessor接口中定义的postProcessBeforeInstantiation方法
创建UserServiceImpl
----------------容器初始化完毕----------------
当前容器中bean:[myBean, userService, myBeanFactoryPostProcessor, myBeanPostProcessor, myDestructionAwareBeanPostProcessor, myInstantiationAwareBeanPostProcessor, org.springframework.context.annotation.internalConfigurationAnnotationProcessor, org.springframework.context.annotation.internalAutowiredAnnotationProcessor, org.springframework.context.annotation.internalCommonAnnotationProcessor, org.springframework.context.event.internalEventListenerProcessor, org.springframework.context.event.internalEventListenerFactory]
MyBean{userService=null, beanName='myBean', normalAttribute='null'}
----------------开始关闭容器----------------
调用DestructionAwareBeanPostProcessor接口中定义的postProcessBeforeDestruction方法
调用@PreDestroy注解标记的方法
调用DisposableBean接口中的destroy方法
调用xml配置文件中定义的destroyMethod方法
从中可以清晰地看出Bean完整的生命周期
<?xml version="1.0" encoding="UTF-8"?>
<beans xmlns="http://www.springframework.org/schema/beans"
       xmlns:xsi="http://www.w3.org/2001/XMLSchema-instance"
       xmlns:context="http://www.springframework.org/schema/context"
       xsi:schemaLocation="http://www.springframework.org/schema/beans http://www.springframework.org/schema/beans/spring-beans.xsd http://www.springframework.org/schema/context https://www.springframework.org/schema/context/spring-context.xsd">

    <bean class="cn.ken.exercise.lifecycle.MyBean" name="myBean" destroy-method="destroyMethod" init-method="initMethod">
        <constructor-arg name="userService" ref="userService"/>
        <property name="normalAttribute" value="ken!"/>
    </bean>

    <bean class="cn.ken.exercise.service.impl.UserServiceImpl" id="userService"/>

    <context:component-scan base-package="cn.ken.exercise"/>

</beans>
----------------开启容器初始化----------------
创建BeanFactoryPostProcessor
调用BeanFactoryPostProcessor接口定义的postProcessBeanFactory方法
创建MyBeanPostProcessor
创建MyDestructionAwareBeanPostProcessor
创建InstantiationAwareBeanPostProcessor
调用InstantiationAwareBeanPostProcessor接口中定义的postProcessBeforeInstantiation方法
创建UserServiceImpl
调用有参构造函数,传入的userService为cn.ken.exercise.service.impl.UserServiceImpl@6ce86ce1
调用InstantiationAwareBeanPostProcessor接口中定义的postProcessAfterInstantiation方法
调用InstantiationAwareBeanPostProcessor接口中定义的postProcessProperties方法
为normalAttribute属性赋值为ken!
调用BeanNameAware接口中定义的setBeanName方法,将beanName属性赋值为myBean
调用BeanPostProcessor接口中定义的postProcessBeforeInitialization方法
调用@PostConstruct注解标记的方法
调用InitializingBean接口中定义的afterPropertiesSet方法
调用xml配置文件中定义的initMethod方法
调用BeanPostProcessor接口中定义的postProcessAfterInitialization方法
调用InstantiationAwareBeanPostProcessor接口中定义的postProcessBeforeInstantiation方法
----------------容器初始化完毕----------------
当前容器中bean:[myBean, userService, myBeanFactoryPostProcessor, myBeanPostProcessor, myDestructionAwareBeanPostProcessor, myInstantiationAwareBeanPostProcessor, org.springframework.context.annotation.internalConfigurationAnnotationProcessor, org.springframework.context.annotation.internalAutowiredAnnotationProcessor, org.springframework.context.annotation.internalCommonAnnotationProcessor, org.springframework.context.event.internalEventListenerProcessor, org.springframework.context.event.internalEventListenerFactory]
MyBean{userService=null, beanName='myBean', normalAttribute='null'}
----------------开始关闭容器----------------
调用DestructionAwareBeanPostProcessor接口中定义的postProcessBeforeDestruction方法
调用@PreDestroy注解标记的方法
调用DisposableBean接口中的destroy方法
调用xml配置文件中定义的destroyMethod方法
可以看到调用了有参构造,使得UserServiceImpl提前创建了,同时也调用了set方法为normalAttribute属性赋值

可以对配置文件进行修改,体会不同构造方式导致的运行方式的差异,以更深的了解Bean的生命周期。
Processor
调用InstantiationAwareBeanPostProcessor接口中定义的postProcessBeforeInstantiation方法
创建UserServiceImpl
调用有参构造函数,传入的userService为cn.ken.exercise.service.impl.UserServiceImpl@6ce86ce1
调用InstantiationAwareBeanPostProcessor接口中定义的postProcessAfterInstantiation方法
调用InstantiationAwareBeanPostProcessor接口中定义的postProcessProperties方法
为normalAttribute属性赋值为ken!
调用BeanNameAware接口中定义的setBeanName方法,将beanName属性赋值为myBean
调用BeanPostProcessor接口中定义的postProcessBeforeInitialization方法
调用@PostConstruct注解标记的方法
调用InitializingBean接口中定义的afterPropertiesSet方法
调用xml配置文件中定义的initMethod方法
调用BeanPostProcessor接口中定义的postProcessAfterInitialization方法
调用InstantiationAwareBeanPostProcessor接口中定义的postProcessBeforeInstantiation方法
----------------容器初始化完毕----------------
当前容器中bean:[myBean, userService, myBeanFactoryPostProcessor, myBeanPostProcessor, myDestructionAwareBeanPostProcessor, myInstantiationAwareBeanPostProcessor, org.springframework.context.annotation.internalConfigurationAnnotationProcessor, org.springframework.context.annotation.internalAutowiredAnnotationProcessor, org.springframework.context.annotation.internalCommonAnnotationProcessor, org.springframework.context.event.internalEventListenerProcessor, org.springframework.context.event.internalEventListenerFactory]
MyBean{userService=null, beanName=‘myBean’, normalAttribute=‘null’}
----------------开始关闭容器----------------
调用DestructionAwareBeanPostProcessor接口中定义的postProcessBeforeDestruction方法
调用@PreDestroy注解标记的方法
调用DisposableBean接口中的destroy方法
调用xml配置文件中定义的destroyMethod方法
可以看到调用了有参构造,使得UserServiceImpl提前创建了,同时也调用了set方法为normalAttribute属性赋值
可以对配置文件进行修改,体会不同构造方式导致的运行方式的差异,以更深的了解Bean的生命周期。


 2465
2465


 被折叠的 条评论
为什么被折叠?
被折叠的 条评论
为什么被折叠?
 到【灌水乐园】发言


