


paddleOCR link: https://github.com/PaddlePaddle/PaddleOCR
模型
neck部分:
- 错误:修改Eval 配置 DetResizeForTest:image_shape: [1000, 1000]报错
- 原因:图片resize后,in4 = self.in4_conv(c4)卷积后,[1, 256, 63, 63] 3,4维不一定是64,out4 = in4 + F.upsample(in5, scale_factor=2, mode="nearest", align_mode=1)维度不一样,无法相加。
File "/data/root/PaddleOCR2.5/ppocr/modeling/architectures/base_model.py", line 82, in forward
    x = self.neck(x)
  File "/opt/conda/lib/python3.8/site-packages/paddle/fluid/dygraph/layers.py", line 917, in __call__
    return self._dygraph_call_func(*inputs, **kwargs)
  File "/opt/conda/lib/python3.8/site-packages/paddle/fluid/dygraph/layers.py", line 907, in _dygraph_call_func
    outputs = self.forward(*inputs, **kwargs)
  File "/data/root/PaddleOCR2.5/ppocr/modeling/necks/db_fpn.py", line 174, in forward
    out4 = in4 + F.upsample(
  File "/opt/conda/lib/python3.8/site-packages/paddle/fluid/dygraph/math_op_patch.py", line 264, in __impl__
    return math_op(self, other_var, 'axis', axis)
ValueError: (InvalidArgument) Broadcast dimension mismatch. Operands could not be broadcast together with the shape of X = [1, 256, 63, 63] and the shape of Y = [1, 256, 64, 64]. Received [63] in X i     s not equal to [64] in Y at i:2.
  [Hint: Expected x_dims_array[i] == y_dims_array[i] || x_dims_array[i] <= 1 || y_dims_array[i] <= 1 == true, but received x_dims_array[i] == y_dims_array[i] || x_dims_array[i] <= 1 || y_dims_array[i     ] <= 1:0 != true:1.] (at /paddle/paddle/fluid/operators/elementwise/elementwise_op_function.h:240)
  [operator < elementwise_add > error]
对应的代码:
位置:PaddleOCR2.5/ppocr/modeling/necks/db_fpn.py
- 修正1:为保证卷积后int4维度和上采样int5后维度一致,int4需补差值
    def forward(self, x):
        #print('run FPN')
        c2, c3, c4, c5 = x #backbone的输出x2,x3,x4,x5  c2:[1, 64, 160, 160], c3:[1, 128, 80, 80], c4:[1, 256, 40, 40], c5:[1, 512, 20, 20]
        # Top-down
        p5 = self.reduce_conv_c5(c5) #[1, 512, 20, 20]->[1, 64, 20, 20]
        p4 = self._upsample_add(p5, self.reduce_conv_c4(c4)) # p4 & reduce_conv_c4(c4):[1, 64, 40, 40]
        p4 = self.smooth_p4(p4) #[1, 64, 40, 40]
        p3 = self._upsample_add(p4, self.reduce_conv_c3(c3))#reduce_conv_c3(c3):[1, 64, 80, 80]
        p3 = self.smooth_p3(p3) #[1, 64, 80, 80]
        p2 = self._upsample_add(p3, self.reduce_conv_c2(c2))
        p2 = self.smooth_p2(p2) #[1, 64, 160, 160]

        x = self._upsample_cat(p2, p3, p4, p5) #[1, 256, 160, 160]
        x = self.conv(x)
        return x
# 把x差值变大到y的大小,再相加
def _upsample_add(self, x, y):
return F.interpolate(x, size=y.size()[2:],mode='bilinear',align_corners=True) + y- 修正2:将图像大小调整为网络所需的32倍大小,原代码无需修改
前处理
图片resize:
- Eval 配置 DetResizeForTest,不同方式resize图片
class DetResizeForTest(object):
    def __init__(self, **kwargs):
        super(DetResizeForTest, self).__init__()
        self.resize_type = 0
        if 'image_shape' in kwargs:
            self.image_shape = kwargs['image_shape']
            self.resize_type = 1
        elif 'limit_side_len' in kwargs:
            self.limit_side_len = kwargs['limit_side_len']
            self.limit_type = kwargs.get('limit_type', 'min')
        elif 'resize_long' in kwargs:
            self.resize_type = 2
            self.resize_long = kwargs.get('resize_long', 960)
        else:
            self.limit_side_len = 736
            self.limit_type = 'min'
对应的代码:
位置:PaddleOCR2.5/ppocr/data/imaug/operators.py
可视化MakeBorderMap:
class MakeBorderMap(object):
    def __init__(self,
                 shrink_ratio=0.4,
                 thresh_min=0.3,
                 thresh_max=0.7,
                 **kwargs):
        self.shrink_ratio = shrink_ratio
        self.thresh_min = thresh_min
        self.thresh_max = thresh_max

    def __call__(self, data):

        img = data['image']
        text_polys = data['polys']
        ignore_tags = data['ignore_tags']

        canvas = np.zeros(img.shape[:2], dtype=np.float32)
        mask = np.zeros(img.shape[:2], dtype=np.float32)

        for i in range(len(text_polys)):
            if ignore_tags[i]:
                continue
            self.draw_border_map(text_polys[i], canvas, mask=mask)
        canvas = canvas * (self.thresh_max - self.thresh_min) + self.thresh_min
        # 可视化代码
        import os
        canvas = cv2.cvtColor(np.array(canvas)*255, cv2.COLOR_GRAY2BGR)
        cv2.imwrite('/data/PaddleOCR2.5/temp_border_map/' + os.path.basename(data['img_path']), canvas)
        import shutil
        shutil.copyfile(data['img_path'],'/data/PaddleOCR2.5/temp_border_map/' + os.path.splitext(os.path.basename(data['img_path']))[0]+'_'+'.png')

        data['threshold_map'] = canvas
        data['threshold_mask'] = mask
        return data
对应的代码:
位置:PaddleOCR2.5\ppocr\data\imaug\make_border_map.py
图片读取:
- 错误:训练过程,图片读取报错Corrupt JPEG data: 2478 extraneous bytes before marker 0yuan
- 原因:图片实际格式与文件名后缀不一样,例如实际编码为GIF,后缀为png
训练策略
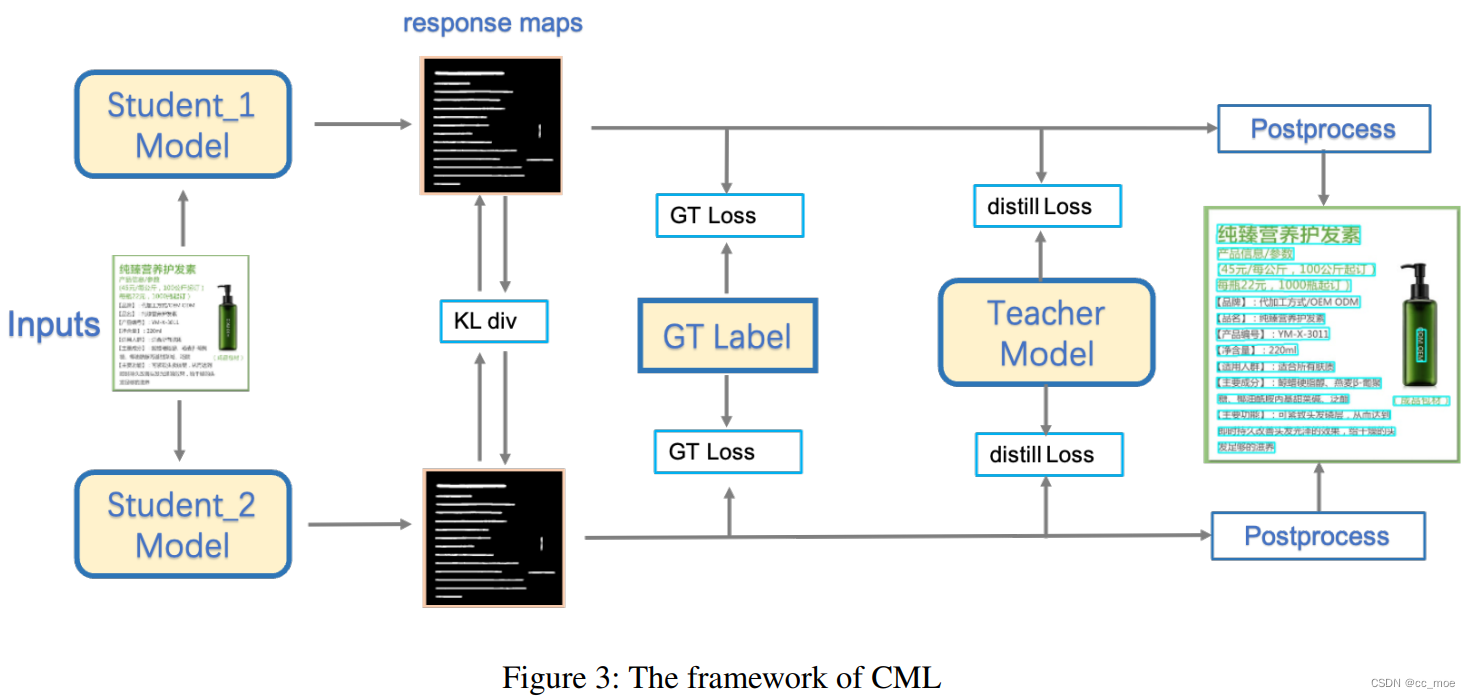
CML (Collaborative Mutual Learning)
- CML由三部分loss组成,公式(4)
![]()
- Lgt是DBLoss(student模型),包括概率图lp的loss、二值图lb的loss以及DB之后阈值图lt的loss。GTLoss的公式如下,其中lp、lb、lt分别为二元交叉熵损失,Dice损失和L1损失。α、β为超参数,默认值分别为5和10。

- 子学生模型DML方法相互学习,每次迭代都是同时训练子学生模型,以加快训练过程。利用KL散度计算学生模型之间的距离。计算thrink_maps的loss。学生模型之间的同伴损失(peer loss)如下:

link:KL散度理解以及使用pytorch计算KL散度 - 知乎
- 蒸馏损失如下,其中lp、lb分别为二元交叉熵损失、Dice loss。概率图lp的loss、二值图lb的loss。而超参数γ默认为5。fdila是核为矩阵[[1,1],[1,1]]的膨胀函数。
![]()
数据增强
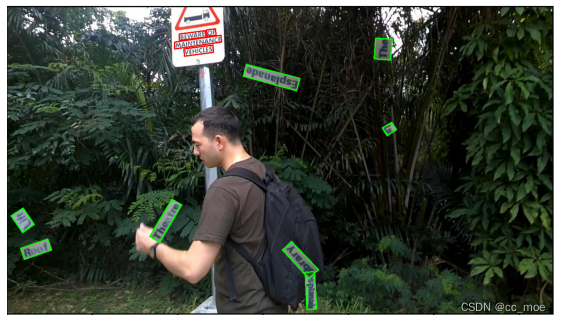
CopyPaste
CopyPaste是一种新的数据增强技巧,已被证明是有效的提高性能的对象检测和实例分割任务。它可以合成文本实例来平衡训练集中正样本和负样本的比例,这是传统的图像旋转、随机翻转和随机裁剪无法实现的。由于前景中的所有文本都是独立的,所以copyypaste在随机选择的背景图像上粘贴文本时不会重叠。图4是一个copypaste的例子。
评估
- Polygon(points).is_simple:点连线,相交则为Fasle。顺时针点和凹点为True
- paddle的GT point前处理:按照一张图点数最多的文本框的点,给其他文本框补点,补点为文本框各自最后一个点。
- 问题:导致评估代码,Polygon(points).is_simple=False,剔除所有补点的文本框,precision严重偏低
Polygon(points).is_simple

#测试
from shapely.geometry import Polygon
# points = [[269, 358], [403, 388.], [268, 383],[405, 363.]]#相交点
# points=[[269, 358], [405, 363.], [403, 388.], [268, 383]]#顺时针点
points = [[269, 358], [300,300],[405, 363.], [403, 388.], [268, 383]]#凹点
if not Polygon(points).is_valid or not Polygon(points).is_simple:
    print('self-intersections')
对应的代码:
位置:D:\PaddleOCR2.5\ppocr\metrics\eval_det_iou.py
- 修正:删除重复点
data = np.array([[1,8,3,3,4],
                 [1,8,9,9,4],
                 [1,8,3,3,4]])
 #删除整个数组的重复元素
uniques = np.unique(data)
print( uniques)
array([1, 3, 4, 8, 9])
 #删除重复行
uniques = np.unique(data,axis=0)
print( uniques)
array([[1,8,3,3,4],
	 [1,8,9,9,4]])
 #删除重复列
uniques = np.unique(data,axis=1)
Paddle2ONNX模型转化与预测
- 模型转换
使用 Paddle2ONNX 将Paddle静态图模型转换为ONNX模型格式:
paddle2onnx --model_dir ./inference/ch_PP-OCRv2_det_infer \
--model_filename inference.pdmodel \
--params_filename inference.pdiparams \
--save_file ./inference/det_onnx/model.onnx \
--opset_version 10 \
--input_shape_dict="{'x':[-1,3,-1,-1]}" \
--enable_onnx_checker True

paddle2onnx --model_dir ./inference/ch_PP-OCRv2_rec_infer \
--model_filename inference.pdmodel \
--params_filename inference.pdiparams \
--save_file ./inference/rec_onnx/model.onnx \
--opset_version 10 \
--input_shape_dict="{'x':[-1,3,-1,-1]}" \
--enable_onnx_checker True

paddle2onnx --model_dir ./inference/ch_ppocr_mobile_v2.0_cls_infer \
--model_filename ch_ppocr_mobile_v2.0_cls_infer/inference.pdmodel \
--params_filename ch_ppocr_mobile_v2.0_cls_infer/inference.pdiparams \
--save_file ./inferencecls_onnx/model.onnx \
--opset_version 10 \
--input_shape_dict="{'x':[-1,3,-1,-1]}" \
--enable_onnx_checker True
执行完毕后,ONNX 模型会被分别保存在 ./inference/det_onnx/,./inference/rec_onnx/,./inference/cls_onnx/路径下
- 注意:对于OCR模型,转化过程中必须采用动态shape的形式,即加入选项--input_shape_dict="{'x': [-1, 3, -1, -1]}",否则预测结果可能与直接使用Paddle预测有细微不同。
ONNX转TRT
- 模型转换
torch 转onnx需要配置动态的轴,onnx转trt需要配置各维度的动态尺寸范围
profile.set_shape(network.get_input(0).name, (1, 3, 1, 1), (16, 3, 1024, 1024), (16, 3, 1024, 1024))#min optim max
config.add_optimization_profile(profile)- cuda使用:
#指定可见cuda
os.environ["CUDA_VISIBLE_DEVICES"] = "2"
# 获取所有可见cuda,指定可见cuda中的第1张
import pycuda.autoinit
the other


 904
904


 被折叠的 条评论
为什么被折叠?
被折叠的 条评论
为什么被折叠?
 到【灌水乐园】发言


