


我的工程
需要ubuntu系统下用mxnet框架、2080Ti级别的12GB显存的GPU,用1060的6GB显存的显卡不行
其它参考链接
Unet代码试运行,这个好像只能分割细胞膜,对于日常生活的图片不行
利用Unet进行人体分割,这个分割的效果很差,有不规则黑白斑纹
制作UNet数据集
直接上手
在cmd \ anaconda prompt中下载标注工具:
pip install labelme同时注意label依赖pyqt5,pillow4.0.0或者6.0以上,pillow5.0.0不行。
下载后在cmd \ anaconda prompt下输入labelme可以直接打开此标注软件。
标注好数据后,要将此数据保存为json文件:
修改labelme/cli/json_to_dataset.py文件为:(如果你找不到这个文件可以在你的anaconda3\envs目录下搜索json_to_dataset.py,此代码经过修改,源作者:Jia_11)
# 来源:https://blog.csdn.net/u010103202/article/details/81635436
# encoding='utf-8'
import argparse
import json
import os
import os.path as osp
import warnings
import copy

import numpy as np
import PIL.Image
from skimage import io
import yaml

from labelme import utils

NAME_LABEL_MAP = {
    '_background_': 0,
    "people": 1
    # "ship": 2,
    # "storage_tank": 3,
    # "airplane": 4
}

LABEL_NAME_MAP = {
    0: '_background_',
    1: "people"
    # 2: "ship",
    # 3: "storage_tank",
    # 4: "airplane",
}


def main():
    parser = argparse.ArgumentParser()
    parser.add_argument('json_file')
    parser.add_argument('-o', '--out', default=None)
    args = parser.parse_args()

    json_file = args.json_file

    list = os.listdir(json_file)
    for i in range(0, len(list)):
        path = os.path.join(json_file, list[i])
        filename = list[i][:-5]       # .json
        if os.path.isfile(path):
            data = json.load(open(path))
            img = utils.image.img_b64_to_arr(data['imageData'])
            lbl, lbl_names = utils.shape.labelme_shapes_to_label(img.shape, data['shapes'])  # labelme_shapes_to_label

            # modify labels according to NAME_LABEL_MAP
            lbl_tmp = copy.copy(lbl)
            for key_name in lbl_names:
                old_lbl_val = lbl_names[key_name]
                new_lbl_val = NAME_LABEL_MAP[key_name]
                lbl_tmp[lbl == old_lbl_val] = new_lbl_val
            lbl_names_tmp = {}
            for key_name in lbl_names:
                lbl_names_tmp[key_name] = NAME_LABEL_MAP[key_name]

            # Assign the new label to lbl and lbl_names dict
            lbl = np.array(lbl_tmp, dtype=np.int8)
            lbl_names = lbl_names_tmp

            captions = ['%d: %s' % (l, name) for l, name in enumerate(lbl_names)]
            lbl_viz = utils.draw.draw_label(lbl, img, captions)
            out_dir = osp.basename(list[i]).replace('.', '_')
            out_dir = osp.join(osp.dirname(list[i]), out_dir)
            if not osp.exists(out_dir):
                os.mkdir(out_dir)

            PIL.Image.fromarray(img).save(osp.join(out_dir, '{}_src.png'.format(filename)))
            utils.lblsave(osp.join(out_dir, '{}.png'.format(filename)), lbl)
            PIL.Image.fromarray(lbl_viz).save(osp.join(out_dir, '{}_viz.png'.format(filename)))

            with open(osp.join(out_dir, 'label_names.txt'), 'w') as f:
                for lbl_name in lbl_names:
                    f.write(lbl_name + '\n')

            warnings.warn('info.yaml is being replaced by label_names.txt')
            info = dict(label_names=lbl_names)
            with open(osp.join(out_dir, 'info.yaml'), 'w') as f:
                yaml.safe_dump(info, f, default_flow_style=False)

            print('Saved to: %s' % out_dir)


if __name__ == '__main__':
    main()
cmd \ anaonda prompt下使用命令:
labelme_json_to_dataset <json目录>来转换json成png文件
转换之后,他会生成很多个文件夹,注意:这些文件夹都放在你的控制台当前目录,每个文件夹里存有目标分割的标注:xxx.png,还有源图片
再次使用博主Jia_11的代码并修改了一点:
import os
import random
import shutil
import re

GT_from_PATH = "./json"  # 你的那些存有目标分割标注图片的文件夹的父目录
GT_to_PATH = "./label"  # 寻找目标分割标注图片后放入的目录


def copy_file(from_dir, to_dir, Name_list):
    if not os.path.isdir(to_dir):
        os.mkdir(to_dir)
    # 1
    # name_list = os.listdir(from_dir)

    # # 2
    # sample = random.sample(pathDir, 2)
    # print(sample)

    # 3
    for name in Name_list:
        try:
            # print(name)
            if not os.path.isfile(os.path.join(from_dir, name)):
                print("{} is not existed".format(os.path.join(from_dir, name)))
            shutil.copy(os.path.join(from_dir, name), os.path.join(to_dir, name))
            # print("{} has copied to {}".format(os.path.join(from_dir, name), os.path.join(to_dir, name)))
        except:
            # print("failed to move {}".format(from_dir + name))
            pass
        # shutil.copyfile(fileDir+name, tarDir+name)
    print("{} has copied to {}".format(from_dir, to_dir))


if __name__ == '__main__':
    filepath_list = os.listdir(GT_from_PATH)
    # print(name_list)
    for i, file_path in enumerate(filepath_list):
        gt_path = "{}/{}.png".format(os.path.join(GT_from_PATH, filepath_list[i]), file_path[:-5])
        print("copy {} to ...".format(gt_path))
        gt_name = ["{}.png".format(file_path[:-5])]
        gt_file_path = os.path.join(GT_from_PATH, file_path)
        copy_file(gt_file_path, GT_to_PATH, gt_name)
直接运行,标注图片就会被拷贝到:GT_to_PATH/,里去。
试试专业标注工具ITK-Snap(这个软件不怎么好用,上手困难,所以我最后只用labelme来做分割标签)
制作UNet数据集的填坑记录
在上面这个网页里,我选用了labelme工具,安装方法参考它的github说明,如果你用window的anaconda的话,直接:
pip install labelmeanaconda prompt下输入labelme可以直接打开。
但是labelme标注生成的是json文件,我训练用的是png图片,所以要把json转换成png图片,参考这个:网址
按照他批量转换json的代码,我去修改了labelme目录下的json_to_dataset.py文件
Bug1:
new_lbl_val = NAME_LABEL_MAP[key_name] KeyError: 'people'solution:
根据上面那个网站的评论来看,需将'people'加入NAME_LABEL_MAP字典中,还有LABEL_NAME_MAP。
Bug2:
lbl_viz = colormap[lbl] IndexError: index 4 is out of bounds for axis 0 with size 2solution:
颜色列只有两列,我的NAME_LABEL_MAP字典和LABEL_NAME_MAP字典有超过了两列,这里我不知道怎么改,于是把类别减少到两类,背景和人类。
Bug3:使用命令labelme_json_to_dataset json目录来转换生成的xxx_gt.png图片全黑
solution:
参考labelme原来的代码,只要把该博主上面第2大块代码片的第77行改为:
utils.lblsave(osp.join(out_dir, '{}_gt.png'.format(filename)), lbl)就可以了,json转换成的xxx_gt.png图就不会全黑。
如果你看不懂,不知道在哪里改的话翻到这个网页,看下面我UryWu的评论。
Bug4:在使用命令labelme_json_to_dataset json目录,的时候,出现错误:
return loads(fp.read(),UnicodeDecodeError: 'gbk' codec can't decode byte 0xff in position 0: illegal multibyte sequence参考这几个网址的办法也解决不了:
https://blog.csdn.net/m0_37407756/article/details/80748895
https://blog.csdn.net/qq_37422923/article/details/80204917
https://blog.csdn.net/lqzdreamer/article/details/76549256
他们在json_to_dataset文件的:
![]() 这一行
这一行
改为:data = json.load(open(path, encoding='gb18030'))
或者:data = json.load(open(path, encoding='utf-8')) # utf-16,utf-32都试一下,但是没有用。
solution:
结果是因为json目录下面不能存在其他的文件,只能存在你的json文件。
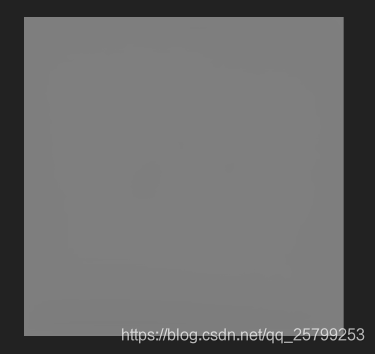
Bug5:U-net low contrast test images, predict output is grey box
description:
Unet预测的结果为灰色的方块:
UserWarning: data/people/test\3_predict.png is a low contrast image warn('%s is a low contrast image' % fname) solution:
出现这个警告:你的图像是低对比图像,目标分割不出来,估计要更多数据更多迭代来训练模型。警告在第几行你的第几个图片就预测为空白。
Bug6:generator_output = next(output_generator) StopIteration
solution:
出现这个错误:说明你的测试的图片数量没改对,翻上去改一下
Bug7:
ValueError: Dimension 0 in both shapes must be equal,
but are 3 and 64. Shapes are [3,3,1,64] and [64,3,3,3].
for 'Assign' (op: 'Assign') with input shapes: [3,3,1,64], [64,3,3,3].
solution:
我用灰色的图像训练时,没有出现这个问题,用‘rgb’的图片训练后,去测试出现这个问题,估计对测试数据的处理要改为‘rgb'的,就是改testGenerator
Unet测试人像目标分割填坑记录:
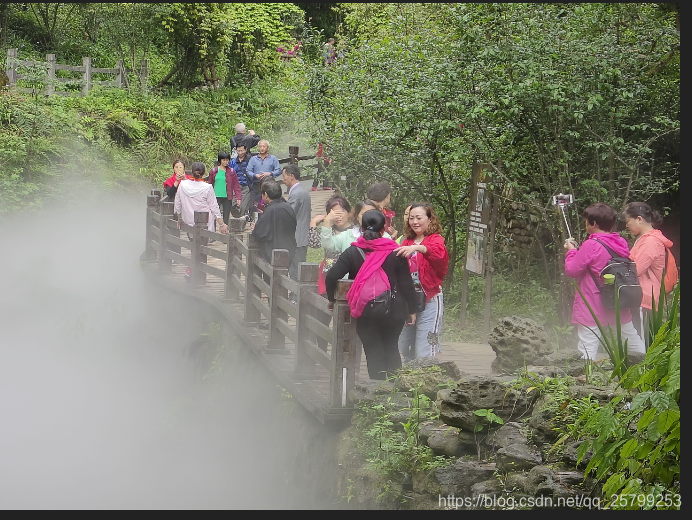
训练后,测试图片,原图:
目标分割的结果:
我非常疑惑,为什么分割的结果是灰色的,正常的结果应该是这样的:
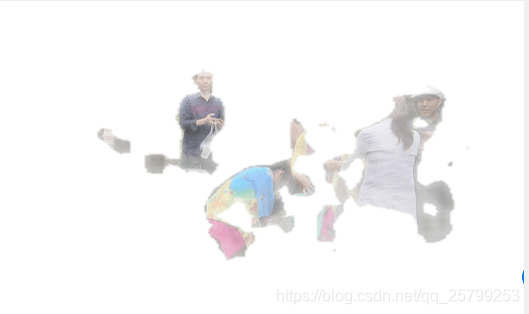

这个Unet工程的源代码对数据就只有转换为灰度图和压缩到512X512的处理,也没有其他的啊。但是运行它的Demo模型却是正常的没有错:
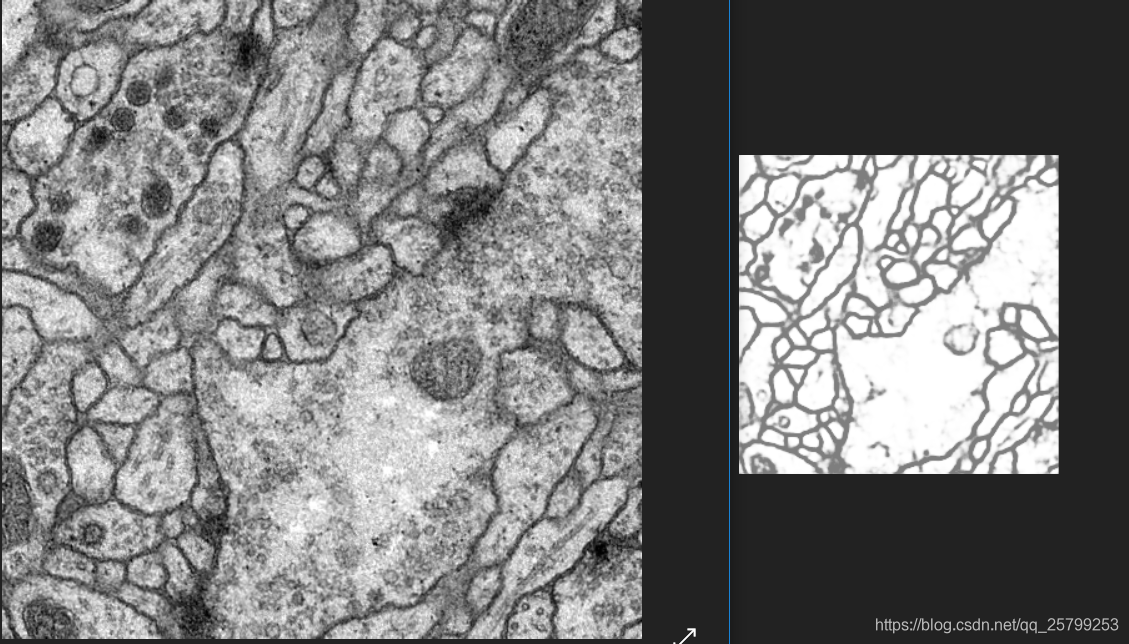
难道是他这个Unet工程:Unet代码试运行,只适用于边缘的勾勒,不适用于目标的分割?
使用友校的Unet工程:需要ubuntu系统下用mxnet框架、2080Ti级别的12GB显存的GPU,用1060的6GB显存的显卡不行 后,终于把人像分割出来。但是,他是用mxnet写的,我上面的工程都是keras写的,所以先跑一下他的代码,但有一些报错:
Bug1:
mxnet.base.MXNetError:
Error in operator unet0_conv10_deconvolution0:
[19:27:46] C:\Jenkins\workspace\mxnet-tag\mxnet\src\operator\nn\deconvolution.cc:131:
Check failed: dshape_nchw[1] % param_.num_group == 0U (511 vs. 0) : input num_filter must divide group sizeconv_1 = Conv(data, num_filter=7, kernel=(3, 3), pad=(1, 1), stride=(2, 2), name=“conv_1”) # 224/112
conv_2_dw = Conv(conv_1, num_group=7, num_filter=14, kernel=(3, 3), pad=(1, 1), stride=(1, 1), name=“conv_2_dw”) 看这两层网络的参数:conv_2_dw的num_group等于conv_1的num_filter,conv_2_dw的num_filter等于conv_2_dw的num_group的倍数
所以说,这里本层卷积的channels必须是groups的倍数,下一层卷积的groups必须等于上一层卷积的channels
但是这个解决方法没用:(
sulotion2:
出现上面的错误的时候我的mxnet版本为1.5.0,更换了1.4.0后,终于过了这个奇葩的错误,因为我根本就没错。
但是出现新的问题:
File "G:/MXnet-Unet/train_net.py", line 100,
in <module> net.collect_params().initialize(ctx=ctx)
mxnet.base.MXNetError: [18:47:58]
C:\Jenkins\workspace\mxnet-tag\mxnet\src\ndarray\ndarray.cc:1279: GPU is not enabled参照此网址,使用命令:pip install mxnet-cu80==1.0.0 更换另一个版本mxnet之后出现了找不到mxnet模块的错误,很无语出现这种奇葩的错误。我又试了mxnet-cu80==1.4.0也没用
看了此网址,才知道这个mxnet-cu80的80是指cuda,本机的cuda是9.0的,于是我卸载了80安装了mxnet-cu90==1.4.0 终于可以运行了
但是报错:
    raise MXNetError(py_str(_LIB.MXGetLastError()))
mxnet.base.MXNetError: [21:43:07]
c:\jenkins\workspace\mxnet-tag\mxnet\src\operator\nn\./cudnn/cudnn_activation-inl.h:129:
 Check failed: e == CUDNN_STATUS_SUCCESS (8 vs. 0) cuDNN: CUDNN_STATUS_EXECUTION_FAILED
但是使用CPU版的mxnet==1.4.0则报错:
  mxnet.base.MXNetError: [21:39:38]
c:\jenkins\workspace\mxnet-tag\mxnet\src\storage\./cpu_device_storage.h:70:
Failed to allocate CPU Memory刚刚看了这个网站
安装mxnet-cu90是GPU版本,安装mxnet是CPU版本,也就是说不加-cux0的后缀参数就是默认安装的CPU版本的mxnet。
于是我安装了ubuntu-16.04LTS作为双系统之一,并用了mxnet-cu90==1.4.0,终于有了更大的进展,现在遇到错误:
Bug2:导出模型结构的 json 文件时出现了如下的错误提示:
RuntimeError: Please first call block.hybridize() and then run forward with this block at least once before calling export.reference:
mxnet训练模型、导出模型、加载模型 进行预测(python和C++)
solution:
只要在导出模型前
net.hybridize()  # 导出模型前先hybridize一下
x_test = nd.random.uniform(shape=(1,3,224,224),ctx=mx.gpu())  # 再放入数据测试一下
net(x_test)
net.export(path=prefix_file, epoch=epoch)  # 才能导出模型
测试训练好的网络模型就行了。
大功告成!!但是我的这个代码运行的环境配置要求很苛刻(GeForce RTX 2080 Ti、ubuntu-16.04LTS、mxnet-cu90==1.4.0),理论上应该windos下就用keras就可以了,也不需要用这么大的显存。但是像我开头用的别人的工程,他们的代码的人像分割效果不尽人意。我估计是代码的问题,在我的这个代码:需要ubuntu系统下用mxnet框架、2080Ti级别的12GB显存的GPU,用1060的6GB显存的显卡不行 ,对数据有一些预处理:归一化,我估计可能是这些操作提升原生unet分割效果的吧。
理解Unet网络:
深入理解深度学习分割网络Unet——U-Net: Convolutional Networks for Biomedical Image Segmentation
Unet网络结构、插值算法:
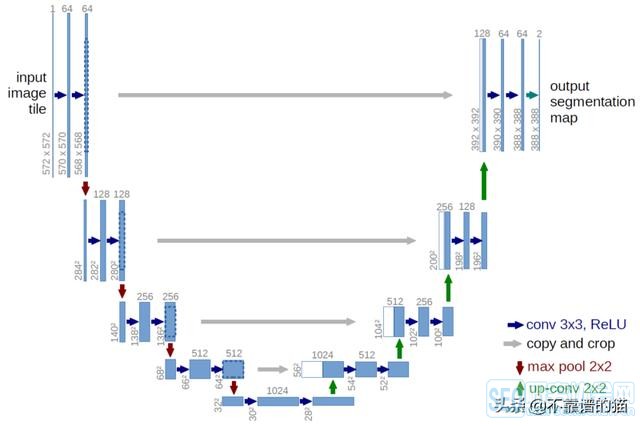

从这张图可看到,最初图像大小是572X572,3X3卷积之后,变为570X570,64个通道,然后后面的不详细讲,往下的红箭头就是2X2最大值池化,到底端的时候,有个向上的绿色箭头,叫上采样,上采样就是还原图像本真,上采样有三种常用的方法:
1.线性插值 2.反卷积(转置卷积) 3.反池化
上采样实际上就是放大被缩小的图像,而且不能让它模糊。
我看到Keras版本的工程里用的是这个函数:UpSampling2D(),看了下源码,它只有‘nearest’和‘bilinear’两种插值方法,默认第一种。


 766
766

 被折叠的 条评论
为什么被折叠?
被折叠的 条评论
为什么被折叠?
 到【灌水乐园】发言


