


ming_node
介绍
ming_node是什么
ming_node是用于快速构建web服务与接口测试的工具库,使用方法与express非常类似,并且ming_node只有一个文件,ming_node可以随用随扔而又让人不感到可惜,ming_node的web服务部分是参照express来写的.
安装
更新日志
最新稳定版本:v1.8.2
项目主页 GitHub
每个版本的更新日志 GitHub
项目地址 GitHub
npm地址 NPM
NPM
ming_node无任何第三方依赖,只是一个比较大的js文件.
# 最新稳定版
npm i ming_node
0依赖引入
https://minglie.github.io/js/ming_node.js
+async function () {
    M = await new Promise((v) => require('https').get("https://minglie.github.io/js/ming_node.js", (q) => { d = ''; q.on('data', (a) => d += a); q.on('end', () => v(eval(d))) }))
    var app = M.server();
    app.listen(8888);
    app.get("/getById", async (req, res) => {
        console.log(req.params);
        res.send("ok");
    })
}();
起步
官方指南假设你已了解关于node, commonJs, npm的初级知识。如果你没用过node不知道npm,
花点时间了解一下http://www.runoob.com/nodejs/nodejs-install-setup.html, 把node环境装上就ok了.
快速体验
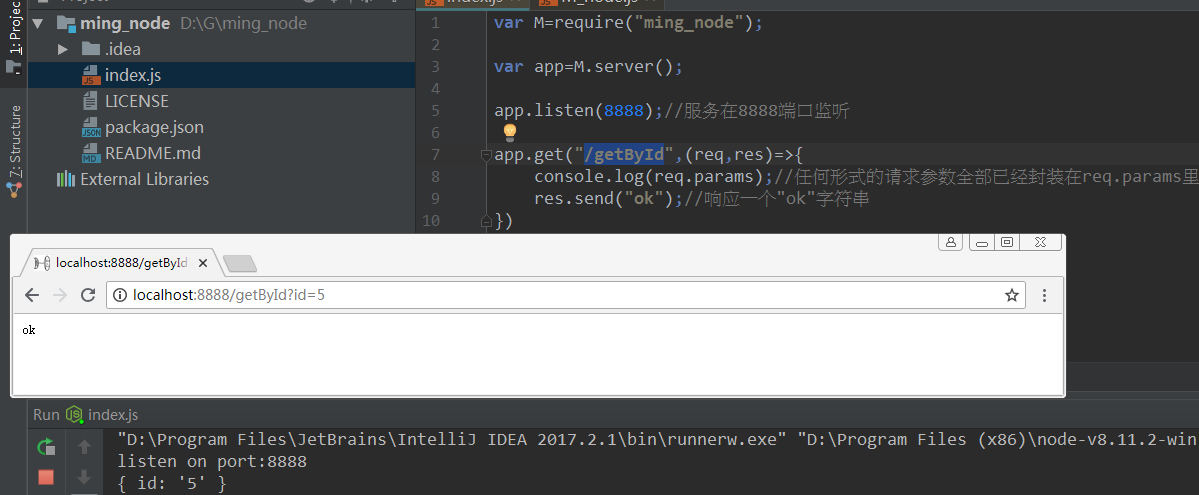
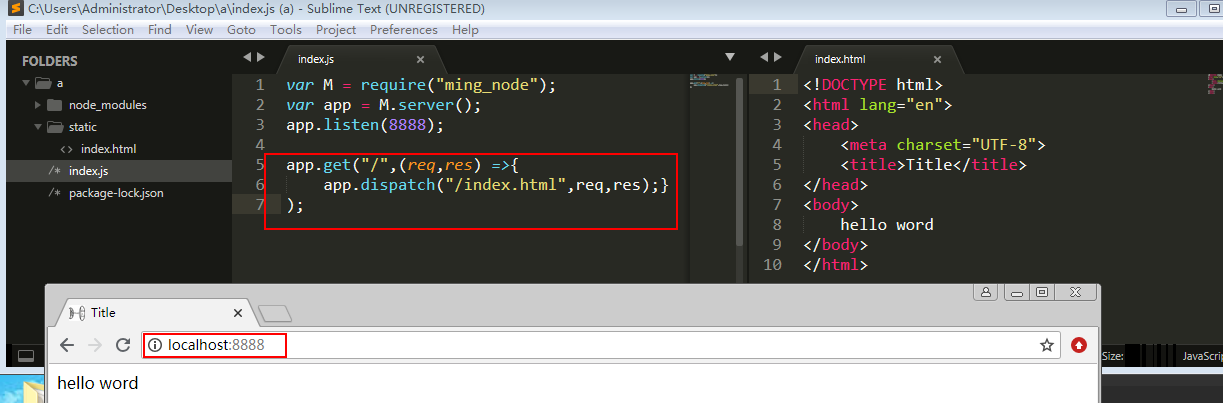
下面是ming_node关于web服务的最小环境 ,如果你只对web服务感兴趣可以直接看 Web服务章节
var M = require("ming_node");
var app = M.server();
app.listen(8888);//服务在8888端口监听
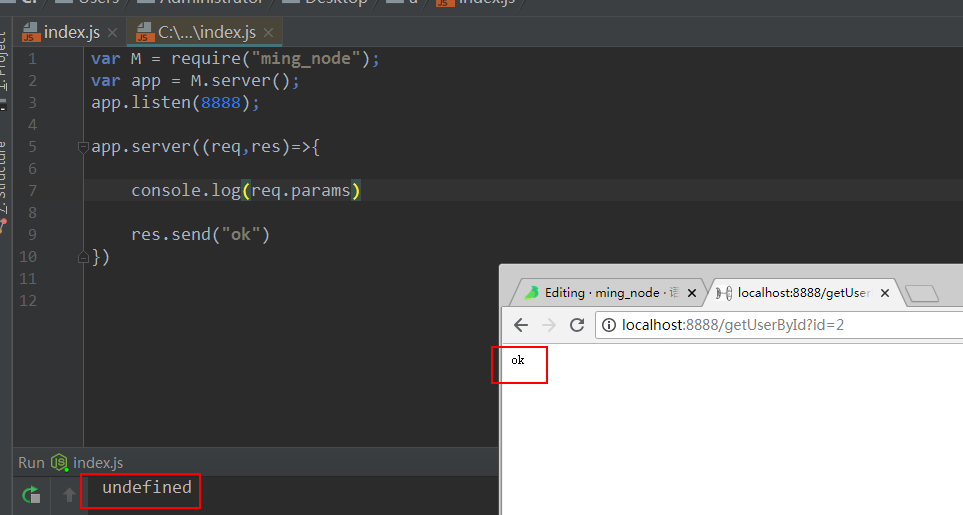
app.get("/getById", (req, res) => {
console.log(req.params);//任何形式的请求参数全部已经封装在req.params里
res.send("ok");//响应一个"ok"字符串
})
在浏览器中输入http://localhost:8888/getById?id=5 效果如下图
日志
你可以使用M.log()方法输出一些日志,方便问题排查,M.log是可变参数的方法,参数必须为字符串,默认是开启的并且带时间的
M.log有4个配置参数分别为
M.log_file_enable=true;//将日志输出到文件
M.log_console_enable=true;//将日志输出到控制台
M.log_path="C:M.log";//输出日志文件路径
M.log_display_time=true;//日志是否显示当前时间
文件操作
文件操作我封装了以下几个方法
基础操作方法
拷贝文件夹
M.copyDir(src,dst);
递归创建dirpath文件夹
M.mkdir(dirpath);
读取文件file的内容
M.readFile(file);
向文件file写入str
M.writeFile(file,str);
向文件file追加写入str
M.appendFile(file,str)
文件型数据库方法
读取json文件file对应的对象
M.getObjByFile(file)
将对象obj写入file
M.writeObjToFile(file,obj)
将file中追加一个对象obj,file存的是对象数组
M.addObjToFile(file,obj)
删除file中指定id的对象,file存的是对象数组,对象都有id
M.deleteObjByIdFile(file,id)
删除file中包含o的对象,o形如{k,v}
M.deleteObjByPropFile(file,o)
修改file中的obj对象,file存的是对象数组,对象都有id
M.updateObjByIdFile(file,obj)
二次封装文件型数据库的方法
内部有一个M.database_path="./M_database.json"作为下列方法的操作文件
//将obj写入M.database_path,会自动生成一个id,返回新增的对象
M.add(obj)
//修改M.database_path中的obj, obj必有id属性
M.update(obj)
//根据id或id数组 删除M.database_path中的obj
M.deleteById(id)
//清空M.database_path
M.deleteAll({k,v})
//删除M.database_path中属性k值为v的对象
M.deleteByProp({k,v})
//根据id查询M.database_path中的obj
M.getById(id)
//查询M.database_path的所有对象
M.listAll({k,v})
//查询M.database_path中属性k值为v的对象
M.listByProp({k:v})
//分页查询M.database_path,startPage为起始页,limit是每页条数,caseObj为条件,可省略,
//返回形如{total:4,rows:[]}
M.listByPage(startPage,limit,caseObj)
文件型数据库mock前端接口
var M=require("ming_node");
var app=M.server();
app.listen(8888);

app.post("/add",(req,res)=>{
    r=M.add(req.params)
    res.send(M.result(r));
})

app.get("/delete",(req,res)=>{
    M.deleteById(req.params.id)
    res.send(M.result("ok"));
})

app.post("/update",(req,res)=>{
    M.update(req.params)
    res.send(M.result("ok"));
})

app.get("/getById",(req,res)=>{
    r=M.getById(req.params.id)
    res.send(M.result(r));
})

app.get("/listAll",(req,res)=>{
    r=M.listAll()
    res.send(M.result(r));
})

app.get("/listByParentId",(req,res)=>{
    r=M.listByProp({parentId:req.params.parentId})
    res.send(M.result(r));
})

app.get("/listByPage",(req,res)=>{
    r=M.listByPage(req.params.startPage,req.params.limit)
    res.send(M.result(r));
})
多文件通信的方法
在进行接口测试,多个接口可能有某些关联,或者有些接口需要登陆之后才能访问,ming_node内部有一个存放公共变量的文件,将其称为全局作用域
通过
M.map_path="./M_map.json"
配置这个文件的位置,也可以把它当作应用的配置文件使用,只有两个方法
操作这个全局作用域
向全局作用域 加入 或 修改 键为K对应的值为V,K必须为字符串,V则没有要求
M.setAttribute(k,V)
从全局作用域取得键为K的对应的值
M.getAttribute(K)
逐行读取文件
//可以按行读取file的内容,callback的参数就是每一行的内容
M.readLine(file, callback)
CSV文件解析
//可以按行读取file的内容,callback的参数就是每一行的内容用逗号分割形成的数组

//如果数据中也有逗号,请用双引号括起来,比如下面,callback第一行的参数为["zs","18","会使用node,python,c++"]
//zs,18,"会使用node,python,c++"
//zs,21,"会使用c#,python,c++"
M.readCsvLine(file, callback)
文件模版
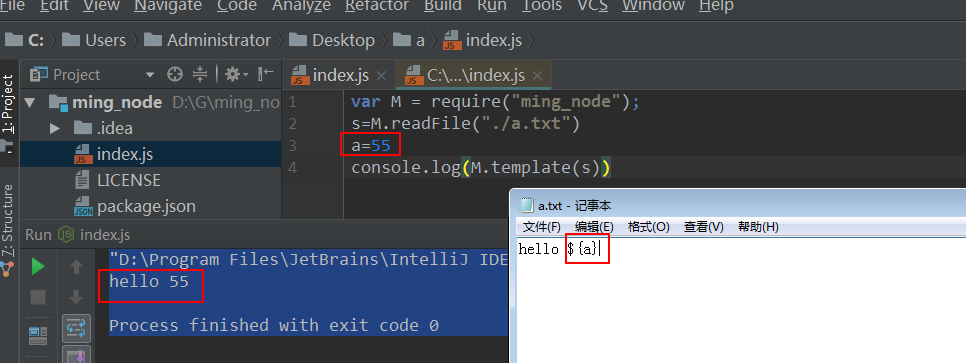
新建一个模版文件a.txt
内容为
hello ${a}
执行下面代码
var M = require("ming_node");
s=M.readFile("./a.txt")
a=55
console.log(M.template(s))
执行效果如图,我用这样的技巧写了一个很好用的代码生成器.
Sql生成器
为了让ming_node不依赖数据库,我将sql生成器放入ming_node,可以将某种数据先转换成sql,存到文件里,再自己手动执行sql,下面生成的sql只是规规矩矩的sql,如果需要模糊,分页,关联查询需要自己写sql
//根据表名与对象obj生成添加sql
M.getInsertObjSql(tableName,obj)

//根据表名与对象obj生成删除sql,删除条件是obj
M.getDeleteObjSql(tableName,obj)

//根据表名与对象obj生成修改sql,修改条件为caseObj对象
M.getUpdateObjSql(tableName,obj,caseObj)

//根据表名与对象obj生成查询sql,查询条件是obj
M.getSelectObjSql(tableName,obj)
hook函数
ming_node内置了大量的hook函数,用于在处于特定场景下,让外部来定义执行的行为,实际上服务接口的注册也属于hook函数,在特定的场景下这些hook函数才会被执行到
//作为服务器 的 请求前钩子
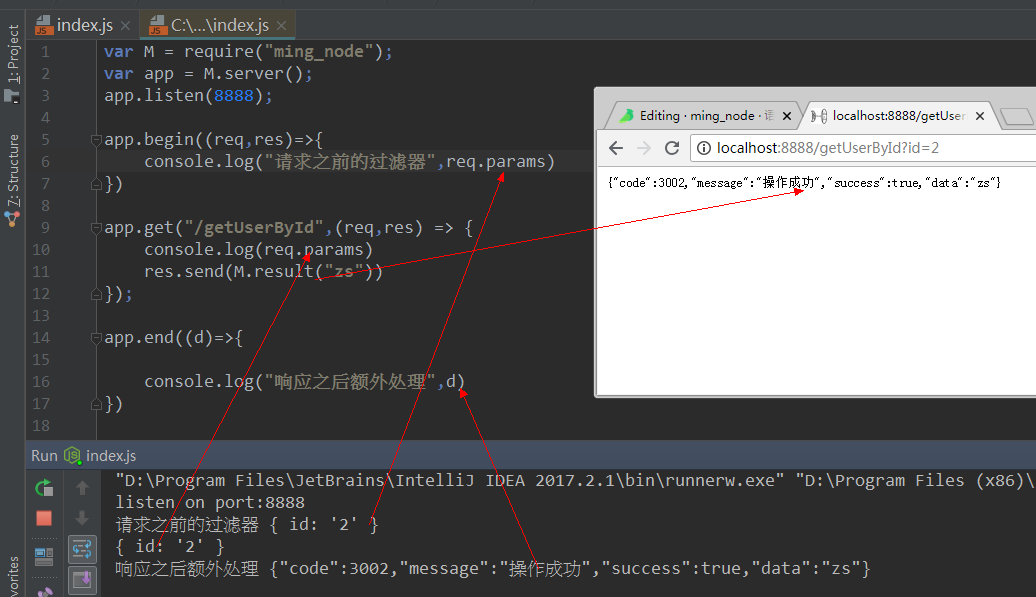
app.begin((req,res)=>{console.log("req ",req.url)})
//作为服务器 的 响应后钩子
app.end((d)=>{console.log("res ",d)})
//作为客户端 的 请求前钩子
M.httpBefore = (d) => {console.log(d); return d }
//作为客户端 的 响应后的钩子
M.httpEnd = (d) => { console.log("rrrrrr",d)}
//通用唯一服务注册
app.server=(req,res)=>{}
//通用服务注册
app.mapping("/getMyId",(req,res)=>{})
//get服务注册
app.get("/getMyId",(req,res)=>{})
//post服务注册
app.post("/getMyId",(req,res)=>{})
接口测试
请求方法
M.get 与 M.post的参数 data,headers都是非必填项,
简化版可以省略主机地址与回调函数,默认回调函数为打印响应结果
//get请求
M.get(url,callback,data,headers)
//简化版get请求
M.get0(url,data)

//post请求
M.post(url,callback,data,headers)
//简化版post请求
M.post0(url,data)

//json格式post请求
M.postJson(url,callback,data,headers)

//https请求的get请求
M.getHttps= function(url,callback,data)
公共请求参数与公共请求头
有时候每个接口都会携带相同的参数,可以把这些公共参数提取出来
//M.reqComQueryparams与M.reqComHeaders可以是对象或者时函数
M.reqComQueryparams={}
M.reqComHeaders={}

M.cookie={}
接口测试增强
在1.7版本对接口测试 增加了代理配置 与 Promise风格响应, 类axios拦截器, 并且保留原有的回调方式
M=require("ming_node")

//代理配置
M.httpProxy={
    host: '127.0.0.1', // 代理 IP
    port: 8888, // 代理端口
}

//请求之前拦截器
M.httpBefore = (d) => {console.log(d);  return d }
//请求之后拦截器
M.httpEnd = (d) => { console.log("rrrrrr",d)}

//公共 Queryparams
M.reqComQueryparams={userId:123456}

//get请求
M.get("http://baidu.com/pagelist",{name:"zs"}).then(d=>{
     console.log(d.code)
})

//get请求回调版
M.get("http://baidu.com/pagelist",d=>{
    console.log(d.code)
},{name:"huidiao"})

//post请求
M.post("http://baidu.com/a?age=44",{name:"ls"}).then(d=>{
     console.log(d)
})

//实际是简化板的get请求,内部自动识别返回的是js,json还是普通文本
 M.require(`https://www.baidu.com/`).then(d=>{
        console.log(d)
})
常用测试用例demo
M=require("ming_node")
//代理配置
M.httpProxy={
    host: '127.0.0.1', // 代理 IP
    port: 8888, // 代理端口
}
//请求之前拦截器
M.httpBefore = (d) => {console.log(d.path);  return d }

/**
 //本机8888端口 服务端 代码
app.get("/pagelist",async (req,res)=>{
    console.log(req.params)
    res.send(`{"code":3002,"message":"操作成功","success":true,"data":[{"name":"zs"},{"name":"ls"}]}`)
})
 */
async function main(){
    let r=await M.get("http://minglie.github.io/pagelist?name=zs")
    for(let i=0;i<r.data.length;i++){
         let user= r.data[i];
         const {name}=user;
         M.log(name);
    }
 }

 main()
请求带cookie
有很多接口必须登陆之后才能调用,可以先模拟登陆,使用文件或全局作用域保存cookie,之后再调用其他接口
M = require("ming_node")

M.post(M.host + "/authentication/form", function (date, res) {
        config = {};
        cookie = res.headers["set-cookie"][0].split(";")[0];
        _csrf = res.headers["x-csrf-token"]
        console.log(date, cookie, _csrf)
        M.writeObjToFile("../applicationConfig.json", {cookie, _csrf});
    },
    {
        username: "zs",
        password: "123456"
    }
)


config = M.getObjByFile("../applicationConfig.json")
M.cookie = config.cookie;
M.host = "http://localhost:8888"

if (1)
M.get(M.host + "/resource/listAll", function (d) {
        console.log(d);
    }
)

if (0)
M.post(M.host + "/resource/add", function (d) {
        console.log(d);
    },
    {
		   name:"账号管理"
    }
)
文件下载与网页图片抓取
//可将指定url对应的文件保存到本地file
M.download(url,file,callback)
//可将指定url网页的所有图片保存到本地file中
M.downloadAllImg(url,file,callback)
加载远程文件
+async function(){
    M =await new Promise((v)=>require('https').get("https://minglie.gitee.io/mingpage/static/js/ming_node.js",(q)=>{d='';q.on('data',(a)=>d+=a);q.on('end',()=>v(eval(d)))}))
	var app=M.server();
    app.listen(8888);
    app.get("/",async (req,res)=>{
       app.redirect("/index.html",req,res)
    })
}();
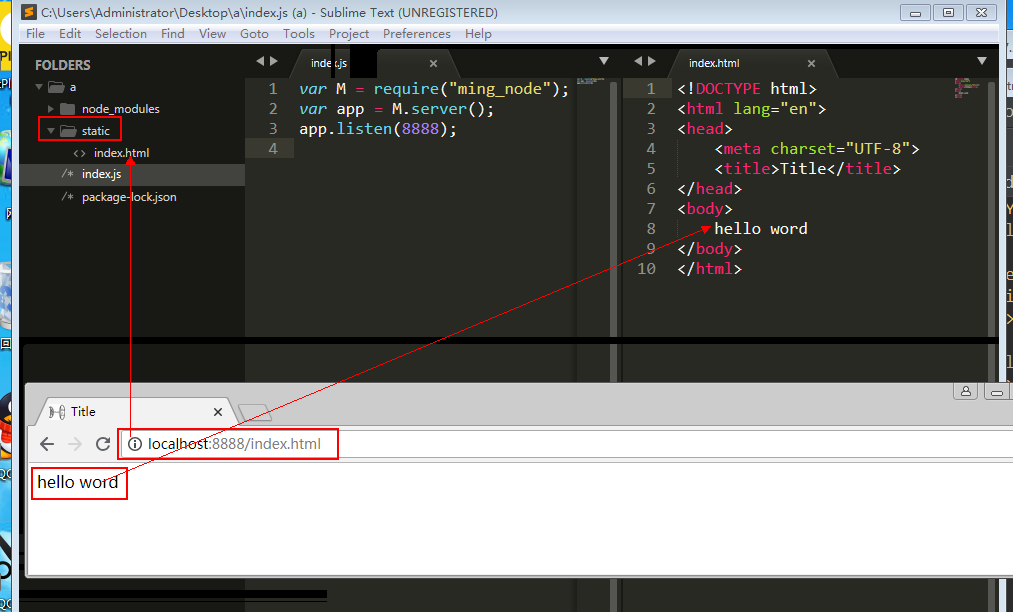
web服务
静态web服务
ming_node只要开启监听,就自动开启了静态web服务.
默认根路径为运行文件同目录的static文件夹下,也就是说参数views的默认值为"./static".
如果想改到其他位置,可以通过 app.set(“views”,“C:/a”); 设置静态文件根路径,
项目结构与运行效果
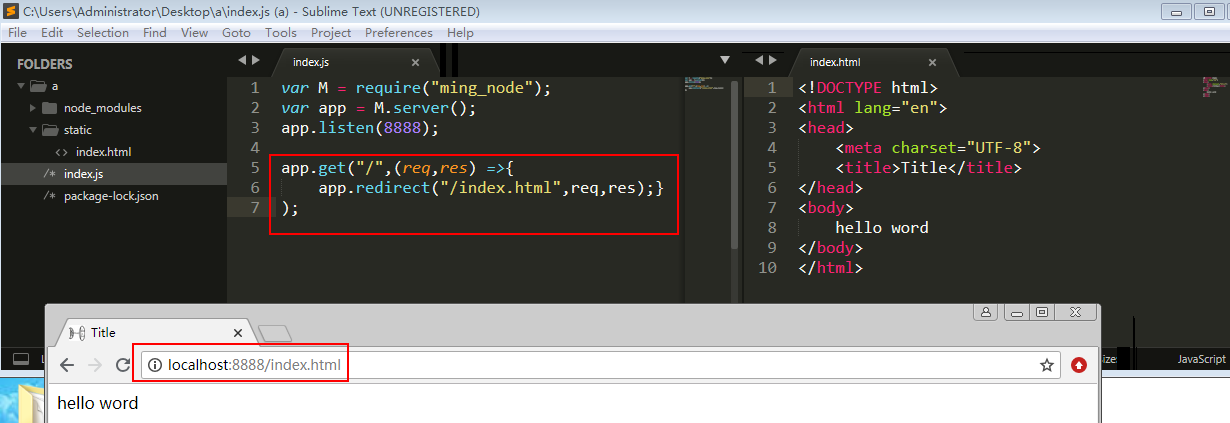
重定向与转发
上面是通过访问http://localhost:8888/index.html,才看到index.html的,
如果想通过输入http://localhost:8888看到index.html有重定向与转发两种方式
当然这两种方式也可以转向其他接口
请求重定向
请求转发
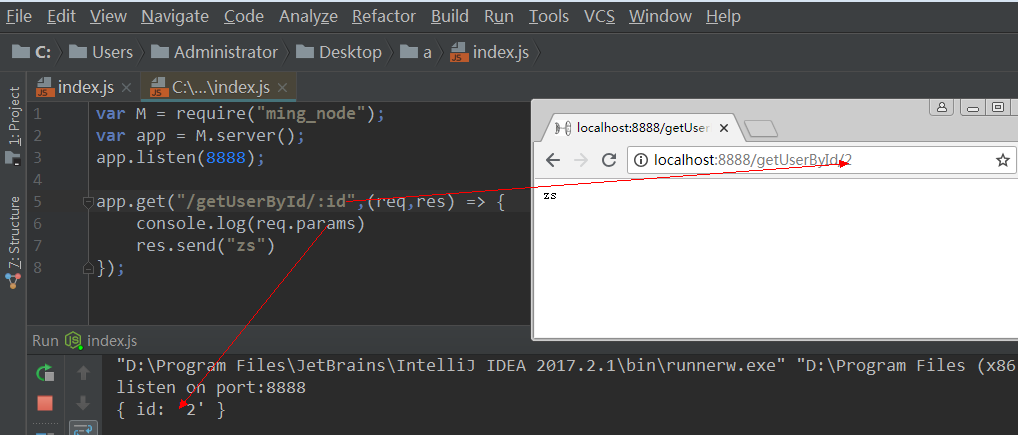
GET接口服务
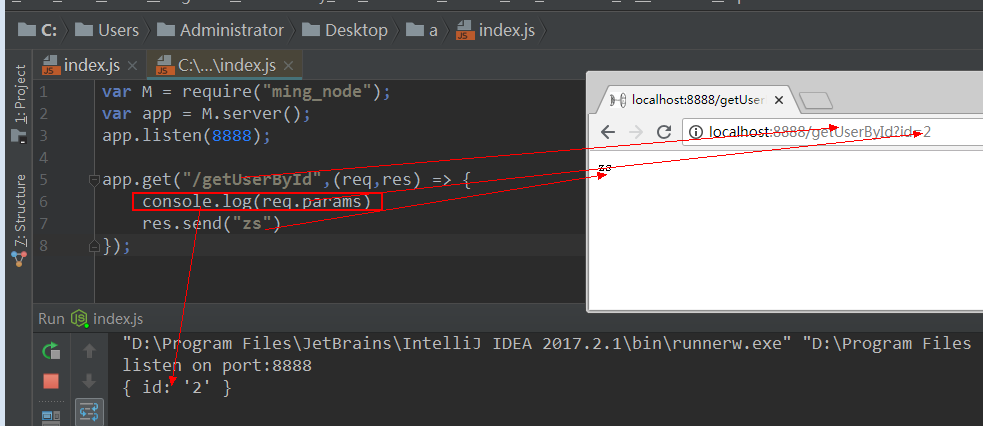
Rest风格服务
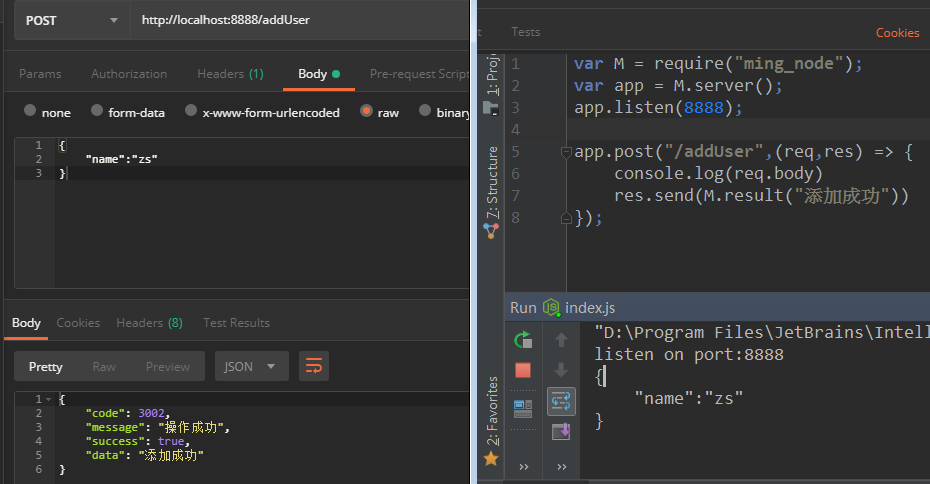
POST接口服务

POST提交json
我用M.result()方法封装封响应
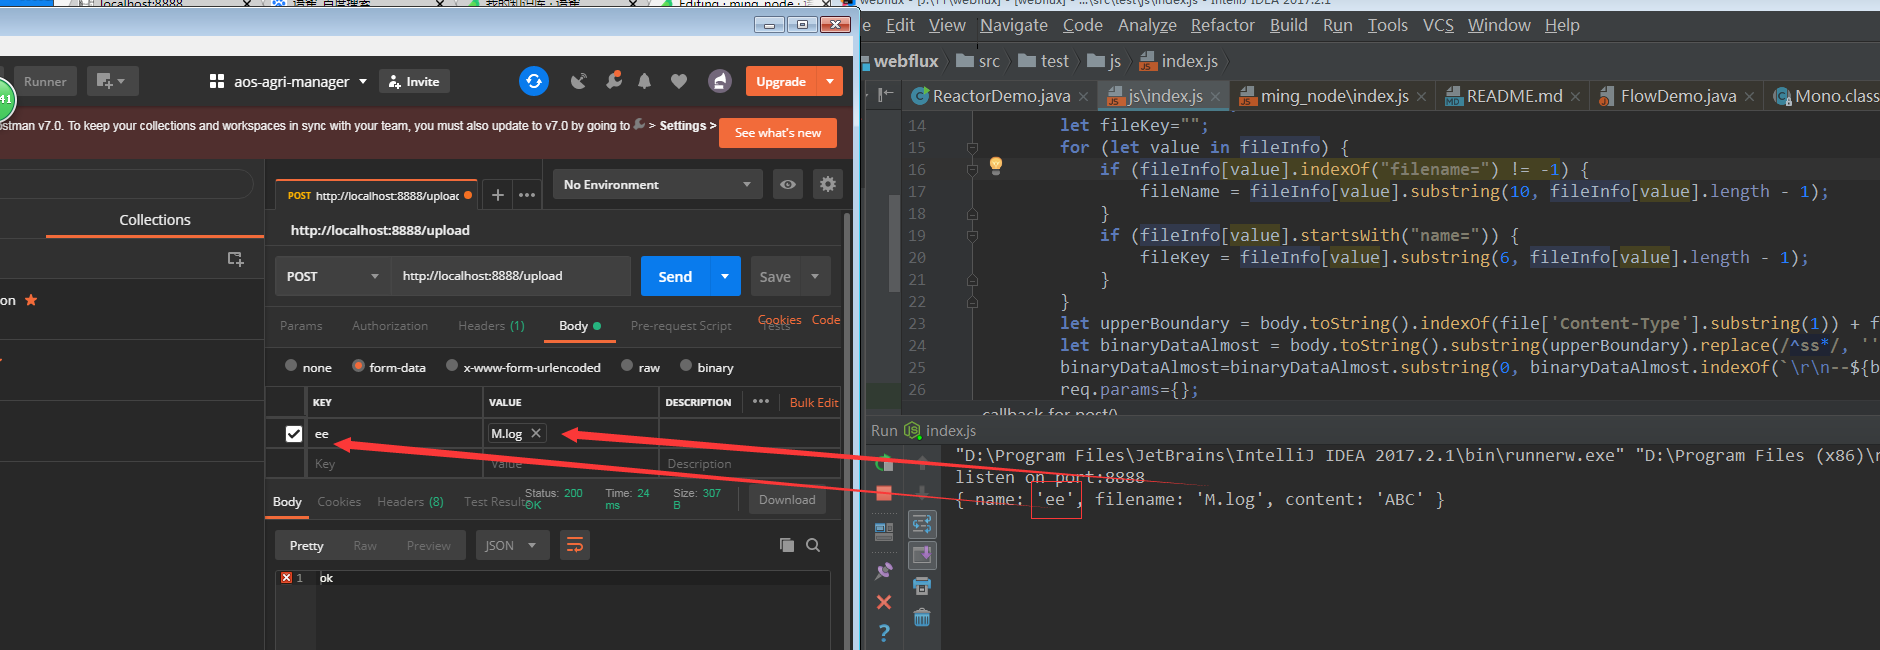
POST上传文件
上传文件用的很少,我没有往ming_node里封装,如果用到文件上传就用第三方插件吧,这里只给出一个上传文本文件的例子
var M=require("ming_node");
var querystring=require('querystring');
var app=M.server();
app.listen(8888);


app.post(`/upload`,  (req,res) =>{
    if(req.headers['content-type'] && req.headers['content-type'].startsWith("multipart/form-data")) {
        let boundary = req.headers['content-type'].split('; ')[1].replace('boundary=', '');
        let body=req.body;
        let file = querystring.parse(body, '\r\n', ':');
        let fileInfo = file['Content-Disposition'].split('; ');
        let fileName = '';
        let fileKey="";
        for (let value in fileInfo) {
            if (fileInfo[value].indexOf("filename=") != -1) {
                fileName = fileInfo[value].substring(10, fileInfo[value].length - 1);
            }
            if (fileInfo[value].startsWith("name=")) {
                fileKey = fileInfo[value].substring(6, fileInfo[value].length - 1);
            }
        }
        let upperBoundary = body.toString().indexOf(file['Content-Type'].substring(1)) + file['Content-Type'].substring(1).length+4;
        let binaryDataAlmost = body.toString().substring(upperBoundary).replace(/^ss*/, '').replace(/ss*$/, '');
        binaryDataAlmost=binaryDataAlmost.substring(0, binaryDataAlmost.indexOf(`\r\n--${boundary}`))
        req.params={};
        req.params["name"]=fileKey;
        req.params["filename"]=fileName;
        req.params["content"]=binaryDataAlmost;
        console.log(req.params);
        res.send("ok");
    }else {
        res.send("ko")
    }
})
任意请求方法的接口
如果不关心请求方法可以用app.mapping代替上面的app.get或app.post
任意请求方法任意路由的接口
如果不关心请求方法,也不关心请求路由,除了用下面的app.begin,也可以用app.server,由于找不到相关注册方法,
我并没有封装请求参数,但可以用原生的req得到请求的相关信息
过滤器
如果想在请求之前或响应之后做一些额外处理可以添加多个过滤器,利用转发将这些过滤器连接起来,
注意执行app.end注册的方法是在响应之后才执行的,请求最先进入的是app.begin注册的方法
cookie,session的处理
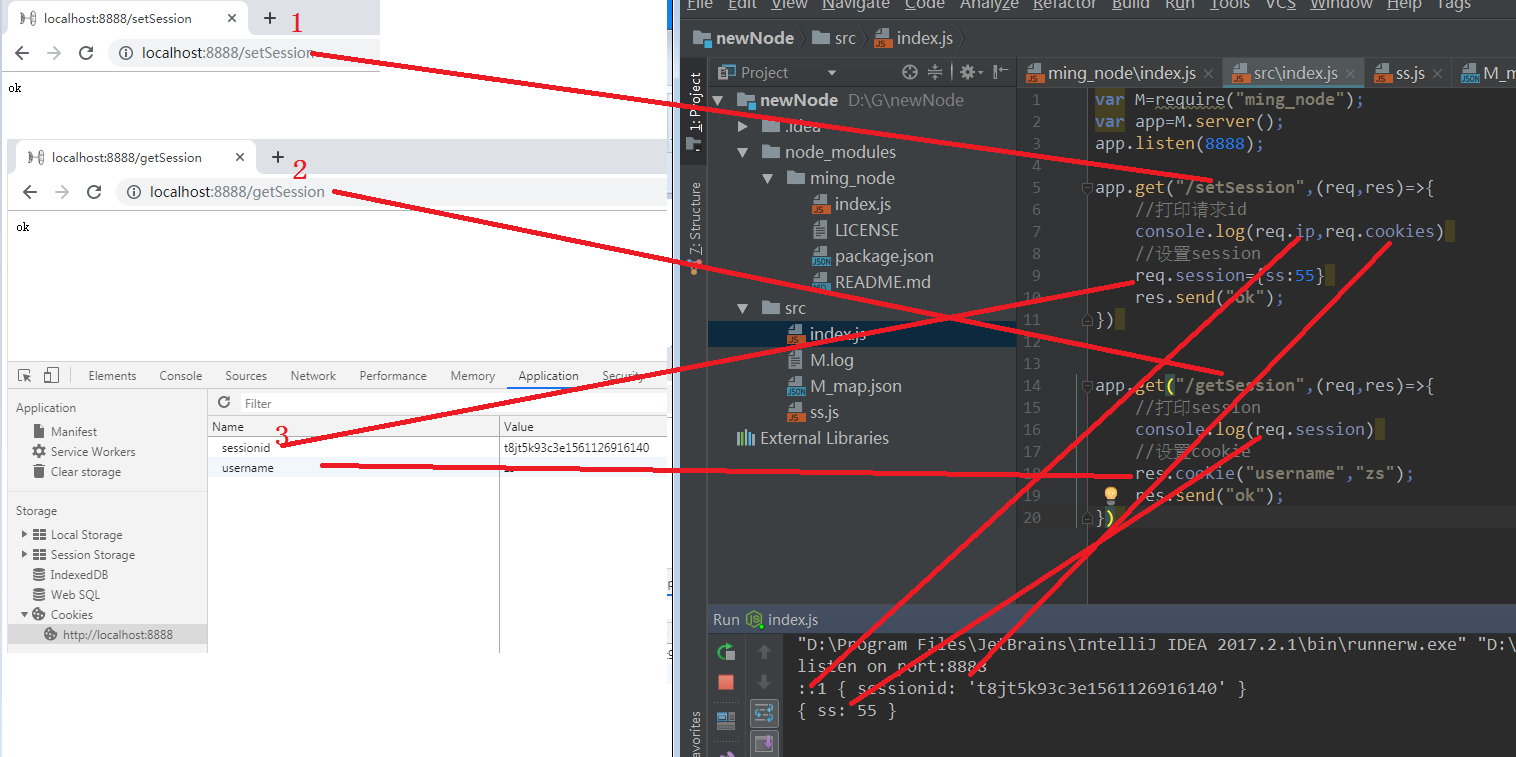
cookie与session的处理与express雷同
var M=require("ming_node");
var app=M.server();
app.listen(8888);

app.get("/setSession",(req,res)=>{
    //打印请求ip与请求cookie
    console.log(req.ip,req.cookies)
    //设置session
    req.session={ss:55}
    res.send("ok");
})

app.get("/getSession",(req,res)=>{
    //打印session
    console.log(req.session)
    //设置cookie
    res.cookie("username","zs");
    res.send("ok");
})
token,csrf等的处理
我没有封装相关方法,但是用原生方法结合全局作用域能很容易实现,只是读请求头,设置响应头的东西,
下面是一个token 鉴权的例子
M=require("ming_node")
app=M.server()
app.listen(8888)
token="abcdefg"

app.get("/getUserById",(req,res)=>{
    console.log(req.params)
    if(req.headers["authorization"]==token){
        id=req.params.id;
        res.send(M.result("ok"));
    }else{
        res.send(M.result("无权访问"));
    }
})
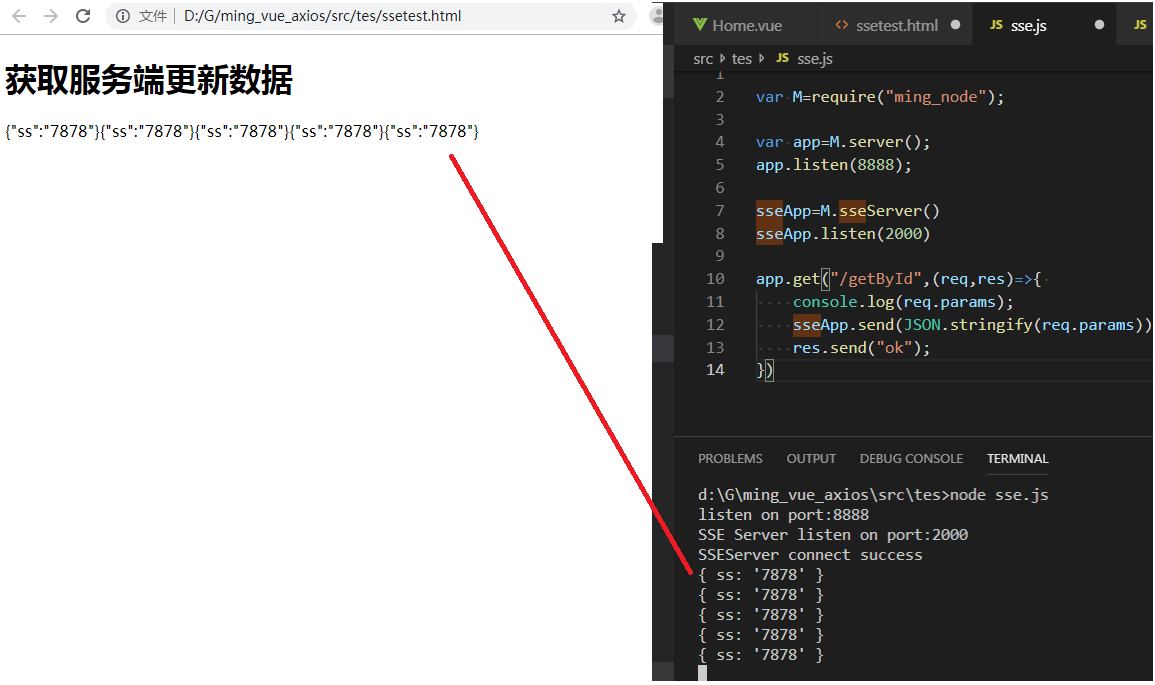
SSE服务端推送消息到浏览器
服务端代码
var M=require("ming_node");

var app=M.server();
app.listen(8888);

sseApp=M.sseServer()
sseApp.listen(2000)

app.get("/getById",(req,res)=>{
    console.log(req.params);
    sseApp.send(JSON.stringify(req.params));
    res.send("ok");
})
或者共有Web服务端口
var M=require("ming_node");

var app=M.server();
app.listen(8888);

sseApp=M.sseServer()
//sseApp.listen(2000)

app.get("/sseServer",sseApp)

app.get("/getById",(req,res)=>{
    console.log(req.params);
    sseApp.send(JSON.stringify(req.params));
    res.send("ok");
})
浏览器代码
<!DOCTYPE html>
<html>
<head>
<meta charset="utf-8">
<title>xxx</title>
</head>
<body>
<h1>获取服务端更新数据</h1>
<div id="result"></div>

<script>

if (window.EventSource) {
  // 创建 EventSource 对象连接服务器
  const source = new EventSource('http://localhost:2000');

  // 连接成功后会触发 open 事件
  source.addEventListener('open', () => {
    console.log('Connected');
  }, false);

  // 服务器发送信息到客户端时,如果没有 event 字段,默认会触发 message 事件
  source.addEventListener('message', e => {
    console.log(`data: ${e.data}`);
  }, false);

  // 自定义 EventHandler,在收到 event 字段为 slide 的消息时触发
  source.addEventListener('slide', e => {
    result.innerText+=e.data;
    console.log(`data: ${e.data}`);
  }, false);

  // 连接异常时会触发 error 事件并自动重连
  source.addEventListener('error', e => {
    if (e.target.readyState === EventSource.CLOSED) {
      console.log('Disconnected');
    } else if (e.target.readyState === EventSource.CONNECTING) {
      console.log('Connecting...');
    }
  }, false);
} else {
  console.error('Your browser doesn\'t support SSE');
}

</script>

</body>
</html>
或者使用ming_mock
<!DOCTYPE html>
<html>
<head>
<meta charset="utf-8">
<title>xxx</title>
<script src="https://cdn.bootcss.com/jquery/3.3.1/jquery.js"></script>
<script src="https://minglie.github.io/js/M_mock.js"></script>
</head>
<body>
<h1>获取服务端更新数据</h1>
<div id="result"></div>
<script>

         M.EventSource('http://localhost:2000',function(e){
            result.innerText+=e.data;
         })

</script>

</body>
</html>
效果
前端学习环境搭建
为了方便前端学习可以使用 ming_node与ming_click搭建一个方便的环境
后端代码
var M=require("ming_node");
var app=M.server();
app.listen(8888);
app.get("/",async (req,res)=>{
app.redirect("/index.html",req,res)
})
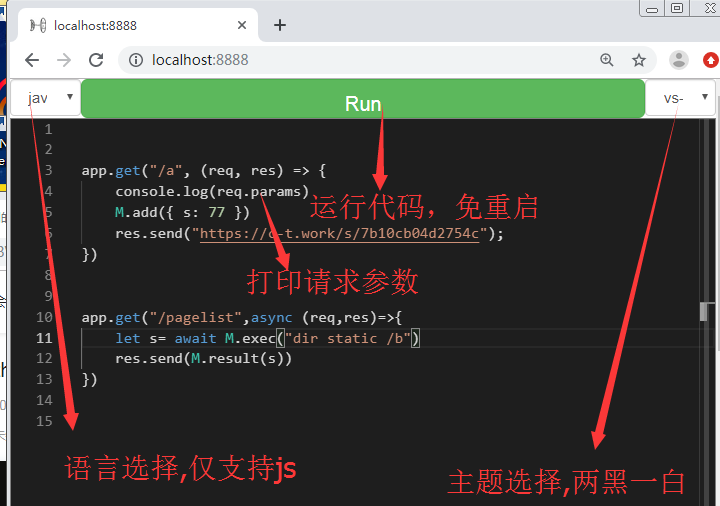
app.get("/pagelist",async (req,res)=>{
//如果是linux系统应改用 M.exec("ls static")
let s= await M.exec("dir static /b")
res.send(M.result(s))
})
或者0依赖
+async function () {
    M = await new Promise((v) => require('https').get("https://minglie.github.io/js/ming_node.js", (q) => { d = ''; q.on('data', (a) => d += a); q.on('end', () => v(eval(d))) }))
    var app = M.server();
    app.listen(8888);
    app.get("/", async (req, res) => {
       app.redirect("/index.html", req, res)
    })

	app.get("/pagelist",async (req,res)=>{
		//如果是linux系统应改用 M.exec("ls static")
		let s= await M.exec("dir static /b")
		res.send(M.result(s))
	})
}();
前端代码
<!DOCTYPE html>
<html>

<head>
    <meta charset="utf-8">
    <title>index</title>
    <script src="https://cdn.staticfile.org/vue/2.4.2/vue.min.js"></script>
</head>

<body>
    <div id="app">
        <h1>网页列表</h1>
        <div v-for="file in list">
            <a :href="file">{{ file }}</a>


        </div>
    </div>
    <script type="text/javascript">
        new Vue({
            el: '#app',
            data() {
                return {
                    list: null
                }
            },
            mounted() {
                M_this = this;
                fetch('/pagelist').then(function (response) {
                    return response.json();
                }).then(function (response) {
                    let list = response.data.split("\n");
                    list = list.filter((d) => (d.indexOf(".html") >= 0))
                    console.log(list)
                    M_this.list = list
                });
            }

        })
    </script>
</body>
</html>
前后端代码还可以合并
+async function () {
	M = await new Promise((v) => require('https').get("https://minglie.github.io/js/ming_node.js", (q) => { d = ''; q.on('data', (a) => d += a); q.on('end', () => v(eval(d))) }))
	url = require("url");

	var app = M.server();
	app.set("views", "./")
	app.listen(8888);

	app.begin((req, res) => {
		if (req.url.includes(".html")) {
			let obj = url.parse("?" + req.url, true);
			req.url = "/" + Object.keys(obj.query)[0].slice(1)
		}
		console.log(req.url)
	})


	app.get("/pagelist", async (req, res) => {
		//如果是linux系统应改用 M.exec("ls static")
		let s = await M.exec("ls")
		res.send(M.result(s))
	})

	app.get("/", async (req, res) => {
		res.writeHead(200, { "Content-Type": "text/html;charset='utf-8'" });
		res.write(`<!DOCTYPE html>
						<html>

						<head>
						    <meta charset="utf-8">
						    <title>index</title>
						    <script src="https://cdn.staticfile.org/vue/2.4.2/vue.min.js"></script>
						</head>

						<body>
						    <div id="app">
						        <h1>网页列表</h1>
						        <div v-for="file in list">
						            <a :href="file">{{ file }}</a>


						        </div>
						    </div>
						    <script type="text/javascript">
						        new Vue({
						            el: '#app',
						            data() {
						                return {
						                    list: null
						                }
						            },
						            mounted() {
						                M_this = this;
						                fetch('/pagelist').then(function (response) {
						                    return response.json();
						                }).then(function (response) {
						                    let list = response.data.split("\\n");
						                    list = list.filter((d) => (d.indexOf(".html") >= 0))
						                    console.log(list)
						                    M_this.list = list
						                });
						            }

						        })
						    </script>
						</body>
						</html>`
		);
		res.end(); /*结束响应*/
	})
}();
ming_click自动刷新浏览器
如果需要自动刷新浏览器,可以在后端加入这两行代码,原理是用C语言找到页面的窗口句柄,模拟按下F5键
https://github.com/minglie/ming_click
var C = require('ming_click');
C.watch("./static")
其他方法
//执行一条系统命令,打印当前的TCP/IP配置的设置值
console.log(M.exec("ipconfig"))
//延时指定毫秒
M.sleep(numberMillis)
//下划线转驼峰,打印"userId"
console.log("user_id".underlineToHump())
//驼峰转下划线,打印"user_id"
console.log("userId".humpToUnderline())
//首字母变大写,打印"User"
console.log("user".firstChartoUpper())
//首字母变小写,打印"uSER"
console.log("USER".firstChartoLower())
//打印当前日期,2019-03-24
console.log(new Date().format("yyyy-MM-dd"))
其他ming_node相关
便捷的静态web服务
在含有static文件夹的目录执行下面命令,static便作为web根目录
#node
curl https://minglie.github.io/js/index.js > index.js && node index.js
#python
curl https://minglie.github.io/python/index.py > index.py && python index.py

#启动ming_mock_server
git clone https://github.com/minglie/ming_mockServer.git && cd ming_mockServer && npm i && npm run start

#curl启动ming_mockServer0
curl https://minglie.gitee.io/mingpage/static/js/ming_mockServer0.js > index.js && node index.js
当前目录静态页
curl https://minglie.gitee.io/mingpage/static/js/index_cur.js > index.js && node index.js
+async function(){
    M =await new Promise((v)=>require('https').get("https://minglie.github.io/js/ming_node.js",(q)=>{d='';q.on('data',(a)=>d+=a);q.on('end',()=>v(eval(d)))}))
  var app=M.server();
  app.set("views","./")
    app.listen(8888);
    app.get("/",async (req,res)=>{
       app.redirect("/index.html",req,res)
    })
}();
接口代理
/**
 POST  http://localhost:8888/axios
 {
   "url": "https://www.baidu.com/",
   "method":"get",
    "headers": {"Content-Type": "application/json"},
   "params": {
          "dd":848
    },
   "data": {
          "id":5
    }
}
 */
function myAxios(body) {
    let bodyObj = JSON.parse(body);
    return new Promise((r, j) => {
        try {
            let getData = {}
            if (bodyObj.method == "post") {
                if (bodyObj.params) {
                    let getData = Object.keys(bodyObj.params).map(u => u + "=" + bodyObj.params[u]).join("&");
                    if (bodyObj.url.indexOf("?") > 0) {
                        getData = "&" + getData;
                    } else {
                        getData = "?" + getData;
                    }
                    bodyObj.url = bodyObj.url + getData;
                }
                M.post(bodyObj.url, r, bodyObj.data, bodyObj.headers)
            } else {
                M.get(bodyObj.url, r, bodyObj.params, bodyObj.headers)
            }
        } catch (e) {
            j(e);
        }
    });
}

app.post("/axios", async (req, res) => {
    console.log(req.body)
    let r = await myAxios(req.body)
    res.send(M.result(r));
})
写web接口最快捷的方式ming_share_edit
运行脚本, 访问 http://localhost:8888/
curl https://minglie.gitee.io/mi/i2.js > index.js && node index.js
ming_api_mock
因为 ming_share_edit采用txt格式存储文件,不便于编辑器查看,以及启动文件的冗余,不支持多服务文件,因此有了命令行工具 [ming_api_mock](https://www.yuque.com/docs/share/fc8547e1-e815-4e50-817c-4829e3c76442?#)


 500
500

 被折叠的 条评论
为什么被折叠?
被折叠的 条评论
为什么被折叠?
 到【灌水乐园】发言


