Spring Boot整合Kaptcha实现验证码功能

一、前言

kaptcha 是一个很有用的验证码生成工具,由于它有许多可配置项,所以用它可以简单快捷的生成各式各样的验证码。

1.Kaptcha 简介

Kaptcha谷歌验证码) 是一个可高度配置的实用验证码生成工具,可自由配置的选项如:

  • 验证码的字体
  • 验证码字体的大小
  • 验证码字体的字体颜色
  • 验证码内容的范围(数字,字母,中文汉字!)
  • 验证码图片的大小,边框,边框粗细,边框颜色
  • 验证码的干扰线
  • 验证码的样式(鱼眼样式、3D、普通模糊、…)

2.Kaptcha 详细配置表
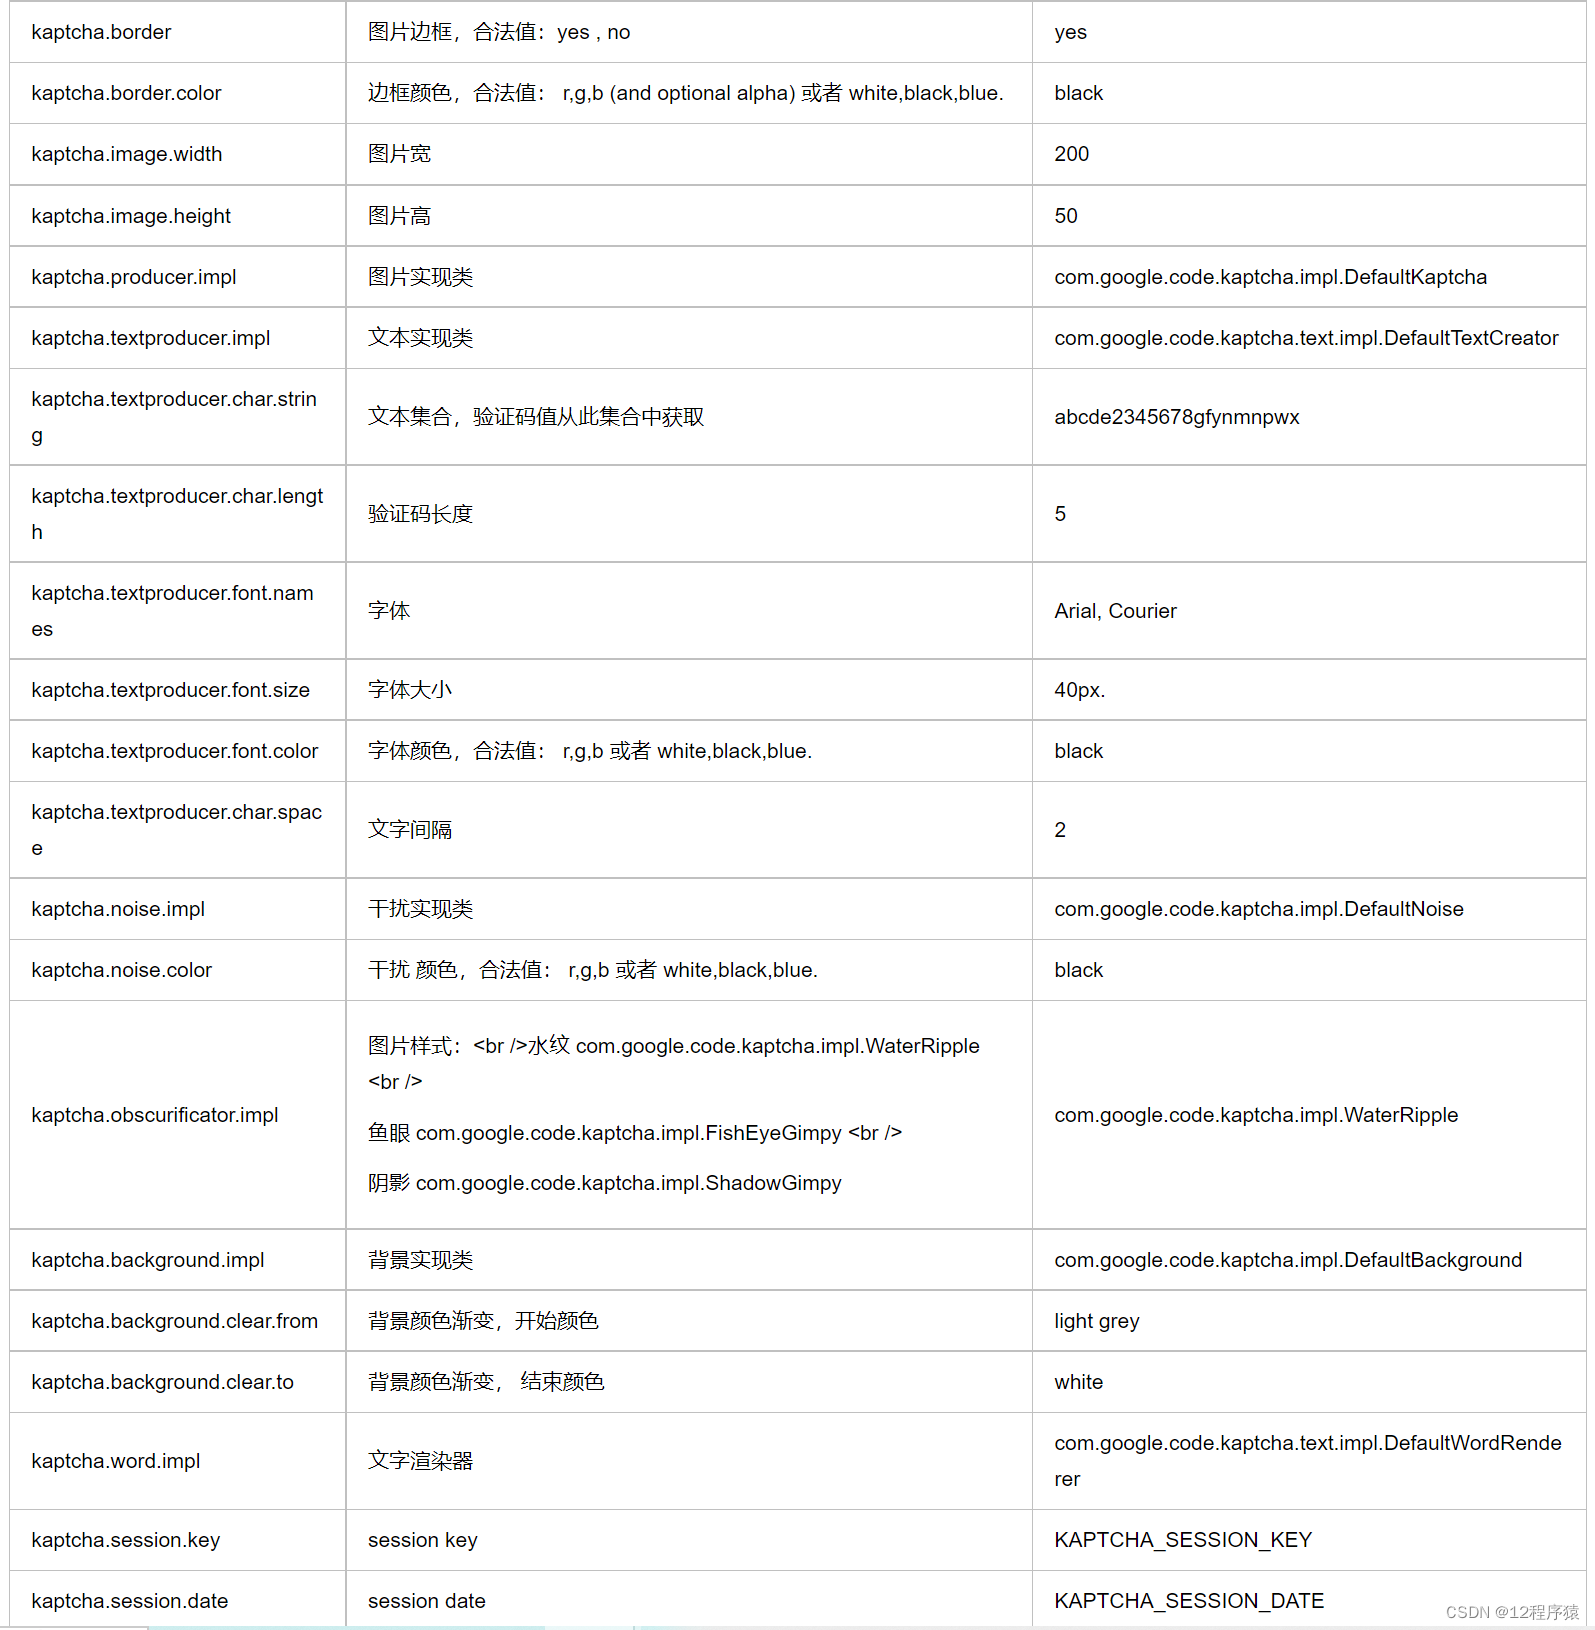
在这里插入图片描述

二、实现

实现思路:
1.整合kaptcha,创建kaptcha的工具类
2.编写接口,在接口中使用 kaptcha 工具类来生成验证码图片(验证码信息)并返回
3.登录时从 session 中获取验证码进行校验
4.测试获取验证码图片(验证码信息)接口

1.整合kaptcha,创建kaptcha的工具类

1.1 添加依赖

<dependency>
    <groupId>org.springframework.boot</groupId>
    <artifactId>spring-boot-starter-web</artifactId>
</dependency>
<!--谷歌 验证码-->
<dependency>
    <groupId>com.github.penggle</groupId>
    <artifactId>kaptcha</artifactId>
    <version>2.3.2</version>
</dependency>

1.2 创建KaptchaConfig工具类

package com.example.validationcodedemo.config;

import com.google.code.kaptcha.impl.DefaultKaptcha;
import com.google.code.kaptcha.util.Config;
import org.springframework.context.annotation.Bean;
import org.springframework.context.annotation.Configuration;

import java.util.Properties;

/**
 * 谷歌验证码配置文件
 * @author qzz
 */
@Configuration
public class KaptchaConfig {


    @Bean(name = "kaptchaProducer")
    public DefaultKaptcha getKaptchaBean(){
   
        DefaultKaptcha defaultKaptcha = new DefaultKaptcha();

        Properties properties = new Properties();
        //是否有边框 默认true 也可以自己设置yes,no
        properties.setProperty("kaptcha.border", "no");
        //验证码文本字符颜色 默认为Color.BLACK
        properties.
  • 1
    点赞
  • 6
    收藏
    觉得还不错? 一键收藏
  • 0
    评论
要使用Spring Boot和Vue实现验证码,可以按照以下步骤进行: 1. 首先在Spring Boot中添加依赖项,包括spring-boot-starter-web和spring-boot-starter-validation。 2. 创建一个验证码生成器类,该类可以使用Java的Graphics2D类在内存中生成图片。 3. 创建一个Spring Boot控制器,该控制器将生成的验证码图片返回给客户端。 4. 在Vue中创建一个组件,该组件将显示验证码图片,并允许用户输入验证码。 5. 在Vue中实现验证逻辑,将用户输入的验证码与后端生成的验证码进行比较。 以下是示例代码: Spring Boot控制器: ```java @RestController public class CaptchaController { @Autowired private CaptchaGenerator captchaGenerator; @GetMapping("/captcha") public void getCaptcha(HttpServletRequest request, HttpServletResponse response) throws Exception { // 获取验证码图片 BufferedImage image = captchaGenerator.generateCaptchaImage(); // 将图片写入响应流 response.setContentType("image/png"); ImageIO.write(image, "png", response.getOutputStream()); // 将验证码存储在session中 HttpSession session = request.getSession(); session.setAttribute("captcha", captchaGenerator.getCaptchaString()); } } ``` Vue组件: ```vue <template> <div> <img :src="captchaUrl" @click="refreshCaptcha"> <input v-model="captchaInput" @keyup.enter="submitCaptcha"> <button @click="submitCaptcha">Submit</button> </div> </template> <script> export default { data() { return { captchaUrl: '/captcha', captchaInput: '' } }, methods: { refreshCaptcha() { this.captchaUrl = '/captcha?' + Math.random() }, submitCaptcha() { axios.post('/validate-captcha', { captcha: this.captchaInput }).then(response => { if (response.data.success) { alert('验证码正确') } else { alert('验证码错误') } }) } } } </script> ``` 在上面的Vue组件中,我们使用axios发送POST请求到后端验证用户输入的验证码。在后端,我们可以将存储在session中的验证码与用户输入的验证码进行比较。 希望这可以帮助到你!

“相关推荐”对你有帮助么?

  • 非常没帮助
  • 没帮助
  • 一般
  • 有帮助
  • 非常有帮助
提交
评论
添加红包

请填写红包祝福语或标题

红包个数最小为10个

红包金额最低5元

当前余额3.43前往充值 >
需支付:10.00
成就一亿技术人!
领取后你会自动成为博主和红包主的粉丝 规则
hope_wisdom
发出的红包
实付
使用余额支付
点击重新获取
扫码支付
钱包余额 0

抵扣说明:

1.余额是钱包充值的虚拟货币,按照1:1的比例进行支付金额的抵扣。
2.余额无法直接购买下载,可以购买VIP、付费专栏及课程。

余额充值