


如果官网下载不顺利,可以到百度网盘下载
1.安装显卡驱动
- 查看你的显卡信息:lspci | grep -i nvidia。
- 根据你的显卡型号到官方中文驱动下载页面下载驱动。该页面有安装指导。
- 禁用Nouveau驱动,重启。Ctrl+Alt+F1进入文本模式,输入sudo service lightdm stop关闭X服务器,输入sudo apt-get autoremove --purge nvidia-*卸载已安装的显卡驱动。
- 开启 32-bit 包支持:
sudo dpkg --add-architecture i386 sudo apt update sudo apt install libc6:i386 否则安装过程会报错: WARNING: Unable to find a suitable destination to install 32-bit compatibility libraries. Your system may not be set up for 32-bit compatibility. 32-bit compatibility files will not be installed; if you wish to install them, re-run the installation and set a valid directory with the --compat32-libdir option. - 到安装文件目录执行:
sudo sh NVIDIA-Linux-x86_64-390.87.run -no-x-check -no-nouveau-check -no-opengl-files -no-x-check:安装时关闭X服务器 -no-nouveau-check:安装时禁用nouveau -no-opengl-files:不安装OpenGL,否则会出现循环登录的问题 - 安装选项:
The distribution-provided pre-install script failed! Are you sure you want to continue? Continue installation Abort installation 选前者 There appears to already be a driver installed on your system (version: 390.87). As part of installing this driver (version: 390.87), the existing driver will be uninstalled. Are you sure you want to continue? Continue installation Abort installation 选前者 This distribution-provided pre-install script failed! Are you sure you want to continue? Continue installation Abort installation 选前者 Would you like to register the kernel module source with DKMS? This will allow DKMS to automatically build a new module, if you install a different kernel later. Yes No 选前者 Would you like to run the nvidia-xconfig utility to automatically update your X configuration file so that the NVIDIA X driver will be used when you restart X? Any pre-existing X configuration file will be backed up. Yes No 选前者 用sudo service lightdm start启用X服务器,会回到桌面模式。如果不能,按Ctrl+Alt+F7回到桌面模式。- 分辨率异常解决办法:
备份:sudo mv /etc/X11/xorg.conf /etc/X11/xorg.conf2.backup(我这里已经有xorg.conf.backup) 新建:sudo touch /etc/X11/xorg.conf 重启 - 如果安装出错,重新安装即可覆盖。
- 检查安装是否成功:
nvidia-smi
2.安装cuda
验证你的显卡是否支持cuda
- 查看你的显卡信息:lspci | grep -i nvidia。
- 进入GPU列表页面。
- 根据第一条命令输出的信息查看支持的显卡列表。比如我的显卡是GeForce系列,则点击CUDA-Enabled GeForce Products,然后会展开受支持的显卡,确保你的显卡在展开的列表内。
下载
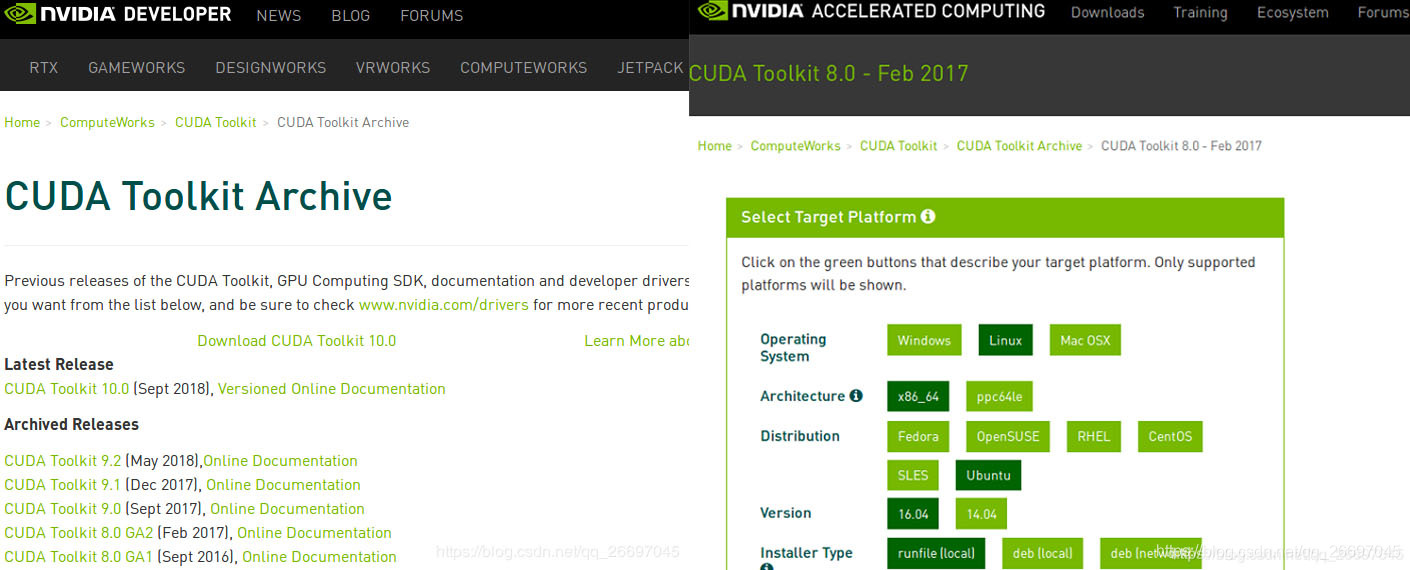
- 进入cuda版本选择页面,如图1。CUDA Toolkit 8.0之后的版本有在线文档,可以查看该版本CUDA Toolkit对环境的要求。
- 查看环境信息:
查看你的linux版本: uname -m && cat /etc/*release) 查看GCC版本: gcc --version 验证内核头文件和开发包:uname -r - 选择版本后,选择安装文件,如图2。
- 这里选择下载runfile[local]的Base Installer。
卸载(之前版本)
Toolkit runfile安装:
sudo /usr/local/cuda-X.Y/bin/uninstall_cuda_X.Y.pl

Driver runfile安装:
sudo /usr/bin/nvidia-uninstall

RPM/Deb安装:
$ sudo yum remove <package_name>                      # Redhat/CentOS
$ sudo dnf remove <package_name>                      # Fedora
$ sudo zypper remove <package_name>                   # OpenSUSE/SLES
$ sudo apt-get --purge remove <package_name>          # Ubuntu
安装
- 安装依赖:
sudo apt-get install freeglut3-dev build-essential libx11-dev libxmu-dev libxi-dev libgl1-mesa-glx libglu1-mesa libglu1-mesa-dev - 点击版本后的"Online Documentation"可以阅读官方安装教程。CUDA Toolkit 8.0的教程在这里可以看到。
- 根据官方教程,runfile安装,要禁用Nouveau驱动,前面禁用过就不必再禁用。
- 重启电脑进入登录界面而不登录(为了以root身份执行),按Ctrl+Alt+F1进入文本模式,输入sudo service lightdm stop关闭X服务器。
- 切换到cuda安装包目录,运行:sudo sh cuda_8.0.61_375.26_linux.run,依次输入:accept、n、y、y、y:
Description --* * --(0%) accept/decline.quit: accept <按住Enter键查看协议到100%> ----------------- Do you accept the previously read EULA? accept/decline/quit: accept Install NVIDIA Accelerated Graphics Driver for Linux-x86_64 396.37? (y)es/(n)o/(q)uit: n Install the CUDA 9.2 Toolkit? (y)es/(n)o/(q)uit: y Enter Toolkit Location [ default is /usr/local/cuda-9.2 ]: y Toolkit location must be an absolute path. Enter Toolkit Location [ default is /usr/local/cuda-9.2 ]: y Toolkit location must be an absolute path. Enter Toolkit Location [ default is /usr/local/cuda-9.2 ]: Do you want to install a symbolic link at /usr/local/cuda? (y)es/(n)o/(q)uit: y Install the CUDA 9.2 Samples? (y)es/(n)o/(q)uit: y Enter CUDA Samples Location [ default is /home/omen ]: /home/omen/software Installing the CUDA Toolkit in /usr/local/cuda-9.2 ... Installing the CUDA Samples in /home/omen/software ... Copying samples to /home/omen/software/NVIDIA_CUDA-9.2_Samples now... Finished copying samples. =========== = Summary = =========== Driver: Not Selected Toolkit: Installed in /usr/local/cuda-9.2 Samples: Installed in /home/omen/software Please make sure that - PATH includes /usr/local/cuda-9.2/bin - LD_LIBRARY_PATH includes /usr/local/cuda-9.2/lib64, or, add /usr/local/cuda-9.2/lib64 to /etc/ld.so.conf and run ldconfig as root To uninstall the CUDA Toolkit, run the uninstall script in /usr/local/cuda-9.2/bin Please see CUDA_Installation_Guide_Linux.pdf in /usr/local/cuda-9.2/doc/pdf for detailed information on setting up CUDA. ***WARNING: Incomplete installation! This installation did not install the CUDA Driver. A driver of version at least 384.00 is required for CUDA 9.2 functionality to work. To install the driver using this installer, run the following command, replacing <CudaInstaller> with the name of this run file: sudo <CudaInstaller>.run -silent -driver Logfile is /tmp/cuda_install_7100.log - 输入sudo service lightdm start
启用X服务器,会回到桌面模式。如果不能,按Ctrl+Alt+F7回到桌面模式。 - 设置环境变量,在/home/<yourname>/.bashrc文件中追加:
根据你的安装位置和版本 export PATH=$PATH:/usr/local/cuda-9.2/bin export LD_LIBRARY_PATH=$LD_LIBRARY_PATH:/usr/local/cuda-9.2/lib64 - 查看cuda是否安装成功:nvcc -V。
- 查看版本:cat /usr/local/cuda/version.txt 。
3.安装cudnn
下载
- python、tf、cuda、cudnn的版本对应关系可以在这里查看。
- 到cuDNN版本选择页面选择版本后登录、下载,该页面有该版本的使用、安装指导。cuDNN文档在这里。选择cuDNN Library for Linux而不是cuDNN Runtime Library for Ubuntu16.04 (Deb)或cuDNN Developer Library for Ubuntu16.04 (Deb)。
安装
- 解压cudnn-10.0-linux-x64-v7.6.3.30.tgz得到一个cuda文件夹。
- 执行:
拷贝(/usr/local/cuda是一个带箭头的链接文件夹)
sudo cp cuda/include/cudnn.h /usr/local/cuda/include
sudo cp cuda/lib64/libcudnn* /usr/local/cuda/lib64
更改权限
sudo chmod a+r /usr/local/cuda/include/cudnn.h /usr/local/cuda/lib64/libcudnn*
验证
查看版本:cat /usr/local/cuda/include/cudnn.h | grep CUDNN_MAJOR -A 2 。
4.多版本CUDA和cudnn
4.1 切换CUDA
1. 添加环境变量:
export PATH=$PATH:/XXX/cuda-8.0/bin
export LD_LIBRARY_PATH=$LD_LIBRARY_PATH:/XXX/cuda-8.0/lib64
2. 更改软链接:/usr/local目录下一个带箭头的cuda文件夹是一个软链接。
-- 查看软链接指向:stat /usr/local/cuda 。
-- 删除软链接:sudo rm -rf /usr/local/cuda 。
-- 创建软链接:sudo ln -s /XXX/cuda-8.0 /usr/local/cuda 。即让cuda指向/XXX/cuda-8.0 。
4.2 替换cudnn
同cudnn的安装步骤。
[参考]


 2511
2511

 被折叠的 条评论
为什么被折叠?
被折叠的 条评论
为什么被折叠?
 到【灌水乐园】发言


