


- fragment生命周期解析
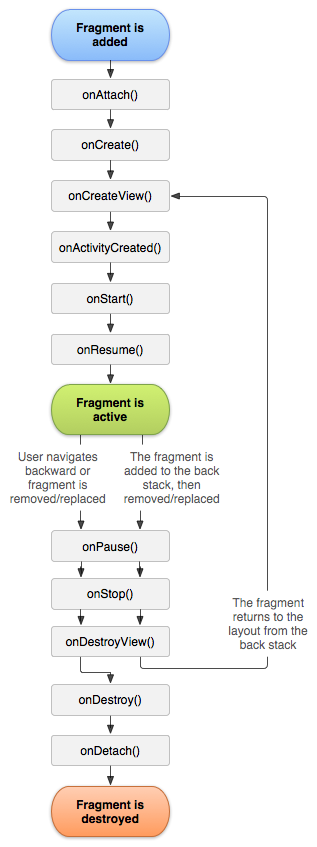
当一个fragment被创建的时候:
onAttach()
onCreate()
onCreateView()
onActivityCreated()
当这个fragment对用户可见的时候,它会经历以下状态。
onStart()
onResume()
1.2可以理解为从创建到显示(或切换)
当这个fragment进入“后台模式”的时候,它会经历以下状态。
onPause()
onStop()
当这个fragment被销毁了(或者持有它的activity被销毁了):
onPause()
onStop()
onDestroyView()
onDestroy()
onDetach()
就像Activity一样,在以下的状态中,可以使用Bundle对象保存一个fragment的对象。
onCreate()
onCreateView()
onActivityCreated()
其他场景的调用
屏幕灭掉
onPause() onSaveInstanceState() onStop()
屏幕解锁
onStart() onResume()
切换到其他Fragment
onPause() onStop() onDestroyView()
切换回本身的Fragment
onCreateView() onActivityCreated() onStart() onResume()
回到桌面
onPause() onSaveInstanceState() onStop()
回到应用
onStart() onResume()
退出应用
onPause() onStop() onDestroyView() onDestroy() onDetach()
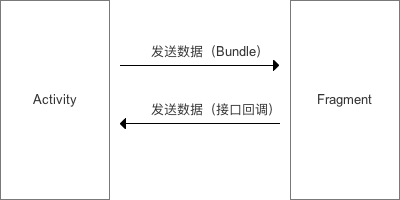
2.Activity 与 Fragment 相互通信
问题1: Activity 如何传递数据到 Fragment?
答:采用 Bundle方式
activity设置Bundle数据传给Fragment
public class FragmentActivity extends AppCompatActivity {
    private TextView text;
    @Override
    protected void onCreate(Bundle savedInstanceState) {
        super.onCreate(savedInstanceState);
        setContentView(R.layout.activity_fragment);
        text = (TextView) findViewById(R.id.text);
        // 步骤1:获取FragmentManager
        FragmentManager fragmentManager = getFragmentManager();
        // 步骤2:获取FragmentTransaction
        FragmentTransaction fragmentTransaction = fragmentManager.beginTransaction();
        // 步骤3:创建需要添加的Fragment
        final MyFragment fragment = new MyFragment();
        // 步骤4:创建Bundle对象
        // 作用:存储数据,并传递到Fragment中
        Bundle bundle = new Bundle();
        // 步骤5:往bundle中添加数据
        bundle.putString("message", "I love Google");
        // 步骤6:把数据设置到Fragment中
        fragment.setArguments(bundle);
        // 步骤7:动态添加fragment
        // 即将创建的fragment添加到Activity布局文件中定义的占位符中(FrameLayout)
        fragmentTransaction.add(R.id.fragment_container, fragment, null);
        fragmentTransaction.commit();
    }
}
fragment获取activity传递的数据
public class MyFragment extends Fragment {
    private Button button;
    private TextView text;
    private Bundle bundle;
    private String message;
    @Override
    public View onCreateView(LayoutInflater inflater, ViewGroup container,
 Bundle savedInstanceState) {
        View contentView = inflater.inflate(R.layout.fragment, container, false);
        // 设置布局文件
        button = (Button) contentView.findViewById(R.id.button);
        text = (TextView) contentView.findViewById(R.id.text);
        // 步骤1:通过getArgments()获取从Activity传过来的全部值
        bundle = this.getArguments();
        // 步骤2:获取某一值
        message = bundle.getString("message");
        // 步骤3:设置按钮,将设置的值显示出来
        button.setOnClickListener(new View.OnClickListener() {
            @Override
            public void onClick(View v) {
                // 显示传递过来的值
                text.setText(message);
            }
        });
        return contentView;
    }
}
问题2:Fragment 如何传递数据到 Activity
答:采用 接口回调 方式。
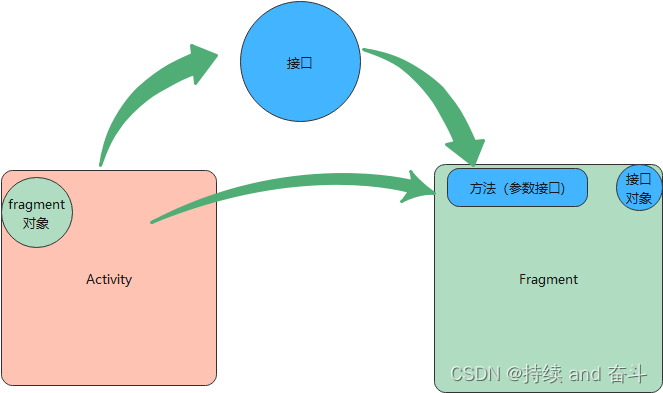
Fragment提供对外接口回调方法
public class MyFragment extends Fragment {

    @Override
    public View onCreateView(LayoutInflater inflater, ViewGroup container,
Bundle savedInstanceState) {
        View contentView = inflater.inflate(R.layout.fragment, container, false);
        // 设置布局文件
        return contentView;
    }

    // 设置 接口回调 方法
    public void sendMessage(ICallBack callBack){
        callBack.get_message_from_Fragment("消息:我来自Fragment");
    }
}
activity调用fragment提供接口回调方法,并传递回调
public class FragmentActivity extends AppCompatActivity {
    Button button;
    TextView text;
    @Override
    protected void onCreate(Bundle savedInstanceState) {
        super.onCreate(savedInstanceState);
        setContentView(R.layout.activity_main);
        button = (Button)findViewById(R.id.button);
        text = (TextView)findViewById(R.id.text);
        // 步骤1:获取FragmentManager
        FragmentManager fragmentManager = getFragmentManager();
        // 步骤2:获取FragmentTransaction
        FragmentTransaction fragmentTransaction = fragmentManager.beginTransaction();
        // 步骤3:创建需要添加的Fragment
        final mFragment fragment = new mFragment();

        // 步骤4:动态添加fragment
        // 即将创建的fragment添加到Activity布局文件中定义的占位符中(FrameLayout)
        fragmentTransaction.add(R.id.fragment_container, fragment, null);
        fragmentTransaction.commit();


        button.setOnClickListener(new View.OnClickListener() {
            @Override
            public void onClick(View v) {

                // 通过接口回调将消息从fragment发送到Activity
                fragment.sendMessage(new ICallBack() {
                    @Override
                    public void get_message_from_Fragment(String string) {
                            text.setText(string);
                    }
                });
            }
        });
    }

}
其他方案:利用观察者模式 or 发布订阅模式,利用模式架构来管理(进阶,待补充。。。。)
A、eventBus
B、LiveData...
3.总结
看完本文,你应该非常清楚该如何实现 Activity 与 Fragment 相互通信


 600
600


 被折叠的 条评论
为什么被折叠?
被折叠的 条评论
为什么被折叠?
 到【灌水乐园】发言


