


记录一下我将训练好的YOLOv5模型移植到Android手机上的详细步骤,真的是踩坑无数加秃头的一个过程,步骤如下:
需要的环境:
pycharm/vscode,AndroidStudio,Visual studio2017
一.将训练好的.pt模型转换成.onnx
- 首先你得拥有一个YOLOv5训练好的模型,我训练好的是last.pt或者预训练的模型(以YOLOv5s为例)
- 将export.py/onnx_export.py从models文件夹中拖到外面和models同级目录,然后修改参数,如下所示:
提示:image_size建议改小一点,按照默认的640在手机上运行会超级无敌的慢,慢到你以为手机直接卡死,不出结果的那种慢,软件直接黑屏,我曾经等待过30s,然后果断的改小了(仙女就是这么没耐心)。


- 然后去models中的cocommon.py,修改Focus 去除slice数组操作,如果不改后续onnx2ncnn转换的时候会报错。修改如下所示:

代码如下:
class Focus(nn.Module):
 # Focus wh information into c-space
 def __init__(self, c1, c2, k=1, s=1, p=None, g=1, act=True):  # ch_in, ch_out, kernel, stride, padding, groups
     super(Focus, self).__init__()
     self.conv = Conv(c1 * 4, c2, k, s, p, g, act)

 def forward(self, x):  # x(b,c,w,h) -> y(b,4c,w/2,h/2)
    return self.conv(torch.cat([x,x,x,x],1))
    # return self.conv(torch.cat([x[..., ::2, ::2], x[..., 1::2, ::2], x[..., ::2, 1::2], x[..., 1::2, 1::2]], 1))
- 使用YOLOv5 project中的export.py/onnx_export.py将模型转换输出。
- 简化onnx模型,使用指令:
python -m onnxsim yolov5s.onnx yolov5ssim.onnx,自己把“yolov5s.onnx”修改成自己的名字就好了,如果没有安装onnxsim,先安装pip install onnx-simplifier再运行上面的简化指令python -m onnxsim yolov5s.onnx yolov5ssim.onnx
运行成功之后,会生成一个简化后的模型,这一大部分就完成了。
二. onnx -> ncnn
1.需要安装的依赖库
- cmake(这个一定得先安装,后面有很多指令要基于这个)
- protobuf-3.4.0 (https://github.com/google/protobuf/archive/v3.4.0.zip)
- opencv(https://sourceforge.net/projects/opencvlibrary/)
- ncnn(https://github.com/Tencent/ncnn/releases)
2.安装cmake很重要,这个很简单啦,自己搜教程吧
3.编译protobuf-3.4.0
- 编译的时候需要用到Visual studio2017,所以需要提前安装上,步骤如下图所示:

- 然后打开你下载并解压好的目录,我的是D盘,所以我的指令是
d:,cd D:\JHFimportantthing\protobuf-3.4.0,然后依次输出如下的指令:注意里面的路径需要修改成自己的
mkdir build-vs2015

cd build-vs2015

cmake -G"NMake Makefiles" -DCMAKE_BUILD_TYPE=Release -DCMAKE_INSTALL_PREFIX=%cd%/install -Dprotobuf_BUILD_TESTS=OFF -Dprotobuf_MSVC_STATIC_RUNTIME=OFF ../cmake

nmake

nmake install

4.下载OpenCV并安装
这个也很重要,但是也很简单,根据上述链接,然后下载安装即可,可以自己搜教程啦
5.编译ncnn
- 根据链接,下载ncnn,建议不要下载很高版本的,可能会不兼容吧,我下载的是ncnn-20201208,一定要下载source code哦

2.下载并解压,依旧使用vs2017的本机工具命令提示符进行编译,和编译protobuf-3.4.0 一样,cd到你下载并解压好的目录中,然后依次输入如下指令:
mkdir build-vs2015

cd build-vs2015

cmake -G"NMake Makefiles" -DCMAKE_BUILD_TYPE=Release   -DCMAKE_INSTALL_PREFIX=%cd%/install -DProtobuf_INCLUDE_DIR=D:/JHFimportantthing/protobuf-3.4.0/build-vs2015/install/include -DProtobuf_LIBRARIES=D:/JHFimportantthing/protobuf-3.4.0/build-vs2015/install/lib/libprotobuf.lib -DProtobuf_PROTOC_EXECUTABLE=D:/JHFimportantthing/protobuf-3.4.0/build-vs2015/install/bin/protoc.exe ..

nmake

nmake install
- 检查是否成功,成功了在…\ncnn-20201208\build-vs2015\tools\onnx中会有onnx2ncnn.exe应用程序
- 成功后,在该目录下(\build-vs2015\tools\onnx),按shift+鼠标右键,打开Powershell窗口,然后会出现一个蓝色的框框,输入指令:
./onnx2ncnn best-sim.onnx best.param best.bin,这里的名字自己修改,然后成功之后会生成两个新的文件,.bin和 .param, - 压缩模型,返回上一级目录,即\ncnn-20201208\build-vs2015\tools目录下,将上一步生成的两个文件copy到这里,按shift+鼠标右键,打开Powershell窗口,输入指令:
./ncnnoptimize best.param best.bin best-opt.param best-opt.bin 65536,这个指令是压缩模型。 - 理论上这一步会出现两个提示,但是没关系,不用管。
6.修改上一步生成的 .param
打开上一步生成的 .param文件,直接拉到最后,将图中的3个数字改为-1,这一步是为了防止Android移植后,检测结果正确显示用,如果不改的话,会出现n多个框,密密麻麻的覆盖你的原本图片。

三、Android studio工程的编辑
1.新建一个Android studioproject
2.添加好你想要的控件及相关的功能
3.yolov5的移植
a.将上面编译好的转换好的模型放到assert中
b. 首先向project中添加混合编程的c++依赖
- 添加cpp文件夹,步骤如下所示

- 添加YoloV5class,步骤如下:

- 向.h和.cpp添加前处理和后处理函数,可以直接用我的(小声:我用的也是别的大佬写好的,大佬的链接:https://blog.csdn.net/lindamtd/article/details/107360899,大佬的文章是VIP只能看,不知道为啥怎么做,文章开头有工程的超链接,大家可以自行下载).h文件代码如下:里面的labels和layers需要修改成自己的,后面添加layers修改的方法
#ifndef MYCAMERA_YOLOV5_H
#define MYCAMERA_YOLOV5_H
#include "ncnn/net.h"
namespace cv{
typedef struct{
int width;
int height;
}Size;
}
typedef struct {
std::string name;
int stride;
std::vector<cv::Size> anchors;
}YoloLayerData;
typedef struct BoxInfo {
float x1;
float y1;
float x2;
float y2;
float score;
int label;
} BoxInfo;
class YoloV5 {
public:
YoloV5(AAssetManager* mgr, const char* param, const char* bin);
~YoloV5();
std::vector<BoxInfo> detect(JNIEnv* env, jobject image, float threshold, float nms_threshold);
/*
std::vector<std::string> labels{"person", "bicycle", "car", "motorcycle", "airplane", "bus", "train", "truck", "boat", "traffic light",
"fire hydrant", "stop sign", "parking meter", "bench", "bird", "cat", "dog", "horse", "sheep", "cow",
"elephant", "bear", "zebra", "giraffe", "backpack", "umbrella", "handbag", "tie", "suitcase", "frisbee",
"skis", "snowboard", "sports ball", "kite", "baseball bat", "baseball glove", "skateboard", "surfboard",
"tennis racket", "bottle", "wine glass", "cup", "fork", "knife", "spoon", "bowl", "banana", "apple",
"sandwich", "orange", "broccoli", "carrot", "hot dog", "pizza", "donut", "cake", "chair", "couch",
"potted plant", "bed", "dining table", "toilet", "tv", "laptop", "mouse", "remote", "keyboard", "cell phone",
"microwave", "oven", "toaster", "sink", "refrigerator", "book", "clock", "vase", "scissors", "teddy bear",
"hair drier", "toothbrush"};*/
std::vector<std::string> labels{"mxymx","cngd","gudu","xcbgd","ydgm"};
private:
static std::vector<BoxInfo> decode_infer(ncnn::Mat &data, int stride,const cv::Size& frame_size, int net_size,int num_classes,const std::vector<cv::Size>& anchors,float threshold);
static void nms(std::vector<BoxInfo>& result,float nms_threshold);
ncnn::Net* Net;
int input_size = 640;
//int num_class = 80;
int num_class = 5;
/*
std::vector<YoloLayerData> layers{
{"394",32,{{116,90},{156,198},{373,326}}},
{"375",16,{{30,61},{62,45},{59,119}}},
{"output",8,{{10,13},{16,30},{33,23}}},
};*/
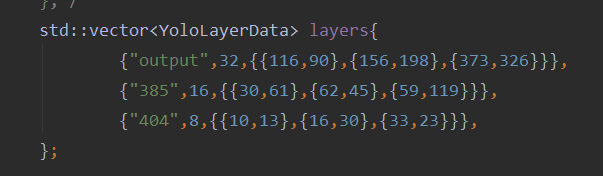
std::vector<YoloLayerData> layers{
{"output",32,{{116,90},{156,198},{373,326}}},
{"385",16,{{30,61},{62,45},{59,119}}},
{"404",8,{{10,13},{16,30},{33,23}}},
};
public:
static YoloV5 *detector;
static bool hasGPU;
};
#endif //YOLOV5_H
.cpp文件
//
// Created by 13071 on 2021/1/14.
//

#include "YoloV5.h"
bool YoloV5::hasGPU = false;
YoloV5* YoloV5::detector = nullptr;

YoloV5::YoloV5(AAssetManager* mgr, const char *param, const char *bin) {
    Net = new ncnn::Net();
    Net->load_param(mgr,param);
    Net->load_model(mgr,bin);
}

YoloV5::~YoloV5() {
    delete Net;
}

std::vector<BoxInfo> YoloV5::detect(JNIEnv* env, jobject image, float threshold, float nms_threshold) {
    AndroidBitmapInfo img_size;
    AndroidBitmap_getInfo(env, image, &img_size);
    ncnn::Mat in = ncnn::Mat::from_android_bitmap_resize(env,image,ncnn::Mat::PIXEL_BGR2RGB,input_size/2,input_size/2);
    float norm[3] = {1/255.f,1/255.f,1/255.f};
    float mean[3] = {0,0,0};
    in.substract_mean_normalize(mean,norm);
    auto ex = Net->create_extractor();
    ex.set_light_mode(true);
    ex.set_num_threads(4);
    ex.input(0, in);
    std::vector<BoxInfo> result;
    for(const auto& layer: layers){
        ncnn::Mat blob;
        ex.extract(layer.name.c_str(),blob);
        auto boxes = decode_infer(blob,layer.stride,{(int)img_size.width,(int)img_size.height},input_size,num_class,layer.anchors,threshold);
        result.insert(result.begin(),boxes.begin(),boxes.end());
    }
    nms(result,nms_threshold);
    return result;
}

inline float fast_exp(float x)
{
    union {uint32_t i;float f;} v{};
    v.i=(1<<23)*(1.4426950409*x+126.93490512f);
    return v.f;
}

inline float sigmoid(float x){
    return 1.0f / (1.0f + fast_exp(-x));
}

std::vector<BoxInfo>
YoloV5::decode_infer(ncnn::Mat &data, int stride, const cv::Size &frame_size, int net_size, int num_classes,const std::vector<cv::Size>& anchors, float threshold) {
    std::vector<BoxInfo> result;
    int grid_size = int(sqrt(data.h));
    float *mat_data[data.c];
    for(int i=0;i<data.c;i++){
        mat_data[i] = data.channel(i);
    }
    float cx,cy,w,h;
    for(int shift_y=0;shift_y<grid_size;shift_y++){
        for(int shift_x=0;shift_x<grid_size;shift_x++){
            int loc = shift_x+shift_y*grid_size;
            for(int i=0;i<3;i++){
                float *record = mat_data[i];
                float *cls_ptr = record + 5;
                for(int cls = 0; cls<num_classes;cls++){
                    float score = sigmoid(cls_ptr[cls]) * sigmoid(record[4]);
                    if(score>threshold){
                        cx = (sigmoid(record[0]) * 2.f - 0.5f + (float)shift_x) * (float) stride;
                        cy = (sigmoid(record[1]) * 2.f - 0.5f + (float)shift_y) * (float) stride;
                        w = pow(sigmoid(record[2]) * 2.f,2)*anchors[i].width;
                        h = pow(sigmoid(record[3]) * 2.f,2)*anchors[i].height;
                        //printf("[grid size=%d, stride = %d]x y w h %f %f %f %f\n",grid_size,stride,record[0],record[1],record[2],record[3]);
                        BoxInfo box;
                        box.x1 = std::max(0,std::min(frame_size.width,int((cx - w / 2.f) * (float)frame_size.width / (float)net_size)));
                        box.y1 = std::max(0,std::min(frame_size.height,int((cy - h / 2.f) * (float)frame_size.height / (float)net_size)));
                        box.x2 = std::max(0,std::min(frame_size.width,int((cx + w / 2.f) * (float)frame_size.width / (float)net_size)));
                        box.y2 = std::max(0,std::min(frame_size.height,int((cy + h / 2.f) * (float)frame_size.height / (float)net_size)));
                        box.score = score;
                        box.label = cls;
                        result.push_back(box);
                    }
                }
            }
            for(auto& ptr:mat_data){
                ptr+=(num_classes + 5);
            }
        }
    }
    return result;
}

void YoloV5::nms(std::vector<BoxInfo> &input_boxes, float NMS_THRESH) {
    std::sort(input_boxes.begin(), input_boxes.end(), [](BoxInfo a, BoxInfo b){return a.score > b.score;});
    std::vector<float>vArea(input_boxes.size());
    for (int i = 0; i < int(input_boxes.size()); ++i)
    {
        vArea[i] = (input_boxes.at(i).x2 - input_boxes.at(i).x1 + 1)
                   * (input_boxes.at(i).y2 - input_boxes.at(i).y1 + 1);
    }
    for (int i = 0; i < int(input_boxes.size()); ++i)
    {
        for (int j = i + 1; j < int(input_boxes.size());)
        {
            float xx1 = std::max(input_boxes[i].x1, input_boxes[j].x1);
            float yy1 = std::max(input_boxes[i].y1, input_boxes[j].y1);
            float xx2 = std::min(input_boxes[i].x2, input_boxes[j].x2);
            float yy2 = std::min(input_boxes[i].y2, input_boxes[j].y2);
            float w = std::max(float(0), xx2 - xx1 + 1);
            float   h = std::max(float(0), yy2 - yy1 + 1);
            float   inter = w * h;
            float ovr = inter / (vArea[i] + vArea[j] - inter);
            if (ovr >= NMS_THRESH)
            {
                input_boxes.erase(input_boxes.begin() + j);
                vArea.erase(vArea.begin() + j);
            }
            else
            {
                j++;
            }
        }
    }
}
- 使用https://netron.app/,查看自己的输出节点名称,打开自己的模型,记录图中的2个数字,其中output name:就是layer节点的名称,一共有三个,分别对应128,256,512

- 上述的三层已经全部记录好,按照512,256,128,对应的output name进行修改,我自己的是:
| 404 | 128 |
| 385 | 256 |
| output |512 |
修改之后的layer如下图所示:
- 添加接口文件jin_interface.cpp
#include <jni.h>
#include <string>
#include <ncnn/gpu.h>
#include <android/asset_manager_jni.h>
#include <android/log.h>
#include "YoloV5.h"

JNIEXPORT jint JNI_OnLoad(JavaVM* vm, void* reserved)
{
    ncnn::create_gpu_instance();
    if(ncnn::get_gpu_count() > 0){
        YoloV5::hasGPU = true;
    }
    return JNI_VERSION_1_4;
}

JNIEXPORT void JNI_OnUnload(JavaVM* vm, void* reserved)
{
    ncnn::destroy_gpu_instance();
}
c.添加其他需要的Java class
- 添加box class,修改一下labels

import android.graphics.Color;
import android.graphics.RectF;

import java.util.Random;

public class Box {
    public float x0,y0,x1,y1;
    private int label;
    private float score;
    private static String[] labels={"mxymx","cngd","gudu","xcbgd","ydgm"};
    public Box(float x0, float y0, float x1, float y1, int label, float score){
        this.x0 = x0;
        this.y0 = y0;
        this.x1 = x1;
        this.y1 = y1;
        this.label = label;
        this.score = score;
    }
    public RectF getRect(){
        return new RectF(x0,y0,x1,y1);
    }

    public String getLabel(){
        return labels[label];
    }

    public float getScore(){
        return score;
    }
    public int getColor(){
        Random random = new Random(label);
        return Color.argb(255,random.nextInt(256),random.nextInt(256),random.nextInt(256));
    }
}
- 添加YOLOv5 class, public static native void init(AssetManager manager);
public static native Box[] detect(Bitmap bitmap, double threshold, double nms_threshold);这里是将Java 接口和c++类链接起来
import android.content.res.AssetManager;
import android.graphics.Bitmap;

public class YOLOv5 {
    static {
        System.loadLibrary("yolov5");
    }

    public static native void init(AssetManager manager);
    public static native Box[] detect(Bitmap bitmap, double threshold, double nms_threshold);
}
这里会有个错误,就是public static native void init(AssetManager manager); public static native Box[] detect(Bitmap bitmap, double threshold, double nms_threshold);会提示没有c++关联reports native method declarations in java where no responding JIN function,这里先clean project,然后这两行上面会有一个紫色的灯泡提示,按照上面的提示,会自动在接口文件jin_interface.cpp生成一个链接,这样,紫色的灯泡就会变成C++的链接提示,点击一下会自动调到jin_interface.cpp中进行修改,内容分别如下:请选择性的paste
Java_com_example_mycamera_YOLOv5_init(JNIEnv *env, jclass clazz, jobject manager) {
    // TODO: implement init()
    if(YoloV5::detector == nullptr){
        AAssetManager* mgr = AAssetManager_fromJava(env, manager);
        //YoloV5::detector = new YoloV5(mgr,"yolov5.param","yolov5.bin");
        YoloV5::detector = new YoloV5(mgr,"last-opt.param","last-opt.bin");
    }
}extern "C"

JNIEXPORT jobjectArray JNICALL
Java_com_example_mycamera_YOLOv5_detect(JNIEnv *env, jclass clazz, jobject bitmap,
                                        jdouble threshold, jdouble nms_threshold) {
    // TODO: implement detect()
    auto result = YoloV5::detector->detect(env,bitmap,threshold,nms_threshold);

    auto box_cls = env->FindClass("com/example/mycamera/Box");
    auto cid = env->GetMethodID(box_cls, "<init>", "(FFFFIF)V");
    jobjectArray ret = env->NewObjectArray( result.size(), box_cls, nullptr);
    int i = 0;
    for(auto& box:result){
        env->PushLocalFrame(1);
        jobject obj = env->NewObject(box_cls, cid,box.x1,box.y1,box.x2,box.y2,box.label,box.score);
        obj = env->PopLocalFrame(obj);
        env->SetObjectArrayElement( ret, i++, obj);
    }
    return ret;
}
d.将ncnn复制到cpp文件下,后续我会添加资源,自行下载
e.添加CMakeLists.txt文件
- 添加方法是在cpp文件夹下新建CMakeLists.txt file,然后添加如下内容:
# For more information about using CMake with Android Studio, read the
# documentation: https://d.android.com/studio/projects/add-native-code.html

# Sets the minimum version of CMake required to build the native library.

cmake_minimum_required(VERSION 3.4.1)
set(CMAKE_CXX_FLAGS "${CMAKE_CXX_FLAGS} -fopenmp")
set(CMAKE_C_FLAGS "${CMAKE_C_FLAGS} -fopenmp")
if(DEFINED ANDROID_NDK_MAJOR AND ${ANDROID_NDK_MAJOR} GREATER 20)
    set(CMAKE_SHARED_LINKER_FLAGS "${CMAKE_SHARED_LINKER_FLAGS} -static-openmp")
endif()
# Creates and names a library, sets it as either STATIC
# or SHARED, and provides the relative paths to its source code.
# You can define multiple libraries, and CMake builds them for you.
# Gradle automatically packages shared libraries with your APK.

add_library( # Sets the name of the library.
        yolov5

        # Sets the library as a shared library.
        SHARED

        # Provides a relative path to your source file(s).
        jni_interface.cpp
        YoloV5.cpp)

include_directories(
        ncnn/include
)
# Searches for a specified prebuilt library and stores the path as a
# variable. Because CMake includes system libraries in the search path by
# default, you only need to specify the name of the public NDK library
# you want to add. CMake verifies that the library exists before
# completing its build.

find_library(log-lib log)
find_library(android-lib android)
find_library(vulkan-lib vulkan)
find_library(jnigraphics-lib jnigraphics)
add_library( ncnn STATIC IMPORTED )
set_target_properties( # Specifies the target library.
        ncnn

        # Specifies the parameter you want to define.
        PROPERTIES IMPORTED_LOCATION

        # Provides the path to the library you want to import.
        ${CMAKE_SOURCE_DIR}/ncnn/${ANDROID_ABI}/libncnn.a )
# Specifies libraries CMake should link to your target library. You
# can link multiple libraries, such as libraries you define in this
# build script, prebuilt third-party libraries, or system libraries.

target_link_libraries( # Specifies the target library.
        yolov5

        # Links the target library to the log library
        # included in the NDK.
        ${log-lib}
        ${vulkan-lib}
        ${android-lib}
        ${jnigraphics-lib}
        ncnn)
4.YOLOv5的调用
- 先初始化,YOLOv5.init(getAssets());
- 调用detect并将检测结果显示在图片上,核心代码如下:
Box[] result = YOLOv5.detect(bitmap,threshold,nms_threshold);
            croppedBitmap = bitmap.copy(Bitmap.Config.ARGB_8888, true);
            Canvas canvas = new Canvas(croppedBitmap);
            final Paint boxPaint = new Paint();
            boxPaint.setAlpha(200);
            boxPaint.setStyle(Paint.Style.STROKE);
            boxPaint.setStrokeWidth(4 * bitmap.getWidth()/800);
            boxPaint.setTextSize(40 * bitmap.getWidth()/800);
            for(Box box:result){
                boxPaint.setColor(box.getColor());
                boxPaint.setStyle(Paint.Style.FILL);
                canvas.drawText(box.getLabel(),box.x0,box.y0,boxPaint);
                boxPaint.setStyle(Paint.Style.STROKE);
                canvas.drawRect(box.getRect(),boxPaint);
            }
            albumsPicture.setImageBitmap(croppedBitmap);//将最终的图显示在ImageVieView控件
5.在build.gradle中添加native库


        externalNativeBuild {
            cmake {
                cppFlags ""
            }
        }
externalNativeBuild {
        cmake {
            path "src/main/cpp/CMakeLists.txt"
            version "3.10.2"
        }
    }
6.编译然后就可以在你的手机上运行啦
7.可能遇到的错误
- ERROR: Cause: executing external native build for cmake,
这个错误,我真是找了很多方法,最终解决的方法也是傻逼:vulkan支持的最小SDK版本为24,我的是15,当时不知道,看到别的博主提示了,才试着修改然后一下子就成功了,修改build.gradle中的defaultConfig的minSdkVersion 24
总结
耗时4天的终端移植终于完成啦,参考了一些博主博客的过程和一些博主的工程,中间又是各种问题,最终成功了,其实并不容易,但是好开心,昨天晚上差点蹦起来,哈哈哈哈~~~~


 3530
3530


 被折叠的 条评论
为什么被折叠?
被折叠的 条评论
为什么被折叠?
 到【灌水乐园】发言


