


网络资源:网络资源模板--基于 Android Studio 实现简易的记事本
目录
一、运行演示
前言
本项目运用到 Android 基础阶段知识,控件、界面布局容器的使用,以及 SharedPreferences 和 SQLite 数据库存储及读取、Glide 图片加载框架的使用。
一、运行演示
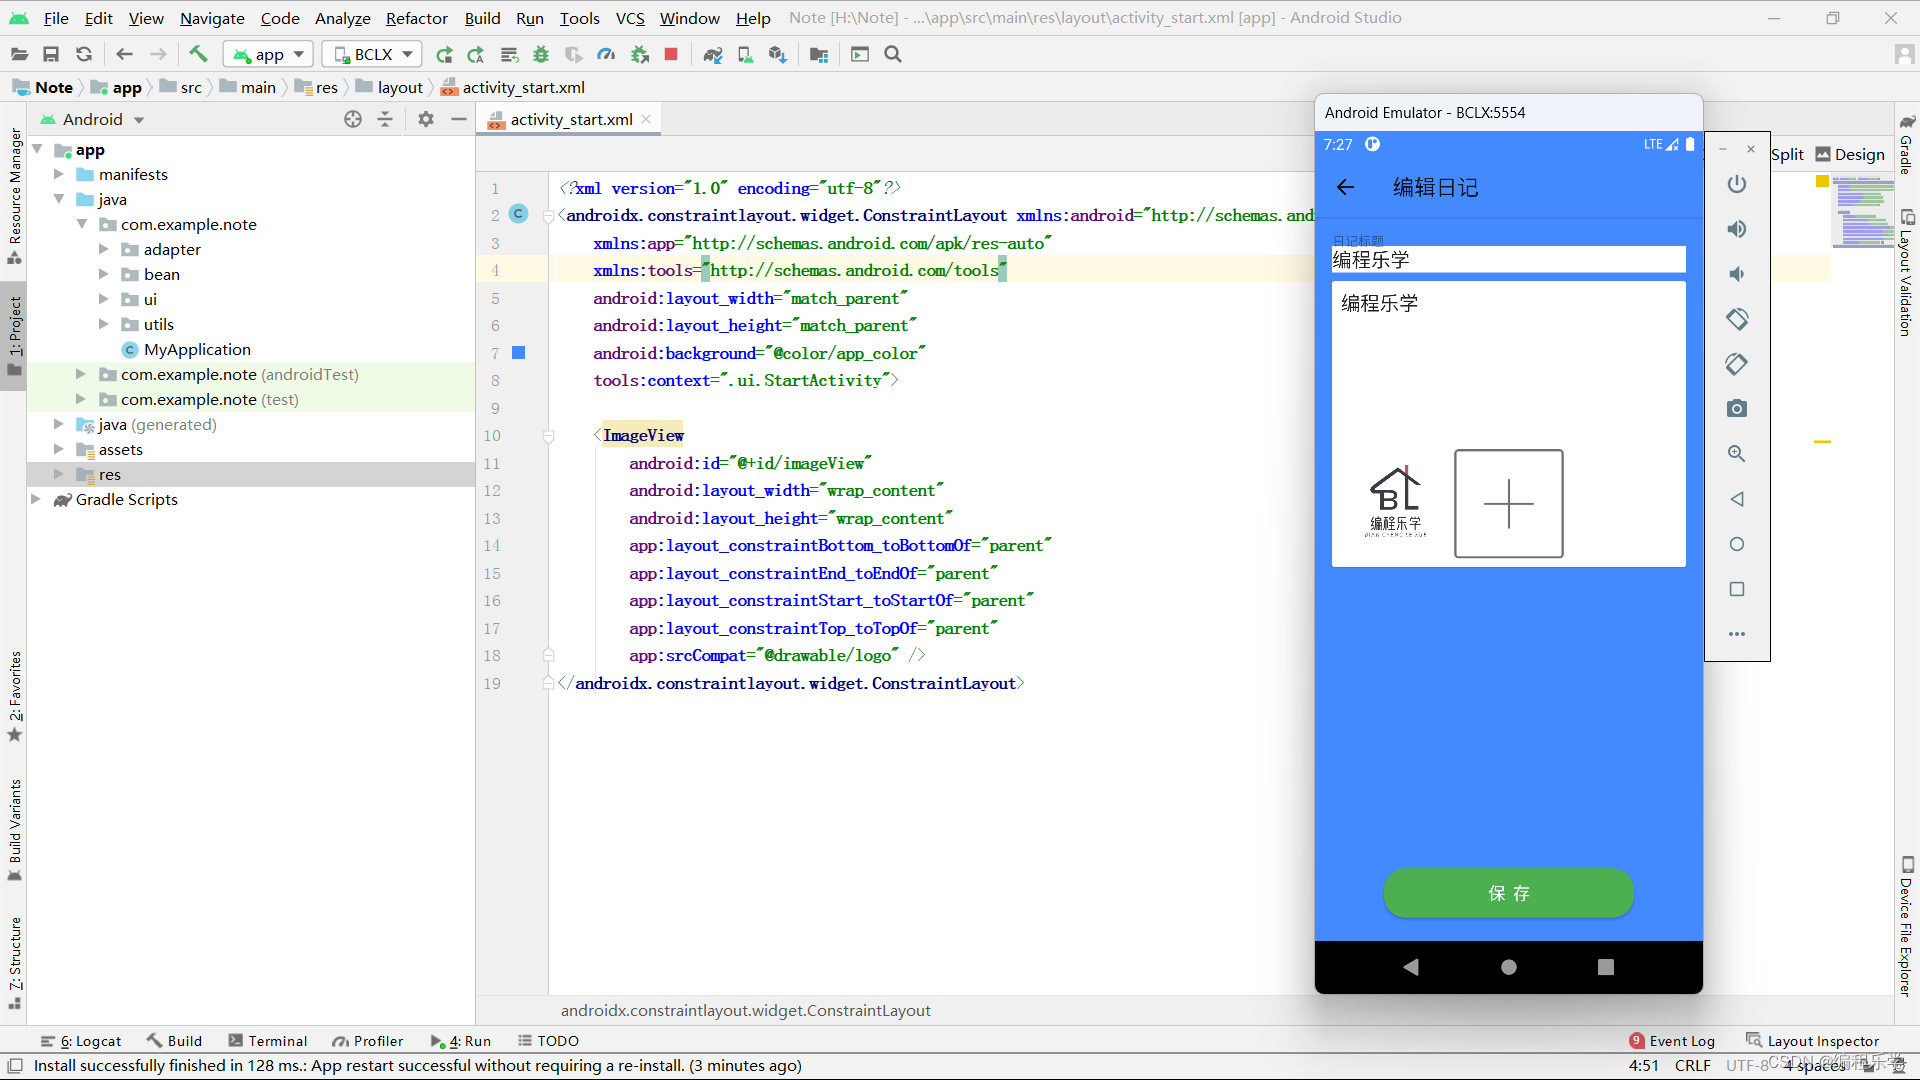
我们先来看下运行演示效果
Android Studio 实现图片日记本
二、项目目标
具体要达到如下目标:
(1) 能够了解 Android 的基础阶段知识
(2) 能够配置 Android Studio 开发工具的编程环境
(3) 能够了解 Android 工程目录的概念
(4) 掌握 Android 的常用控件、界面布局
(5) 掌握 SharedPreference、Sqlite 存储的封装
(6) 掌握 Glide 图片加载框架的使用
(7) 掌握 LitePal、PictureSelector 等第三方框架的使
三、开发环境
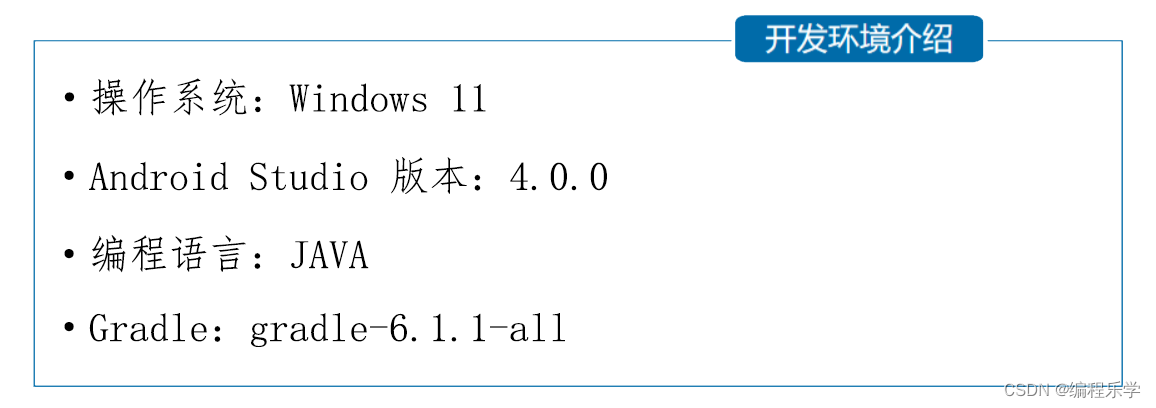
我的开发环境如下,大家的AS版本不需要和我相同,只要是近两年从官网下载的版本,都是比4.0.0 (2020)高的,是可以满足运行和开发要求的。
四、完成步骤
步骤 1:创建项目,添加权限
打开 Android studio 开发工具后,进行项目创建,左上角 File—>New Project、填写后点击 Finish 完成创建!
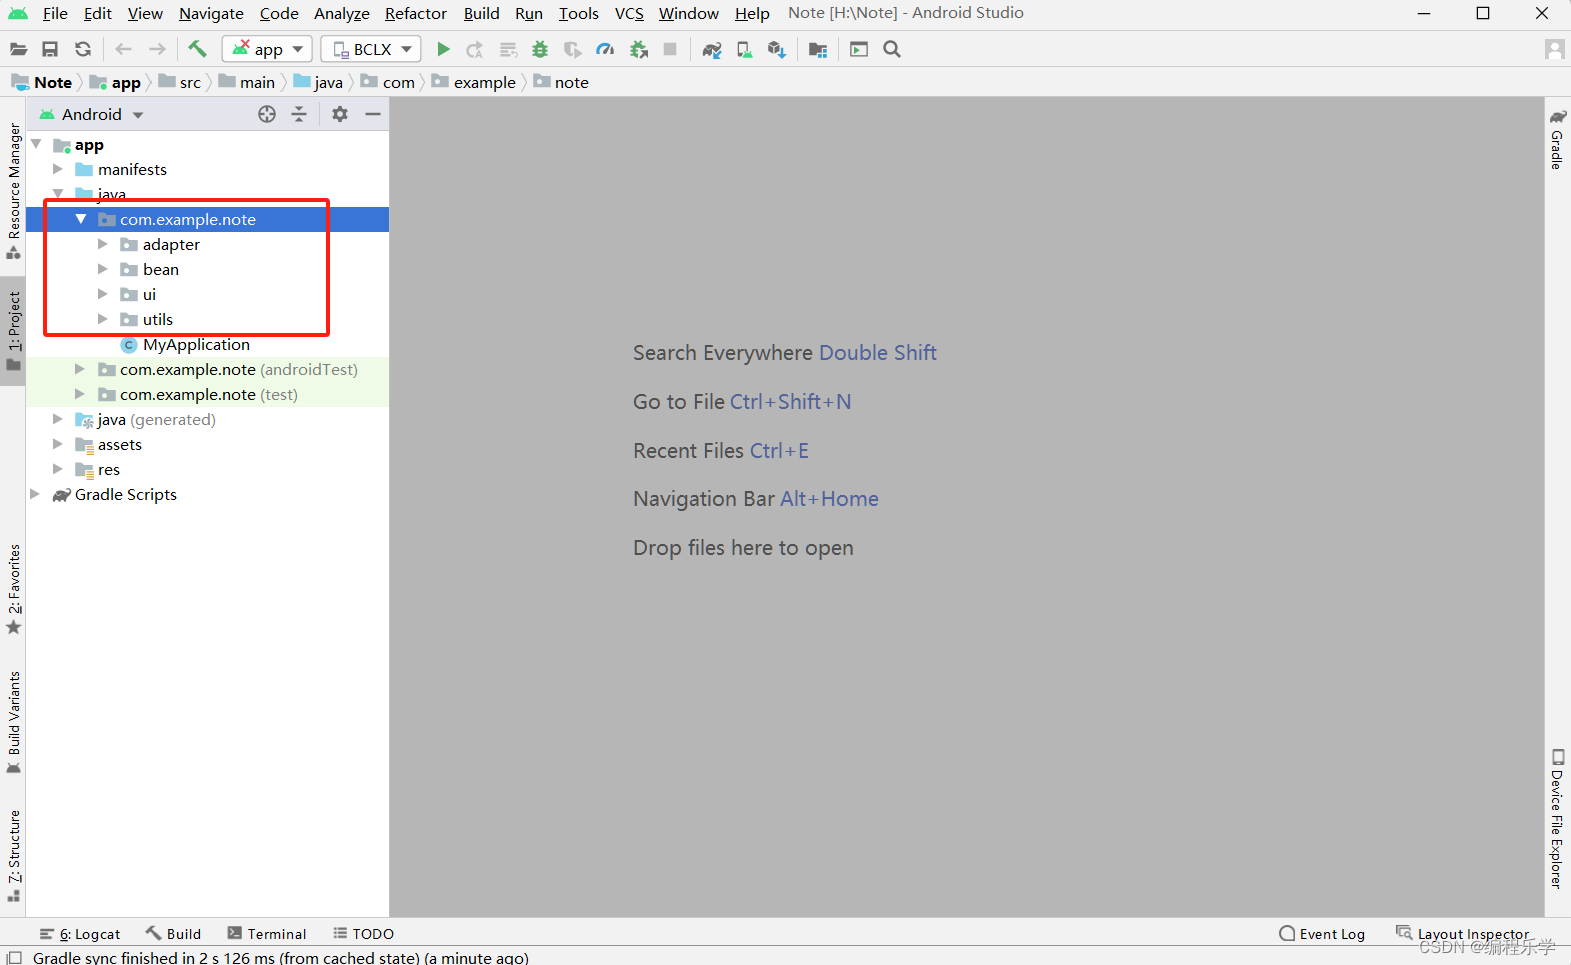
步骤 2:创建包名和创建数据库实体
选中com.example.note包 名 右 键 New — >package 后 在 对 话 框 中 输 入com.example.note.bean 回车后创建包 bean,操作如下图 3-3-1。并按需求依次 ui(存放各类 Activity)、adapter(存放各类适配器)、utils(存放工具类) 等包名,后续代码将按对应包名去创建,并将 MainActivity.java 移动到 ui 包 下
步骤 3:实现启动页
在 ui 包上右键创建 New—>Activity—>Empty Activity 选项创建 Activity 后弹 出对话框,输入相关信息,即可创建 Activity.
启动页页面布局背景放置一张自己喜欢的logo即可
这里我们直接看java部分代码:
package com.example.note.ui;

import androidx.appcompat.app.AppCompatActivity;

import android.content.Intent;
import android.os.Bundle;
import android.os.CountDownTimer;
import android.os.Handler;
import android.widget.Button;
import android.widget.ImageView;

import com.example.note.R;

public class StartActivity extends AppCompatActivity {
    TimeCount timeCount;
    private Handler handler = new Handler();
    private Runnable runnable = new Runnable() {
        @Override
        public void run() {
            tomainActive();
        }
    };

    // 进入主页面
    private void tomainActive() {
        startActivity(new Intent(this, LoginActivity.class));
        // 跳转完成后注销
        finish();
    }

    @Override
    protected void onCreate(Bundle savedInstanceState) {
        super.onCreate(savedInstanceState);
        setContentView(R.layout.activity_start);
        //隐藏 ActionBar
        getSupportActionBar().hide();

      }

    // 计时器
    class TimeCount extends CountDownTimer {
        public TimeCount(long millisInFuture, long countDownInterval) {
            super(millisInFuture, countDownInterval);
        }

        @Override
        public void onTick(long l) {
        }

        @Override
        public void onFinish() {

        }
    }
}
步骤 5:实现用户注册
在 ui 包上右键创建 New—>Activity—>Empty Activity 选项创建 Activity 后弹 出对话框,输入相关信息,即可创建 Activity.
用户注册页面布局代码如下所示:
<?xml version="1.0" encoding="utf-8"?>
<LinearLayout xmlns:android="http://schemas.android.com/apk/res/android"
    xmlns:app="http://schemas.android.com/apk/res-auto"
    android:layout_width="fill_parent"
    android:layout_height="fill_parent"
    android:fitsSystemWindows="true"
    android:gravity="center"
    android:background="@color/app_color"
    android:orientation="vertical"
    android:paddingLeft="24dp"
    android:paddingRight="24dp">

    <TextView
        android:layout_width="match_parent"
        android:layout_height="wrap_content"
        android:gravity="center"
        android:text="My Note"
        android:textColor="@color/white"
        android:textSize="48sp" />
    <TextView
        android:id="@+id/tv_login"
        android:layout_width="match_parent"
        android:layout_height="wrap_content"
        android:layout_marginTop="8dp"
        android:gravity="center|right"
        android:text="已有帐号,立即登录!" />

    <com.google.android.material.button.MaterialButton
        android:id="@+id/btnRegister"
        android:layout_width="match_parent"
        android:layout_height="wrap_content"
        android:layout_marginLeft="48dp"
        android:layout_marginTop="24dp"
        android:layout_marginRight="48dp"
        android:padding="12dp"
        android:shadowRadius="10"
        android:text="立 即 注 册"
        android:textColor="@color/white"
        android:textSize="16sp"
        app:cornerRadius="20dp" />
</LinearLayout>
编写 RegisterActivity.java 的代码为:
package com.example.note.ui;

import android.os.Bundle;
import android.view.MenuItem;
import android.view.View;
import android.widget.EditText;
import android.widget.TextView;

import androidx.annotation.NonNull;
import androidx.appcompat.app.AppCompatActivity;

import com.blankj.utilcode.util.ToastUtils;
import com.google.android.material.button.MaterialButton;
import com.google.android.material.textfield.TextInputEditText;
import com.example.note.R;
import com.example.note.bean.UserBean;

import org.litepal.LitePal;

public class RegisterActivity extends AppCompatActivity {
    private EditText etName;
    private TextInputEditText etPassword;
    private MaterialButton btnRegister;
    private TextView tvLogin;

    @Override
    protected void onCreate(Bundle savedInstanceState) {
        super.onCreate(savedInstanceState);
        setContentView(R.layout.activity_register);
        //隐藏 ActionBar
        getSupportActionBar().hide();
        initUI();
        login();
    }
    //返回登陆页面
    private void login() {
        tvLogin.setOnClickListener(new View.OnClickListener() {
            @Override
            public void onClick(View v) {
                finish();
            }
        });
    }

    private void initUI() {
        etName = findViewById(R.id.etName);
        etPassword = findViewById(R.id.etPassword);
        tvLogin = findViewById(R.id.tv_login);
        btnRegister = findViewById(R.id.btnRegister);
//注册按钮点击事件监听
        btnRegister.setOnClickListener(new View.OnClickListener() {
            @Override
            public void onClick(View view) {
                register();
            }
        });
    }

    //进行注册逻辑
    private void register() {
//获取用户名输入框的输入信息
        String name = etName.getText().toString();
//获取密码输入框的输入信息
        String password = etPassword.getText().toString();
//去掉头部尾部空格字符串后,判断账户名长度是否小于 0
        if (name.trim().length() <= 0) {
            ToastUtils.showShort("请输入用户名!");
            return;
        }
//去掉头部尾部空格字符串后,判断密码长度是否小于 0
        if (password.trim().length() <= 0) {
            ToastUtils.showShort("请输入密码!");
            return;
        }
//先查询是否存在该用户,查询结果不为 null,则标识存在该用户
        UserBean user = LitePal.where("name = ?", name).findFirst(UserBean.class);
        if (null != user) {
            ToastUtils.showShort("已存在该用户名,请更换!");
            return;
        }
    //监听返回按钮,如果点击返回按钮则关闭当前 Activity
    @Override
    public boolean onOptionsItemSelected(@NonNull MenuItem item) {
        if (item.getItemId() == android.R.id.home) {
            this.finish();
            return true;
        }
        return super.onOptionsItemSelected(item);
    }
}
步骤 6:实现用户登录
在 ui 包上右键创建 New—>Activity—>Empty Activity 选项的对话框下输入 LoginActivity 创建,同时会在 res-layout 生成 activity_login.xml 文件.
activity_login.xml页面代码如下所示L:
<?xml version="1.0" encoding="utf-8"?>
<LinearLayout xmlns:android="http://schemas.android.com/apk/res/android"
    xmlns:app="http://schemas.android.com/apk/res-auto"
    android:layout_width="fill_parent"
    android:layout_height="fill_parent"
    android:background="@color/app_color"
    android:fitsSystemWindows="true"
    android:gravity="center"
    android:orientation="vertical"
    android:paddingLeft="24dp"
    android:paddingRight="24dp">

    <TextView
        android:layout_width="match_parent"
        android:layout_height="wrap_content"
        android:gravity="center"
        android:text="My Note"
        android:textColor="@color/white"
        android:textSize="48sp" />
    <com.google.android.material.textfield.TextInputLayout
        android:layout_width="match_parent"
        android:layout_height="wrap_content"
        android:layout_marginTop="8dp"
        android:layout_marginBottom="8dp"
        app:passwordToggleEnabled="true">

        <com.google.android.material.textfield.TextInputEditText
            android:id="@+id/etPassword"
            android:layout_width="match_parent"
            android:layout_height="wrap_content"
            android:hint="输入你的密码"
            android:inputType="textPassword" />
    </com.google.android.material.textfield.TextInputLayout>

    <com.google.android.material.button.MaterialButton
        android:id="@+id/btnLogin"
        android:layout_width="match_parent"
        android:layout_height="wrap_content"
        android:layout_marginLeft="48dp"
        android:layout_marginTop="24dp"
        android:layout_marginRight="48dp"
        android:backgroundTint="@color/green_500"
        android:padding="12dp"
        android:shadowRadius="10"
        android:text="立 即 登 录"
        android:textColor="@color/white"
        android:textSize="16sp"
        app:cornerRadius="20dp" />

    <TextView
        android:id="@+id/tvRegister"
        android:layout_width="match_parent"
        android:layout_height="48dp"
        android:gravity="center"
        android:text="还没有账号? 去注册"
        android:textColor="@color/white"
        android:textSize="14sp" />
</LinearLayout>
对应的Java页面代码如下所示:
package com.example.note.ui;

import android.os.Bundle;
import android.view.MenuItem;
import android.view.View;
import android.widget.EditText;
import android.widget.TextView;

import androidx.annotation.NonNull;
import androidx.appcompat.app.AppCompatActivity;

import com.blankj.utilcode.util.ToastUtils;
import com.google.android.material.button.MaterialButton;
import com.google.android.material.textfield.TextInputEditText;
import com.example.note.R;
import com.example.note.bean.UserBean;

import org.litepal.LitePal;

public class RegisterActivity extends AppCompatActivity {
    private EditText etName;
    private TextInputEditText etPassword;
    private MaterialButton btnRegister;
    private TextView tvLogin;

    @Override
    protected void onCreate(Bundle savedInstanceState) {
        super.onCreate(savedInstanceState);
        setContentView(R.layout.activity_register);
        //隐藏 ActionBar
        getSupportActionBar().hide();
        initUI();
        login();
    }
    //返回登陆页面
    private void login() {
        tvLogin.setOnClickListener(new View.OnClickListener() {
            @Override
            public void onClick(View v) {
                finish();
            }
        });
    }

    private void initUI() {
        etName = findViewById(R.id.etName);
        etPassword = findViewById(R.id.etPassword);
        tvLogin = findViewById(R.id.tv_login);
        btnRegister = findViewById(R.id.btnRegister);
//注册按钮点击事件监听
        btnRegister.setOnClickListener(new View.OnClickListener() {
            @Override
            public void onClick(View view) {
                register();
            }
        });
    }

    //进行注册逻辑
    private void register() {
//获取用户名输入框的输入信息
        String name = etName.getText().toString();
//获取密码输入框的输入信息
        String password = etPassword.getText().toString();
//去掉头部尾部空格字符串后,判断账户名长度是否小于 0
        if (name.trim().length() <= 0) {
            ToastUtils.showShort("请输入用户名!");
            return;
        }
//去掉头部尾部空格字符串后,判断密码长度是否小于 0
        if (password.trim().length() <= 0) {
            ToastUtils.showShort("请输入密码!");
            return;
        }
//先查询是否存在该用户,查询结果不为 null,则标识存在该用户
        UserBean user = LitePal.where("name = ?", name).findFirst(UserBean.class);
        if (null != user) {
            ToastUtils.showShort("已存在该用户名,请更换!");
            return;
        }
    //监听返回按钮,如果点击返回按钮则关闭当前 Activity
    @Override
    public boolean onOptionsItemSelected(@NonNull MenuItem item) {
        if (item.getItemId() == android.R.id.home) {
            this.finish();
            return true;
        }
        return super.onOptionsItemSelected(item);
    }
}
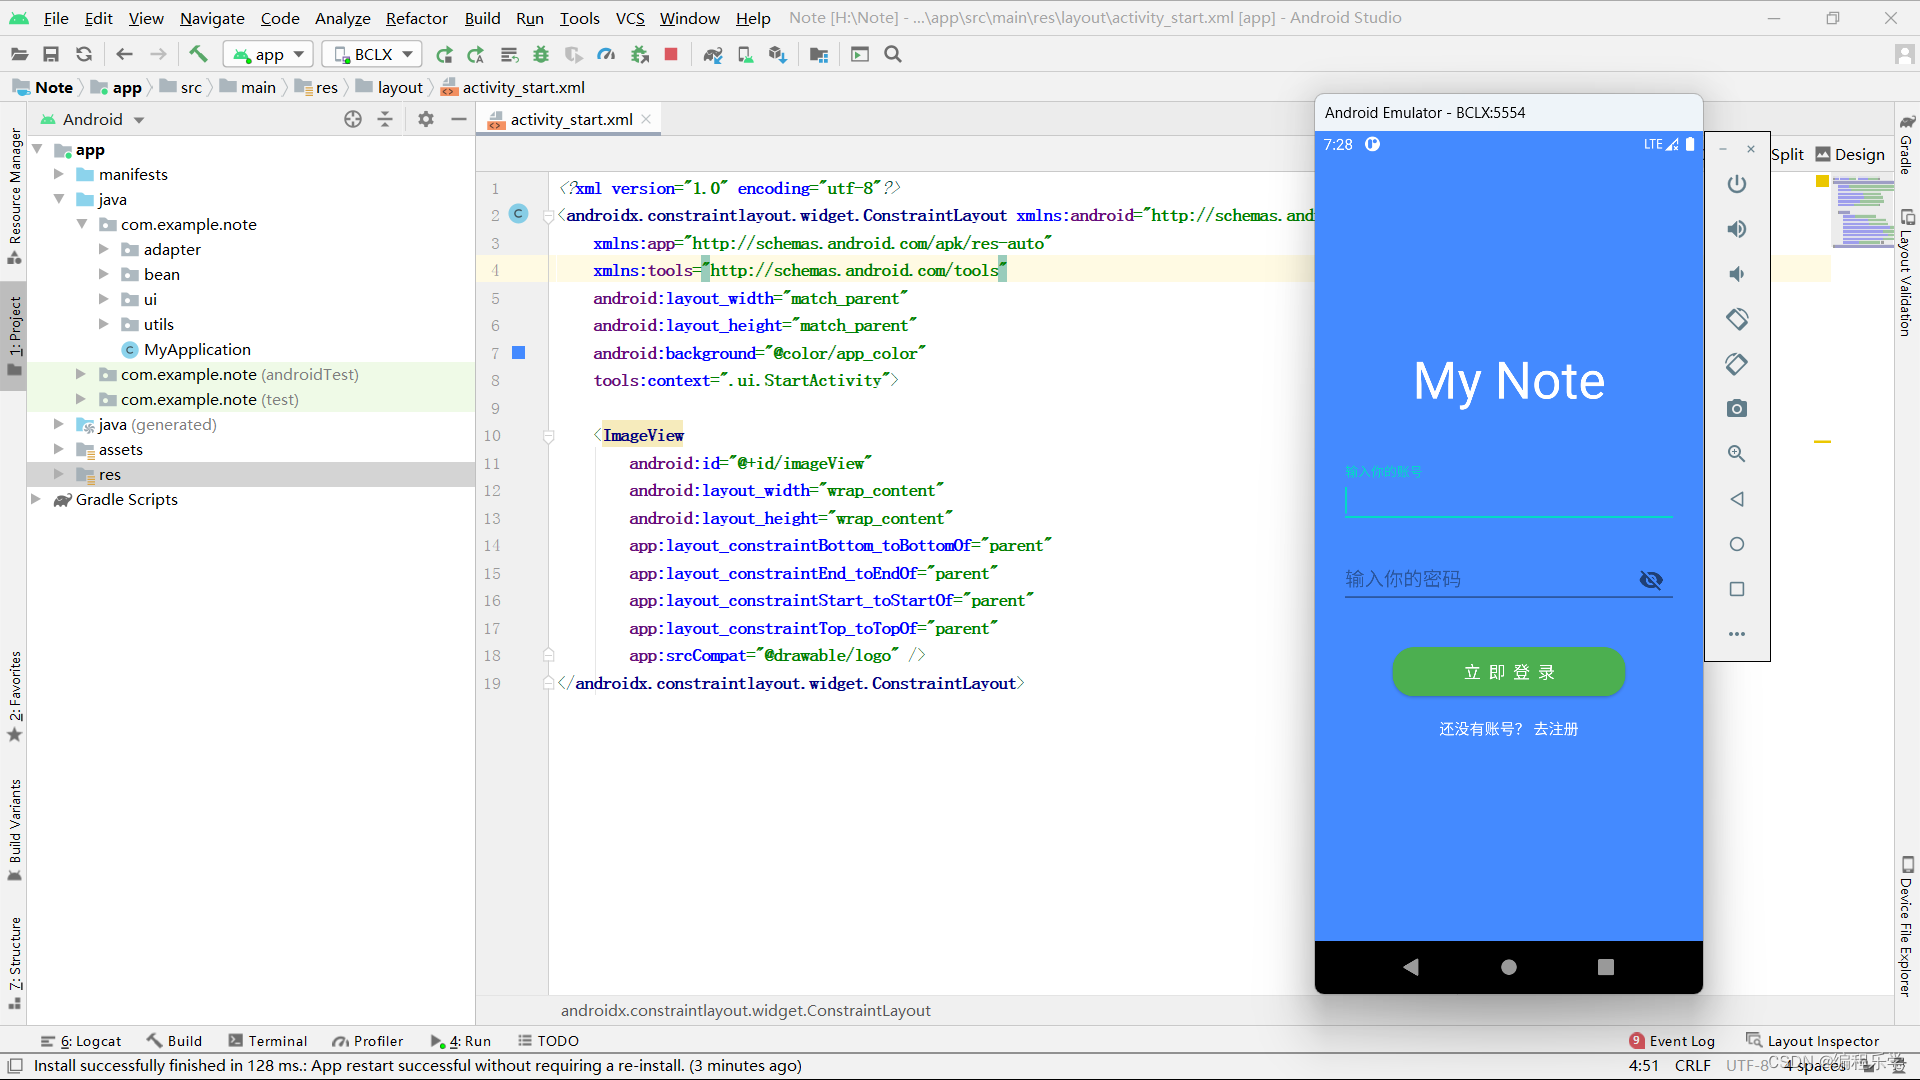
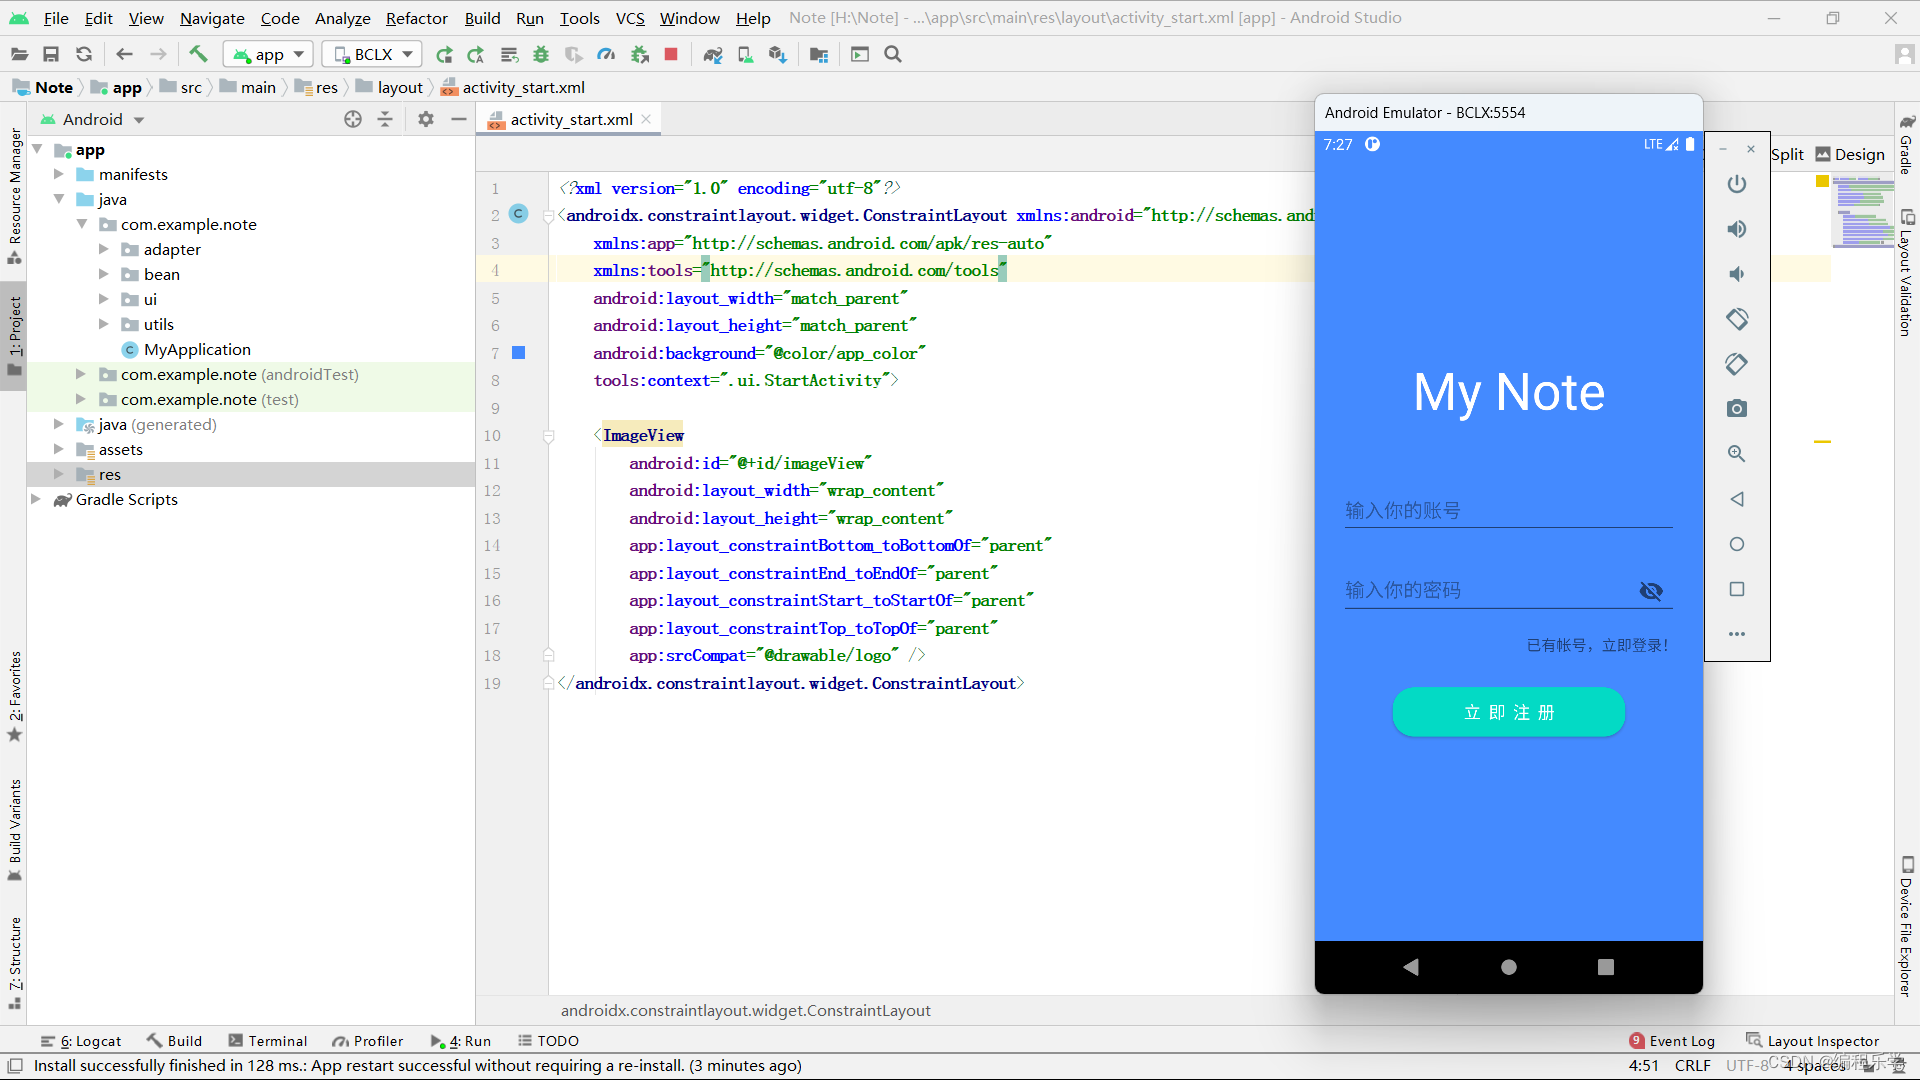
编译代码启动 App,在登录页面(LoginActivity)的注册按钮中点击跳转注册 页面(RegisterActivity)进行注册,注册成功后自动返回登录页面进行登录 操作,登录成功之后正常跳转主页面(MainActivity)。
步骤 7:实现编写添加(修改)日记
在 ui 包上创建 NoteActivity,res 的 layout 文件夹下自动生成 activity_note.xml 文件,
首先我们先来看布局页面 activity_note.xml代码:
<?xml version="1.0" encoding="utf-8"?>
<LinearLayout xmlns:android="http://schemas.android.com/apk/res/android"
    xmlns:app="http://schemas.android.com/apk/res-auto"
    xmlns:tools="http://schemas.android.com/tools"
    android:layout_width="match_parent"
    android:layout_height="match_parent"
    android:background="@color/app_color"
    android:orientation="vertical"
    android:padding="16dp"
    tools:context=".ui.NoteActivity">

    <com.google.android.material.textfield.TextInputLayout
        android:id="@+id/tLTitle"
        android:layout_width="match_parent"
        android:layout_height="wrap_content">

        <EditText
            android:id="@+id/etTitle"
            android:layout_width="match_parent"
            android:layout_height="wrap_content"
            android:background="@color/white"
            android:hint="日记标题"
            android:inputType="textMultiLine" />
    </com.google.android.material.textfield.TextInputLayout>

    <ScrollView
        android:layout_width="match_parent"
        android:layout_height="0dp"
        android:layout_weight="1">

        <com.google.android.material.card.MaterialCardView
            android:layout_width="match_parent"
            android:layout_height="wrap_content"
            android:layout_marginTop="8dp"
            app:contentPadding="8dp">

            <LinearLayout
                android:layout_width="match_parent"
                android:layout_height="match_parent"
                android:orientation="vertical">

                <androidx.appcompat.widget.AppCompatEditText
                    android:id="@+id/etContent"
                    android:layout_width="match_parent"
                    android:layout_height="wrap_content"
                    android:background="@color/white"
                    android:gravity="left|top"
                    android:hint="这一刻的心情..."
                    android:inputType="textMultiLine"
                    android:minHeight="140dp" />

                <com.lwkandroid.widget.ngv.NineGridView
                    android:id="@+id/nineGridView"
                    android:layout_width="match_parent"
                    android:layout_height="wrap_content"
                    android:layout_marginTop="8dp"
                    app:divider_line_size="4dp"
                    app:enable_edit_mode="true"
                    app:horizontal_child_count="3"
                    app:icon_delete_size_ratio="0" />
            </LinearLayout>
        </com.google.android.material.card.MaterialCardView>
    </ScrollView>

    <com.google.android.material.button.MaterialButton
        android:id="@+id/btnSave"
        android:layout_width="match_parent"
        android:layout_height="wrap_content"
        android:layout_marginLeft="48dp"
        android:layout_marginTop="16dp"
        android:layout_marginRight="48dp"
        android:backgroundTint="@color/green_500"
        android:padding="12dp"
        android:shadowRadius="10"
        android:text="保 存"
        android:textColor="@color/white"
        android:textSize="16sp"
        app:cornerRadius="20dp" />
</LinearLayout>
接下来我们看逻辑代码,这里我们实现的是一页两用,既可以添加又可以修改详情代码如下所示:
package com.example.note.ui;

import android.os.Bundle;
import android.view.MenuItem;
import android.view.View;
import android.widget.EditText;
import android.widget.ImageView;

import androidx.annotation.NonNull;
import androidx.appcompat.app.AppCompatActivity;
import androidx.appcompat.widget.AppCompatEditText;

import com.blankj.utilcode.util.LogUtils;
import com.blankj.utilcode.util.SPUtils;
import com.blankj.utilcode.util.ToastUtils;
import com.bumptech.glide.Glide;
import com.google.android.material.button.MaterialButton;
import com.example.note.R;
import com.example.note.bean.NoteBean;
import com.example.note.utils.GlideEngine;
import com.luck.picture.lib.basic.PictureSelector;
import com.luck.picture.lib.config.SelectMimeType;
import com.luck.picture.lib.entity.LocalMedia;
import com.luck.picture.lib.interfaces.OnExternalPreviewEventListener;
import com.luck.picture.lib.interfaces.OnResultCallbackListener;
import com.lwkandroid.widget.ngv.DefaultNgvAdapter;
import com.lwkandroid.widget.ngv.INgvImageLoader;
import com.lwkandroid.widget.ngv.NgvChildImageView;
import com.lwkandroid.widget.ngv.NineGridView;

import org.litepal.LitePal;

import java.util.ArrayList;
import java.util.Calendar;
import java.util.Date;
import java.util.List;
public class NoteActivity extends AppCompatActivity {
    private EditText etTitle;
    private MaterialButton btnSave;
    private AppCompatEditText etContent;
    private NineGridView nineGridView;
    private long userId;//当前登录的用户 id
    private long noteId;//编辑情况下记事本的 id
    private NoteBean noteBean;//记录编辑情况下当条日志的信息
    private List<LocalMedia> selectedList;//已选相册的列表
    private DefaultNgvAdapter<LocalMedia> mAdapter;

    @Override
    protected void onCreate(Bundle savedInstanceState) {
        super.onCreate(savedInstanceState);
        setContentView(R.layout.activity_note);
//初始化 UI
        initUI();
//初始化数据
        initData();
    }

    //初始化 UI
    private void initUI() {
//给左上角图标的左边加上一个返回的图标
        getSupportActionBar().setDisplayHomeAsUpEnabled(true);
//使左上角图标是否显示,如果设成 false,则没有程序图标
        getSupportActionBar().setDisplayShowHomeEnabled(true);
        etTitle = findViewById(R.id.etTitle);
        btnSave = findViewById(R.id.btnSave);
        etContent = findViewById(R.id.etContent);
        nineGridView = findViewById(R.id.nineGridView);
        btnSave.setOnClickListener(new View.OnClickListener() {
            @Override
            public void onClick(View view) {
                save();
            }
        });
//实例化 adapter
        mAdapter = new DefaultNgvAdapter<>(9, new INgvImageLoader<LocalMedia>() {
            @Override
            public void load(LocalMedia localMedia, ImageView imageView, int width,
                             int height) {
                LogUtils.e("----执行了" + localMedia.getPath());
                Glide.with(NoteActivity.this).load(localMedia.getPath()).into(imageView);
            }
        });
        nineGridView.setAdapter(mAdapter);
        mAdapter.setOnChildClickListener(new DefaultNgvAdapter.OnChildClickedListener < LocalMedia > () {
            @Override
            public void onPlusImageClicked (ImageView plusImageView,int dValueToLimited){
//点击+号的事件
                selectImages();
            }
            @Override
            public void onContentImageClicked ( int position, LocalMedia data, NgvChildImageView childImageView){
//预览图片

            }
            @Override
            public void onImageDeleted ( int position, LocalMedia data){
            }
        });
    }


    private void setUI() {
        etTitle.setText(noteBean.getTitle());
        etContent.setText(noteBean.getContent());
    }

    //跳转相册选择相册图片
    private void selectImages() {
       }

    //保存日记
    private void save() {
//获取日记标题信息
        String title = etTitle.getText().toString();
//获取日记内容
        String content = etContent.getText().toString();
        if (title.trim().length() <= 0) {
            ToastUtils.showShort("请输入日记标题!");
            return;
        }
        noteBean.setUserId(userId);
        noteBean.setTitle(title);
        noteBean.setContent(content);
//获取当前时间
        Date curTime = Calendar.getInstance().getTime();
        if (0 == noteId) {
//创建时间(只有新创建的时候需要修改)
            noteBean.setCreateTime(curTime);
        }

    }

    //监听返回按钮,如果点击返回按钮则关闭当前 Activity
    @Override
    public boolean onOptionsItemSelected(@NonNull MenuItem item) {
        if (item.getItemId() == android.R.id.home) {
            this.finish();
            return true;
        }
        return super.onOptionsItemSelected(item);
    }
}
步骤 8:主页面编写
我们先来看activity_main.xml代码,这里我们用到了RecylerView列表来显示,详情代码如下所示:
<?xml version="1.0" encoding="utf-8"?>
<androidx.constraintlayout.widget.ConstraintLayout xmlns:android="http://schemas.android.com/apk/res/android"
    xmlns:app="http://schemas.android.com/apk/res-auto"
    xmlns:tools="http://schemas.android.com/tools"
    android:layout_width="match_parent"
    android:layout_height="match_parent"
    android:background="#eeeeee"
    tools:context=".ui.MainActivity">

    <androidx.swiperefreshlayout.widget.SwipeRefreshLayout
        android:id="@+id/swipeRefreshLayout"
        android:layout_width="match_parent"
        android:layout_height="match_parent">

        <androidx.recyclerview.widget.RecyclerView
            android:id="@+id/recyclerView"
            android:layout_width="match_parent"
            android:layout_height="match_parent" />
    </androidx.swiperefreshlayout.widget.SwipeRefreshLayout>

    <ImageView
        android:id="@+id/ivAdd"
        android:layout_width="48dp"
        android:layout_height="48dp"
        android:layout_margin="48dp"
        android:src="@drawable/ic_add"
        app:layout_constraintBottom_toBottomOf="parent"
        app:layout_constraintLeft_toLeftOf="parent"
        app:layout_constraintRight_toRightOf="parent" />
</androidx.constraintlayout.widget.ConstraintLayout>
然后我们进行逻辑代码的编写,实现删除,跳转修改页面,添加页面的功能
package com.example.note.ui;
import android.content.DialogInterface;
import android.content.Intent;
import android.os.Bundle;
import android.view.View;
import android.widget.ImageView;
import androidx.annotation.NonNull;
import androidx.appcompat.app.AlertDialog;
import androidx.appcompat.app.AppCompatActivity;
import androidx.recyclerview.widget.LinearLayoutManager;
import androidx.recyclerview.widget.RecyclerView;
import androidx.swiperefreshlayout.widget.SwipeRefreshLayout;
import com.blankj.utilcode.util.SPUtils;
import com.chad.library.adapter.base.BaseQuickAdapter;
import com.chad.library.adapter.base.listener.OnItemClickListener;
import com.chad.library.adapter.base.listener.OnItemLongClickListener;
import com.example.note.R;
import com.example.note.adapter.NoteListAdapter;
import com.example.note.bean.NoteBean;
import org.litepal.LitePal;
import java.util.List;
public class MainActivity extends AppCompatActivity {
    private ImageView ivAdd;
    private RecyclerView recyclerView;
    private SwipeRefreshLayout swipeRefreshLayout;
    private long userId;//用户 id
    private NoteListAdapter adapter;
    @Override
    protected void onCreate(Bundle savedInstanceState) {
        super.onCreate(savedInstanceState);
        setContentView(R.layout.activity_main);
//初始化控件
        initUI();
    }
    //每次页面可见的时候执行该方法
    @Override
    protected void onResume() {
        super.onResume();
        loadData();
    }
    //初始化控件
    private void initUI() {
        userId = SPUtils.getInstance().getLong("userId");
//设置标题
        String title = SPUtils.getInstance().getString("name") + "的心情日记";
        getSupportActionBar().setTitle(title);
        swipeRefreshLayout = findViewById(R.id.swipeRefreshLayout);
        recyclerView = findViewById(R.id.recyclerView);
        ivAdd = findViewById(R.id.ivAdd);
//点击事件监听
        ivAdd.setOnClickListener(new View.OnClickListener() {
            @Override
            public void onClick(View view) {
                Intent intent = new Intent(MainActivity.this, NoteActivity.class);
                startActivity(intent);
            }
        });
        adapter = new NoteListAdapter();
        recyclerView.setLayoutManager(new LinearLayoutManager(this));
        recyclerView.setAdapter(adapter);
//适配器点击 item 的事件监听
        adapter.setOnItemClickListener(new OnItemClickListener() {
            @Override
            public void onItemClick(@NonNull BaseQuickAdapter<?, ?> adapter, @NonNull View view, int position) {
                Intent intent = new Intent(MainActivity.this, NoteActivity.class);
                startActivity(intent);
            }
        });
//长按事件监听
        adapter.setOnItemLongClickListener(new OnItemLongClickListener() {
            @Override
            public boolean onItemLongClick(@NonNull BaseQuickAdapter adapter, @NonNull View view, int position) {
                return true;
            }
        });
//下拉刷新事件监听
        swipeRefreshLayout.setOnRefreshListener(new SwipeRefreshLayout.OnRefreshListener() {
            @Override
            public void onRefresh() {

            }
        });
    }

    //删除日记
    private void deleteNote(final NoteBean noteBean) {
//通过创建者模式创建一个对话框
        AlertDialog.Builder builder = new AlertDialog.Builder(this);
        builder.setTitle("提示")
                .setMessage("是否删除该条日记?")
                .setNegativeButton("取消", null)
                .setPositiveButton("确定", new DialogInterface.OnClickListener() {
                    @Override
                    public void onClick(DialogInterface dialogInterface, int i) {
                        int delete = LitePal.delete(NoteBean.class, noteBean.getId(
                        ));
                        if (0 < delete) {
                                              }
                    }
                }).create();
        builder.show();//显示对话框
    }
}
至此,完整的图片日记本项目就创建完成了。
Get 项目模板源码
👇👇👇快捷获取方式👇👇👇


 658
658

 被折叠的 条评论
为什么被折叠?
被折叠的 条评论
为什么被折叠?
 到【灌水乐园】发言


