


目录
0. 背景
全面国产化,用瑞芯微rk3588开发板替代jetson nano开发板。
1. 模型转化
模型转化这一步,需要在笔记本上的ubuntu20.04桌面版的虚拟机内完成,包括yolov5s.pt转为yolov5s.onnx,yolov5s.onnx转为yolov5s.rknn等两个主要步骤。
主要参考博客《yolov5篇—yolov5训练pt模型并转换为rknn模型,部署在RK3588开发板上——从训练到部署全过程》
1.1 基础环境
基础环境:x86平台的ubuntu 20.04虚拟机(注意,这里必须要x86平台的计算机,一般笔记本就可以;虚拟机中系统版本为ubuntu 20.04桌面版)
1.2 创建python环境
- 虚拟机中安装miniconda,然后激活base环境
- 创建python 3.8的conda环境(注意,这里python版本必须为3.8),参考以下命令
conda create -n rk3588 python=3.8
conda activate rk3588
pip install numpy -i https://mirror.baidu.com/pypi/simple
cd ~/Desktop
git clone https://gitcode.net/mirrors/rockchip-linux/rknn-toolkit2.git
pip install -r rknn-toolkit2/doc/requirements_cp38-1.4.0.txt -i https://mirror.baidu.com/pypi/simple
pip install pandas==1.4.* pyyaml matplotlib==3.3.* seaborn -i https://mirror.baidu.com/pypi/simple
1.3 将yolov5s.pt转为yolov5s.onnx
首先,将yolov5项目代码下载到桌面(注意,这里的yolov5项目实际为v5.0版本),如下
cd ~/Desktop
git clone https://gitcode.net/mirrors/ultralytics/yolov5.git
cd yolov5
git reset --hard c5360f6e7009eb4d05f14d1cc9dae0963e949213
其次,从yolov5项目地址中找到yolov5s.pt的下载地址,用迅雷下载即可,将yolov5s.pt上传到虚拟机~/Desktop/yolov5/weights目录下;
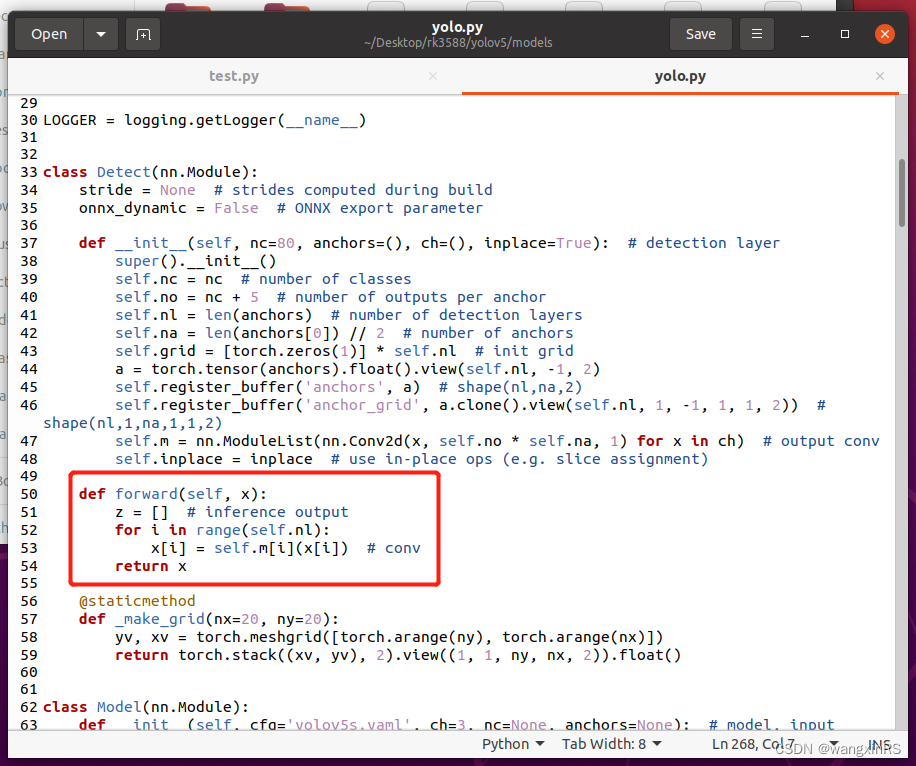
再次,修改~/Desktop/yolov5/models/yolo.py中的Detect函数,如下图所示(注意,该部分仅限于转化时使用,在训练时不能修改)
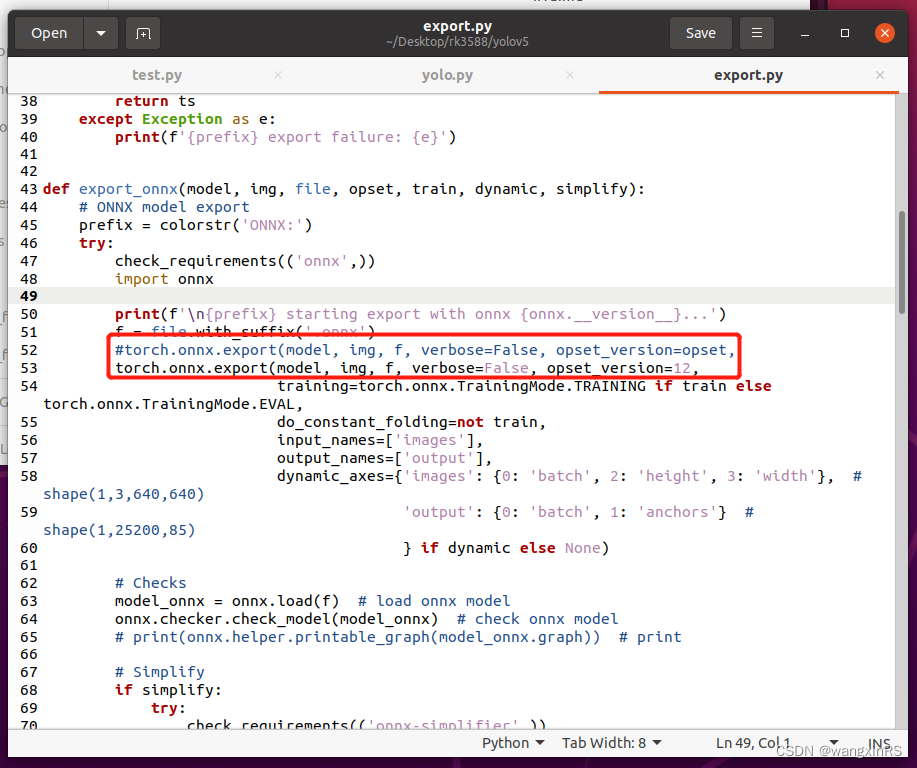
再次,修改~/Desktop/yolov5/export.py中的export_onnx()函数,如下图所示
最后,在命令行调用以下命令,在weights目录下,存在yolov5s.onnx文件:
python export.py --weights weights/yolov5s.pt --img 640 --batch 1 --include onnx
1.4 将yolov5s.onnx转为yolov5s.rknn
首先,下载rknn-toolkit2项目。该步骤实际上已经在环境准备中做完。
cd ~/Desktop
git clone https://gitcode.net/mirrors/rockchip-linux/rknn-toolkit2.git
其次,安装rknn-toolkit2的环境。该步骤实际上已经在环境准备中做完。
cd ~/Desktop/rknn-toolkit2
cd doc && pip install -r requirements_cp38-1.4.0.txt -i https://mirror.baidu.com/pypi/simple
再次,安装rknn-toolkit2工具包。
cd ~/Desktop/rknn-toolkit2
cd packages && pip install rknn_toolkit2-1.4.0_22dcfef4-cp38-cp38-linux_x86_64.whl -i https://mirror.baidu.com/pypi/simple
测试是否安装成功。在终端运行python环境,然后输入
from rknn.api import RKNN
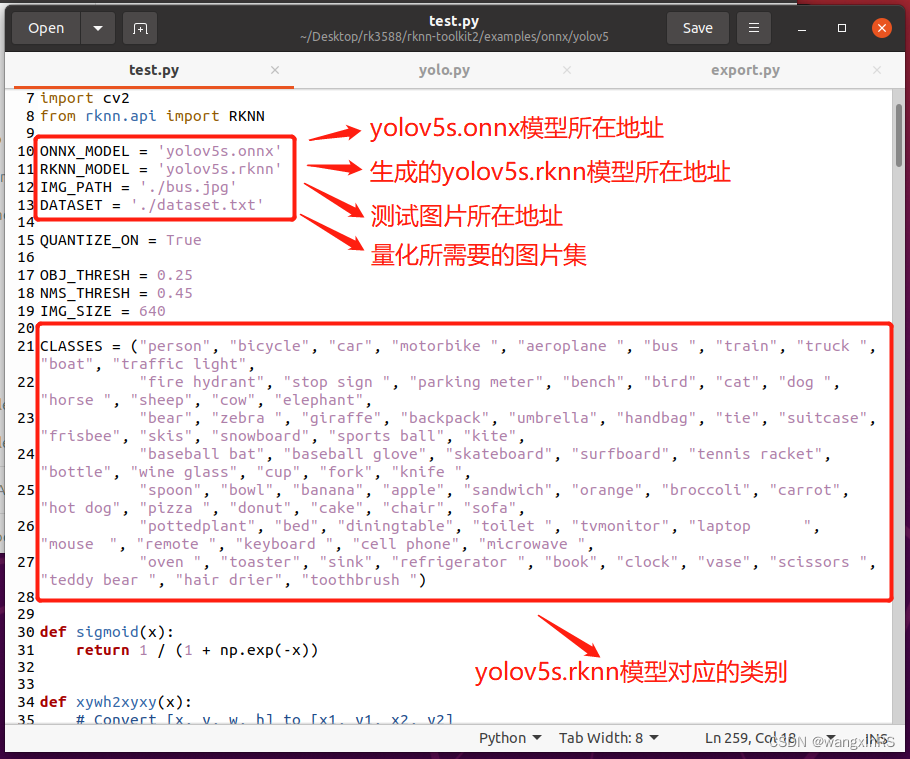
再次,将yolov5s.onnx复制到~/Desktop/rknn-toolkit2/examples/onnx/yolov5目录下,将该目录下的test.py作出一些修改,如下图

最后,执行python test.py,即可在同级目录下获得yolov5s.rknn。
2. 开发板部署
利用yolov5s.onnx,我们运行yolov5代码。这里区分为c版本和python版本。以下操作均在开发板上进行。
2.1. c版本
- 在rk3588开发板上下载官方demo
cd ~/Desktop
git clone https://gitcode.net/mirrors/rockchip-linux/rknpu2.git
- 修改文件。首先进入到rknpu2/examples/rknn_yolov5_demo目录下,然后修改include文件中的头文件postprocess.h,如下图

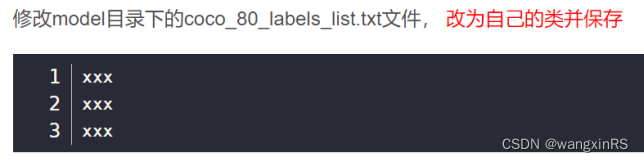
其次修改model目录下的coco_80_labels_list.txt文件,改为自己的类并保存,如下图
最后,将转换后的rknn文件放在model/RK3588目录下,编译并运行shell,该命令成功执行后,会生成install目录。
bash ./build-linux_RK3588.sh
(3)运行demo。将yolov5s.rknn上传到model/RK3588目录下,在model目录下放入需要推理的图片,运行
cd install/rknn_yolov5_demo_linux
./rknn_yolov5_demo ./model/RK3588/yolov5s.rknn ./model/bus.jpg
2.1. python版本(必须是python 3.9)
该版本API主要参考《RKNN Toolkit Lite2用户使用指南》。
- 更新源
# 默认注释了源码镜像以提高 apt update 速度,如有需要可自行取消注释
deb http://mirrors.tuna.tsinghua.edu.cn/ubuntu-ports/ focal main restricted universe multiverse
# deb-src https://mirrors.tuna.tsinghua.edu.cn/ubuntu-ports/ jammy main restricted universe multiverse
deb http://mirrors.tuna.tsinghua.edu.cn/ubuntu-ports/ focal-updates main restricted universe multiverse
# deb-src https://mirrors.tuna.tsinghua.edu.cn/ubuntu-ports/ jammy-updates main restricted universe multiverse
deb http://mirrors.tuna.tsinghua.edu.cn/ubuntu-ports/ focal-backports main restricted universe multiverse
# deb-src https://mirrors.tuna.tsinghua.edu.cn/ubuntu-ports/ jammy-backports main restricted universe multiverse
deb http://mirrors.tuna.tsinghua.edu.cn/ubuntu-ports/ focal-security main restricted universe multiverse
# deb-src https://mirrors.tuna.tsinghua.edu.cn/ubuntu-ports/ jammy-security main restricted universe multiverse
更新源:
sudo apt-get update
- miniconda安装
wget https://repo.anaconda.com/miniconda/Miniconda3-latest-Linux-aarch64.sh (在线安装)
推荐离线安装,进入miniconda官网,选择py3.8版本,用迅雷下载下来,如下
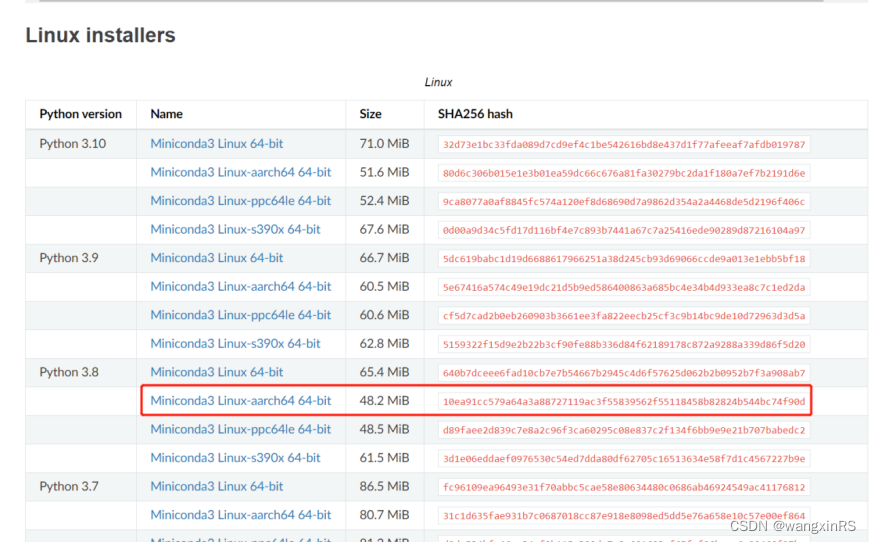
然后将Miniconda3-py38_23.1.0-1-Linux-aarch64.sh上传到rk3588板子的~/Downloads目录下,执行安装操作
bash ./Miniconda3-py38_23.1.0-1-Linux-aarch64.sh
- 创建python环境,主要包含numpy,opencv,psutils等。
conda create -n rk3588 python=3.9
conda activate rk3588
pip install numpy opencv-python -i https://mirror.baidu.com/pypi/simple
- 下载RKNN Toolkit2项目到桌面上
cd ~/Desktop && git clone https://gitcode.net/mirrors/rockchip-linux/rknn-toolkit2.git
- 安装RKNN Toolkit Lite2环境
cd rknn-toolkit2/rknn_toolkit_lite2/packages
pip install rknn_toolkit_lite2-1.4.0-cp39-cp39-linux_aarch64.whl -i https://mirror.baidu.com/pypi/simple
- 添加.so文件。这里主要为了确保python脚本可正常调用npu的C脚本。
cd ~/Downloads && git clone https://gitcode.net/mirrors/rockchip-linux/rknpu2.git
sudo cp rknpu2/runtime/RK3588/Linux/librknn_api/aarch64/librknn* /usr/lib
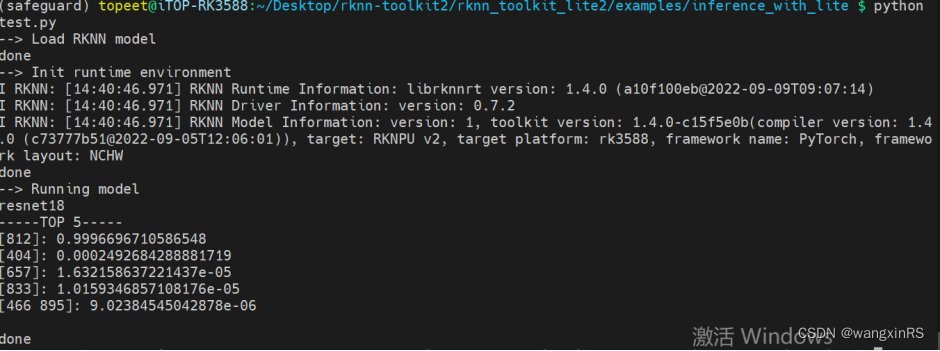
- 测试环境。测试案例在examples/inference_with_lite目录下。
cd rknn-toolkit2/rknn_toolkit_lite2/examples/inference_with_lite
python test.py
运行结果如下
- 测试yolov5的python脚本。在inference_with_lite目录下创建data,将测试图片放入该目录中;将yolov5s.rknn上传到inference_with_lite目录下;创建yolov5.py,对测试图片进行推理,并将结果保存到同级目录下res.jpg,(参考连接https://github.com/ChuanSe/yolov5-PT-to-RKNN/blob/main/detect.py)代码如下
import os
import urllib
import traceback
import time
import sys
import numpy as np
import cv2
#from rknn.api import RKNN
import platform
from rknnlite.api import RKNNLite
import multiprocessing

ONNX_MODEL = 'yolov5s.onnx'
RKNN_MODEL = 'yolov5s.rknn'
IMG_PATH = './data/car.png'
DATASET = './dataset.txt'

QUANTIZE_ON = True

OBJ_THRESH = 0.25
NMS_THRESH = 0.45
IMG_SIZE = 640

CLASSES = ("person", "bicycle", "car", "motorbike ", "aeroplane ", "bus ", "train", "truck ", "boat", "traffic light",
           "fire hydrant", "stop sign ", "parking meter", "bench", "bird", "cat", "dog ", "horse ", "sheep", "cow", "elephant",
           "bear", "zebra ", "giraffe", "backpack", "umbrella", "handbag", "tie", "suitcase", "frisbee", "skis", "snowboard", "sports ball", "kite",
           "baseball bat", "baseball glove", "skateboard", "surfboard", "tennis racket", "bottle", "wine glass", "cup", "fork", "knife ",
           "spoon", "bowl", "banana", "apple", "sandwich", "orange", "broccoli", "carrot", "hot dog", "pizza ", "donut", "cake", "chair", "sofa",
           "pottedplant", "bed", "diningtable", "toilet ", "tvmonitor", "laptop    ", "mouse  ", "remote ", "keyboard ", "cell phone", "microwave ",
           "oven ", "toaster", "sink", "refrigerator ", "book", "clock", "vase", "scissors ", "teddy bear ", "hair drier", "toothbrush ")


# decice tree for rk356x/rk3588
DEVICE_COMPATIBLE_NODE = '/proc/device-tree/compatible'

def get_host():
    # get platform and device type
    system = platform.system()
    machine = platform.machine()
    os_machine = system + '-' + machine
    if os_machine == 'Linux-aarch64':
        try:
            with open(DEVICE_COMPATIBLE_NODE) as f:
                device_compatible_str = f.read()
                if 'rk3588' in device_compatible_str:
                    host = 'RK3588'
                else:
                    host = 'RK356x'
        except IOError:
            print('Read device node {} failed.'.format(DEVICE_COMPATIBLE_NODE))
            exit(-1)
    else:
        host = os_machine
    return host

INPUT_SIZE = 224
RK3588_RKNN_MODEL = 'resnet18_for_rk3588.rknn'


def sigmoid(x):
    return 1 / (1 + np.exp(-x))


def xywh2xyxy(x):
    # Convert [x, y, w, h] to [x1, y1, x2, y2]
    y = np.copy(x)
    y[:, 0] = x[:, 0] - x[:, 2] / 2  # top left x
    y[:, 1] = x[:, 1] - x[:, 3] / 2  # top left y
    y[:, 2] = x[:, 0] + x[:, 2] / 2  # bottom right x
    y[:, 3] = x[:, 1] + x[:, 3] / 2  # bottom right y
    return y


def process(input, mask, anchors):

    anchors = [anchors[i] for i in mask]
    grid_h, grid_w = map(int, input.shape[0:2])

    box_confidence = sigmoid(input[..., 4])
    box_confidence = np.expand_dims(box_confidence, axis=-1)

    box_class_probs = sigmoid(input[..., 5:])

    box_xy = sigmoid(input[..., :2])*2 - 0.5

    col = np.tile(np.arange(0, grid_w), grid_w).reshape(-1, grid_w)
    row = np.tile(np.arange(0, grid_h).reshape(-1, 1), grid_h)
    col = col.reshape(grid_h, grid_w, 1, 1).repeat(3, axis=-2)
    row = row.reshape(grid_h, grid_w, 1, 1).repeat(3, axis=-2)
    grid = np.concatenate((col, row), axis=-1)
    box_xy += grid
    box_xy *= int(IMG_SIZE/grid_h)

    box_wh = pow(sigmoid(input[..., 2:4])*2, 2)
    box_wh = box_wh * anchors

    box = np.concatenate((box_xy, box_wh), axis=-1)

    return box, box_confidence, box_class_probs


def filter_boxes(boxes, box_confidences, box_class_probs):
    """Filter boxes with box threshold. It's a bit different with origin yolov5 post process!

    # Arguments
        boxes: ndarray, boxes of objects.
        box_confidences: ndarray, confidences of objects.
        box_class_probs: ndarray, class_probs of objects.

    # Returns
        boxes: ndarray, filtered boxes.
        classes: ndarray, classes for boxes.
        scores: ndarray, scores for boxes.
    """
    boxes = boxes.reshape(-1, 4)
    box_confidences = box_confidences.reshape(-1)
    box_class_probs = box_class_probs.reshape(-1, box_class_probs.shape[-1])

    _box_pos = np.where(box_confidences >= OBJ_THRESH)
    boxes = boxes[_box_pos]
    box_confidences = box_confidences[_box_pos]
    box_class_probs = box_class_probs[_box_pos]

    class_max_score = np.max(box_class_probs, axis=-1)
    classes = np.argmax(box_class_probs, axis=-1)
    _class_pos = np.where(class_max_score >= OBJ_THRESH)

    boxes = boxes[_class_pos]
    classes = classes[_class_pos]
    scores = (class_max_score* box_confidences)[_class_pos]

    return boxes, classes, scores


def nms_boxes(boxes, scores):
    """Suppress non-maximal boxes.

    # Arguments
        boxes: ndarray, boxes of objects.
        scores: ndarray, scores of objects.

    # Returns
        keep: ndarray, index of effective boxes.
    """
    x = boxes[:, 0]
    y = boxes[:, 1]
    w = boxes[:, 2] - boxes[:, 0]
    h = boxes[:, 3] - boxes[:, 1]

    areas = w * h
    order = scores.argsort()[::-1]

    keep = []
    while order.size > 0:
        i = order[0]
        keep.append(i)

        xx1 = np.maximum(x[i], x[order[1:]])
        yy1 = np.maximum(y[i], y[order[1:]])
        xx2 = np.minimum(x[i] + w[i], x[order[1:]] + w[order[1:]])
        yy2 = np.minimum(y[i] + h[i], y[order[1:]] + h[order[1:]])

        w1 = np.maximum(0.0, xx2 - xx1 + 0.00001)
        h1 = np.maximum(0.0, yy2 - yy1 + 0.00001)
        inter = w1 * h1

        ovr = inter / (areas[i] + areas[order[1:]] - inter)
        inds = np.where(ovr <= NMS_THRESH)[0]
        order = order[inds + 1]
    keep = np.array(keep)
    return keep


def yolov5_post_process(input_data):
    masks = [[0, 1, 2], [3, 4, 5], [6, 7, 8]]
    anchors = [[10, 13], [16, 30], [33, 23], [30, 61], [62, 45],
               [59, 119], [116, 90], [156, 198], [373, 326]]

    boxes, classes, scores = [], [], []
    for input, mask in zip(input_data, masks):
        b, c, s = process(input, mask, anchors)
        b, c, s = filter_boxes(b, c, s)
        boxes.append(b)
        classes.append(c)
        scores.append(s)

    boxes = np.concatenate(boxes)
    boxes = xywh2xyxy(boxes)
    classes = np.concatenate(classes)
    scores = np.concatenate(scores)

    nboxes, nclasses, nscores = [], [], []
    for c in set(classes):
        inds = np.where(classes == c)
        b = boxes[inds]
        c = classes[inds]
        s = scores[inds]

        keep = nms_boxes(b, s)

        nboxes.append(b[keep])
        nclasses.append(c[keep])
        nscores.append(s[keep])

    if not nclasses and not nscores:
        return None, None, None

    boxes = np.concatenate(nboxes)
    classes = np.concatenate(nclasses)
    scores = np.concatenate(nscores)

    return boxes, classes, scores


def draw(image, boxes, scores, classes):
    """Draw the boxes on the image.

    # Argument:
        image: original image.
        boxes: ndarray, boxes of objects.
        classes: ndarray, classes of objects.
        scores: ndarray, scores of objects.
        all_classes: all classes name.
    """
    for box, score, cl in zip(boxes, scores, classes):
        top, left, right, bottom = box
        print('class: {}, score: {}'.format(CLASSES[cl], score))
        print('box coordinate left,top,right,down: [{}, {}, {}, {}]'.format(top, left, right, bottom))
        top = int(top)
        left = int(left)
        right = int(right)
        bottom = int(bottom)

        cv2.rectangle(image, (top, left), (right, bottom), (255, 0, 0), 2)
        cv2.putText(image, '{0} {1:.2f}'.format(CLASSES[cl], score),
                    (top, left - 6),
                    cv2.FONT_HERSHEY_SIMPLEX,
                    0.6, (0, 0, 255), 2)


def letterbox(im, new_shape=(640, 640), color=(0, 0, 0)):
    # Resize and pad image while meeting stride-multiple constraints
    shape = im.shape[:2]  # current shape [height, width]
    if isinstance(new_shape, int):
        new_shape = (new_shape, new_shape)

    # Scale ratio (new / old)
    r = min(new_shape[0] / shape[0], new_shape[1] / shape[1])

    # Compute padding
    ratio = r, r  # width, height ratios
    new_unpad = int(round(shape[1] * r)), int(round(shape[0] * r))
    dw, dh = new_shape[1] - new_unpad[0], new_shape[0] - new_unpad[1]  # wh padding

    dw /= 2  # divide padding into 2 sides
    dh /= 2

    if shape[::-1] != new_unpad:  # resize
        im = cv2.resize(im, new_unpad, interpolation=cv2.INTER_LINEAR)
    top, bottom = int(round(dh - 0.1)), int(round(dh + 0.1))
    left, right = int(round(dw - 0.1)), int(round(dw + 0.1))
    im = cv2.copyMakeBorder(im, top, bottom, left, right, cv2.BORDER_CONSTANT, value=color)  # add border
    return im, ratio, (dw, dh)

def scale_coords(img1_shape, coords, img0_shape, ratio_pad=None):
    # 将预测的坐标信息coords(相对img1_shape)转换回相对原图尺度(img0_shape)
    #:param img1_shape: 缩放后的图像大小  [H, W]=[384, 512]
    #:param coords: 预测的box信息 [7,4]  [anchor_nums, x1y1x2y2] 这个预测信息是相对缩放后的图像尺寸(img1_shape)的
    #:param img0_shape: 原图的大小  [H, W, C]=[375, 500, 3]
    #:param ratio_pad: 缩放过程中的缩放比例以及pad  一般不传入
    #:return: coords: 相对原图尺寸(img0_shape)的预测信息

    # Rescale coords (xyxy) from img1_shape to img0_shape
    if ratio_pad is None:  # calculate from img0_shape
        # gain = old/new = 1.024  max(img1_shape): 求img1的较长边  这一步对应的是之前的letterbox步骤
        gain = max(img1_shape) / max(img0_shape)
        # wh padding 这一步起不起作用,完全取决于letterbox的方式
        # 当letterbox为letter_pad_img时,pad=(0.0, 64.0); 当letterbox为leeter_img时,pad=(0.0, 0.0)
        pad = (img1_shape[1] - img0_shape[1] * gain) / 2, (img1_shape[0] - img0_shape[0] * gain) / 2
    else:
        gain = ratio_pad[0][0]
        pad = ratio_pad[1]

    # 将相对img1的预测信息缩放得到相对原图img0的预测信息
    coords[:, [0, 2]] -= pad[0]  # x padding
    coords[:, [1, 3]] -= pad[1]  # y padding
    coords[:, :4] /= gain  # 缩放
    # 缩放到原图的预测结果,并对预测值进行了一定的约束,防止预测结果超出图像的尺寸
    clip_coords(coords, img0_shape)
    return coords

def clip_coords(boxes, img_shape):
    # Clip bounding xyxy bounding boxes to image shape (height, width)
    # np.clip(c, a, b): 将矩阵c中所有的元素约束在[a, b]中间
    # 如果某个元素小于a,就将这个元素变为a;如果元素大于b,就将这个元素变为b
    # 这里将预测得到的xyxy做个约束,是因为当物体处于图片边缘的时候,预测值是有可能超过图片大小的
    #:param boxes: 函数开始=>缩放到原图的预测结果[7, 4]
    # 函数结束=>缩放到原图的预测结果,并对预测值进行了一定的约束,防止预测结果超出图像的尺寸
    #:param img_shape: 原图的shape [H, W, C]=[375, 500, 3]

    boxes[:, 0] = np.clip(boxes[:, 0], 0, img_shape[1])  # x1
    boxes[:, 1] = np.clip(boxes[:, 1], 0, img_shape[0])  # y1
    boxes[:, 2] = np.clip(boxes[:, 2], 0, img_shape[1])  # x2
    boxes[:, 3] = np.clip(boxes[:, 3], 0, img_shape[0])  # y2

def yolov5Detection(roundNum):
    print('当前进程ID:{}'.format(os.getpid()))
    #host_name = get_host()
    rknn_model = 'yolov5s.rknn'

    # Create RKNN object
    #rknn = RKNN(verbose=True)
    #rknn_lite = RKNNLite(verbose=True) # 详细日志显示在终端上
    rknn_lite = RKNNLite()

    # load RKNN model
    print('--> Load RKNN model')
    ret = rknn_lite.load_rknn(rknn_model)
    if ret != 0:
        print('Load RKNN model failed')
        exit(ret)
    print('done')

    # Init runtime environment
    print('--> Init runtime environment')
    #ret = rknn.init_runtime()
    ret = rknn_lite.init_runtime(core_mask=RKNNLite.NPU_CORE_AUTO)
    # ret = rknn.init_runtime('rk3566')
    if ret != 0:
        print('Init runtime environment failed!')
        exit(ret)
    print('done')


    starttime = time.time()
    for ii in range(roundNum):
        print("进程{},执行第{}轮推理".format(os.getpid(), ii+1))
        # Set inputs
        img0 = cv2.imread(IMG_PATH)
        img = img0.copy()
        img, ratio, (dw, dh) = letterbox(img, new_shape=(IMG_SIZE, IMG_SIZE))
        img = cv2.cvtColor(img, cv2.COLOR_BGR2RGB)
        img = cv2.resize(img, (IMG_SIZE, IMG_SIZE))

        # Inference
        print('--> Running model')
        outputs = rknn_lite.inference(inputs=[img])
        #np.save('./onnx_yolov5_0.npy', outputs[0])
        #np.save('./onnx_yolov5_1.npy', outputs[1])
        #np.save('./onnx_yolov5_2.npy', outputs[2])
        print('done')


        # post process
        input0_data = outputs[0]
        input1_data = outputs[1]
        input2_data = outputs[2]

        input0_data = input0_data.reshape([3, -1]+list(input0_data.shape[-2:]))
        input1_data = input1_data.reshape([3, -1]+list(input1_data.shape[-2:]))
        input2_data = input2_data.reshape([3, -1]+list(input2_data.shape[-2:]))

        input_data = list()
        input_data.append(np.transpose(input0_data, (2, 3, 0, 1)))
        input_data.append(np.transpose(input1_data, (2, 3, 0, 1)))
        input_data.append(np.transpose(input2_data, (2, 3, 0, 1)))

        boxes, classes, scores = yolov5_post_process(input_data) # 此时检测框为缩放后的尺寸
        img1_shape = img.shape  # letterbox缩放后的图片尺寸
        img0_shape = img0.shape  # 原始图片尺寸
        boxes = self.scale_coords(img1_shape, boxes, img0_shape)  # 将缩放后图片上的预测结果,调整到原图片尺寸上


        #img_1 = cv2.cvtColor(img, cv2.COLOR_RGB2BGR)
        img_1 = img0.copy()
        if boxes is not None:
            draw(img_1, boxes, scores, classes) # 在原图上做检测框
            #cv2.imwrite('res.jpg', img_1)
        # show output
        # cv2.imshow("post process result", img_1)
        # cv2.waitKey(0)
        # cv2.destroyAllWindows()
        #time.sleep(0.001)

    endtime = time.time()
    print("进程Pid:{}, 总耗时{}秒,单轮平均耗时{}秒".format(os.getpid(), endtime-starttime, (endtime-starttime) / float(roundNum)))

    rknn_lite.release()


if __name__ == '__main__':
    roundNum = 1000
    total = 9
    processes = []
    for i in range(total):
        myprocess = multiprocessing.Process(target=yolov5Detection,args=(roundNum,))
        processes.append(myprocess)
    for i in range(total):
        processes[i].daemon = True
        processes[i].start()

    for _ in range(roundNum):
        print('主进程pid:{},当前共有{}个子进程'.format(os.getpid(), total))
        time.sleep(1)
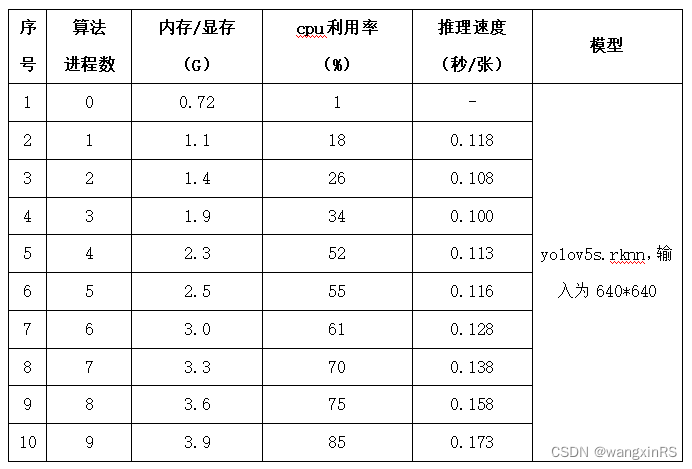
3. 性能测试
以下测试为1000次循环yolov5的图片读取、推理、后处理等步骤,下文的推理速度为单次读取、推理和后处理等完整流程的总耗时。


 1万+
1万+


 被折叠的 条评论
为什么被折叠?
被折叠的 条评论
为什么被折叠?
 到【灌水乐园】发言


