


目录
一、Co-DETR环境配置
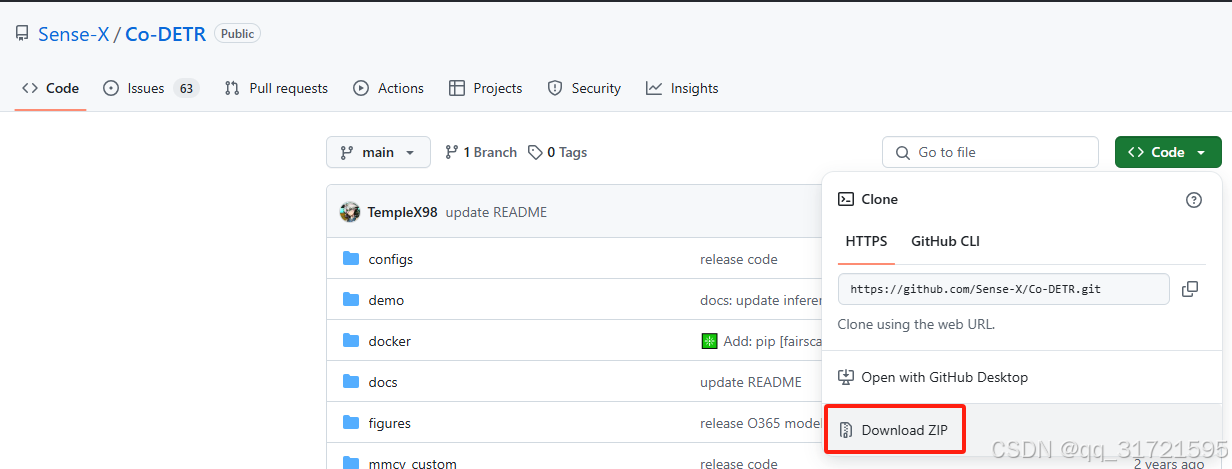
Co-DETR官网github仓库地址:https://github.com/Sense-X/Co-DETR
首先需要在一个有pytorch,cuda的环境下进行如下安装,可以采用租用服务器的方法,选择pytorch基础镜像。pytorch版本参考官方给的(见下图),其中python3.8的版本也可。

1、下载Co-DETR
可采用如下命令下载Co-DETR的代码(方法1),但我在拉取时一直没有成功,所以直接在github上将其下载下来再解压使用(方法2)
方法1:
# 拉取github上的代码
git clone https://github.com/Sense-X/Co-DETR.git
# 进入Co-DETR目录
cd Co-DETR
方法2:
2、安装所需的库
(1)安装Co-DETR代码中所依赖的库
pip install -e .(2)安装mmcv。官方说了他们使用了mmdet和mmcv实现Co-DETR
pip install -U openmim
mim install mmcv-full==1.6.1
注:一定要使用mim install来安装,我最开始直接使用pip install mmcv-full==1.6.1,结果没有成功,使用mim很快就成功了,并且最好安装mmcv-full,mmcv可能后面会出现报错。我的环境里是有mmdet的,如果没有需要使用pip install mmdet==2.25.3。
(3)重新安装低版本yapf,当前yapf版本过高会报错“TypeError: FormatCode() got an unexpected keyword argument ‘verify‘”,参考了另一篇博文(CO-DETR利用coco数据集训练和推理过程_co-detr训练自己的数据集-CSDN博客)给出的方法,发现降低yapf版本即可。
pip install yapf==0.40.1二、训练自己的数据集
1、准备数据集
首先你需要准备好自己的coco格式数据集,如果之前你的数据集是yolo格式,那就将其转换为coco格式(下面的yolo转换为coco格式的代码是其他博主的,但具体参考的哪篇博文忘记了):
import json
import os
import shutil
import cv2

# info ,license,categories 结构初始化;
# 在train.json,val.json,test.json里面信息是一致的;

# info,license暂时用不到
# info = {
#     "year": 2024,
#     "version": '1.0',
#     "date_created": 2024 - 3 - 29
# }
#
# licenses = {
#     "id": 1,
#     "name": "null",
#     "url": "null",
# }

info = {}
licenses ={}

# 自己的标签类别,跟yolo的数据集类别要对应好;
categories = [
    {
        "id": 0,
        "name": 'Bus',
        "supercategory": 'lines',
    },
    {
        "id": 1,
        "name": 'Bike',
        "supercategory": 'lines',
    },
    {
        "id": 2,
        "name": 'Car',
        "supercategory": 'lines',
    },
    {
        "id": 3,
        "name": 'Pedestrian',
        "supercategory": 'lines',
    },
    {
        "id": 4,
        "name": 'Truck',
        "supercategory": 'lines',
    },
]

# 初始化train,test、valid 数据字典
# info licenses categories 在train和test里面都是一致的;
train_data = {'info': info, 'licenses': licenses, 'categories': categories, 'images': [], 'annotations': []}
test_data = {'info': info, 'licenses': licenses, 'categories': categories, 'images': [], 'annotations': []}
valid_data = {'info': info, 'licenses': licenses, 'categories': categories, 'images': [], 'annotations': []}

# image_path 对应yolo的图像路径,比如images/train;
# label_path 对应yolo的label路径,比如labels/train 跟images要对应;
def yolo_covert_coco_format(image_path, label_path):
    images = []
    annotations = []
    for index, img_file in enumerate(os.listdir(image_path)):
        if img_file.endswith('.png'):
            image_info = {}
            img = cv2.imread(os.path.join(image_path, img_file))
            height, width, channel = img.shape
            image_info['id'] = index
            image_info['file_name'] = img_file
            image_info['width'], image_info['height'] = width, height
        else:
            continue
        if image_info != {}:
            images.append(image_info)
        # 处理label信息-------
        label_file = os.path.join(label_path, img_file.replace('.png', '.txt'))
        file_size = os.path.getsize(label_file)
        with open(label_file, 'r') as f:
            if file_size == 0:
                info_annotation = {}
                info_annotation["category_id"] = None  # 类别的id
                info_annotation['bbox'] = []  ## bbox的坐标
                info_annotation['area'] = None  ###area
                info_annotation['image_id'] = index  # bbox的id
                info_annotation['id'] = index * 100  # bbox的id
                # cv2.imwrite(f"./temp/{info_annotation['id']}.png", img_copy)
                info_annotation['segmentation'] = [[]]  # 四个点的坐标
                info_annotation['iscrowd'] = 0  # 单例
                annotations.append(info_annotation)
            else:
                for idx, line in enumerate(f.readlines()):
                    info_annotation = {}
                    class_num, xs, ys, ws, hs = line.strip().split(' ')
                    class_id, xc, yc, w, h = int(class_num), float(xs), float(ys), float(ws), float(hs)
                    xmin = (xc - w / 2) * width
                    ymin = (yc - h / 2) * height
                    xmax = (xc + w / 2) * width
                    ymax = (yc + h / 2) * height
                    bbox_w = int(width * w)
                    bbox_h = int(height * h)

                    info_annotation["category_id"] = class_id  # 类别的id
                    info_annotation['bbox'] = [xmin, ymin, bbox_w, bbox_h]  ## bbox的坐标
                    info_annotation['area'] = bbox_h * bbox_w  ###area
                    info_annotation['image_id'] = index  # bbox的id
                    info_annotation['id'] = index * 100 + idx  # bbox的id
                    # cv2.imwrite(f"./temp/{info_annotation['id']}.png", img_copy)
                    info_annotation['segmentation'] = [[xmin, ymin, xmax, ymin, xmax, ymax, xmin, ymax]]  # 四个点的坐标
                    info_annotation['iscrowd'] = 0  # 单例
                    annotations.append(info_annotation)
    return images, annotations


# key == train,test,val
# 对应要生成的json文件,比如instances_train.json,instances_test.json,instances_val.json
# 只是为了不重复写代码。。。。。
def gen_json_file(yolo_data_path, coco_format_path, key):
    # json path
    json_path = os.path.join(coco_format_path, f'annotations/instances_{key}2017.json')
    dst_path = os.path.join(coco_format_path, f'{key}')
    if not os.path.exists(os.path.dirname(json_path)):
        os.makedirs(os.path.dirname(json_path), exist_ok=True)
    data_path = os.path.join(yolo_data_path, f'images/{key}')
    label_path = os.path.join(yolo_data_path, f'labels/{key}')
    images, anns = yolo_covert_coco_format(data_path, label_path)
    if key == 'train':
        train_data['images'] = images
        train_data['annotations'] = anns
        with open(json_path, 'w') as f:
            json.dump(train_data, f, indent=2)
        # shutil.copy(data_path,'')
    elif key == 'test':
        test_data['images'] = images
        test_data['annotations'] = anns
        with open(json_path, 'w') as f:
            json.dump(test_data, f, indent=2)
    elif key == 'val':
        valid_data['images'] = images
        valid_data['annotations'] = anns
        with open(json_path, 'w') as f:
            json.dump(valid_data, f, indent=2)
    else:
        print(f'key is {key}')
    print(f'generate {key} json success!')
    return


if __name__ == '__main__':
    yolo_data_path = "your yolo datapath"
    coco_format_path = "your save coco datapath"
    gen_json_file(yolo_data_path, coco_format_path, key='train')
    # gen_json_file(yolo_data_path, coco_format_path, key='val')
    # gen_json_file(yolo_data_path, coco_format_path, key='test')
yolo格式的目录层级为:
yolo
——images
————train
————test
——labels
————train
————test
coco格式的目录层级为:
coco
——annotations
————instances_train2017.json
————instances_val2017.json
——train2017
——val2017
2、修改配置文件
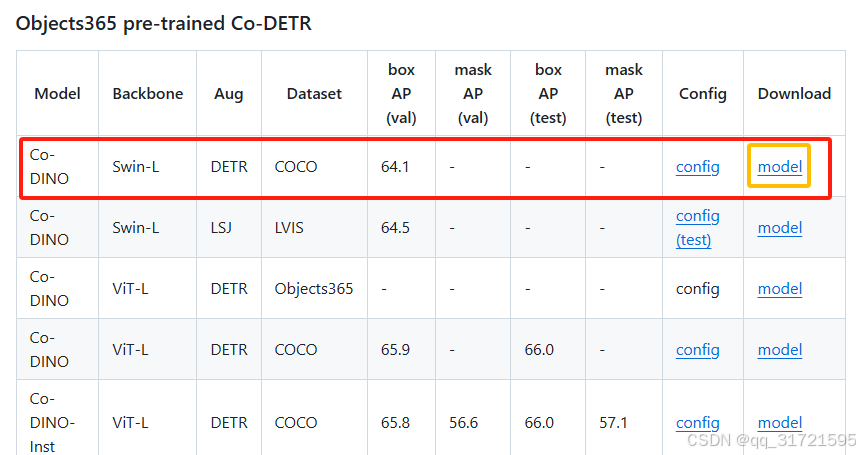
(1)下载权重文件
可以直接去github官网下载,点进model,里面会有几个模型权重,我下载了co_dino_5scale_swin_large_3x_coco.pth这个权重文件。
(2)修改配置文件
在这个目录下Co-DETR/projects/configs/co_dino/co_dino_5scale_swin_large_3x_coco.py找到这个模型权重的配置文件,一般和模型权重的名字相同。
打开这个文件会发现它很短(见下图),base的其它文件:
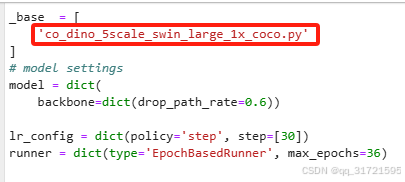
我们又找到它base的这个文件 :
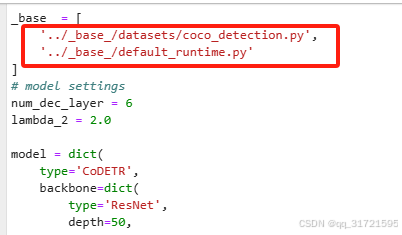
发现通过这样一层层修改参数比较麻烦,所以我们可以利用下述命令先生成一个config文件,在这个config文件上进行修改,这个文件具有所有的参数设置。
# projects/configs/co_dino/co_dino_5scale_swin_large_3x_coco.py这个就是刚官方的config文件,运行后生成的config文件就在output
python tools/train.py projects/configs/co_dino/co_dino_5scale_swin_large_3x_coco.py --work_dir output
然后点开这个文件对里面的参数进行修改,重点修改如下参数:
data_root改成自己存放数据集的路径,最开始是'data/coco/'
![]()


load_from第(1)步下载的权重文件:
![]()
在Swin-Transformer的github官网(GitHub - microsoft/Swin-Transformer: This is an official implementation for "Swin Transformer: Hierarchical Vision Transformer using Shifted Windows".)下载这个权重:
![]()
![]()
就是如下这个权重:
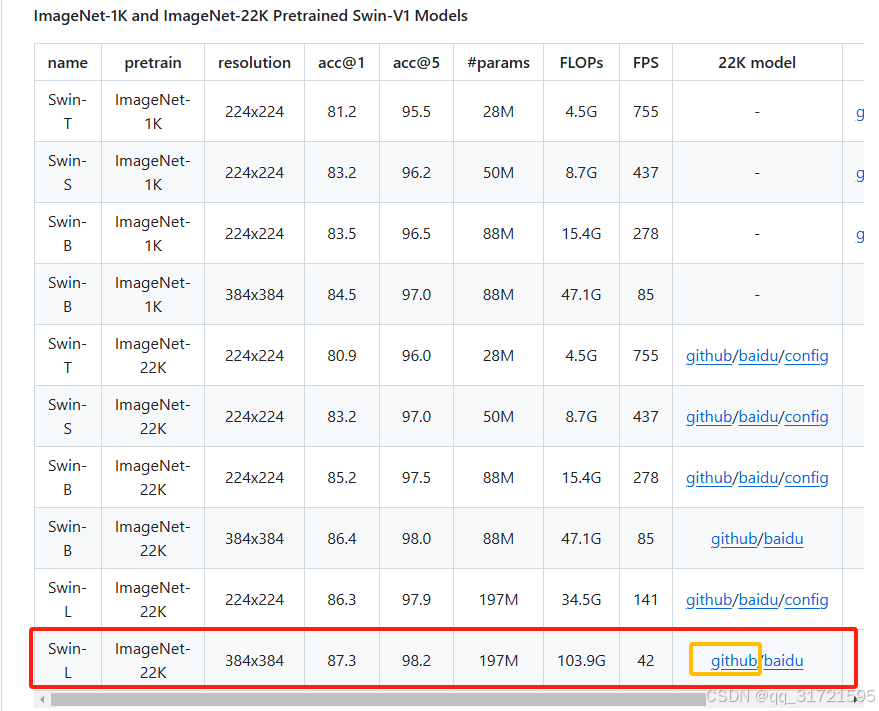
注:一定要注意!!!这里需要导入两个模型权重文件,一个是“load_from”参数:导入的是co_dino_5scale_swin_large_3x_coco.pth模型权重,是Co-DINO模型在COCO数据集上训练后得到的模型;另一个是“pretrained”参数(有两处需要修改):导入的是swin_large_patch4_window12_384_22k.pth模型权重。
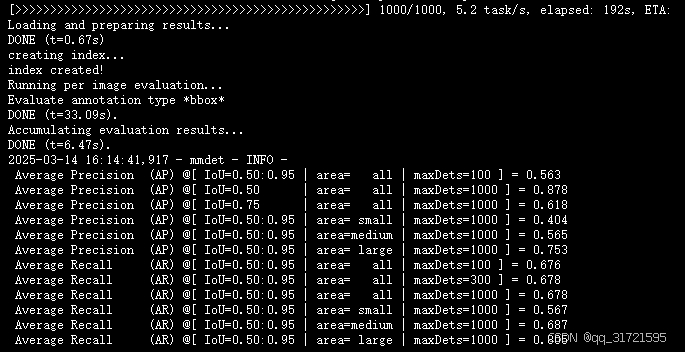
因为我在训练自己的模型时,load_from参数为None,pretrained参数为co_dino_5scale_swin_large_3x_coco.pth,导致训练过程中评估结果全为0,更改过后才变正常,如下图。
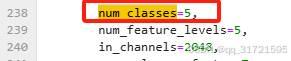
下面这些参数根据需要更改,num_classes类别数(在config文件内有3处需要更改,可直接搜索num_classes将其改为自定义数据集的类别数,默认是80)。
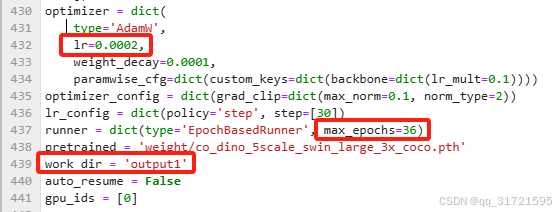
lr学习率,max_epochs迭代轮数,work_dir结果保存路径。
samples_per_gpu(每个 GPU 上每次迭代所处理的样本数量)和workers_per_gpu(每个 GPU 所分配的数据加载线程数)两个参数(这两个参数可能就是我们平时训练模型的batch_size,因为在这个config文件内没有直接找到batch_size参数,感觉就是这两个参数控制的) 。
eg.若你有 4 个 GPU,samples_per_gpu设置为 8,那么总的批量大小就是 4 × 8 = 32。
eg.若你有 4 个 GPU,workers_per_gpu设置为 2,那么总共会使用 4 × 2 = 8 个线程来进行数据加载。

此外,还需要对COCO数据类型的一些参数进行更改,改为自定义数据集的类别,更改文件包括:
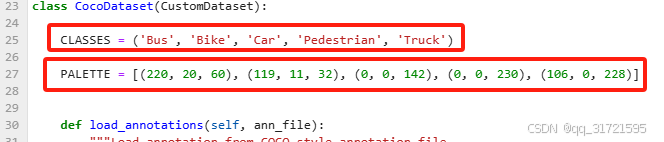
(1)Co-DETR/mmdet/datasets/coco.py,更改如下图。将其改为自定义数据集的类别名称,以及对应类别数的PALETTE颜色。
注:这里也出现了一个问题,我在训练模型时,最开始是将原有的COCO数据集默认的CLASSES和PALETTE直接注释了,然后在下面重写的自定义的数据类别,但训练时模型并没有将我更改后的CLASSES读入,导致LOSS全为0,后面我直接将默认的删除掉,才解决了这个问题,这里我也比较疑惑?
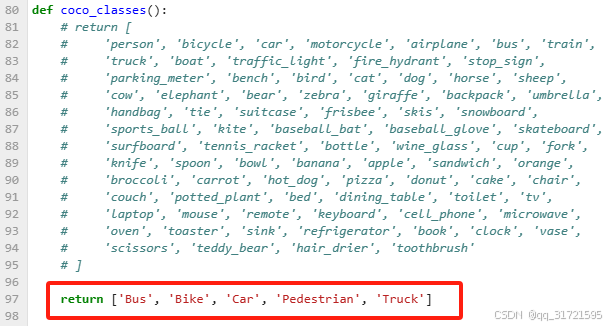
(2) Co-DETR/mmdet/core/evaluation/class_names.py,更改如下图。找到coco_classes,同样将其改为自己的类别,这里我就是直接注释掉上面默认的,在下面接着写的就没有问题,但上面不知道为什么有那个问题。
根据上述的修改,模型就可以按如下命令训练起来了:
python tools/train.py 你保存的config文件的位置


 1562
1562

 被折叠的 条评论
为什么被折叠?
被折叠的 条评论
为什么被折叠?
 到【灌水乐园】发言


