


Apache Hive
一、概述
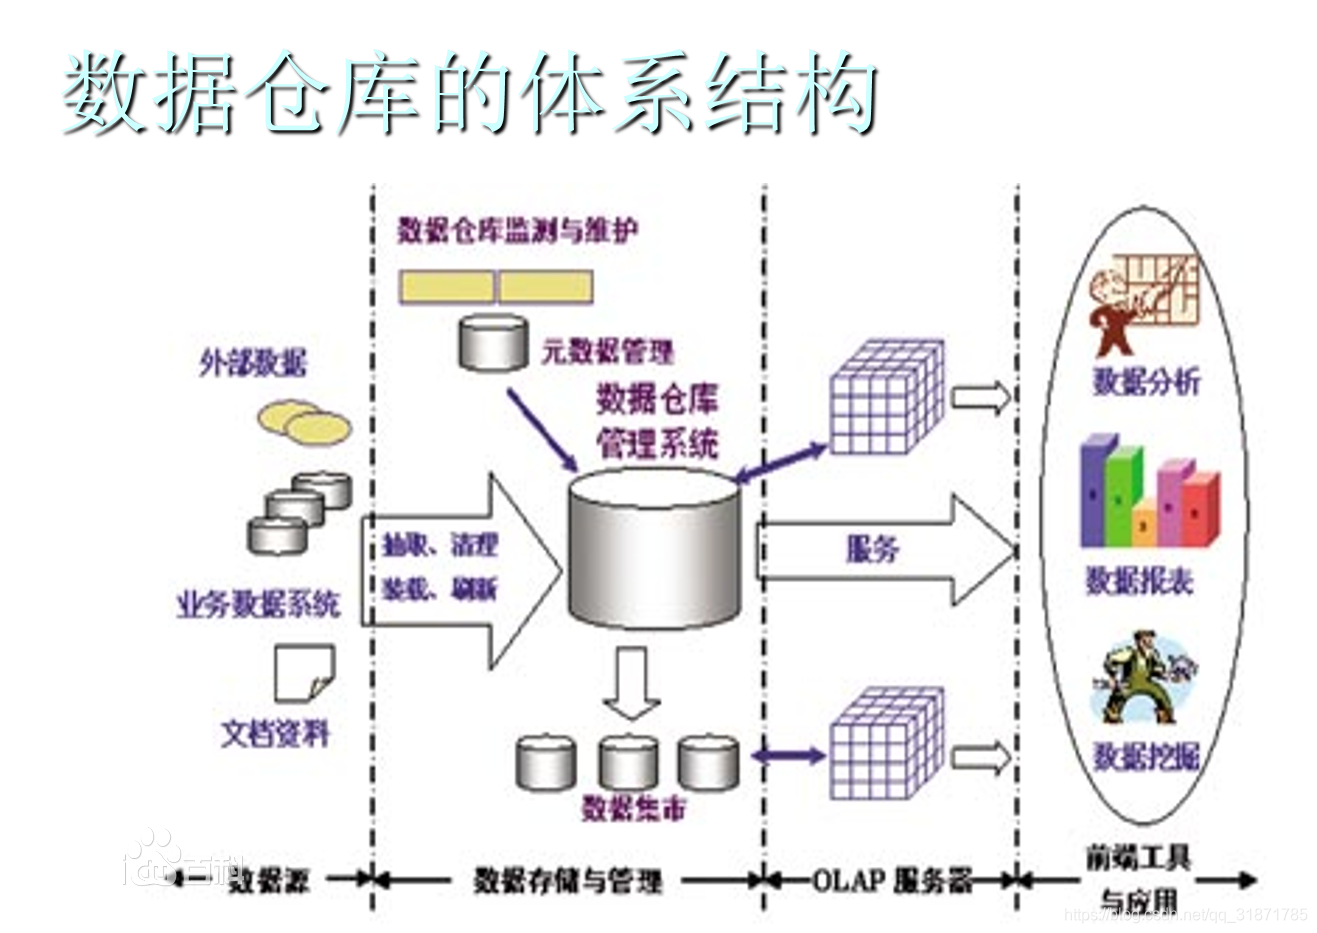
数据仓库:英文名称为Data Warehouse,可简写为DW或DWH。数据仓库,是为企业所有级别的决策制定过程,提供所有类型数据支持的战略集合。它是单个数据存储,出于分析性报告和决策支持目的而创建。 为需要业务智能的企业,提供指导业务流程改进、监视时间、成本、质量以及控制。
Apache Hive是基于Hadoop的一个数据仓库工具,可以将结构化的数据文件映射为一张数据库表,并提供简单的类sql查询功能,可以将sql语句转换为MapReduce任务进行运行。其优点是学习成本低,可以通过类SQL语句快速实现简单的MapReduce统计,不必开发专门的MapReduce应用,十分适合数据仓库的统计分析。
Hive是建立在 Hadoop 上的数据仓库基础构架。它提供了一系列的工具,可以用来进行数据提取转化加载(ETL),这是一种可以存储、查询和分析存储在 Hadoop 中的大规模数据的机制。Hive定义了简单的类 SQL查询语言,称为 HQL,它允许熟悉 SQL 的用户查询数据。同时,这个语言也允许熟悉MapReduce 开发者的开发自定义的 mapper 和 reducer 来处理内建的 mapper 和 reducer 无法完成的复杂的分析工作。Hive 没有专门的数据格式。 Hive 可以很好的工作在 Thrift 之上,控制分隔符,也允许用户指定数据格式。
Note
ETL:大数据中的一个专业术语, E:Extract(抽取) T:Transfer(转换) L:Load(加载)ETL指的是从数据源到数据仓库的处理过程
- E:将数据源中的数据按照一些规则提取出来关键某些数据
- T:将数据做一些简单格式转换,存放在数据仓库的临时表中
- L:将临时表中的数据按照业务需求装载到数据仓库的业务表中;
适用场景
Hive 构建在基于静态批处理的Hadoop 之上,Hadoop 通常都有较高的延迟并且在作业提交和调度的时候需要大量的开销。因此,Hive 并不能够在大规模数据集上实现低延迟快速的查询,例如,Hive 在几百MB 的数据集上执行查询一般有分钟级的时间延迟。因此,Hive 并不适合那些需要低延迟的应用,例如,联机事务处理(OLTP)。Hive 查询操作过程严格遵守Hadoop MapReduce 的作业执行模型,Hive将用户的HiveQL 语句通过解释器转换为MapReduce 作业提交到Hadoop 集群上,Hadoop 监控作业执行过程,然后返回作业执行结果给用户。Hive并非为联机事务处理而设计,Hive并不提供实时的查询和基于行级的数据更新操作。Hive的最佳使用场合是大数据集的批处理作业,例如,网络日志分析。
特点
Hive 是一种底层封装了Hadoop 的数据仓库处理工具,使用类SQL 的HiveQL 语言实现数据查询,所有Hive 的数据都存储在Hadoop 兼容的文件系统例如(HDFS)
Hive 在加载数据过程中不会对数据进行任何的修改,只是将数据移动到HDFS 中Hive 设定的目录下,因此,Hive 不支持对数据的改写和添加,所有的数据都是在加载的时候确定的。
- 支持索引,加快数据查询
- 不同的存储类型,例如,纯文本文件、HBase 中的文件。
- 将元数据保存在关系数据库中,大大减少了在查询过程中执行语义检查的时间。
- 可以直接使用存储在Hadoop 文件系统中的数据。
- 内置大量用户函数UDF 来操作时间、字符串和其他的数据挖掘工具,支持用户扩展UDF 函数来完成内置函数无法实现的操作。
- 类SQL 的查询方式,将SQL 查询转换为MapReduce 的job 在Hadoop集群上执行。
数据类型
首先Hive没有专门的数据存储格式,也没有为数据建立索引,用户可以非常自由的组织 Hive 中的表,只需要在创建表的时候告诉 Hive 数据中的列分隔符和行分隔符,Hive 就可以解析数据。其次Hive 中所有的数据都存储在 HDFS 中,Hive 中包含以下数据模型:表(Table,也称为内部表),外部表(External Table),分区(Partition),分桶表(Bucket)
二、环境搭建
准备工作
-
MySQL DB(Hive使用关系型数据库存放元数据,减少语义检查查询,需要mysql开启远程访问支持)
-
Hadoop(HDFS & Yarn集群)服务健康
[root@HadoopNode00 ~]# start-dfs.sh Starting namenodes on [HadoopNode00] HadoopNode00: starting namenode, logging to /home/hadoop/hadoop-2.6.0/logs/hadoop-root-namenode-HadoopNode00.out localhost: starting datanode, logging to /home/hadoop/hadoop-2.6.0/logs/hadoop-root-datanode-HadoopNode00.out Starting secondary namenodes [0.0.0.0] 0.0.0.0: starting secondarynamenode, logging to /home/hadoop/hadoop-2.6.0/logs/hadoop-root-secondarynamenode-HadoopNode00.out [root@HadoopNode00 ~]# [root@HadoopNode00 ~]# [root@HadoopNode00 ~]# start-yarn.sh starting yarn daemons starting resourcemanager, logging to /home/hadoop/hadoop-2.6.0/logs/yarn-root-resourcemanager-HadoopNode00.out localhost: starting nodemanager, logging to /home/hadoop/hadoop-2.6.0/logs/yarn-root-nodemanager-HadoopNode00.out [root@HadoopNode00 ~]# jps 1858 DataNode 1765 NameNode 2618 Jps 2204 ResourceManager 2046 SecondaryNameNode 2302 NodeManager -
JDK8.0 以上
安装
上传安装包
解压缩安装
[root@HadoopNode00 ~]# tar -zxf apache-hive-1.2.1-bin.tar.gz -C /usr
配置
新建hive-site.xml
[root@HadoopNode00 conf]# vi hive-site.xml
<?xml-stylesheet type="text/xsl" href="configuration.xsl"?>
<configuration>
        <property>
                <name>javax.jdo.option.ConnectionURL</name>
                <value>jdbc:mysql://192.168.197.1:3306/hive</value>
        </property>
        <property>
                <name>javax.jdo.option.ConnectionDriverName</name>
                <value>com.mysql.jdbc.Driver</value>
        </property>
        <property>
                <name>javax.jdo.option.ConnectionUserName</name>
                <value>root</value>
        </property>
         <property>
                <name>javax.jdo.option.ConnectionPassword</name>
                <value>1234</value>
         </property>
</configuration>
注意:
hive数据库的编码格式需要定义为拉丁
添加MySQL驱动jar包
注意版本匹配
[root@HadoopNode00 apache-hive-1.2.1-bin]# mv /root/mysql-connector-java-5.1.6.jar /usr/apache-hive-1.2.1-bin/lib/
替换Hadoop jline的低版本jar包
[root@HadoopNode00 ~]# cp /usr/apache-hive-1.2.1-bin/lib/jline-2.12.jar /home/hadoop/hadoop-2.6.0/share/hadoop/yarn/lib/
[root@HadoopNode00 ~]# rm -rf /home/hadoop/hadoop-2.6.0/share/hadoop/yarn/lib/jline-0.9.94.jar
启动Hive服务
单用户访问
在一个服务窗口,同时启动Hive Server和Hive Client; 只能允许当前的Hive Client操作Hive Server
[root@HadoopNode00 ~]# cd /usr/apache-hive-1.2.1-bin/
[root@HadoopNode00 apache-hive-1.2.1-bin]# bin/hive
Logging initialized using configuration in jar:file:/usr/apache-hive-1.2.1-bin/lib/hive-common-1.2.1.jar!/hive-log4j.properties
hive> show databases;
OK
default
Time taken: 0.669 seconds, Fetched: 1 row(s)
hive> use default;
OK
Time taken: 0.028 seconds
hive> show tables;
OK
Time taken: 0.024 seconds
多用户访问
首先启动HiveServer,可以在另外窗口启动多个Hive Client操作
[root@HadoopNode00 apache-hive-1.2.1-bin]# bin/hiveserver2

[root@HadoopNode00 apache-hive-1.2.1-bin]# bin/beeline -u -n root jdbc:hive2://localhost:10000
Connecting to jdbc:hive2://localhost:10000
Connected to: Apache Hive (version 1.2.1)
Driver: Hive JDBC (version 1.2.1)
Transaction isolation: TRANSACTION_REPEATABLE_READ
Beeline version 1.2.1 by Apache Hive
0: jdbc:hive2://localhost:10000> show databases;
+----------------+--+
| database_name  |
+----------------+--+
| default        |
+----------------+--+
1 row selected (1.07 seconds)
0: jdbc:hive2://localhost:10000> use default;
No rows affected (0.052 seconds)
0: jdbc:hive2://localhost:10000> show tables;
+-----------+--+
| tab_name  |
+-----------+--+
+-----------+--+
No rows selected (0.037 seconds)
0: jdbc:hive2://localhost:10000>
注意:
- 启动Hive Server后会在MySQL中创建29张和元数据存储相关的表
- Hive会在HDFS中创建数据仓库目录,用以存放数据
三、数据库和表相关操作
数据库
创建数据库
完整语法
CREATE (DATABASE|SCHEMA) [IF NOT EXISTS] database_name
  [COMMENT database_comment]
  [LOCATION hdfs_path]
  [WITH DBPROPERTIES (property_name=property_value, ...)];
如:
第一种写法:
hive> create database if not exists baizhi;
OK
Time taken: 0.159 seconds

自动在hdfs创建数据库的数据存放目录: /user/hive/warehouse/baizhi.db

第二种写法:
hive>
    > create database test1;
OK

第三种完整写法:
hive> create database if not exists test2 comment 'test2 database' location '/user/test2' with dbproperties('author'='gaozhy','company'='baizhiedu');
OK
删除数据库
完整语法
DROP (DATABASE|SCHEMA) [IF EXISTS] database_name [RESTRICT|CASCADE];
默认是:
RESTRICT不允许删除数据库有表的库
CASCADE删除数据库时级联删除表
如:
hive> drop schema if exists test3 restrict;
Moved: 'hdfs://HadoopNode00:9000/user/hive/warehouse/test3.db' to trash at: hdfs://HadoopNode00:9000/user/root/.Trash/Current
OK
Time taken: 0.178 seconds
hive> drop database test2 cascade;
Moved: 'hdfs://HadoopNode00:9000/user/test2' to trash at: hdfs://HadoopNode00:9000/user/root/.Trash/Current
OK
Time taken: 0.101 seconds
查看数据库
完整语法
(DESC|DESCRIBE) (DATABASE|SCHEMA) database_name ;
如:
hive> desc database baizhi;
OK
baizhi          hdfs://HadoopNode00:9000/user/hive/warehouse/baizhi.db  root    USER
Time taken: 0.037 seconds, Fetched: 1 row(s)
修改数据库
完整语法
ALTER (DATABASE|SCHEMA) database_name SET DBPROPERTIES (property_name=property_value, ...);
ALTER (DATABASE|SCHEMA) database_name SET OWNER [USER|ROLE] user_or_role;
如:
hive> desc database baizhi;
OK
baizhi          hdfs://HadoopNode00:9000/user/hive/warehouse/baizhi.db  zs      USER
Time taken: 0.049 seconds, Fetched: 1 row(s)
hive> alter database baizhi set owner user root;
OK
Time taken: 0.026 seconds
hive> desc database baizhi;
OK
baizhi          hdfs://HadoopNode00:9000/user/hive/warehouse/baizhi.db  root    USER
Time taken: 0.016 seconds, Fetched: 1 row(s)
切换数据库
完整语法
hive> select current_database();
OK
default
Time taken: 0.585 seconds, Fetched: 1 row(s)
hive> use baizhi;
OK
Time taken: 0.021 seconds
hive> select current_database();
OK
baizhi
展示数据库列表
完整语法
hive> show databases;
Hive表中的数据类型
数据类型(primitive,array,map,struct)
-
Primitive(原始类型):
- 整数:TINYINT、SMALLINT、INT、BIGINT (等价于Byte、Short、Int、Long存值范围)
- 布尔:BOOLEAN
- 小数:FLOAT、DOUBLE
- 字符:STRING、CHAR、VARCHAR
- 二进制:BINARY
- 时间类型:TIMESTAMP、DATE
-
Array(数组类型):ARRAY < data_type >
-
Map(key-value类型):MAP < primitive_type, data_type >
-
Struct(结构体类型):STRUCT <col_name:data_type, …>
Hive默认使用的分隔符
| 分隔符 | 描述 |
|---|---|
| \n | 对于文本来说,每一行都是一条记录。因此\n可以分割记录。 |
| ^A(Ctrl+a) | 用于分割字段(列),在create table中可以使用\001表示。 |
| ^B(Ctrl+b) | 用于分割array或者是struct中 的元素或者用于map结构中的k-v对的分隔符,在create table中可以使用\002表示。 |
| ^C(Ctrl+c) | 用于Map中k-v的分隔符,在create table中可以使用\003表示。 |
分隔符在vi模式下,使用Ctrl +v + Ctrl + A|B|C
Hive表的使用
创建表的语法
标准语法
类似于DB的创建表的语法
hive> create table t_user(id int, name varchar(50),sex boolean,birthday date);
OK
Time taken: 0.161 seconds
hive> show tables;
OK
t_user
装载数据
# 1. 准备数据文件,按照hive表的格式要求 准备数据
1^Azs^Atrue^A2018-01-01
2^Als^Afalse^A1998-07-07

# 2. hive指令将数据文件的内容装载到Hive Table中  [本地文件系统]
hive> load data local inpath '/usr/apache-hive-1.2.1-bin/data/t_user.txt' into table t_user;
Loading data to table baizhi.t_user
Table baizhi.t_user stats: [numFiles=1, totalSize=43]
OK
Time taken: 0.299 seconds

# 3. hive指令将数据文件的内容追加装载到Hive Table中  [HDFS文件系统]
hive > load data inpath 'hdfs://HadoopNode00:9000/t_user.txt' into table t_user;
Loading data to table baizhi.t_user
Table baizhi.t_user stats: [numFiles=2, totalSize=86]
OK
Time taken: 0.233 seconds
hive> select * from t_user;
OK
1       zs      true    2018-01-01
2       ls      false   1998-07-07
3       zs      true    2018-01-01
4       ls      false   1998-07-07

# 4. hive指令将数据文件的内容覆盖装载到Hive Table中  [HDFS文件系统]
hive> load data inpath 'hdfs://HadoopNode00:9000/t_user.txt'  overwrite into table t_user;
Loading data to table baizhi.t_user
Moved: 'hdfs://HadoopNode00:9000/user/hive/warehouse/baizhi.db/t_user/t_user.txt' to trash at: hdfs://HadoopNode00:9000/user/root/.Trash/Current
Moved: 'hdfs://HadoopNode00:9000/user/hive/warehouse/baizhi.db/t_user/t_user_copy_1.txt' to trash at: hdfs://HadoopNode00:9000/user/root/.Trash/Current
Table baizhi.t_user stats: [numFiles=1, numRows=0, totalSize=43, rawDataSize=0]
OK
Time taken: 0.274 seconds
总结:
- hive默认创建的表是一个内部表,数据文件在装载时会移动拷贝到数据仓库的表的存储目录;
- hive表装载数据时,可以是本地文件系统(local)中数据或者HDFS
- hive表装载数据时,默认采用的是追加(append); 如果需要覆盖表的原始内容,在需要在装载表的时候指定
overwrite
数组类型的使用
# 1. 创建表
hive> create table t_person(id int,name string,hobbies array<String>);
OK
Time taken: 0.063 seconds


# 2. 准备数据文件
1^Azs^ATV^BLOL^BMUSIC
2^Als^ASPORT^BDrink

# 3. 装载数据
hive> load data local inpath '/usr/apache-hive-1.2.1-bin/data/t_person.txt' into table t_person;
Loading data to table baizhi.t_person
Table baizhi.t_person stats: [numFiles=1, totalSize=35]
OK
Time taken: 0.197 seconds
hive> select * from t_person;
OK
1       zs      ["TV","LOL","MUSIC"]
2       ls      ["SPORT","Drink"]
Time taken: 0.053 seconds, Fetched: 2 row(s)
结构化类型的使用
# 1. 创建表
hive> create table t_location(id tinyint,name string,address struct<country:String,city:String>);
OK
Time taken: 0.064 seconds

# 2. 准备数据文件
1^A三里屯^A中国^B北京朝阳
2^A五道口^A中国^B北京海淀

# 3. 装载数据
hive> load data local inpath '/usr/apache-hive-1.2.1-bin/data/t_location.log' into table t_location;
Loading data to table baizhi.t_location
Table baizhi.t_location stats: [numFiles=1, totalSize=64]
OK
Time taken: 0.218 seconds
hive> select * from t_location;
OK
1       三里屯  {"country":"中国","city":"北京朝阳"}
2       五道口  {"country":"中国","city":"北京海淀"}
Time taken: 0.063 seconds, Fetched: 2 row(s)
注意:
struct type数据本质上由Json格式组织和管理;
Map类型的使用
# 1. 创建表
hive> create table t_product(id int,name varchar(50),tag map<String,String>);
OK
Time taken: 0.063 seconds


# 2. 准备数据文件
1^Aiphone11^Amemory^C256GB^Bsize^C5.8
2^Ahuawei mate30^Asize^C6.1

# 3. 加载数据
hive> load data local inpath '/usr/apache-hive-1.2.1-bin/data/t_product.txt' into table t_product;
Loading data to table baizhi.t_product
Table baizhi.t_product stats: [numFiles=2, totalSize=107]
OK
Time taken: 0.194 seconds
hive> select * from t_product;
OK
1       iphone11        {"memory":"256GB"}
2       huawei mate30   {"size":"6.1"}
1       iphone11        {"memory":"256GB","size":"5.8"}
2       huawei mate30   {"size":"6.1"}
Time taken: 0.076 seconds, Fetched: 4 row(s)
自定义分隔符
字段分隔符
# 1. 自定义字段的分隔符  空格
hive> create table tt_user(id int,name varchar(32),sex boolean,birth date) row format delimited fields terminated by ' ' lines terminated by '\n';
OK
Time taken: 0.123 seconds

# 2. 准备数据文件
1 zs true 2018-01-01
2 ls false 2020-01-02
3 ww false 2020-01-01

# 3. 装载数据时
hive> load data local inpath '/usr/apache-hive-1.2.1-bin/data/tt_user.txt' into table tt_user;
Loading data to table baizhi.tt_user
Table baizhi.tt_user stats: [numFiles=1, totalSize=65]
OK
Time taken: 0.228 seconds
hive> select * from tt_user;
OK
1       zs      true    2018-01-01
2       ls      false   2020-01-02
3       ww      false   2020-01-01
Time taken: 0.05 seconds, Fetched: 3 row(s)
数组分隔符
# 1. 自定义字段和集合元素的分隔符  空格
hive> create table t_order(id int,name varchar(32),num int,price double,tags array<string>,user_id int)row format delimited fields terminated by ' ' collection items terminated by '>' lines terminated by '\n';
OK
Time taken: 0.108 seconds

# 2. 准备数据文件
[root@HadoopNode00 data]# vi t_order.txt
1 iphone11 2 4999.0 贵>好用>香 101
2 huaweimate30 1 3999.0 国产>麒麟 102


# 3. 装载数据时
hive> load data local inpath '/usr/apache-hive-1.2.1-bin/data/t_order.txt' into table t_order;
Loading data to table baizhi.t_order
Table baizhi.t_order stats: [numFiles=1, totalSize=81]
OK
Time taken: 0.223 seconds
hive> select * from t_order;
OK
1       iphone11        2       4999.0  ["贵","好用","香"]      101
2       huaweimate30    1       3999.0  ["国产","麒麟"] 102
Time taken: 0.04 seconds, Fetched: 2 row(s)
map分隔符
map keys terminated by '分隔符'
基于正则表达式数据装载
# 1. 样例数据
192.168.197.1 - - [20/Dec/2019:22:12:42 +0800] "GET / HTTP/1.1" 200 612 "-" "Mozilla/5.0 (Windows NT 6.1; Win64; x64) AppleWebKit/537.36 (KHTML, like Gecko) Chrome/78.0.3904.108 Safari/537.36"
192.168.197.1 - - [20/Dec/2019:22:12:42 +0800] "GET /favicon.ico HTTP/1.1" 404 571 "http://hadoopnode00/" "Mozilla/5.0 (Windows NT 6.1; Win64; x64) AppleWebKit/537.36 (KHTML, like Gecko) Chrome/78.0.3904.108 Safari/537.36"

# 2. 正则表达式
^(\d{1,3}\.\d{1,3}\.\d{1,3}\.\d{1,3}).*\[(.*)\]\s"(\w+)\s(.*)\sHTTP\/1.1"\s(\d{3})\s.*$

# 3. 实践
hive> create table t_log(ip string,access_time string,method string,uri string,code smallint) ROW FORMAT SERDE 'org.apache.hadoop.hive.serde2.RegexSerDe' WITH SERDEPROPERTIES("input.regex"="^(\\d{1,3}\\.\\d{1,3}\\.\\d{1,3}\\.\\d{1,3}).*\\[(.*)\\]\\s\"(\\w+)\\s(.*)\\sHTTP\\/1.1\"\\s(\\d{3})\\s.*$")
    > ;
OK
Time taken: 0.085 seconds
hive> load data local inpath '/usr/apache-hive-1.2.1-bin/data/nginx.log' into table t_log;
Loading data to table baizhi.t_log
Table baizhi.t_log stats: [numFiles=1, totalSize=416]
OK
Time taken: 0.195 seconds
hive> select * from t_log;
OK
192.168.197.1   20/Dec/2019:22:12:42 +0800      GET     /       200
192.168.197.1   20/Dec/2019:22:12:42 +0800      GET     /favicon.ico    404
Time taken: 0.035 seconds, Fetched: 2 row(s)
基于Json文件数据装载
[root@HadoopNode00 json]# vi user1.json
{"id":1,"name":"zs","sex":true,"birthday":"1998-12-12"}
{"id":2,"name":"ls","sex":true,"birthday":"1990-12-12"}

[root@HadoopNode00 json]# vi user2.json
{"id":3,"name":"ww","sex":false,"birthday":"1995-07-08"}
{"id":4,"name":"zl","sex":false}


# 2. 创建hive表
hive> create table t_user_json(id int,name varchar(32),sex boolean,birthday date)ROW FORMAT SERDE 'org.apache.hive.hcatalog.data.JsonSerDe';
FAILED: Execution Error, return code 1 from org.apache.hadoop.hive.ql.exec.DDLTask. Cannot validate serde: org.apache.hive.hcatalog.data.JsonSerDe
hive> ADD JAR /usr/apache-hive-1.2.1-bin/hcatalog/share/hcatalog/hive-hcatalog-core-1.2.1.jar ;
Added [/usr/apache-hive-1.2.1-bin/hcatalog/share/hcatalog/hive-hcatalog-core-1.2.1.jar] to class path
Added resources: [/usr/apache-hive-1.2.1-bin/hcatalog/share/hcatalog/hive-hcatalog-core-1.2.1.jar]
hive> create table t_user_json(id int,name varchar(32),sex boolean,birthday date)ROW FORMAT SERDE 'org.apache.hive.hcatalog.data.JsonSerDe';
OK
Time taken: 0.138 seconds


# 3. 数据装载
hive> load data local inpath '/usr/apache-hive-1.2.1-bin/data/json'  overwrite into table t_user_json;
Loading data to table baizhi.t_user_json
Moved: 'hdfs://HadoopNode00:9000/user/hive/warehouse/baizhi.db/t_user_json/user1.json' to trash at: hdfs://HadoopNode00:9000/user/root/.Trash/Current
Moved: 'hdfs://HadoopNode00:9000/user/hive/warehouse/baizhi.db/t_user_json/user2.json' to trash at: hdfs://HadoopNode00:9000/user/root/.Trash/Current
Table baizhi.t_user_json stats: [numFiles=2, numRows=0, totalSize=202, rawDataSize=0]
OK
Time taken: 0.239 seconds
hive> select * from t_user_json;
OK
1       zs      true    1998-12-12
2       ls      true    1990-12-12
3       ww      false   1995-07-08
4       zl      false   NULL
四、Hive表分类
在Hive表分为了管理表(内部表)、外部表、分区表、分桶表、临时表(依然与会话,hive客户端如何创建一个临时表,在会话结束时,自动删除);
删除表
DROP TABLE [IF EXISTS] table_name [PURGE];
可选关键字
purge,
- 添加则删除表的元数据+表中内容
- 不添加只删除表的元数据,而表中的内容会移动到HDFS的
.trash/current垃圾数据存放目录;
管理(内部)表
管理表会控制数据的生命周期,不能进行多团队数据共享分析处理;
0: jdbc:hive2://localhost:10000> drop table t_location;
No rows affected (0.885 seconds)
0: jdbc:hive2://localhost:10000> drop table t_user_json;
No rows affected (0.15 seconds)
外部表
# 1. 创建外部表的语法
0: jdbc:hive2://localhost:10000> create external table t_user_json(id int,name varchar(32),sex boolean,birthday date)ROW FORMAT SERDE 'org.apache.hive.hcatalog.data.JsonSerDe';
No rows affected (0.294 seconds)

# 2. 装载数据
0: jdbc:hive2://localhost:10000> load data local inpath '/usr/apache-hive-1.2.1-bin/data/json' into table t_user_json;
INFO  : Loading data to table baizhi.t_user_json from file:/usr/apache-hive-1.2.1-bin/data/json
INFO  : Table baizhi.t_user_json stats: [numFiles=2, totalSize=202]
No rows affected (0.543 seconds)
0: jdbc:hive2://localhost:10000> drop table t_user_json purge;
No rows affected (0.139 seconds)
注意:
在删除外部表时,仅仅删除的是表的元数据(metadata),而不会删除外部表控制的数据;
临时表
临时表关键字:
temporary生命周期依赖于会话
0: jdbc:hive2://localhost:10000> create temporary table ttt_user(id int,name string);
No rows affected (0.132 seconds)
0: jdbc:hive2://localhost:10000> show tables;
+------------+--+
|  tab_name  |
+------------+--+
| t_log      |
| t_order    |
| t_person   |
| t_product  |
| t_user     |
| tt_user    |
| ttt_user   |
+------------+--+
7 rows selected (0.492 seconds)
分区表
外部表或者内部表都可以在创建时指定分区,这样的就构成了分区表;分区就是数据分片思想,将一个大数据集按照规则划分为若干个小数据集,这样在进行数据加载或者处理时会有比较好处理性能; 优化策略
# 1. 创建分区表
0: jdbc:hive2://localhost:10000> create table ttt_user(id int,name varchar(32),sex boolean,birth date) partitioned by(country String,state String) row format delimited fields terminated by ' ' lines terminated by '\n';
No rows affected (0.087 seconds)

# 2. 准备数据
1 zs true 2020-01-01
2 ls false 1990-01-01
3 ww false 2001-01-01

# 3. 装载数据
0: jdbc:hive2://localhost:10000> load data local inpath '/usr/apache-hive-1.2.1-bin/data/ttt_user.txt' into table ttt_user partition(country='china',state='sh');


0: jdbc:hive2://localhost:10000> load data local inpath '/usr/apache-hive-1.2.1-bin/data/ttt_user.txt' into table ttt_user partition(country='china',state='bj');


# 4. 如何使用分区表
0: jdbc:hive2://localhost:10000> select * from ttt_user where country='china' and state='bj';
+--------------+----------------+---------------+-----------------+-------------------+-----------------+--+
| ttt_user.id  | ttt_user.name  | ttt_user.sex  | ttt_user.birth  | ttt_user.country  | ttt_user.state  |
+--------------+----------------+---------------+-----------------+-------------------+-----------------+--+
| 1            | zs             | true          | 2020-01-01      | china             | bj              |
| 2            | ls             | false         | 1990-01-01      | china             | bj              |
| 3            | ww             | false         | 2001-01-01      | china             | bj              |
+--------------+----------------+---------------+-----------------+-------------------+-----------------+--+
分区表:
- hive优化方案,按照分区查询时只需要加载分区内的数据,而不需要加载整个表的内容;
- 使用分区伪列+分区内容 进行数据加载
分桶表
分桶表指将数据集分解成容易组织管理若干个部分的技术;解决数据倾斜问题,已经大表和大表的JOIN,高效数据取样;
# 1. 创建分桶表
0: jdbc:hive2://localhost:10000> create table t_bucket(id int,name string) clustered by (id) into 3 buckets;
No rows affected (0.141 seconds)


# 2. 注意 分桶表在装载数据时不能使用load
# 3. 特殊设置
# 强制使用分桶表
set hive.enforce.bucketing = true;
# 设置reducer 任务数量 = 桶的数量
set mapred.reduce.tasks = 3;

# 4. 临时表 首先将数据加载临时表中
create temporary table t_bucket_tmp(id int,name string);
load data local inpath '/usr/apache-hive-1.2.1-bin/data/bucketTmp.txt' into table t_bucket_tmp;

# 5. 将临时表中的数据转换到分桶表中
insert into t_bucket select * from t_bucket_tmp cluster by id;
分区表的其它操作
0: jdbc:hive2://localhost:10000> alter table ttt_user drop partition(country='china',state='sh');
INFO  : Dropped the partition country=china/state=sh
No rows affected (0.224 seconds)
0: jdbc:hive2://localhost:10000> alter table ttt_user add partition(country='china',state='sh');
No rows affected (0.167 seconds)
0: jdbc:hive2://localhost:10000> show partitions ttt_user;
+-------------------------+--+
|        partition        |
+-------------------------+--+
| country=china/state=bj  |
| country=china/state=sh  |
+-------------------------+--+
2 rows selected (0.113 seconds)
截断表
0: jdbc:hive2://localhost:10000> select * from  t_user;
+------------+--------------+-------------+------------------+--+
| t_user.id  | t_user.name  | t_user.sex  | t_user.birthday  |
+------------+--------------+-------------+------------------+--+
| 3          | zs           | true        | 2018-01-01       |
| 4          | ls           | false       | 1998-07-07       |
+------------+--------------+-------------+------------------+--+
2 rows selected (0.134 seconds)
0: jdbc:hive2://localhost:10000> truncate table t_user;
No rows affected (0.107 seconds)
0: jdbc:hive2://localhost:10000> select * from  t_user;
+------------+--------------+-------------+------------------+--+
| t_user.id  | t_user.name  | t_user.sex  | t_user.birthday  |
+------------+--------------+-------------+------------------+--+
+------------+--------------+-------------+------------------+--+
五、HiveOnJdbc
导入Hive JDBC驱动
<dependency>
    <groupId>org.apache.hadoop</groupId>
    <artifactId>hadoop-client</artifactId>
    <version>2.6.0</version>
</dependency>
<dependency>
    <groupId>org.apache.hive</groupId>
    <artifactId>hive-jdbc</artifactId>
    <version>1.1.0</version>
</dependency>
Hive驱动类
org.apache.hive.jdbc.HiveDriver
应用程序
package com.baizhi;

import java.sql.*;

public class HiveOnJdbc {
    public static void main(String[] args) throws ClassNotFoundException, SQLException {
        Class.forName("org.apache.hive.jdbc.HiveDriver");

        Connection connection = DriverManager.getConnection("jdbc:hive2://HadoopNode00:10000/baizhi");

        String sql = "select * from ttt_user where country=? and state=?";

        PreparedStatement pstm = connection.prepareStatement(sql);

        pstm.setString(1, "china");
        pstm.setString(2, "bj");

        ResultSet resultSet = pstm.executeQuery();

        while (resultSet.next()) {
            int id = resultSet.getInt("id");
            String name = resultSet.getString(2);
            Boolean sex = resultSet.getBoolean("sex");
            Date birth = resultSet.getDate("birth");
            System.out.println(id + "\t" + name + "\t" + sex + "\t" + birth);
        }

        resultSet.close();
        pstm.close();
        connection.close();
    }
}
六、Hive SQL操作
回顾
DB SQL查询语法

select 字段列表 from 表名 where 过滤条件  group by 分组字段 having 分组后过滤 order by 排序字段 asc | desc limit 限制结果的返回条数;
Hive SQL完整语法
SELECT [ALL | DISTINCT] select_expr, select_expr, ...
  FROM table_reference
  [WHERE where_condition]
  [GROUP BY col_list]
  [ORDER BY col_list]  # 计算结果全局有序(全局只有一个Reducer)
  [CLUSTER BY col_list | [DISTRIBUTE BY col_list] [SORT BY col_list asc|desc]]  # 分区键 id.hashCode% numReduceTask
 [LIMIT number]
注意:
ORDER BY col_list asc|desc: 全局排序,只有一个Reducer任务;DISTRIBUTE BY col_list: shuffle进行分区时,分区键; 根据指定的字段值进行分区shuffleSORT BY col_list: 对分区进行局部排序字段CLUSTER BY col_list: 如果DISTRIBUTE BY col_list+SORT BY col_list, 简写写法;
# 1. 分组 + 分区后过滤
0: jdbc:hive2://localhost:10000> select sex,count(sex) from ttt_user where country='china' and state='bj' group by sex having sex= false;

# 2. 分组 + 结果集全局排序
0: jdbc:hive2://localhost:10000> select sex,count(sex) as num  from ttt_user where country='china' and state='bj' group by sex order by num desc;

# 3. 分组 + cluster by使用
0: jdbc:hive2://localhost:10000> select sex,count(sex) as num  from ttt_user where country='china' and state='bj' group by sex cluster by sex;

# 4. 分组 + distribute by  + sort by
0: jdbc:hive2://localhost:10000> select sex,count(sex) as num  from ttt_user where country='china' and state='bj' group by sex distribute by sex sort by sex desc;

# 5. limit使用
0: jdbc:hive2://localhost:10000> select sex,count(sex) as num  from ttt_user where country='china' and state='bj' group by sex distribute by sex sort by sex desc limit 1;
表连接查询
内连接([inner] join)
左表和右表符合条件的数据进行连接操作,合为一张大表;
# 员工数据
1,zs,true,18,A
2,ls,false,20,B
3,ww,false,25,A
4,zl,false,30,B
5,tq,true,21,C

# 部门数据
A,研发部
B,市场部
C,销售部
D,后勤部

0: jdbc:hive2://localhost:10000> create table t_employee(id int,name varchar(32),sex boolean,age tinyint,dept string) row format delimited fields terminated by ',' lines terminated by '\n';
No rows affected (0.11 seconds)
0: jdbc:hive2://localhost:10000> load data local inpath '/usr/apache-hive-1.2.1-bin/data/employee.txt' into table t_employee;
INFO  : Loading data to table baizhi.t_employee from file:/usr/apache-hive-1.2.1-bin/data/employee.txt
INFO  : Table baizhi.t_employee stats: [numFiles=1, totalSize=78]
No rows affected (0.286 seconds)
0: jdbc:hive2://localhost:10000> select * from t_employee;
+----------------+------------------+-----------------+-----------------+------------------+--+
| t_employee.id  | t_employee.name  | t_employee.sex  | t_employee.age  | t_employee.dept  |
+----------------+------------------+-----------------+-----------------+------------------+--+
| 1              | zs               | true            | 18              | A                |
| 2              | ls               | false           | 20              | B                |
| 3              | ww               | false           | 25              | A                |
| 4              | zl               | false           | 30              | B                |
| 5              | tq               | true            | 21              | C                |
+----------------+------------------+-----------------+-----------------+------------------+--+


0: jdbc:hive2://localhost:10000> create table t_dept(deptId string,name string) row format delimited fields terminated by ',' lines terminated by '\n';
No rows affected (0.094 seconds)
0: jdbc:hive2://localhost:10000> load data local inpath '/usr/apache-hive-1.2.1-bin/data/dept.txt' into table t_dept;
INFO  : Loading data to table baizhi.t_dept from file:/usr/apache-hive-1.2.1-bin/data/dept.txt
INFO  : Table baizhi.t_dept stats: [numFiles=1, totalSize=48]
No rows affected (0.253 seconds)
0: jdbc:hive2://localhost:10000> select * from t_dept;
+----------------+--------------+--+
| t_dept.deptid  | t_dept.name  |
+----------------+--------------+--+
| A              | 研发部          |
| B              | 市场部          |
| C              | 销售部          |
| D              | 后勤部          |
+----------------+--------------+--+


0: jdbc:hive2://localhost:10000> select * from t_employee t1 inner join t_dept t2 on t1.dept = t2.deptId;
+--------+----------+---------+---------+----------+------------+----------+--+
| t1.id  | t1.name  | t1.sex  | t1.age  | t1.dept  | t2.deptid  | t2.name  |
+--------+----------+---------+---------+----------+------------+----------+--+
| 1      | zs       | true    | 18      | A        | A          | 研发部      |
| 2      | ls       | false   | 20      | B        | B          | 市场部      |
| 3      | ww       | false   | 25      | A        | A          | 研发部      |
| 4      | zl       | false   | 30      | B        | B          | 市场部      |
| 5      | tq       | true    | 21      | C        | C          | 销售部      |
+--------+----------+---------+---------+----------+------------+----------+--+
外连接(left | right outer join)
0: jdbc:hive2://localhost:10000> select * from t_employee t1 left outer join t_dept t2 on t1.dept = t2.deptId;
+--------+----------+---------+---------+----------+------------+----------+--+
| t1.id  | t1.name  | t1.sex  | t1.age  | t1.dept  | t2.deptid  | t2.name  |
+--------+----------+---------+---------+----------+------------+----------+--+
| 1      | zs       | true    | 18      | A        | A          | 研发部      |
| 2      | ls       | false   | 20      | B        | B          | 市场部      |
| 3      | ww       | false   | 25      | A        | A          | 研发部      |
| 4      | zl       | false   | 30      | B        | B          | 市场部      |
| 5      | tq       | true    | 21      | C        | C          | 销售部      |
+--------+----------+---------+---------+----------+------------+----------+--+


0: jdbc:hive2://localhost:10000> select * from t_employee t1 right outer join t_dept t2 on t1.dept = t2.deptId;
+--------+----------+---------+---------+----------+------------+----------+--+
| t1.id  | t1.name  | t1.sex  | t1.age  | t1.dept  | t2.deptid  | t2.name  |
+--------+----------+---------+---------+----------+------------+----------+--+
| 1      | zs       | true    | 18      | A        | A          | 研发部      |
| 3      | ww       | false   | 25      | A        | A          | 研发部      |
| 2      | ls       | false   | 20      | B        | B          | 市场部      |
| 4      | zl       | false   | 30      | B        | B          | 市场部      |
| 5      | tq       | true    | 21      | C        | C          | 销售部      |
| NULL   | NULL     | NULL    | NULL    | NULL     | D          | 后勤部      |
+--------+----------+---------+---------+----------+------------+----------+--+
左半开连接(left semi join)
左半开连接会返回左表的数据,前提是记录需要满足右表on的判定条件;
0: jdbc:hive2://localhost:10000> select * from t_employee t1 left semi join t_dept t2 on t1.dept = t2.deptId;
INFO  : Execution completed successfully
INFO  : MapredLocal task succeeded
INFO  : Number of reduce tasks is set to 0 since there's no reduce operator
WARN  : Hadoop command-line option parsing not performed. Implement the Tool interface and execute your application with ToolRunner to remedy this.
INFO  : number of splits:1
INFO  : Submitting tokens for job: job_1577964101376_0017
INFO  : The url to track the job: http://HadoopNode00:8088/proxy/application_1577964101376_0017/
INFO  : Starting Job = job_1577964101376_0017, Tracking URL = http://HadoopNode00:8088/proxy/application_1577964101376_0017/
INFO  : Kill Command = /home/hadoop/hadoop-2.6.0/bin/hadoop job  -kill job_1577964101376_0017
INFO  : Hadoop job information for Stage-3: number of mappers: 1; number of reducers: 0
INFO  : 2020-01-03 23:02:56,491 Stage-3 map = 0%,  reduce = 0%
INFO  : 2020-01-03 23:03:02,696 Stage-3 map = 100%,  reduce = 0%, Cumulative CPU 2.83 sec
INFO  : MapReduce Total cumulative CPU time: 2 seconds 830 msec
INFO  : Ended Job = job_1577964101376_0017
+--------+----------+---------+---------+----------+--+
| t1.id  | t1.name  | t1.sex  | t1.age  | t1.dept  |
+--------+----------+---------+---------+----------+--+
| 1      | zs       | true    | 18      | A        |
| 2      | ls       | false   | 20      | B        |
| 3      | ww       | false   | 25      | A        |
| 4      | zl       | false   | 30      | B        |
| 5      | tq       | true    | 21      | C        |
+--------+----------+---------+---------+----------+--+
map-side join
map端连接,hive优化表连接查询方法(小表和大表Join);
注意:
- map端连接只适用于内连接和左外连接;
- hive 0.70版本之前,
select /*+mapjoin(小表别名)*/ ..... - hive 0.70版本之后,要求
set hive.auto.convert.join=true;, 自动join优化,要求小表需要写在join关键字之前,因为Hive Join从左向右连接操作;
0: jdbc:hive2://localhost:10000> select /*+mapjoin(t2)*/ * from t_employee t1 left outer join t_dept t2 on t1.dept = t2.deptId;

0: jdbc:hive2://localhost:10000> set hive.auto.convert.join=true;

0: jdbc:hive2://localhost:10000> select * from t_dept t2 left outer join t_employee t1 on t1.dept = t2.deptId;
Full Outer Join
全外连接 左边右表符合条件结果进行连接,保留左表和右表不符合条件的结果
笛卡尔乘积连接
左表和右表交叉连接 左表5条数据 右表6条数据,连接后会产生30条记录
七、Hive 和HBase整合
要求
-
HDFS
-
ZooKeeper
-
HBase集群运行正常
准备HBase BigTable
hbase(main):002:0> create 'baizhi2:t_user','cf1'
0 row(s) in 2.4760 seconds
hbase(main):001:0> put 'baizhi2:t_user','user101','cf1:name','zs'
0 row(s) in 0.3800 seconds

hbase(main):002:0> put 'baizhi2:t_user','user101','cf1:age',18
0 row(s) in 0.0180 seconds

hbase(main):003:0> put 'baizhi2:t_user','user102','cf1:name','ls'
0 row(s) in 0.0060 seconds

hbase(main):004:0> put 'baizhi2:t_user','user102','cf1:age',20
0 row(s) in 0.0180 seconds

hbase(main):005:0> scan 'baizhi2:t_user'
ROW                                        COLUMN+CELL
 user101                                   column=cf1:age, timestamp=1578068239429, value=18
 user101                                   column=cf1:name, timestamp=1578068227481, value=zs
 user102                                   column=cf1:age, timestamp=1578068289077, value=20
 user102                                   column=cf1:name, timestamp=1578068278698, value=ls
2 row(s) in 0.0420 seconds
创建Hive Table并关联HBase
create external table t_hbase_user(id string,name string,age int) stored by 'org.apache.hadoop.hive.hbase.HBaseStorageHandler' with serdeproperties('hbase.columns.mapping'=':key,cf1:name,cf1:age') tblproperties('hbase.table.name'='baizhi2:t_user');


0: jdbc:hive2://localhost:10000> select * from t_hbase_user;
+------------------+--------------------+-------------------+--+
| t_hbase_user.id  | t_hbase_user.name  | t_hbase_user.age  |
+------------------+--------------------+-------------------+--+
| user101          | zs                 | 18                |
| user102          | ls                 | 20                |
+------------------+--------------------+-------------------+--+
2 rows selected (1.142 seconds)


 816
816


 被折叠的 条评论
为什么被折叠?
被折叠的 条评论
为什么被折叠?
 到【灌水乐园】发言


