


用法:https://blog.csdn.net/qq_32868023/article/details/123390627
原理一:https://blog.csdn.net/qq_32868023/article/details/123515652
原理二:https://blog.csdn.net/qq_32868023/article/details/123603241
原理三:https://blog.csdn.net/qq_32868023/article/details/123604439
原理四:https://blog.csdn.net/qq_32868023/article/details/123606236
原理五:https://blog.csdn.net/qq_32868023/article/details/123616110
Binder负责对一个Bindable进行绑定,一个Bindable的属性可能是一个java对象、数组、集合、Map等各种情况,需要递归的去绑定java对象的属性,数组、集合、Map的元素,其流程简单来说就是:从配置属性源中获取到对应的值,将这个值转化为所需要的类型。本节主要分析下Binder的绑定逻辑和绑定上下文Context
1、Binder
Binder里面的几个重要属性
public class Binder {

	private final Iterable<ConfigurationPropertySource> sources;

	private final PlaceholdersResolver placeholdersResolver;

	private final BindConverter bindConverter;

	private final BindHandler defaultBindHandler;

	private final List<DataObjectBinder> dataObjectBinders;
}
- sources,可以迭代出ConfigurationPropertySource
- placeholdersResolver,用于解析配置值里面的placeholder
- bindConverter,用于转换配置的值
- defaultBindHandler,默认的BindHandler,如果没传就用默认的
- dataObjectBinders,用于绑定DataObject
前面分析过,ConfigurationPropertiesBinder在bind和bindOrCreate方法里调用Binder的对应方法,如下
	BindResult<?> bind(ConfigurationPropertiesBean propertiesBean) {
		Bindable<?> target = propertiesBean.asBindTarget();
		ConfigurationProperties annotation = propertiesBean.getAnnotation();
		BindHandler bindHandler = getBindHandler(target, annotation);
		return getBinder().bind(annotation.prefix(), target, bindHandler);
	}

	Object bindOrCreate(ConfigurationPropertiesBean propertiesBean) {
		Bindable<?> target = propertiesBean.asBindTarget();
		ConfigurationProperties annotation = propertiesBean.getAnnotation();
		BindHandler bindHandler = getBindHandler(target, annotation);
		return getBinder().bindOrCreate(annotation.prefix(), target, bindHandler);
	}
顺着ConfigurationPropertiesBinder的调用链路,可以找到Binder下面这个重要方法
	private <T> T bind(ConfigurationPropertyName name, Bindable<T> target, BindHandler handler, boolean create) {
		Assert.notNull(name, "Name must not be null");
		Assert.notNull(target, "Target must not be null");
		handler = (handler != null) ? handler : this.defaultBindHandler;
		Context context = new Context();
		return bind(name, target, handler, context, false, create);
	}
这个方法里面new了一个Context,然后调用了bind的重载。这个bind的重载方法是属性绑定的核心逻辑,它负责对一个Bindable进行绑定,这个Bindable可以是外部调用传进来的Bindable,也可以是绑定过程在为了绑定数组、集合、Map、java属性而生成的Bindable,涉及递归调用,主要处理了几件事情
- 在Bindable绑定的各个阶段,调用Bindable回调函数
- 将Bindable分为属性绑定、Aggregate绑定、DataObject绑定等情况,分别调用对应的Binder
- 绑定方式按JAVA_BEAN和VALUE_OBJECT,分别调用对应的Binder
先一张图分析总体流程
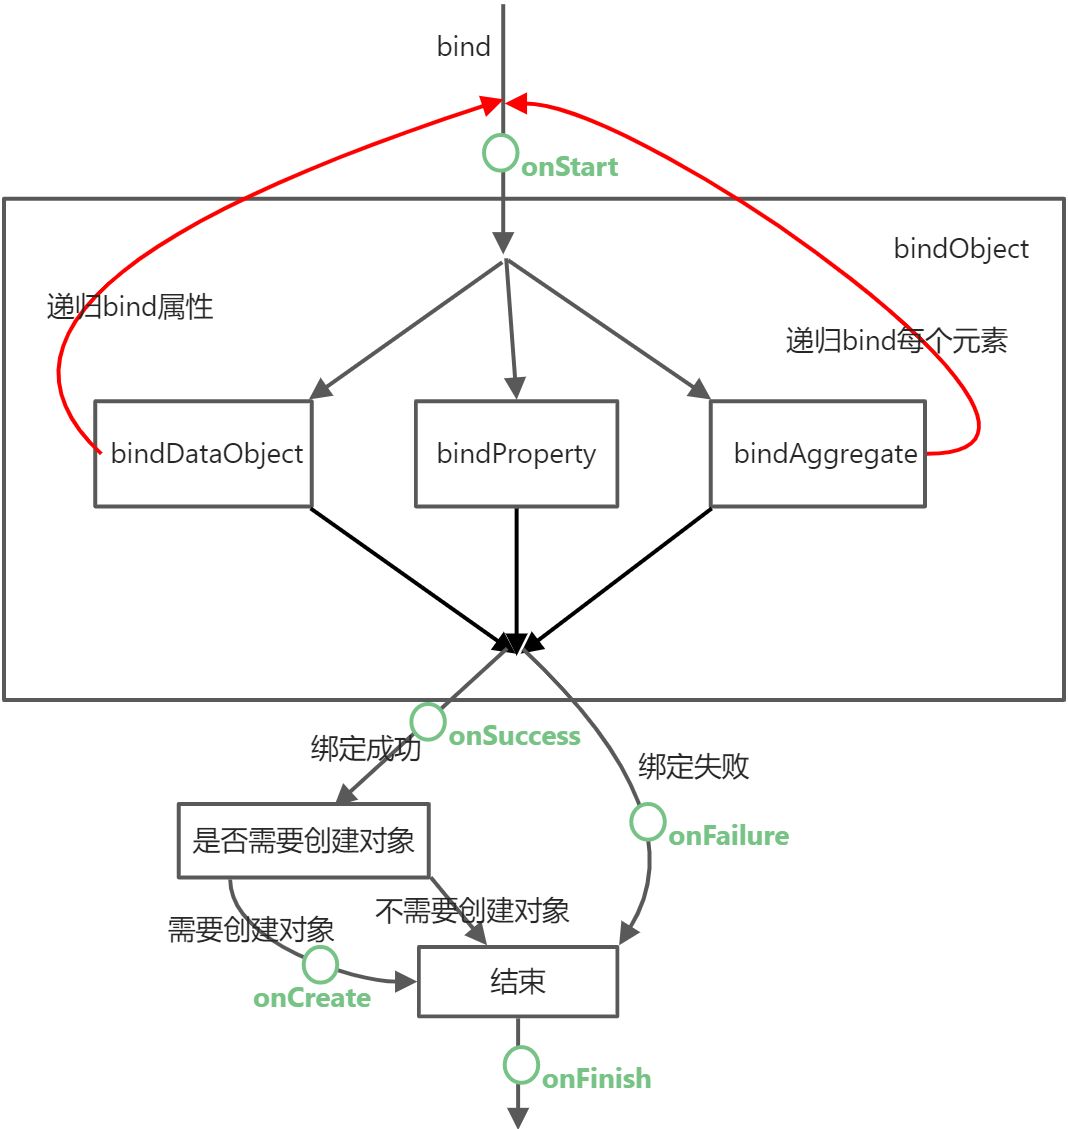
顺着这张图分析代码
	private <T> T bind(ConfigurationPropertyName name, Bindable<T> target, BindHandler handler, Context context,
			boolean allowRecursiveBinding, boolean create) {
		try {
			Bindable<T> replacementTarget = handler.onStart(name, target, context);
			if (replacementTarget == null) {
				return handleBindResult(name, target, handler, context, null, create);
			}
			target = replacementTarget;
			Object bound = bindObject(name, target, handler, context, allowRecursiveBinding);
			return handleBindResult(name, target, handler, context, bound, create);
		}
		catch (Exception ex) {
			return handleBindError(name, target, handler, context, ex);
		}
	}
这里面onStart、handleBindResult、handleBindError处理了hanler回调函数,bindObject将Bindable分为几种情况进行绑定,先看下handleBindResult、handleBindError回调函数的处理
	private <T> T handleBindResult(ConfigurationPropertyName name, Bindable<T> target, BindHandler handler,
			Context context, Object result, boolean create) throws Exception {
		if (result != null) {
			result = handler.onSuccess(name, target, context, result);
			result = context.getConverter().convert(result, target);
		}
		if (result == null && create) {
			result = create(target, context);
			result = handler.onCreate(name, target, context, result);
			result = context.getConverter().convert(result, target);
			Assert.state(result != null, () -> "Unable to create instance for " + target.getType());
		}
		handler.onFinish(name, target, context, result);
		return context.getConverter().convert(result, target);
	}
handleBindResult调用了onSuccess回调,如果需要创建对象(bindOrCreate方法传进来的create为true)则创建对象并调用onCreate回调,最后调用onFinish回调
	private <T> T handleBindError(ConfigurationPropertyName name, Bindable<T> target, BindHandler handler,
			Context context, Exception error) {
		try {
			Object result = handler.onFailure(name, target, context, error);
			return context.getConverter().convert(result, target);
		}
		catch (Exception ex) {
			if (ex instanceof BindException) {
				throw (BindException) ex;
			}
			throw new BindException(name, target, context.getConfigurationProperty(), ex);
		}
	}
handleBindError这里调用了onFailure回调,这个回调里面可以吞掉异常给一个默认值,默认是继续抛出绑定失败
再来看下bindObject方法
	private <T> Object bindObject(ConfigurationPropertyName name, Bindable<T> target, BindHandler handler,
			Context context, boolean allowRecursiveBinding) {
		ConfigurationProperty property = findProperty(name, target, context);
		if (property == null && context.depth != 0 && containsNoDescendantOf(context.getSources(), name)) {
			return null;
		}
		AggregateBinder<?> aggregateBinder = getAggregateBinder(target, context);
		if (aggregateBinder != null) {
			return bindAggregate(name, target, handler, context, aggregateBinder);
		}
		if (property != null) {
			try {
				return bindProperty(target, context, property);
			}
			catch (ConverterNotFoundException ex) {
				// We might still be able to bind it using the recursive binders
				Object instance = bindDataObject(name, target, handler, context, allowRecursiveBinding);
				if (instance != null) {
					return instance;
				}
				throw ex;
			}
		}
		return bindDataObject(name, target, handler, context, allowRecursiveBinding);
	}
bindObject将Bindable的绑定分成了三种情况
- 如果这个Bindable是数组、集合、Map(aggregateBinder != null),那么调用bindAggregate
- 如果配置source中找到了kv,那么开始绑定这个属性,调用bindProperty
- 否则当作DataObject进行绑定,调用bindDataObject
分别看下bindProperty、bindAggregate、bindDataObject
	private <T> Object bindProperty(Bindable<T> target, Context context, ConfigurationProperty property) {
		context.setConfigurationProperty(property);
		Object result = property.getValue();
		result = this.placeholdersResolver.resolvePlaceholders(result);
		result = context.getConverter().convert(result, target);
		return result;
	}
bindProperty逻辑是最简单的,用placeholdersResolver解析一下placeholder,然后通过Converter转换,就是绑定的结果
	private <T> Object bindAggregate(ConfigurationPropertyName name, Bindable<T> target, BindHandler handler,
			Context context, AggregateBinder<?> aggregateBinder) {
		AggregateElementBinder elementBinder = (itemName, itemTarget, source) -> {
			boolean allowRecursiveBinding = aggregateBinder.isAllowRecursiveBinding(source);
			Supplier<?> supplier = () -> bind(itemName, itemTarget, handler, context, allowRecursiveBinding, false);
			return context.withSource(source, supplier);
		};
		return context.withIncreasedDepth(() -> aggregateBinder.bind(name, target, elementBinder));
	}
bindAggregate全是lambda写法不好理解,bindAggregate做了两件事情
1、lambda写法实例化了一个AggregateElementBinder
2、然后调用了context#withIncreasedDepth,这个方法实际上就是调用了里面的Supplier,也就是调用了aggregateBinder#bind方法进行绑定
所以这里实际上就是调用了AggregateBinder#bind方法,并把elementBinder作为参数传了进去,elementBinder在绑定数组、集合、Map的每一个元素时,会被调用。elementBinder被调用时又做了什么?
elementBinder的lambda实现中,实例化了一个Supplier,这个Supplier调用bind方法去绑定一个element,context#withSource实际上就是调用了这个supplier
	private Object bindDataObject(ConfigurationPropertyName name, Bindable<?> target, BindHandler handler,
			Context context, boolean allowRecursiveBinding) {
		if (isUnbindableBean(name, target, context)) {
			return null;
		}
		Class<?> type = target.getType().resolve(Object.class);
		if (!allowRecursiveBinding && context.isBindingDataObject(type)) {
			return null;
		}
		DataObjectPropertyBinder propertyBinder = (propertyName, propertyTarget) -> bind(name.append(propertyName),
				propertyTarget, handler, context, false, false);
		return context.withDataObject(type, () -> {
			for (DataObjectBinder dataObjectBinder : this.dataObjectBinders) {
				Object instance = dataObjectBinder.bind(name, target, context, propertyBinder);
				if (instance != null) {
					return instance;
				}
			}
			return null;
		});
	}
bindDataObject跟bindAggregate理解起来差不多,用lambda写法实例化了一个propertyBinder,然后propertyBinder作为参数遍历dataObjectBinders去绑定这个DataObject。dataObjectBinders包括两个:JavaBeanBinder和ValueObjectBinder,对应JAVA_BEAN和VALUE_OBJECT两种绑定方式,这两个dataObjectBinder前面也以及分析过
2、Context
Context是用来保存上下文信息的,考虑一个问题:AggregateBinder会遍历source来绑定elements,绑定elements的elementBinder又是调用的Binder#bind方法,那么当遍历到某个source s来绑定elements时,绑定element的source应当还是这个source s而不是所有的source(为什么?因为AggregateBinder会遍历所有的source,绑定elements又遍历了所有source的话会重复),context就是为了保存此类上下文环境
	final class Context implements BindContext {

		private int depth;

		private final List<ConfigurationPropertySource> source = Arrays.asList((ConfigurationPropertySource) null);

		private int sourcePushCount;

		private final Deque<Class<?>> dataObjectBindings = new ArrayDeque<>();

		private final Deque<Class<?>> constructorBindings = new ArrayDeque<>();

		private ConfigurationProperty configurationProperty;
    }
- depth:绑定深度,每递归绑定一次深度+1,递归出来深度-1
- source和sourcePushCount,保存当前正在绑定的source
- dataObjectBindings:正在绑定的DataObject的类型
- constructorBindings:正在绑定的VALUE_OBJECT的类型
- configurationProperty:正在绑定的kv
a、depth
		private <T> T withIncreasedDepth(Supplier<T> supplier) {
			increaseDepth();
			try {
				return supplier.get();
			}
			finally {
				decreaseDepth();
			}
		}
深度为0表示正在绑定的是最外层的对象,BindHandler会以此来判断。withIncreasedDepth方法很简单,调用bindAggrate和bindDataObject都会增加深度
	private <T> Object bindAggregate(ConfigurationPropertyName name, Bindable<T> target, BindHandler handler,
			Context context, AggregateBinder<?> aggregateBinder) {
		AggregateElementBinder elementBinder = (itemName, itemTarget, source) -> {
			boolean allowRecursiveBinding = aggregateBinder.isAllowRecursiveBinding(source);
			Supplier<?> supplier = () -> bind(itemName, itemTarget, handler, context, allowRecursiveBinding, false);
			return context.withSource(source, supplier);
		};
		return context.withIncreasedDepth(() -> aggregateBinder.bind(name, target, elementBinder));
	}
	private Object bindDataObject(ConfigurationPropertyName name, Bindable<?> target, BindHandler handler,
			Context context, boolean allowRecursiveBinding) {
		if (isUnbindableBean(name, target, context)) {
			return null;
		}
		Class<?> type = target.getType().resolve(Object.class);
		if (!allowRecursiveBinding && context.isBindingDataObject(type)) {
			return null;
		}
		DataObjectPropertyBinder propertyBinder = (propertyName, propertyTarget) -> bind(name.append(propertyName),
				propertyTarget, handler, context, false, false);
		return context.withDataObject(type, () -> {
			for (DataObjectBinder dataObjectBinder : this.dataObjectBinders) {
				Object instance = dataObjectBinder.bind(name, target, context, propertyBinder);
				if (instance != null) {
					return instance;
				}
			}
			return null;
		});
	}
context#withdataObject也会增加深度,后面再看
b、source
withSource保存了source同时还递增了sourcePushCount
		private <T> T withSource(ConfigurationPropertySource source, Supplier<T> supplier) {
			if (source == null) {
				return supplier.get();
			}
			this.source.set(0, source);
			this.sourcePushCount++;
			try {
				return supplier.get();
			}
			finally {
				this.sourcePushCount--;
			}
		}
Binder在遍历source时并没有直接取Binder的sources属性,而是通过context#getSources来获取
		public Iterable<ConfigurationPropertySource> getSources() {
			if (this.sourcePushCount > 0) {
				return this.source;
			}
			return Binder.this.sources;
		}
bindAggregate时的elementBinder会通过withResource保存正在绑定的source
	private <T> Object bindAggregate(ConfigurationPropertyName name, Bindable<T> target, BindHandler handler,
			Context context, AggregateBinder<?> aggregateBinder) {
		AggregateElementBinder elementBinder = (itemName, itemTarget, source) -> {
			boolean allowRecursiveBinding = aggregateBinder.isAllowRecursiveBinding(source);
			Supplier<?> supplier = () -> bind(itemName, itemTarget, handler, context, allowRecursiveBinding, false);
			return context.withSource(source, supplier);
		};
		return context.withIncreasedDepth(() -> aggregateBinder.bind(name, target, elementBinder));
	}
c、dataObjectBindings
withDataObject缓存正在绑定的DataObject的类型之外,还会递增绑定深度
		private <T> T withDataObject(Class<?> type, Supplier<T> supplier) {
			this.dataObjectBindings.push(type);
			try {
				return withIncreasedDepth(supplier);
			}
			finally {
				this.dataObjectBindings.pop();
			}
		}
其作用就是判断当前是否正在绑定DataObject
		private boolean isBindingDataObject(Class<?> type) {
			return this.dataObjectBindings.contains(type);
		}
使用地方就是bindDataObject方法
d、constructorBindings
pushConstructorBoundTypes缓存正在进行VALUE_OBJECT绑定的类型
		void pushConstructorBoundTypes(Class<?> value) {
			this.constructorBindings.push(value);
		}
作用就是判断当前是否正在VALUE_OBEJCT绑定
		boolean isNestedConstructorBinding() {
			return !this.constructorBindings.isEmpty();
		}
用处就是在ValueObjectBinder#bind过程中
	public <T> T bind(ConfigurationPropertyName name, Bindable<T> target, Binder.Context context,
			DataObjectPropertyBinder propertyBinder) {
		ValueObject<T> valueObject = ValueObject.get(target, this.constructorProvider, context);
		if (valueObject == null) {
			return null;
		}
		context.pushConstructorBoundTypes(target.getType().resolve());
		List<ConstructorParameter> parameters = valueObject.getConstructorParameters();
		List<Object> args = new ArrayList<>(parameters.size());
		boolean bound = false;
		for (ConstructorParameter parameter : parameters) {
			Object arg = parameter.bind(propertyBinder);
			bound = bound || arg != null;
			arg = (arg != null) ? arg : getDefaultValue(context, parameter);
			args.add(arg);
		}
		context.clearConfigurationProperty();
		context.popConstructorBoundTypes();
		return bound ? valueObject.instantiate(args) : null;
	}
e、configurationProperty
缓存正在绑定的属性的kv,在bindProperty之前会set
		void setConfigurationProperty(ConfigurationProperty configurationProperty) {
			this.configurationProperty = configurationProperty;
		}
作用就是当绑定出错时,便于handler获取正在绑定的值,生成报错信息


 2340
2340


 被折叠的 条评论
为什么被折叠?
被折叠的 条评论
为什么被折叠?
 到【灌水乐园】发言


