


python学习资料:
http://www.pythondoc.com/pythontutorial3/index.html#
现在开始学习吧~
有活力的思想是永远不会枯竭的。
——德·叔本华
1. 常用字符类型:int/float
2. 常用运算符:
(1)=
(2)+
(3)-
(4)*
(5)/ (浮点除)
(6)// (整除)
(7)%
(8)**
(9)()
(10)==
(11)!=
3. 使用type()函数查看变量类型
d = 10
type(d)
4. 字符串操作
(1)字符串的转义和连接
str1 = "h\nh"   # 使用\进行转义,\n指的是换行
str2 = "y\\ny"  # 再加一个\表示不转义
str3 = r"l\nl"  # 使用r修饰,表示不转义
print(str1+str2+str3)  # 使用+号进行连接

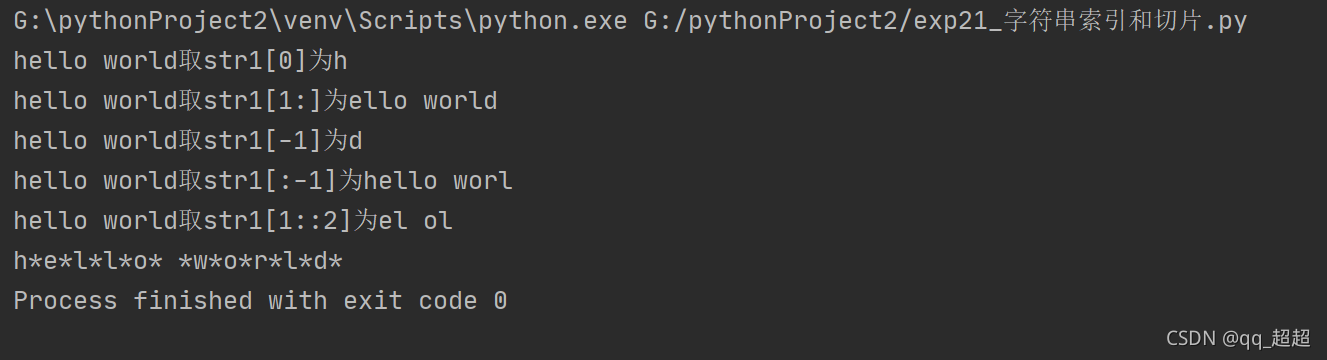
(2)字符串的索引和切片
str1 = "hello world"  # 定义字符串变量
print(str1+"取str1[0]为"+str1[0])  # 字符串切片操作
print(str1+"取str1[1:]为"+str1[1:])  # 字符串切片操作
print(str1+"取str1[-1]为"+str1[-1])  # 字符串切片操作
print(str1+"取str1[:-1]为"+str1[:-1])  # 字符串切片操作,[a,b],前闭后开
print(str1+"取str1[1::2]为"+str1[1::2])  # 字符串切片操作,设置步长为2
for i in range(0, len(str1)):  # 循环输出每个字符
    print(str1[i], end="*")   # 没有end的话默认换行输出,这里默认以*间隔输出
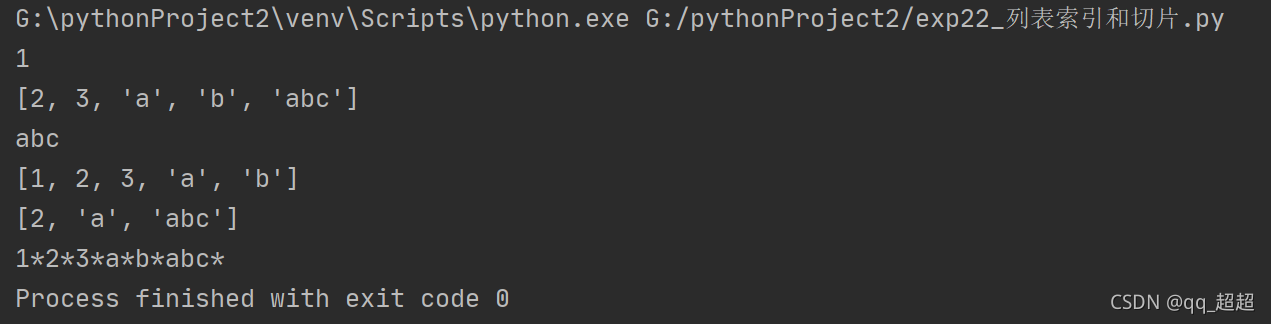
列表的索引和切片同字符串
list1 = [1, 2, 3, "a", "b", "abc"]  # 定义列表变量
print(list1[0])  # 列表切片操作
print(list1[1:])  # 列表切片操作
print(list1[-1])  # 列表切片操作
print(list1[:-1])  # 列表切片操作,[a,b],前闭后开
print(list1[1::2])  # 列表切片操作,设置步长为2
for i in range(0, len(list1)):  # 循环输出每个字符
    print(list1[i], end="*")  # 没有end的话默认换行输出,这里默认以*间隔输出
5. 列表、元组、字典、集合
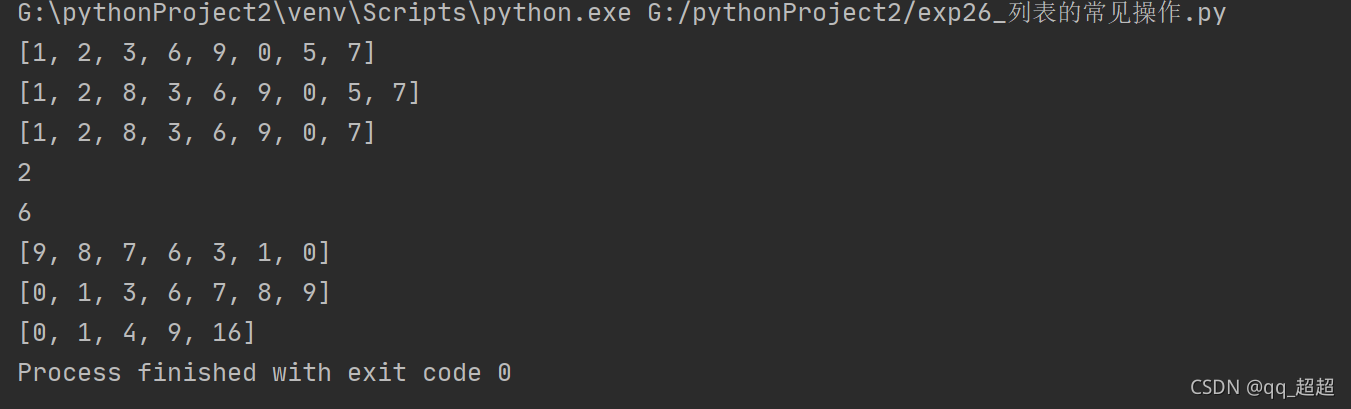
(1)列表常见操作
list1 = [1, 2, 3, 6, 9, 0, 5, 7]
print(list1)
list1.insert(2, 8)  # 在某索引前添加指定数据
print(list1)
list1.remove(5)  # 删除列表的特定数据
print(list1)
i = list1.pop(1)  # 删除列表的特定数据并返回该数据
print(i)
print(list1.index(7))  # 返回特定数据的索引
list1.sort(reverse=True)  # 倒序
print(list1)
list1.sort()  # 正序
print(list1)
j = [a**2 for a in range(0, 5)]  # 使用列表推导式,更加简洁
print(j, end=" ")
(2)元组
# 元组的定义
tuple1 = (1, 2, 3, 3)
# 元组的内置函数
print(tuple1.count(5))  # 返回特定数据出现的次数
print(tuple1.index(3))  # 返回第一次出现的特定数据的索引

(3)字典
# 定义字典的两种方式
dict1 = {"a": 1, "b": 2, "c": 3}
dict2 = dict(e=4, f=5, g=6)
print(dict1)
print(dict2)
print(dict1.keys())  # 返回字典中的全部键
print(dict1.values())  # 返回字典中的全部值
print(dict1.pop("a"))  # 返回要删除的键对应的值
print(dict1.popitem())  # 返回并删除字典中最后一个键值对。以元组形式返回
print(dict1)

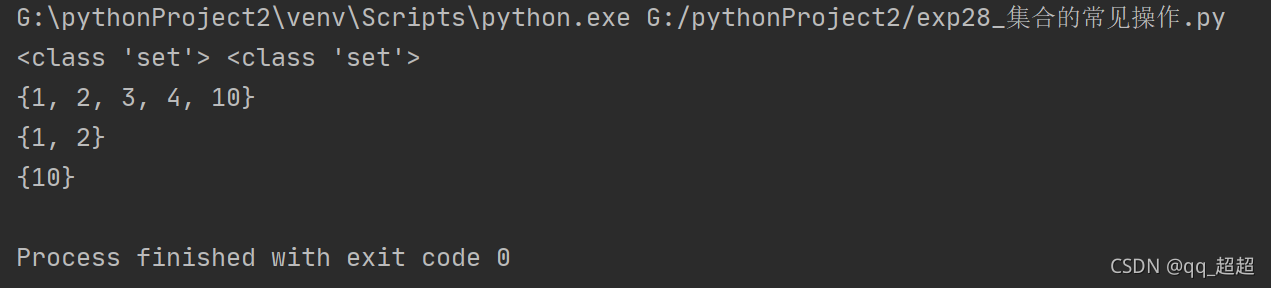
(4)集合
# 定义集合的两种方式
a = {1, 2, 10}
b = set()
c = {1, 2, 3, 4}
print(type(a), type(b))
# 求集合的并集
print(a.union(c))
# 求集合的交集
print(a.intersection(c))
# 求集合的差集
print(a.difference(c))
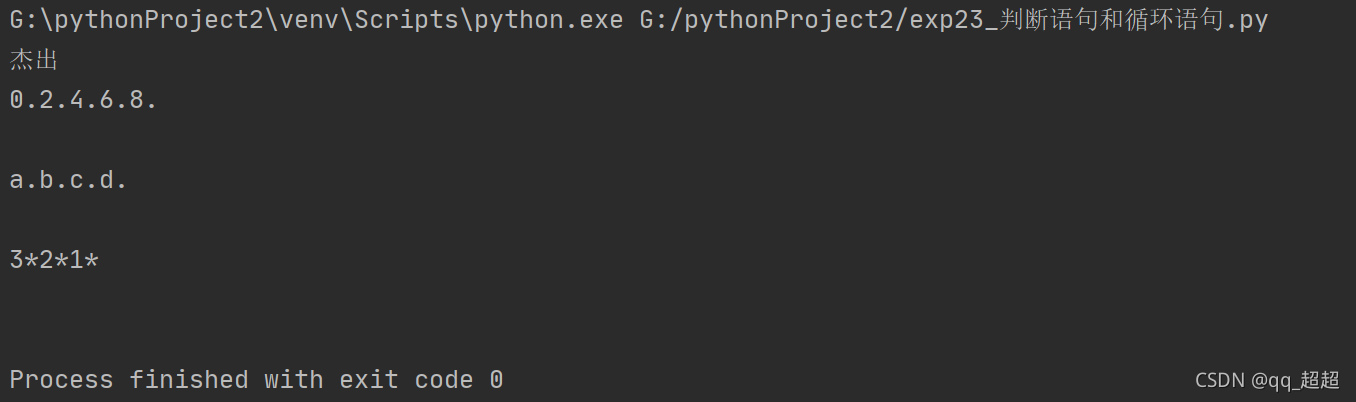
6. 判断语句和循环语句
(1)判断语句 if / elif / else
a = 90
if a < 60:
    print("不及格")
elif a < 80:
    print("及格但不优秀")
elif a < 90:
    print("优秀但不杰出")
else:
    print("杰出")
(2)循环语句for / while
# for循环适用于[知道循环次数或者有特定的循环容器]的场景
# 特定循环次数
for i in range(0, 10, 2):  # range(a, b)左开右闭
    print(i, end=".")
print("\n")

# 特定循环容器
list1 = ["a", "b", "c", "d"]
for j in list1:
    print(j, end=".")
print("\n")

# while循环适用于[不知道循环次数的场景]
a = 3
while a > 0:
    print(a, end="*")
    a -= 1
print("\n")
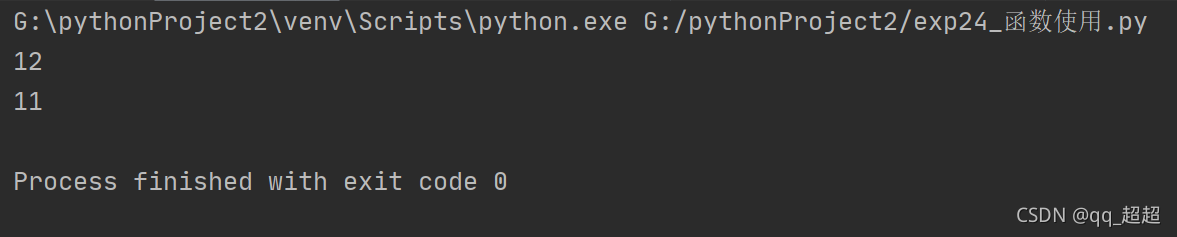
7.函数
(1)函数的定义和调用
"""
函数定义:
以def关键字开头,后面跟上函数名和参数,参数可为空或者默认参数
可以return或者不return,不写return默认返回None
"""


def fun_1(a, b=9):
    """
    函数说明
    """
    return a + b


"""
函数调用
"""
print(fun_1(3))  # use default parameter
print(fun_1(3, 8))  # NOT use default parameter
(2)匿名函数(Lambda函数)
"""
匿名函数lambda表达式
用于简单的代码块的封装
让程序看起来更简单
"""

fun_2 = lambda a, b: a * b
print(fun_2(2, 4))

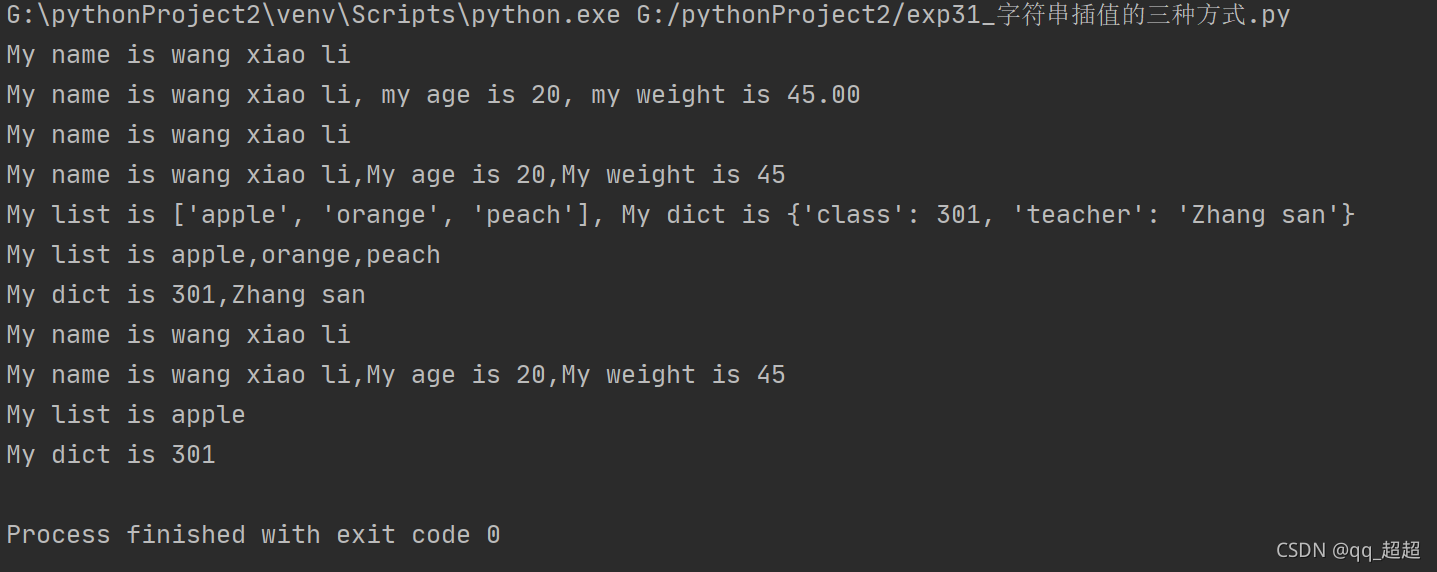
8.python格式化输出的三种方式
# (1)格式化输出,使用%。缺点是要指定格式,比如%d,%s,%f等
name = "wang xiao li"
age = 20
weight = 45
print("My name is %s" % name)
print("My name is %s, my age is %d, my weight is %.2f" % (name, age, weight))
# (2)format输出,不需要指定格式,而且适用于列表、字典等类型
list1 = ["apple", "orange", "peach"]
dict1 = {"class": 301, "teacher": "Zhang san"}
print("My name is {}".format(name))
print("My name is {},My age is {},My weight is {}".format(name, age, weight))
print("My list is {}, My dict is {}".format(list1, dict1))
print("My list is {},{},{}".format(*list1))  # 使用*号拆分列表
print("My dict is {class},{teacher}".format(**dict1))  # 使用**号拆分字典,获取键对应的值
# (3)在字符串前使用f进行修饰, 注意python3.6以上版本支持。最常用!
print(f"My name is {name}")
print(f"My name is {name},My age is {age},My weight is {weight}")
print(f"My list is {list1[0]}")
print(f"My dict is {dict1['class']}")
9.文件操作
三个步骤:
(1)打开文件
(2)操作文件
(3)关闭文件
# 文件操作
# 第一步:打开文件(默认打开的是文本格式,打开图片需要"rb")
f = open("G:\\pythonProject2\\1.txt", "r")  # "r"只读模式
# 第二步:操作文件
# (1)场景1:readlines()函数读取全部行,并放入列表中
# print(f.readlines())
# (2)场景2:readline()函数按照顺序读取每一行,以字符串形式返回

while True:
    every = f.readline()
    if every != "\n":  # 如果不为空则打印
        print(every, end="")
    else:  # 否则退出当前循环,读取下一行
        continue

# 第三步:关闭文件
f.close()
"""
也可以使用with语句块,就不用单独再去编写close语句。执行之后会自动关闭文件
with open("G:\\pythonProject2\\1.txt", "r") as f:
    print(f.readlines())
"""
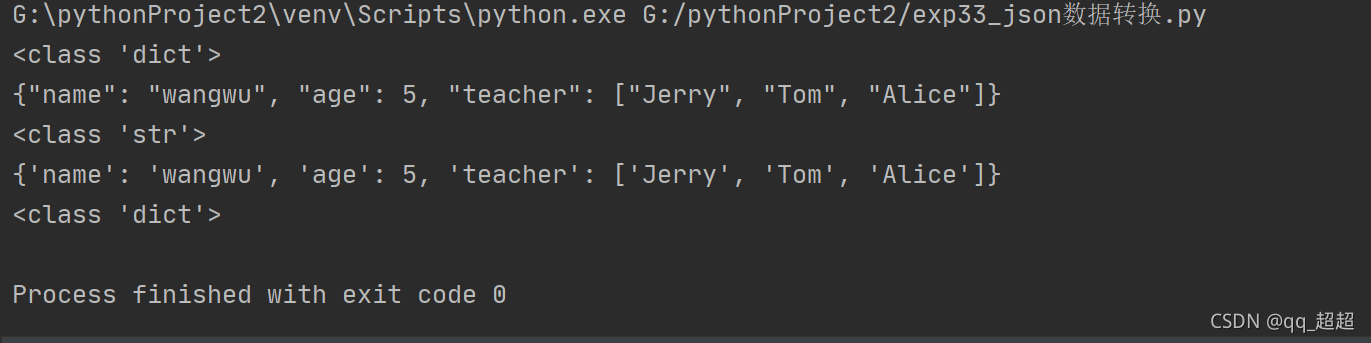
10. json格式和python格式转换
dumps()和loads()函数
import json

# JSON格式是由字典和列表组成的
data = {
    "name": "wangwu",
    "age": 5,
    "teacher": ["Jerry", "Tom", "Alice"]
}

print(type(data))
# 使用json.dumps将JSON转换成字符串
data1 = json.dumps(data)
print(data1)
print(type(data1))
# 使用json.loads将字符串转换成JSON
data2 = json.loads(data1)
print(data2)
print(type(data2))
11.python异常处理流程
# try表示将被执行的代码
try:
    num1 = int(input())
    num2 = int(input())
    print(num1 / num2)

# 当程序异常时执行except代码,如有符合对应的异常则执行,否则执行通用异常
except ZeroDivisionError:  # ZeroDivisionError要对应实际的类,不能随便命名
    print("出现被除数为0的异常")

except ValueError:  # ValueError要对应实际的类,不能随便命名
    print("参数类型错误")

except:  # 通用异常
    print("遇见任何异常都会执行这个语句块")

# 当程序没有异常时执行else代码
else:
    print("没有出现异常")
# 程序无论是否有异常都要执行finally代码
finally:
    print("无论是否异常都执行该语句块")


# 手动抛出自定义异常,继承Exception类
class MyException(Exception):
    def __init__(self, value1):
        self.value1 = value1


raise MyException("value1")

12.面向对象编程:类的定义和使用
# 类的定义
class Human:
    # 类变量
    name = "unknown"
    age = 0
    sex = "unknown"

    # 定义构造函数,构造函数在实例化时执行
    def __init__(self, name, age, sex):
        # self.XX 为实例变量
        self.name = name
        self.age = age
        self.sex = sex

    @classmethod
    def eat(self):
        print("i am eating")

    def jump(self):
        print("i am jumping")


# 类的实例化,实例化后对象就具备了类的变量和方法
my_human = Human("zhangsi", 12, "female")
# 使用对象调用变量或方法,类变量是通过类来访问,实例变量是通过实例(对象)来访问。类不能访问实例方法,除非添加装饰器@classmethod
print(f"姓名是{my_human.name}, 年龄是{my_human.age}, 性别是{my_human.sex}")
print(f"姓名是{Human.name}, 年龄是{Human.age}, 性别是{Human.sex}")
print(f"{my_human.eat()}")
print(f"{Human.eat()}")
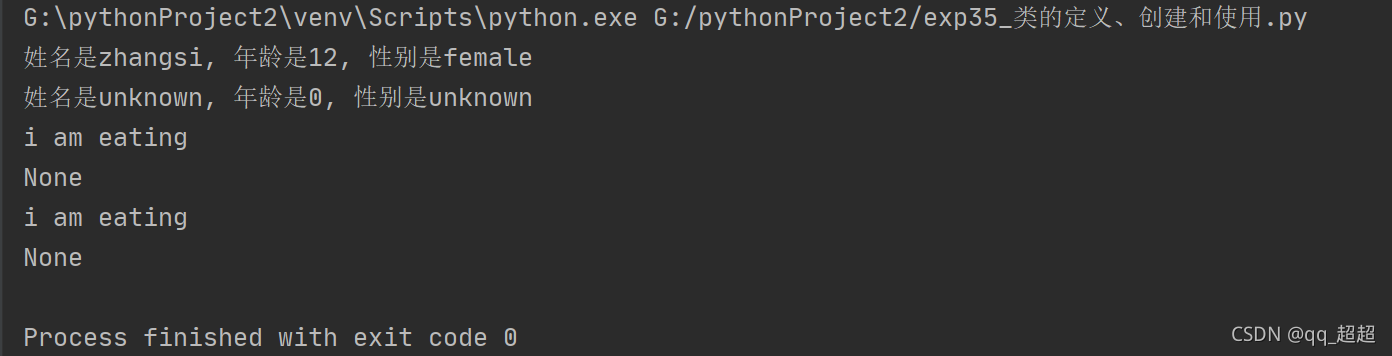
(不知道为什么有None输出)
13.python常用标准库:os \ math \ time \ urllib
import os
import time
import urllib.request
import math
# math包常用函数
print(math.floor(5.5))
print(math.ceil(5.5))
print(math.sqrt(9))

# os包常用函数
# 创建文件夹
os.mkdir("testdir")
# 删除文件夹
os.removedirs("testdir")
# 查询某个路径下的全部文件
print(os.listdir("./"))
# 查询当前路径
print(os.getcwd())
# 判断文件是否存在
print(os.path.exists("test"))

# time包常用函数
print(time.asctime())  # 美国常用的格式
print(time.time())  # 时间戳
print(time.sleep(3))  # 等待3秒
print(time.localtime())  # 元组类型返回
print(time.strftime("%Y-%m-%d %H:%M:%S", time.localtime()))  # 带格式的时间,国内常用

# urllib.request包常用函数
response = urllib.request.urlopen("http://www.baidu.com")
print(response.status)  # 获取返回码
print(response.read())  # 获取返回内容

14.python多线程
(1)进程:指的是执行中的程序,拥有独立的地址空间、内存、数据栈,由操作系统管理。多进程可以并行。 进程之间通过IPC通信。
(2)线程:同一进程下执行,多线程可以并发进行(并发,指的是同一时刻只有一个线程执行),且多个线程的资源是共享的。数据需要同步原语(比如锁、GIL),来保证多个线程间安全进行。
(3)GIL保证了同一时刻只有一个线程执行。
(4)python如何实现多线程:_thread和threading。
○ _thread:基本的线程和锁,使用_thread包实现多线程,需额外自己写锁的代码。
○ threading:更高级的操作,进行了一些封装。比如不需要自己额外写锁的代码。
(5)锁的意义:执行完成后再kill掉线程
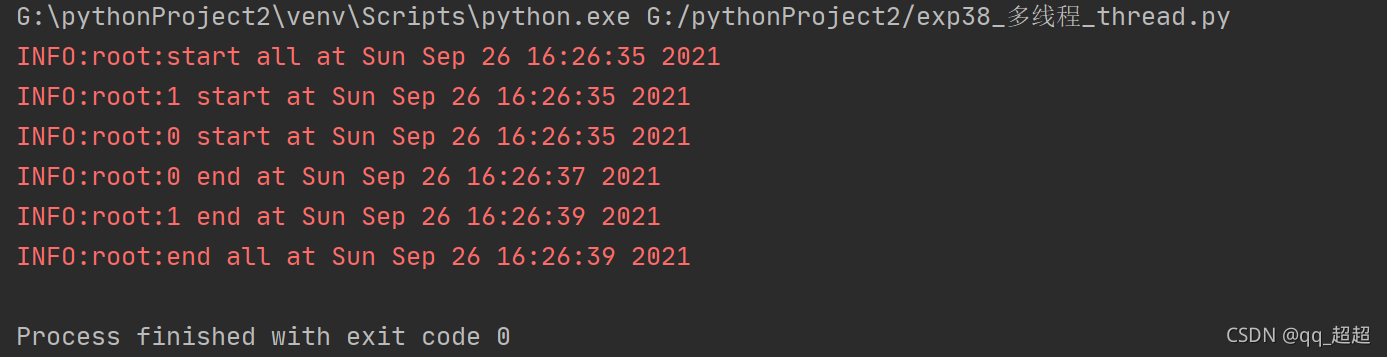
(1)使用_thread包 实现多线程
import _thread  # 导入_thread包
import time  # 导入time包
from time import sleep
import logging  # 导入日志包
logging.basicConfig(level=logging.INFO)  # 配置日志等级


def loop(nloop, nsleep, lock):
    logging.info(f"{nloop} start at {time.asctime()}")  # 打印当前时间
    sleep(nsleep)  # 等待n秒
    logging.info(f"{nloop} end at {time.asctime()}")  # 打印当前时间
    lock.release()  # 释放锁


# 主函数入口


def main():
    logging.info(f"start all at {time.asctime()}")   # 打印当前时间
    # 锁的声明
    locks = []
    loop_time = [2, 4]  # 将休息时间放入列表
    nloop = range(len(loop_time))  # 循环次数
    for i in nloop:
        lock = _thread.allocate_lock()  # 声明一个锁
        lock.acquire()  # 获取锁
        locks.append(lock)  # 添加锁
    for i in nloop:
        _thread.start_new_thread(loop, (i, loop_time[i], locks[i]))  # 创建线程
    for i in nloop:
        while locks[i].locked():  # 判断锁状态,直到解锁才跳出循环
            pass
    logging.info(f"end all at {time.asctime()}")  # 打印当前时间


if __name__ == "__main__":
    main()
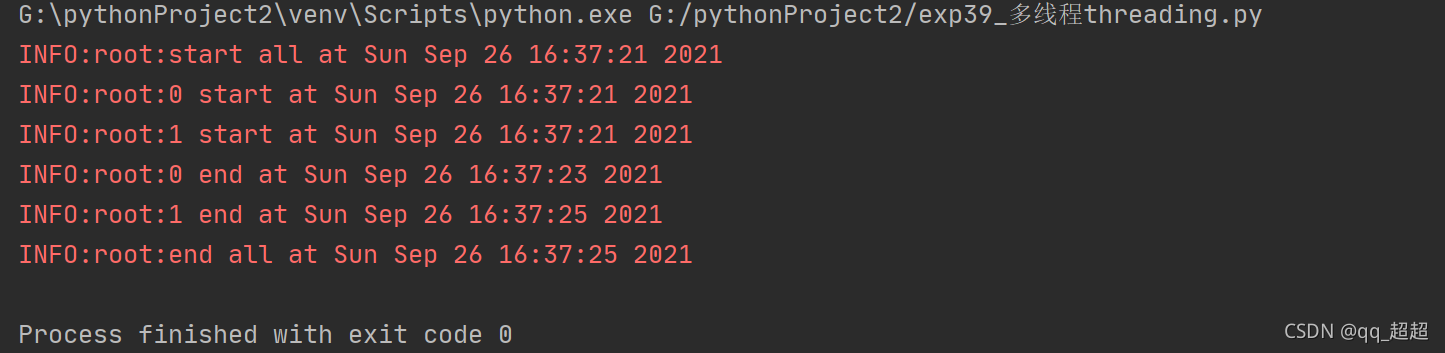
(2)使用threading包 实现多线程(创建了MyThread类,继承父类Thread)
import _thread
import threading
import time
from time import sleep
import logging

logging.basicConfig(level=logging.INFO)


# MyThread继承Thread


class MyThread(threading.Thread):

    def __init__(self, func, args, name=""):
        threading.Thread.__init__(self)
        self.func = func
        self.args = args
        self.name = name

    def run(self):
        self.func(*self.args)


def loop(nloop, nsleep):
    logging.info(f"{nloop} start at {time.asctime()}")
    sleep(nsleep)
    logging.info(f"{nloop} end at {time.asctime()}")


def main():
    logging.info(f"start all at {time.asctime()}")
    threads = []
    loop_time = [2, 4]
    nloop = range(len(loop_time))
    for i in nloop:
        t = MyThread(loop, (i, loop_time[i]), loop.__name__)
        threads.append(t)
    for i in nloop:
        threads[i].start()
    for i in nloop:
        threads[i].join()
    logging.info(f"end all at {time.asctime()}")


if __name__ == "__main__":
    main()

# 使用threading.Thread()创建线程
# 使用start激活线程
# 使用join让线程等待其他线程执行完毕
15.python对外部数据源文件处理
(1)YAML
https://pyyaml.org/wiki/PyYAMLDocumentation
(2)EXCEL
https://openpyxl.readthedocs.io/en/stable/usage.html#write-a-workbook
16.装饰器
(1)优点:在不修改原来业务逻辑的情况下对代码进行扩展,常用于权限校验、用户认证、日志记录、性能测试、事务处理、缓存等。
(2)结构:装饰器是一个带有函数作为参数并返回一个新函数的闭包。本质上也是函数。
(3)语法糖@
以打印场景为例,对比没有使用装饰器和使用装饰器时,对代码量的影响。
(1)不使用装饰器,打印每个函数的开始运行时间和结束运行时间。
import time
from time import sleep
# 打印场景,对比没有使用装饰器和使用装饰器,对代码量的影响
# 当没有使用装饰器时,若每个函数都要进行打印开始运行时间和结束运行时间,代码则非常冗余。

def fun_1():
    print(f"fun_1 start运行的时间{time.asctime()}")
    sleep(2)
    print(f"fun_1 end运行的时间{time.asctime()}")


def fun_2():
    print(f"fun_2 start运行的时间{time.asctime()}")
    sleep(2)
    print(f"fun_2 end运行的时间{time.asctime()}")


def fun_3():
    print(f"fun_3 start运行的时间{time.asctime()}")
    sleep(2)
    print(f"fun_3 end运行的时间{time.asctime()}")


def main():
    fun_1()
    fun_2()
    fun_2()

if __name__ == "__main__":A
    main()
(2)使用装饰器
import time
from time import sleep


# 打印场景,对比没有使用装饰器和使用装饰器,对代码量的影响
# 使用装饰器

def outer(func):
    def inner():
        print(f"{func.__name__} start运行的时间{time.asctime()}")
        func()
        print(f"{func.__name__} end运行的时间{time.asctime()}")
    return inner


def fun_1():
    sleep(2)


# sleep()是举例,可能是其他的一些操作,比如赋值

def fun_2():
    sleep(2)


def fun_3():
    sleep(2)


def main():
    outer(fun_1)()
    outer(fun_2)()
    outer(fun_3)()


if __name__ == "__main__":
    main()
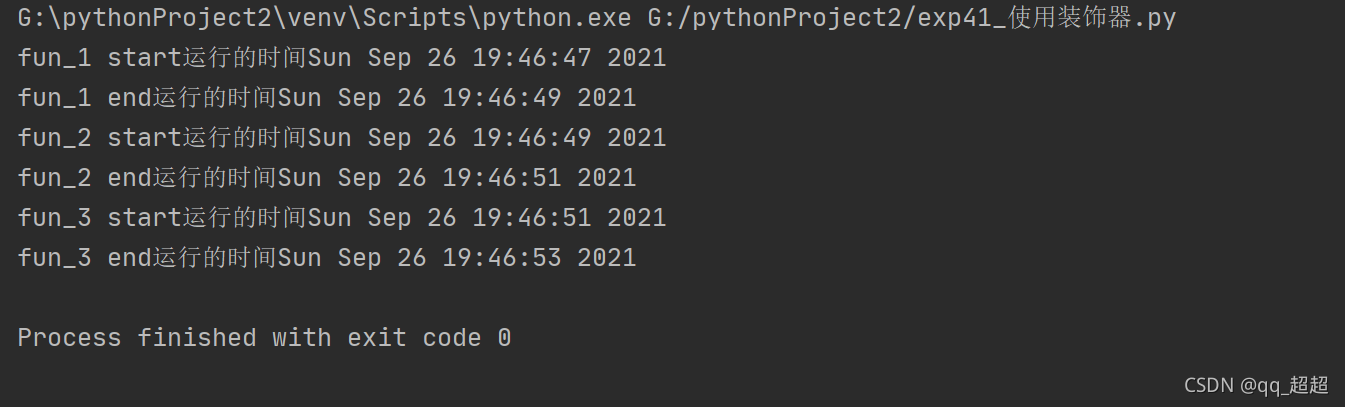
(3)使用语法糖@
import time
from time import sleep


# 打印场景,对比没有使用装饰器和使用装饰器,对代码量的影响
# 使用装饰器
def outer(func):
    def inner():
        print(f"{func.__name__} start运行的时间{time.asctime()}")
        func()
        print(f"{func.__name__} end运行的时间{time.asctime()}")

    return inner


@outer  # 省去了在main()函数中 outer(fun_1)()操作
def fun_1():
    sleep(2)


# sleep()是举例,可能是其他的一些操作,比如赋值

@outer  # 省去了在main()函数中 outer(fun_2)()操作
def fun_2():
    sleep(2)


@outer  # 省去了在main()函数中 outer(fun_3)()操作
def fun_3():
    sleep(2)


def main():
    fun_1()
    fun_2()
    fun_3()


if __name__ == "__main__":
    main()
以上3种情况的运行结果都一样:


 4万+
4万+


 被折叠的 条评论
为什么被折叠?
被折叠的 条评论
为什么被折叠?
 到【灌水乐园】发言


