


1.在 res/drawable 文件夹下把你的头像图片放里面,我这里使用的头像文件是 head.jpg
2.布局 xml 文件里使用 ImageView 组件把头像显示出来
<?xml version="1.0" encoding="utf-8"?>
<LinearLayout xmlns:android="http://schemas.android.com/apk/res/android"
    xmlns:tools="http://schemas.android.com/tools"
    android:layout_width="match_parent"
    android:layout_height="wrap_content"
    android:orientation="horizontal">

    <ImageView
        android:id="@+id/head_portrait"
        android:layout_width="150dp"
        android:layout_height="150dp"
        android:layout_weight="1"
        tools:srcCompat="@drawable/head" />
</LinearLayout>
3.新建Tool类来确保头像图片长宽是正方形
package com.example.tools;

import android.graphics.Bitmap;
import android.graphics.Matrix;

public class Tools {
    //确保头像的是正方形
    public static Bitmap makeBitmapSquare(Bitmap oldbitmap, int newWidth){
        Bitmap newbitmap=null;
        if (oldbitmap.getWidth()>oldbitmap.getHeight()){
            newbitmap=Bitmap.createBitmap(oldbitmap,oldbitmap.getWidth()/2-oldbitmap.getHeight()/2,0,oldbitmap.getHeight(),oldbitmap.getHeight());
        }else{
            newbitmap=Bitmap.createBitmap(oldbitmap,0,oldbitmap.getHeight()/2-oldbitmap.getWidth()/2,oldbitmap.getWidth(),oldbitmap.getWidth());
        }
        int width=newbitmap.getWidth();
        float scaleWidth=((float)newWidth)/width;
        Matrix matrix=new Matrix();
        matrix.postScale(scaleWidth,scaleWidth);
        newbitmap= Bitmap.createBitmap(newbitmap,0,0,width,width,matrix,true);
        return newbitmap;
    }
}
4.在应用启动类里增加圆形头像框设置
package com.example.myapplicationjava;

import android.graphics.Bitmap;
import android.graphics.BitmapFactory;
import android.os.Bundle;
import android.widget.ImageView;
import androidx.appcompat.app.AppCompatActivity;
import androidx.core.graphics.drawable.RoundedBitmapDrawable;
import androidx.core.graphics.drawable.RoundedBitmapDrawableFactory;
import com.example.tools.Tools;

public class MainActivity extends AppCompatActivity {
    @Override
    protected void onCreate(Bundle savedInstanceState) {
        super.onCreate(savedInstanceState);
        setContentView(R.layout.activity_main);

        //设置圆形头像框
        ImageView imageView_tx=(ImageView)findViewById(R.id.head_portrait);
        Bitmap bitmap1= BitmapFactory.decodeResource(getResources(), R.drawable.head);
        Bitmap bitmap2= Tools.makeBitmapSquare(bitmap1,120);
        RoundedBitmapDrawable roundImg1= RoundedBitmapDrawableFactory.create(getResources(),bitmap2);
        roundImg1.setAntiAlias(true);
        roundImg1.setCornerRadius(bitmap2.getWidth()/2);
        imageView_tx.setImageDrawable(roundImg1);
    }
}
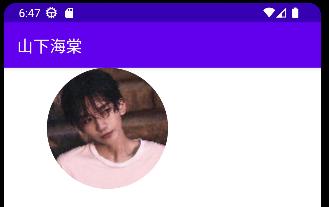
效果如下


 4475
4475


 被折叠的 条评论
为什么被折叠?
被折叠的 条评论
为什么被折叠?
 到【灌水乐园】发言


