


大家好,今天介绍一个手绘工具(matplotlib.pyplot.xkcd()),一行代码可将所有Matplotlib和Seaborn绘制的图形变为手绘风格。赶快收藏学习吧,喜欢点赞支持哦
matplotlib.pyplot.xkcd()简介
这个Matplotlib子函数特别简单,只有三个参数,别看参数少,但功能可不小
matplotlib.pyplot.xkcd(scale=1, #相对于不使用xkcd的风格图,褶皱的幅度
                       length=100, #褶皱长度
                       randomness=2#褶皱的随机性
                      )
matplotlib.pyplot.xkcd()使用
如下,加with行代码即可,括号中参数按个人喜好决定是否设置~
with plt.xkcd(scale=1, length=100, randomness=2):
#with是临时使用一下,不影响其它图使用正常样式
    绘图代码
    。。。。。。
    plt.show()
matplotlib.pyplot.xkcd()使用实例
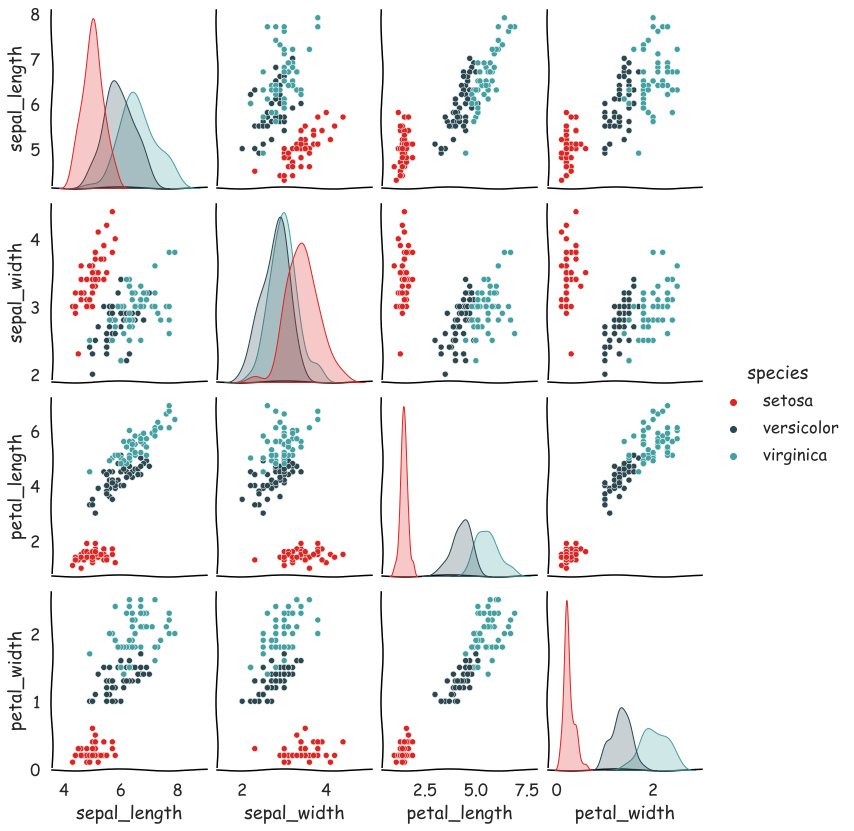
#支持seaborn
import seaborn as sns
iris_sns = sns.load_dataset("iris")
with plt.xkcd():
    g = sns.pairplot(
        iris_sns,
        hue='species',  #按照三种花分类
        palette=['#dc2624', '#2b4750', '#45a0a2'])
    sns.set(style='whitegrid')
    g.fig.set_size_inches(12, 12)
    sns.set(style='whitegrid', font_scale=1.5)
import matplotlib.pyplot as plt
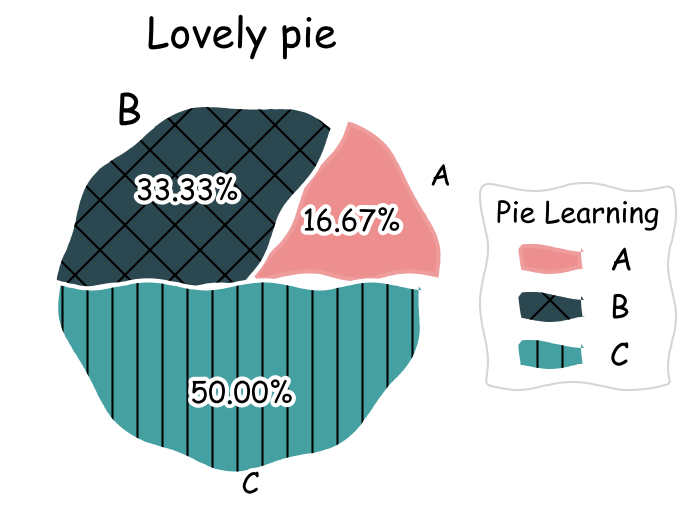
with plt.xkcd(
scale=4, #相对于不使用xkcd的风格图,褶皱的幅度
length=120, #褶皱长度
randomness=2): #褶皱的随机性
plt.figure(dpi=150)
patches, texts, autotexts = plt.pie(
x=[1, 2, 3], #返回三个对象
labels=['A', 'B', 'C'],
colors=['#dc2624', '#2b4750', '#45a0a2'],
autopct='%.2f%%',
explode=(0.1, 0, 0))
texts[1].set_size('20') #修改B的大小
#matplotlib.patches.Wedge
patches[0].set_alpha(0.3) #A组分设置透明度
patches[2].set_hatch('|') #C组分添加网格线
patches[1].set_hatch('x')
plt.legend(
patches,
['A', 'B', 'C'], #添加图例
title="Pie Learning",
loc="center left",
fontsize=15,
bbox_to_anchor=(1, 0, 0.5, 1))
plt.title('Lovely pie', size=20)
plt.show()
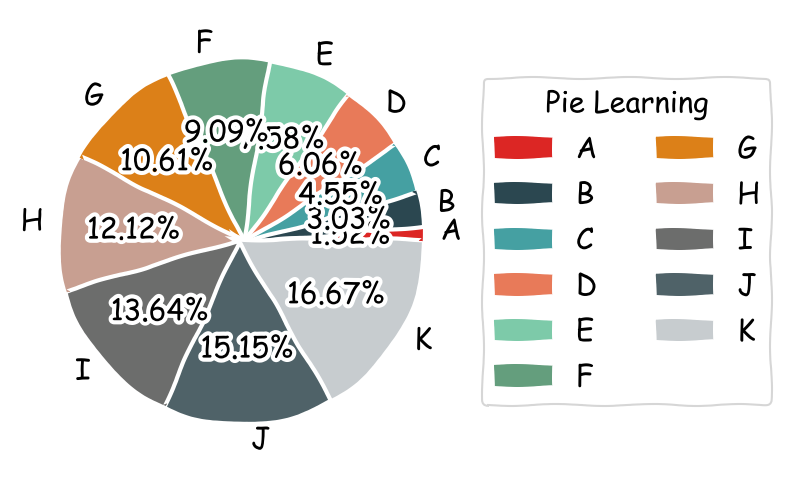
with plt.xkcd():
    from string import ascii_letters
    plt.figure(dpi=150)
    patches, texts, autotexts = plt.pie(
        x=range(1, 12),
        labels=list(ascii_letters[26:])[0:11],
        colors=[
            '#dc2624', '#2b4750', '#45a0a2', '#e87a59', '#7dcaa9', '#649E7D',
            '#dc8018', '#C89F91', '#6c6d6c', '#4f6268', '#c7cccf'
        ],
        autopct='%.2f%%',
    )
    plt.legend(
        patches,
        list(ascii_letters[26:])[0:11],  #添加图例
        title="Pie Learning",
        loc="center left",
        bbox_to_anchor=(1, 0, 0.5, 1),
        ncol=2,  #控制图例中按照两列显示,默认为一列显示,
    )
import matplotlib.pyplot as plt
import numpy as np
with plt.xkcd():
    plt.figure(dpi=150)
    labels = ['Jack', 'Rose', 'Jimmy']
    year_2019 = np.arange(1, 4)
    year_2020 = np.arange(1, 4) + 1
    bar_width = 0.4

    plt.bar(
        np.arange(len(labels)) - bar_width / 2,  #为了两个柱子一样宽
        year_2019,
        color='#dc2624',
        width=bar_width,
        label='year_2019'  #图例
    )
    plt.bar(
        np.arange(len(labels)) + bar_width / 2,
        year_2020,
        color='#45a0a2',
        width=bar_width,
        label='year_2020'  #图例
    )
    plt.xticks(np.arange(0, 3, step=1), labels, rotation=45)  #定义柱子名称
    plt.legend(loc=2)  #图例在左边

x, y = iris.data, iris.target
pd_iris = pd.DataFrame(np.hstack((x, y.reshape(150, 1))),
columns=[
'sepal length(cm)', 'sepal width(cm)',
'petal length(cm)', 'petal width(cm)', 'class'
])
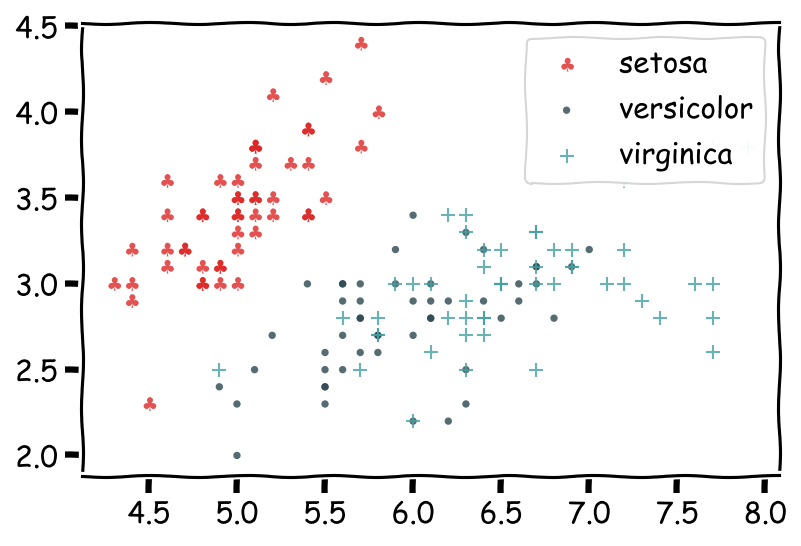
with plt.xkcd():
plt.figure(dpi=150) #设置图的分辨率
#plt.style.use('Solarize_Light2') #使用Solarize_Light2风格绘图
iris_type = pd_iris['class'].unique() #根据class列将点分为三类
iris_name = iris.target_names #获取每一类的名称
colors = ['#dc2624', '#2b4750', '#45a0a2'] #三种不同颜色
markers = ['$\clubsuit, '.', '+'] #三种不同图形
for i in range(len(iris_type)):
plt.scatter(
pd_iris.loc[pd_iris['class'] == iris_type[i],
'sepal length(cm)'], #传入数据x
pd_iris.loc[pd_iris['class'] == iris_type[i],
'sepal width(cm)'], #传入数据y
s=50, #散点图形(marker)的大小
c=colors[i], #marker颜色
marker=markers[i], #marker形状
#marker=matplotlib.markers.MarkerStyle(marker = markers[i],fillstyle='full'),#设置marker的填充
alpha=0.8, #marker透明度,范围为0-1
facecolors='r', #marker的填充颜色,当上面c参数设置了颜色,优先c
edgecolors='none', #marker的边缘线色
linewidths=1, #marker边缘线宽度,edgecolors不设置时,该参数不起作用
label=iris_name[i]) #后面图例的名称取自label
plt.legend(loc='upper right')
参考: https://matplotlib.org/stable/api/_as_gen/matplotlib.pyplot.xkcd.html#matplotlib.pyplot.xkcd


 2248
2248


 被折叠的 条评论
为什么被折叠?
被折叠的 条评论
为什么被折叠?
 到【灌水乐园】发言


