


这篇主要介绍《webpack优化环境配置(下)》。
知识点包括:
一、懒加载和预加载
懒加载
懒加载就是,在实际项目中,某个.js文件,还没有用到,此时不进行加载,当网页中进行某个功能,有需要时在加载。
1、复制代码分割工程文件,修改其中的webpack.config.js,进行精简。
const { resolve } = require('path');
const Htmlwebpackplugin = require('html-webpack-plugin');
module.exports = {
    entry: './src/js/index.js',
    output: {
        filename: 'js/[name].[contenthash:10].js',
        path: resolve(__dirname, 'build')
    },
    plugins: [
        new Htmlwebpackplugin({
            template: './src/index.html',
            minify: {
                collapseWhitespace: true,
                removeComments: true
            }
        }),
    ],
    optimization: {
        splitChunks: { chunks: 'all' }
    },
    mode: 'production'
}
2、然后修改index.js文件
console.log('index.js文件被加载了');


// 给首页的按钮增加一个点击事件,为了实现懒加载,即用到某个js文件时才加载该文件
// 引入方式改为动态引入
document.getElementById('btn').onclick = function () {
  import('./test').then(({ mul }) => {
    console.log(mul(4, 5));
  });
}
3、修改test.js代码
console.log('test.js文件被加载了');
export function mul(x, y) {
  return x * y;
}
export function count(x, y) {
  return x - y;
}
4、修改index.html代码,增加一个按钮,当点击该按钮时,test.js中的功能被需要,然后被加载。
<!DOCTYPE html>
<html lang="en">

<head>
    <meta charset="UTF-8">
    <meta http-equiv="X-UA-Compatible" content="IE=edge">
    <meta name="viewport" content="width=device-width, initial-scale=1.0">
    <title>Document</title>
</head>

<body>
    <h1>懒加载</h1>
    <button id="btn">按钮</button>

</body>

</html>
5、然后终端运行npm run build,打开打包后的index.html。
发现,点击按钮后,test.js文件才被加载。


预加载
打开网页的时候,所有的js文件都加载了,缓存到内存里,然后网页中某个功能实现需要js文件时,直接从内存中读取。
1、修改index.js代码,增加webpackPrefetch: true。
console.log('index.js文件被加载了');

// 给首页的按钮增加一个点击事件,为了实现懒加载,即用到某个js文件时才加载该文件
// 引入方式改为动态引入
document.getElementById('btn').onclick = function () {
  // webpackPrefetch: true开启预加载
  import(/*webpackChunkName:'test',webpackPrefetch: true*/'./test').then(({ mul }) => {
    console.log(mul(4, 5));
  });
}
2、然后输入npm run build重新打包。
打开生成的index.html,可以看到,网页一打开,全部被加载了,点击按钮后,test.js文件开始被调用。


总结
- 懒加载:当文件需要使用时才加载~
- 预加载prefetch:会在使用之前,提前加载js文件
- 正常常加载可以认为是并行加载(同一时间加载多个文件)
- 预加载prefetch:等其他资源加载完毕,浏览器空闲了,再偷偷加载资源
二、PWA(离线可访问)
渐进式网络应用程序(progressive web application - PWA),是一种可以提供类似于native app(原生应用程序) 体验的 web app(网络应用程序)。
1、复制tree shaking工程文件。
2、实现该功能需要一个插件,输入npm i workbox-webpack-plugin -D下载。然后在webpack.config.js中使用
const { resolve } = require('path');
const minicssextractplugin = require('mini-css-extract-plugin');
process.env.NODE_ENV = 'production'
const cssminimizerwebpackplugin = require('css-minimizer-webpack-plugin');
const Htmlwebpackplugin = require('html-webpack-plugin');
const workboxwebpackplugin = require('workbox-webpack-plugin')
// PWA:渐进式网络开发应用程序(离线可访问)
// 通过一个插件workbox-webpack-plugin

module.exports = {
    entry: './src/js/index.js',
    output: {
        filename: 'js/built.[contenthash:10].js',
        path: resolve(__dirname, 'build')
    },
    module: {
        rules: [{

            oneOf: [
                {
                    test: /\.css$/,
                    use: [
                        minicssextractplugin.loader,
                        'css-loader',
                        {
                            loader: 'postcss-loader',
                            options: {
                                postcssOptions: {
                                    plugins: [require('postcss-preset-env')()]
                                }
                            }
                        }
                    ]
                },
                {
                    test: /\.js$/,
                    exclude: /node_modules/,
                    loader: 'babel-loader',
                    options: {
                        presets: [
                            [
                                '@babel/preset-env', {
                                    useBuiltIns: 'usage',
                                    corejs:
                                    {
                                        version: 3
                                    },
                                    targets: {
                                        chrome: '60',
                                        firefox: '50'
                                    }
                                }
                            ]
                        ],
                        cacheDirectory: true,
                    }

                },
                {
                    test: /\.(jpg|png|gif)$/,
                    loader: 'url-loader',
                    options: {
                        limit: 8 * 1024,
                        outputPath: 'imgs',
                        esModule: false
                    },
                    type: 'javascript/auto'
                },
                {
                    test: /\.html$/,
                    loader: 'html-loader',
                    options: {
                        esModule: false,
                    }

                },
                {
                    exclude: /\.(js|css|less|html|jpg|png|gif)$/,
                    loader: 'file-loader',
                    options: {
                        outputPath: 'media',
                        esModule: false,
                    },
                    type: 'javascript/auto'
                }
            ]
        }
        ]
    },
    plugins: [
        new minicssextractplugin({
            filename: 'css/built.[contenthash:10].css'
        }),
        new cssminimizerwebpackplugin(
        ),
        new Htmlwebpackplugin({
            template: './src/index.html',
            minify: {
                collapseWhitespace: true,
                removeComments: true
            }
        }),
        // 使用PWA
        new workboxwebpackplugin.GenerateSW({
            // 进行两个设置,分别:
            // 1.帮助serviceworker快速启动
            //2.删除旧的serviceworkerl
            // 最后生成一个serviceworker配置文件
            clientsClaim: true,
            skipWaiting: true
        })
    ],
    mode: 'production'
}
3、然后输入npm run build进行打包。打包后看到生成两个.js文件

生成的service-worker代码必须运行在服务器上,有三种方法,一是通过nodejs编写代码,二是输入npm install http-server --save-dev安装一个包,还要修改 package.json 的 scripts 部分,增加"start": "http-server dist",然后输入npm start 启动服务器,将build目录下所有资源作为静态资源暴露出去。第三种方法是输入npm install -D webpack-dev-server,然后npx webpack serve。最后点击访问生成的网址。
【!!!注:我在测试后发现,第二种生成的路径打不开,第三种执行后报了错。不知道什么原因~~~下面是原博主的测试执行结果】
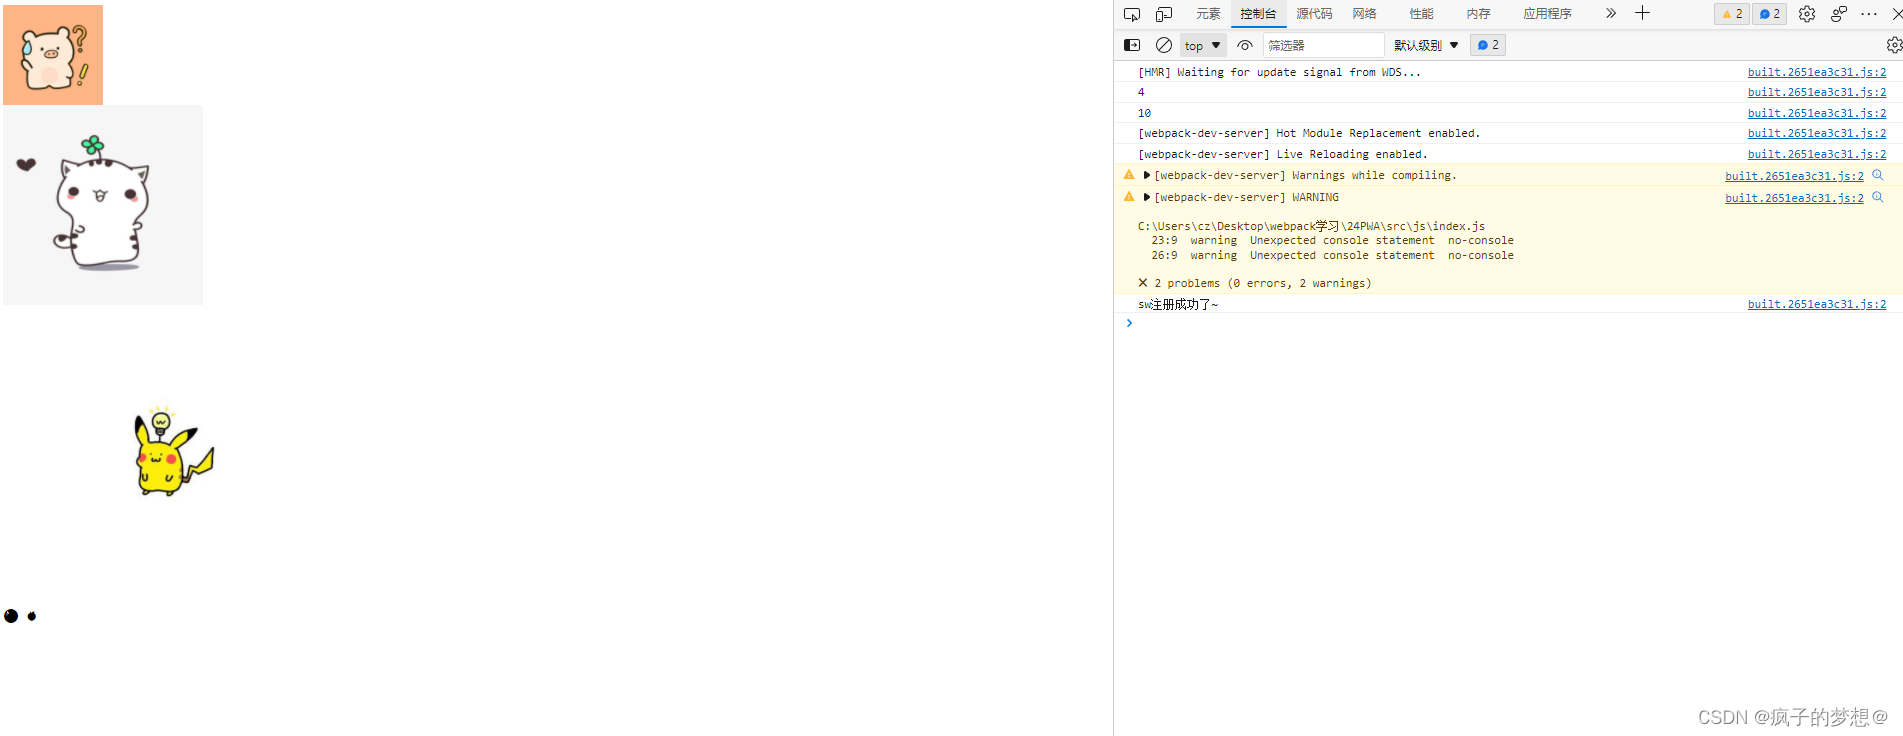
把网络设置为离线,看是否还能访问。

访问正常。
三、多进程打包
1、复制上一小节工程文件。
同一时间多个进程同时打包,优化打包时间。
2、需要下载一个loader。终端输入命令npm i thread-loader -D,修改config.js代码。
const { resolve } = require('path');
const minicssextractplugin = require('mini-css-extract-plugin');
process.env.NODE_ENV = 'production'
const cssminimizerwebpackplugin = require('css-minimizer-webpack-plugin');
const Htmlwebpackplugin = require('html-webpack-plugin');
const workboxwebpackplugin = require('workbox-webpack-plugin')

module.exports = {
    entry: './src/js/index.js',
    output: {
        filename: 'js/built.[contenthash:10].js',
        path: resolve(__dirname, 'build')
    },
    module: {
        rules: [{

            oneOf: [
                {
                    test: /\.css$/,
                    use: [
                        minicssextractplugin.loader,
                        'css-loader',
                        {
                            loader: 'postcss-loader',
                            options: {
                                postcssOptions: {
                                    plugins: [require('postcss-preset-env')()]
                                }
                            }
                        }
                    ]
                },
                {
                    test: /\.js$/,
                    exclude: /node_modules/,
                    use: [
                        // 开启多进程打包,进程启动大概为600ms,进程通信也有开销。只有工作消耗时间比较长,才需要
                        // 一般与babel loader结合使用
                        'thread-loader',
                        {
                            loader: 'babel-loader',
                            options: {
                                presets: [
                                    [
                                        '@babel/preset-env', {
                                            useBuiltIns: 'usage',
                                            corejs:
                                            {
                                                version: 3
                                            },
                                            targets: {
                                                chrome: '60',
                                                firefox: '50'
                                            }
                                        }
                                    ]
                                ],
                                cacheDirectory: true,
                            }
                        }
                    ]
                },
                {
                    test: /\.(jpg|png|gif)$/,
                    loader: 'url-loader',
                    options: {
                        limit: 8 * 1024,
                        outputPath: 'imgs',
                        esModule: false
                    },
                    type: 'javascript/auto'
                },
                {
                    test: /\.html$/,
                    loader: 'html-loader',
                    options: {
                        esModule: false,
                    }

                },
                {
                    exclude: /\.(js|css|less|html|jpg|png|gif)$/,
                    loader: 'file-loader',
                    options: {
                        outputPath: 'media',
                        esModule: false,
                    },
                    type: 'javascript/auto'
                }
            ]
        }
        ]
    },
    plugins: [
        new minicssextractplugin({
            filename: 'css/built.[contenthash:10].css'
        }),
        new cssminimizerwebpackplugin(
        ),
        new Htmlwebpackplugin({
            template: './src/index.html',
            minify: {
                collapseWhitespace: true,
                removeComments: true
            }
        }),
        // 使用PWA
        new workboxwebpackplugin.GenerateSW({
            // 进行两个设置,分别:
            // 1.帮助serviceworker快速启动
            //2.删除旧的serviceworkerl
            // 最后生成一个serviceworker配置文件
            clientsClaim: true,
            skipWaiting: true
        })
    ],
    mode: 'production'
}
3、终端输入npm run build进行打包,一般当项目文件比较大时,这个功能的优势才会更明显。
四、externals
externals是防止将某些 import 的包(package)打包到 build(存放打包后文件的地方)中,是在运行时(runtime)再去从外部获取这些扩展依赖(external dependencies)。
例如,从 CDN 引入 jQuery,而不是把它打包。
1、复制打包html资源工程,并重命名。复制好的工程文件目录如下

2、修改webpack.config.js代码
const { resolve } = require('path');
const HtmlWebpackPlugin = require('html-webpack-plugin')
module.exports = {
    entry: './src/index.js', output: {
        filename: 'built.js',
        path: resolve(__dirname, 'build')
    },
    plugins: [
        new HtmlWebpackPlugin({
            template: './src/index.html'
        })
    ],
    mode: 'production',
    // 外部扩展(externals)
    // 防止将某些 import 的包(package)打包到 built 中,
    externals: {
        jquery: 'jQuery'
    }
}
3、修改index.js代码,使用jquery
import $ from 'jquery';

console.log($);

function add(x, y) {
    return x + y;
}
console.log(add(1, 2));
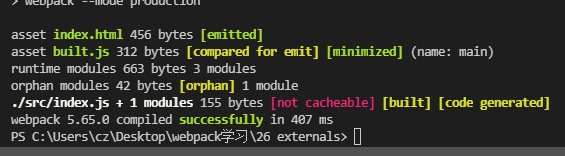
4、然后输入npm run build我们发现生成的built.js文件大小是312bytes。
如果把jquery也打包的话,文件大小肯定远远大于这个值。

5、最后记得要在index.html中手动引入jquery。
因为我们没有打包jquery,被externals设置排除了,手动引入后,才能正常使用。
<!DOCTYPE html>
<html lang="en">

<head>
    <meta charset="UTF-8">
    <meta http-equiv="X-UA-Compatible" content="IE=edge">
    <meta name="viewport" content="width=device-width, initial-scale=1.0">
    <title>Document</title>
</head>

<body>
    <h1 id="title">hello html</h1>
    <script src="https://code.jquery.com/jquery-3.1.0.js"
        integrity="sha256-slogkvB1K3VOkzAI8QITxV3VzpOnkeNVsKvtkYLMjfk=" crossorigin="anonymous">
     </script>
</body>

</html>
6、再重新打包一次。在浏览器打开生成的index.html文件。可以看到此时的built.js文件是312bytes,网页的功能也正常。

五、DLL(动态链接库)
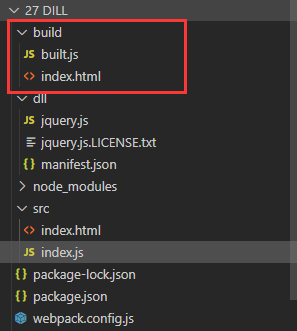
1、复制打包html资源工程。并重命名。
DLL功能就是:单独打包,把不同的文件最后打包到不同的文件,即多对多的关系。
2、在复制的工程文件夹下新增webpack.dll.js文件。其代码如下
/*
使用dll技术,对某些库(第三方库:jquery、react、vue. . . )进行单独打包
当你运行webpack时,默认查找webpack.config.js配置文件
而我们需要运行webpack.dll.js文件
所以输入命令: webpack --config webpack.dll.js,进行修改

*/
const { resolve } = require('path');
// webpack自带的插件
const webpack = require('webpack')
module.exports = {
    entry: {
        //最终打包生成的[name] --> jquery
        // ['jquery']-- > 要打包的库是jquery
        jquery: ['jquery']
    },
    output: {
        filename: '[name].js',
        path: resolve(__dirname, 'dll'),
        library: '[name]_[hash:10]'// 打包的库里面向外暴露出去的内容叫什么名字
    },
    plugins: [
        // 使用webpack自带的插件,打包生成一个manifest.json文件,提供和jquery的映射
        new webpack.DllPlugin({
            name: '[name]_[hash:10]',//映射库的暴露的内容名称
            path: resolve(__dirname, 'dll/manifest.json')//输出文件路径
        })
    ],
    mode: 'production'
}
3、终端输入npm i jquery --save下载jquery包。然后修改package.json中代码
"scripts": {
    "test": "echo \"Error: no test specified\" && exit 1",
    "dev": "webpack --mode development",
    "build": "webpack --mode production",
    "dill":"webpack --config webpack.dll.js"
  },
4、然后终端输入:npm run dill。这样就修改了打包时默认的配置文件,变成了webpack.dll.js。

5、至此, 我们已经把jquery单独打包出来了到一个文件夹中,那么以后再打包时,就可以不用在打包jquery了。
想打包其他非官方modules时,需要再修改webpack.config.js代码。
/*工作流程
loader: 1下载 2使用(配置loader)
plugins: 1.下载 2.引入 3使用
*/
const { resolve } = require('path');
// 引入插件
const HtmlWebpackPlugin = require('html-webpack-plugin');
const webpack = require('webpack')
module.exports = {
    entry: './src/index.js', output: {
        filename: 'built.js',
        path: resolve(__dirname, 'build')
    },

    module: {
        rules: [
            // loader的配置
        ]
    },
    plugins: [
        //plugins的配置
        // html-webpack-plugin配置
        // 功能:默认会创建一个空的HTML,自动引入打包输出的所有资源(S/cSs)
        new HtmlWebpackPlugin({
            //复制'./src/index.html’文件,并自动引入打包输出的所有资源(JS/cSs)
            template: './src/index.html'
        }),
        // 告诉webpack哪些库不参与打包,同时使用时的名称也得变~
        new webpack.DllReferencePlugin({
            manifest: resolve(__dirname, 'dll/manifest.json')
        })
    ],
    mode: 'development'
}
6、然后我们在index.js引入jquery代码。
import $ from 'jquery'
console.log($);
function add(x, y) {
    return x + y;
}
console.log(add(1, 2));
如果此时不修改config.js中代码,直接进行生产环境下的打包,npm run build,则最后的打包文件还是会把jquery与自己写的代码杂糅起来。
7、使用了webpack.DllReferencePlugin插件后,输入npm run build,查看效果。
此时的built.js中没有柔和jquery代码,体积很小。
那么我们需要用jquery,该怎么办呢?
8、此时需要另一个插件,输入npm i add-asset-html-webpack-plugin -D.
该插件将某个文件打包输出去,并在html中自动引入该资源。
然后在config.js中使用。
/*工作流程
loader: 1下载 2使用(配置loader)
plugins: 1.下载 2.引入 3使用
*/
const { resolve } = require('path');
// 引入插件
const HtmlWebpackPlugin = require('html-webpack-plugin');
const webpack = require('webpack');
const AddAssetHtmlWebpackPlugin = require('add-asset-html-webpack-plugin')
module.exports = {
    entry: './src/index.js', output: {
        filename: 'built.js',
        path: resolve(__dirname, 'build')
    },

    module: {
        rules: [
            // loader的配置
        ]
    },
    plugins: [
        //plugins的配置
        // html-webpack-plugin配置
        // 功能:默认会创建一个空的HTML,自动引入打包输出的所有资源(S/cSs)
        new HtmlWebpackPlugin({
            //复制'./src/index.html’文件,并自动引入打包输出的所有资源(JS/cSs)
            template: './src/index.html'
        }),
        // 告诉webpack哪些库不参与打包,同时使用时的名称也得变~
        new webpack.DllReferencePlugin({
            manifest: resolve(__dirname, 'dll/manifest.json')
        }),
        // 将某个文件打包输出去,并在html中自动引入该资源
        new AddAssetHtmlWebpackPlugin({
            filepath: resolve(__dirname, 'dll/jquery.js'),
            outputPath: "auto"
        })
    ],
    mode: 'development'
}
9、此时在重新打包一次,npm run build。

此时在运行打包后的html文件就没问题了。

总结
我们通过一个webpack.dll.js先单独打包jquery文件,然后在webpack.config.js中使用了插件webpack.DllReferencePlugin,告诉webpack,在生产环境打包时,不需要再对jquery打包了,然后又使用了插件AddAssetHtmlWebpackPlugin,告诉webpack,将之前单独打包的jquery自动输出并引入到html文件中去。就可以避免在修改配置后再打包时,还会重复打包jquery,节省了时间。
注:笔记转载自疯子的梦想@博客,课程来自尚硅谷b站Webpack5实战课程


 1894
1894

 被折叠的 条评论
为什么被折叠?
被折叠的 条评论
为什么被折叠?
 到【灌水乐园】发言


