


1. USART2、USART3 配置
1.1 usart2,使能GPIO时钟,这里我用的是A口,以及GPIO口的配置,这里我的串口输出是PA2,输入是PA3
然后初始化usart2,再使能usart2
/* 串口初始化 */
void STM_EVAL_COMInit(USART_InitTypeDef* USART_InitStruct)
{
GPIO_InitTypeDef GPIO_InitStructure;
/* Enable GPIO clock */
RCC_APB2PeriphClockCmd(RCC_APB2Periph_GPIOA, ENABLE);//GPIOA使能
RCC_APB1PeriphClockCmd(RCC_APB1Periph_USART2, ENABLE);USART2时钟使能
/* Configure USART Tx as alternate function push-pull */
GPIO_InitStructure.GPIO_Mode = GPIO_Mode_AF_PP;//输出PA2
GPIO_InitStructure.GPIO_Pin = GPIO_Pin_2;
GPIO_InitStructure.GPIO_Speed = GPIO_Speed_50MHz;
GPIO_Init(GPIOA, &GPIO_InitStructure);
/* Configure USART Rx as input floating */
GPIO_InitStructure.GPIO_Mode = GPIO_Mode_IN_FLOATING;//输入PA3
GPIO_InitStructure.GPIO_Pin = GPIO_Pin_3;
GPIO_Init(GPIOA, &GPIO_InitStructure);
/* USART configuration */
USART_Init(USART2, USART_InitStruct);//USART2初始化
/* Enable USART */
USART_Cmd(USART2, ENABLE);//使能USART2
}
void USART2_Init (void)
{
USART_InitTypeDef USART_InitStructure;
NVIC_InitTypeDef NVIC_InitStructure;
USART_InitStructure.USART_BaudRate = 115200; //波特率
USART_InitStructure.USART_WordLength = USART_WordLength_8b; //数据位个数=8
USART_InitStructure.USART_StopBits = USART_StopBits_1; //1个停止位
USART_InitStructure.USART_Parity = USART_Parity_No; //没有校验位
USART_InitStructure.USART_HardwareFlowControl = USART_HardwareFlowControl_None;
USART_InitStructure.USART_Mode = USART_Mode_Rx | USART_Mode_Tx;
STM_EVAL_COMInit(&USART_InitStructure);
//数据接收的使能中断
/* Enable the USARTz Interrupt */
NVIC_InitStructure.NVIC_IRQChannel = USART2_IRQn;//为USART2
NVIC_InitStructure.NVIC_IRQChannelPreemptionPriority = 0;
NVIC_InitStructure.NVIC_IRQChannelSubPriority = 0;
NVIC_InitStructure.NVIC_IRQChannelCmd = ENABLE;
NVIC_Init(&NVIC_InitStructure);
/* Enable the USARTz Receive Interrupt */
USART_ITConfig(USART2, USART_IT_RXNE, ENABLE);//都能接收数据,需要开启中断
}
1.2 usart3,使能GPIO时钟,这里我用的是B口,以及GPIO口的配置,这里我的串口输出是PB10,输入是PB11
void usart3_init(u32 bound)
{
NVIC_InitTypeDef NVIC_InitStructure;
GPIO_InitTypeDef GPIO_InitStructure;
USART_InitTypeDef USART_InitStructure;
RCC_APB2PeriphClockCmd(RCC_APB2Periph_GPIOB, ENABLE); // GPIOB时钟
RCC_APB1PeriphClockCmd(RCC_APB1Periph_USART3,ENABLE); //串口3时钟使能
USART_DeInit(USART3); //复位串口3
//USART3_TX PB10
GPIO_InitStructure.GPIO_Pin = GPIO_Pin_10; //PB10
GPIO_InitStructure.GPIO_Speed = GPIO_Speed_50MHz;
GPIO_InitStructure.GPIO_Mode = GPIO_Mode_AF_PP; //复用推挽输出
GPIO_Init(GPIOB, &GPIO_InitStructure); //初始化PB10
//USART3_RX PB11
GPIO_InitStructure.GPIO_Pin = GPIO_Pin_11;
GPIO_InitStructure.GPIO_Mode = GPIO_Mode_IN_FLOATING;//浮空输入
GPIO_Init(GPIOB, &GPIO_InitStructure); //初始化PB11
USART_InitStructure.USART_BaudRate = bound;//波特率一般设置为9600;
USART_InitStructure.USART_WordLength = USART_WordLength_8b;//字长为8位数据格式
USART_InitStructure.USART_StopBits = USART_StopBits_1;//一个停止位
USART_InitStructure.USART_Parity = USART_Parity_No;//无奇偶校验位
USART_InitStructure.USART_HardwareFlowControl = USART_HardwareFlowControl_None;//无硬件数据流控制
USART_InitStructure.USART_Mode = USART_Mode_Rx | USART_Mode_Tx; //收发模式
USART_Init(USART3, &USART_InitStructure); //初始化串口 3
USART_Cmd(USART3, ENABLE); //使能串口
//使能接收中断
USART_ITConfig(USART3, USART_IT_RXNE, ENABLE);//开启中断
//设置中断优先级
NVIC_InitStructure.NVIC_IRQChannel = USART3_IRQn;
NVIC_InitStructure.NVIC_IRQChannelPreemptionPriority=0 ;//抢占优先级3
NVIC_InitStructure.NVIC_IRQChannelSubPriority = 3; //子优先级3
NVIC_InitStructure.NVIC_IRQChannelCmd = ENABLE; //IRQ通道使能
NVIC_Init(&NVIC_InitStructure); //根据指定的参数初始化VIC寄存器
USART3_RX_STA=0; //清零
}
1.3. usart1,使能GPIO时钟,这里我用的是A口,以及GPIO口的配置,这里我的串口输出是PA9,输入是PA10
void USART1_Config(void)
{
GPIO_InitTypeDef GPIO_InitStructure;
//USART1配置
USART_InitTypeDef USART_InitStructure;
NVIC_InitTypeDef NVIC_InitStructure;
/*由于UART的TX和RX和AFIO都挂在APB2桥上,
因此采用固件库函数RCC_APB2PeriphClockCmd()进行初始化。
UARTx需要分情况讨论,如果是UART1,则挂在APB2桥上,
因此采用RCC_APB2PeriphClockCmd()进行初始化,其余的UART2~5均挂在APB1上。
*/
//打开时钟
RCC_APB2PeriphClockCmd(RCC_APB2Periph_GPIOA | RCC_APB2Periph_USART1, ENABLE);
/*
GPIO的属性包含在结构体GPIO_InitTypeDef,其中对于TX引脚,
GPIO_Mode字段设置为GPIO_Mode_AF_PP(复用推挽输出),
GPIO_Speed切换速率设置为GPIO_Speed_50MHz;对于RX引脚,
GPIO_Mode字段设置为GPIO_Mode_IN_FLOATING(浮空输入),
不需要设置切换速率。最后通过GPIO_Init()使能IO口。
*/
//USART1 Tx(PA.09)
GPIO_InitStructure.GPIO_Pin = GPIO_Pin_9;
GPIO_InitStructure.GPIO_Speed = GPIO_Speed_50MHz;
GPIO_InitStructure.GPIO_Mode = GPIO_Mode_AF_PP;
GPIO_Init(GPIOA, &GPIO_InitStructure);
//USART1 Rx(PA.10)
GPIO_InitStructure.GPIO_Pin = GPIO_Pin_10;
GPIO_InitStructure.GPIO_Speed = GPIO_Speed_50MHz;
GPIO_InitStructure.GPIO_Mode = GPIO_Mode_IN_FLOATING;
GPIO_Init(GPIOA, &GPIO_InitStructure);
/*通过结构体USART_InitTypeDef来确定。UART模式下的字段如下
USART_BaudRate:波特率,视具体设备而定
USART_WordLength:字长
USART_StopBits:停止位
USART_Parity:校验方式
USART_HardwareFlowControl:硬件流控制
USART_Mode:单/双工
*/
USART_InitStructure.USART_BaudRate = 115200;
USART_InitStructure.USART_WordLength = USART_WordLength_8b;
USART_InitStructure.USART_StopBits = USART_StopBits_1;
USART_InitStructure.USART_Parity = USART_Parity_No;
USART_InitStructure.USART_HardwareFlowControl = USART_HardwareFlowControl_None;
USART_InitStructure.USART_Mode = USART_Mode_Tx | USART_Mode_Rx;
USART_Init(USART1, &USART_InitStructure);
USART_Cmd(USART1, ENABLE);
//数据接收的使能中断 USART1_IRQn
/* Enable the USARTz Interrupt */
/* Enable the USARTy Interrupt */
/*
NVIC_InitStructure.NVIC_IRQChannel = USART1_IRQn;
NVIC_InitStructure.NVIC_IRQChannelPreemptionPriority = 0;
NVIC_InitStructure.NVIC_IRQChannelSubPriority = 1;
NVIC_InitStructure.NVIC_IRQChannelCmd = ENABLE;
*/
NVIC_InitStructure.NVIC_IRQChannel = 37;//为 USART1
NVIC_InitStructure.NVIC_IRQChannelPreemptionPriority = 0;
NVIC_InitStructure.NVIC_IRQChannelSubPriority = 0;
NVIC_InitStructure.NVIC_IRQChannelCmd = ENABLE;
NVIC_Init(&NVIC_InitStructure);
//NVIC_InitStructure.NVIC_IRQChannel = 37;//为 USART1
USART_ITConfig(USART1, USART_IT_RXNE, ENABLE);//
}
2 使用SendString函数发送
USART数据发送有两个标志, 一个是TXE=发送数据寄存器空,另一个是TC=发送结束;
例如发送“hello”,串口助手只接收到了“ello”,没有h这是因为stm32的usart的sr寄存器的TC初始为1,导致第一次while时第一个数据被覆盖. 这种情况,将TC修改为TXE即可:USART_FLAG_TXE
2.1 SendString
void SendString (char *s)
{
while(*s)
{
USART_SendData(USART2, *s++);//依次发送
/* Loop until the end of transmission */
while (USART_GetFlagStatus(USART2, USART_FLAG_TC) == RESET)//TC标志位为reset发送结束
{
}
}
}
2.2 回显
void USART1_IRQHandler_handle(void) // 串口1中断服务函数
{
u16 res;
if(USART_GetITStatus(USART1,USART_IT_RXNE)) // 中断标志
{
res= USART_ReceiveData(USART1); // 串口1 接收
USART_SendData(USART1,res); // 串口1 发送
}
}
void USART2_IRQHandler_handle(void) // 串口2中断服务函数
{
u16 res;
if(USART_GetITStatus(USART2,USART_IT_RXNE)) // 中断标志
{
res= USART_ReceiveData(USART2); // 串口2 接收
USART_SendData(USART2,res); // 串口2 发送
}
}
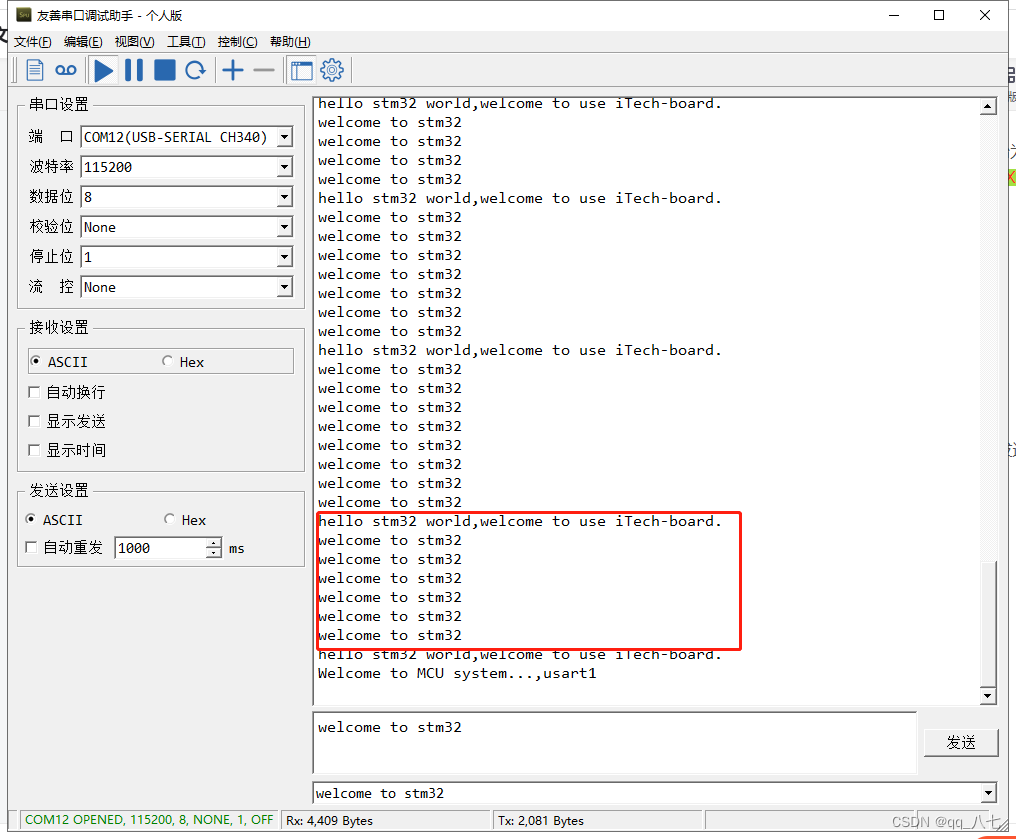
效果如下:


 5137
5137

 被折叠的 条评论
为什么被折叠?
被折叠的 条评论
为什么被折叠?
 到【灌水乐园】发言


