


前言
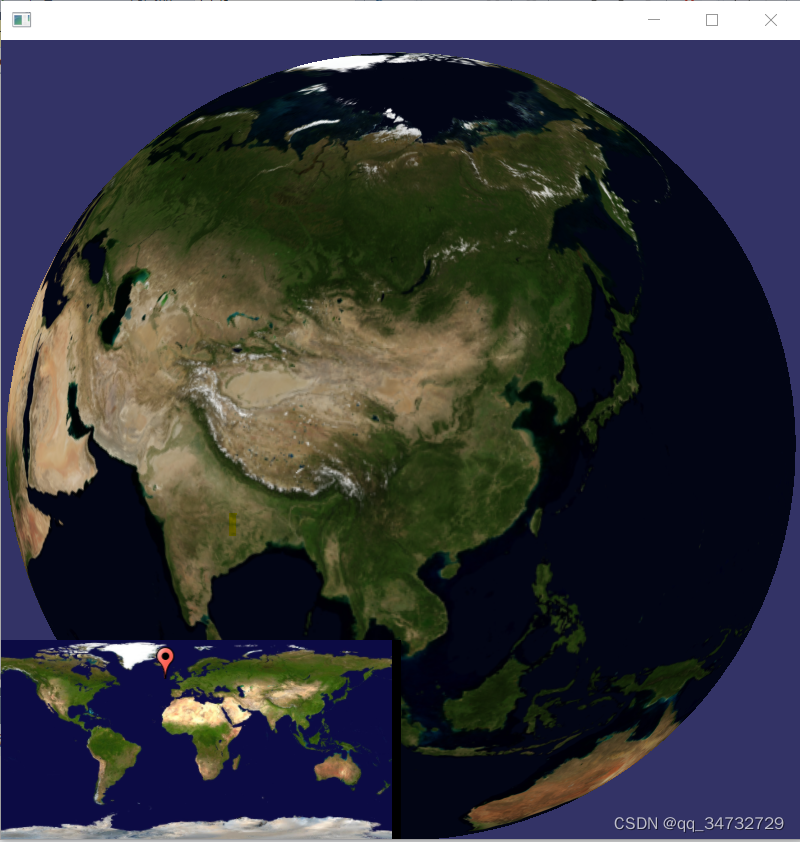
本节分析osgearth_minimap示例。在示例中,拖动三维地图,二维地图上的label标签会移动。二维地图支持拖动和缩放。
代码的目的是:让标签始终跟随三维视点的坐标进行更新。但是,运行过程中,感觉label标签的位置有时候会不对。因为当三维地球放大到中国地图内时,理论来讲label应该定位在中国区域内,但是并没有。目前还没有梳理清楚坐标转换的关系。
在加载三维地图时,采用的读取earth文件方式。而二维地图加载时,更改earth文件的 type=projected,直接读取tif文件。多次尝试直接读取earth文件方式创建二维地图,一直没有成功。如果哪位大佬恰好知道如何操作,烦请告知一下,不胜感激。
earth示例文件如下:
<!-- ----------三维地图的earth文件------------------ -->
<map name="Globe" type="geocentric" version = "2">
	<!--此为全球影像图-->
	<image name="GlobeImage" driver="gdal">
		<url>./globe/globel.tif</url>
	</image>
</map>


<!-- ----------二维地图的earth文件------------------ -->
<map name="Globe" type="projected" version = "2">
	<!--此为全球影像图-->
	<image name="GlobeImage" driver="gdal">
		<url>./globe/globel.tif</url>
	</image>
</map>
执行效果
左下角有二维图,二维图上有一个label,当转动地球时,二维地图的label会移动位置。二维地图可以缩放移动。正常运行情况如下:
当把地图放大,并且定位到局部区域时,会出现矩形框定位。

代码分析
#include <osg/Notify>
#include <osgViewer/Viewer>
#include <osgEarthUtil/EarthManipulator>
#include <osgEarthUtil/ExampleResources>
#include <osgEarthAnnotation/PlaceNode>
#include <osgEarthAnnotation/FeatureNode>
#include <osgViewer/CompositeViewer>
#include <osgEarthDrivers/gdal/GDALOptions>
#include <osgEarth/ImageLayer>

#define LC "[viewer] "

using namespace osgEarth;
using namespace osgEarth::Util;
using namespace osgEarth::Annotation;
using namespace osgEarth::Drivers;


/**
 * Makes a simple projected MapNode that contains a basemap of the world
 */
// 通过直接读取tif文件的方式,创建二维地图
MapNode* makeMiniMapNode( ) {
    MapOptions mapOpt;
    mapOpt.coordSysType() = MapOptions::CSTYPE_PROJECTED;  // 二维地图时,此处需要设置为投影形式
    mapOpt.profile() = ProfileOptions("plate-carre");// 二维图属性
    Map* map = new Map( mapOpt );

    GDALOptions basemapOpt;
    basemapOpt.url() = "../data/world.tif";
    map->addLayer( new ImageLayer( ImageLayerOptions("basemap", basemapOpt) ) );//"basemap" 自定义即可

    // That's it, the map is ready; now create a MapNode to render the Map:
    MapNodeOptions mapNodeOptions;
    mapNodeOptions.enableLighting() = false;

    return new MapNode( map, mapNodeOptions );
}

// 绘制小地图
// 当移动地球时,如果地球整个都在主视图区可见,则二维地图显示完整。
// 当放大地球时,仅地球的部分区域在主视图区域,则二维地图会出现红色矩形,且随着主窗口显示的地区区域进行标绘。
osg::Node* drawBounds(MapNode* mapNode, osgEarth::GeoExtent& bounds)
{
	// 当整个地球都呈献在主窗口时,执行if分支
    if (bounds.crossesAntimeridian())
    {
		// 当转动地球,在南北极拖动时,程序会运行此分支。
        GeoExtent first, second;
        bounds.splitAcrossAntimeridian(first, second);
        osg::Group* group = new osg::Group;
        group->addChild( drawBounds( mapNode, first ) );
        group->addChild( drawBounds( mapNode, second) );
        return group;
    }
    else
    {
		// 绘制矩形的坐标,定位
        osgEarth::Symbology::LineString* geom = new osgEarth::Symbology::LineString();
        geom->push_back(osg::Vec3d(bounds.xMin(), bounds.yMin(), 0));
        geom->push_back(osg::Vec3d(bounds.xMax(), bounds.yMin(), 0));
        geom->push_back(osg::Vec3d(bounds.xMax(), bounds.yMax(), 0));
        geom->push_back(osg::Vec3d(bounds.xMin(), bounds.yMax(), 0));
        geom->push_back(osg::Vec3d(bounds.xMin(), bounds.yMin(), 0));
		// 通过geom和坐标系,创建feature
        osgEarth::Features::Feature* feature = new osgEarth::Features::Feature(geom, osgEarth::SpatialReference::create("wgs84"));
        Style style;
        style.getOrCreateSymbol<LineSymbol>()->stroke()->color() = Color::Yellow;
		style.getOrCreateSymbol<LineSymbol>()->stroke()->width() = 3;
		style.getOrCreateSymbol<PolygonSymbol>()->fill() = Color::Red;
        feature->style() = style;
        FeatureNode* featureNode = new FeatureNode(feature);
        featureNode->setMapNode(mapNode);
		// 关闭深度测试,让此多边形一直浮在地图之上
        featureNode->getOrCreateStateSet()->setMode(GL_DEPTH_TEST, osg::StateAttribute::OFF);
        return featureNode;
    }
}

// 轴对齐的地理空间范围。与空间参照的坐标系对齐的边界框。
// 传入主视图view
osgEarth::GeoExtent getExtent(osgViewer::View* view)
{
    // Get the corners of all points on the view frustum.  Mostly modified from osgthirdpersonview
	// 获取视图平截头体上所有点的角点。大部分是从osgthirdpersview修改的。
	// 投影矩阵
    osg::Matrixd proj = view->getCamera()->getProjectionMatrix();
	// 视口矩阵
    osg::Matrixd mv = view->getCamera()->getViewMatrix();
	// 视口矩阵的逆矩阵
    osg::Matrixd invmv = osg::Matrixd::inverse( mv );

	// 以下计算,是为了获取拉进状态时,4个角点的位置,和拉远状态时,4个角点的位置
    double nearPlane = proj(3,2) / (proj(2,2)-1.0);
    double farPlane = proj(3,2) / (1.0+proj(2,2));

    // Get the sides of the near plane.
    double nLeft = nearPlane * (proj(2,0)-1.0) / proj(0,0);
    double nRight = nearPlane * (1.0+proj(2,0)) / proj(0,0);
    double nTop = nearPlane * (1.0+proj(2,1)) / proj(1,1);
    double nBottom = nearPlane * (proj(2,1)-1.0) / proj(1,1);

    // Get the sides of the far plane.
    double fLeft = farPlane * (proj(2,0)-1.0) / proj(0,0);
    double fRight = farPlane * (1.0+proj(2,0)) / proj(0,0);
    double fTop = farPlane * (1.0+proj(2,1)) / proj(1,1);
    double fBottom = farPlane * (proj(2,1)-1.0) / proj(1,1);

    double dist = farPlane - nearPlane;

    std::vector< osg::Vec3d > verts;
    verts.reserve(9);


    // Include origin?
    //verts.push_back(osg::Vec3d(0., 0., 0. ));
    verts.push_back(osg::Vec3d( nLeft, nBottom, -nearPlane ));
    verts.push_back(osg::Vec3d( nRight, nBottom, -nearPlane ));
    verts.push_back(osg::Vec3d( nRight, nTop, -nearPlane ));
    verts.push_back(osg::Vec3d( nLeft, nTop, -nearPlane ));
    verts.push_back(osg::Vec3d( fLeft, fBottom, -farPlane ));
    verts.push_back(osg::Vec3d( fRight, fBottom, -farPlane ));
    verts.push_back(osg::Vec3d( fRight, fTop, -farPlane ));
    verts.push_back(osg::Vec3d( fLeft, fTop, -farPlane ));

	// 设置空间参考坐标系 WGS84坐标系
    const osgEarth::SpatialReference* srs = osgEarth::SpatialReference::create("epsg:4326");

    // Compute the bounding sphere of the frustum.计算平截头体的边界球。
	// 声明包围球
    osg::BoundingSphered bs;
    for (unsigned int i = 0; i < verts.size(); i++)
    {
        osg::Vec3d world = verts[i] * invmv;
		// 拓展这个包围球,使其能够容纳指定的顶点。
        bs.expandBy( world );
    }

    // Get the center of the bounding sphere
	// 根据坐标系和包围球,获取到中心点
    osgEarth::GeoPoint center;
    center.fromWorld(srs, bs.center());

    double radiusDegrees = bs.radius() /= 111000.0;
    double minLon = center.x() - radiusDegrees;
    double minLat = osg::clampAbove(center.y() - radiusDegrees, -90.0);
    double maxLon = center.x() + radiusDegrees;
    double maxLat = osg::clampBelow(center.y() + radiusDegrees, 90.0);

	// 最终根据坐标系、经纬度范围,创建extent
    osgEarth::GeoExtent extent(srs, minLon, minLat, maxLon, maxLat);

    return extent;
}

int
main(int argc, char** argv)
{
    osg::ArgumentParser arguments(&argc,argv);

    //Setup a CompositeViewer,
	// 声明 多视景器类
    osgViewer::CompositeViewer viewer(arguments);

    //Setup our main view that will show the loaded earth file.
	// 声明主视景器,三维地球
    osgViewer::View* mainView = new osgViewer::View();
	// 设置 透视图的近远率
    mainView->getCamera()->setNearFarRatio(0.00002);
	// 添加操作器
    mainView->setCameraManipulator( new EarthManipulator() );
	// 官方已经弃置setUpViewInWindow方法,建议采用 view.apply(new osgViewer::SingleWindow(x,y,width,screenNum))方法,设置窗口
	// 但是全局搜索,并未发现osgViewer::SingleWindow 此方法的声明和实现
    mainView->setUpViewInWindow( 50, 50, 800, 800 );
	// 主视景器,显示三维地球,添加到多视景器对象
    viewer.addView( mainView );

    //Setup a MiniMap View that will be embedded in the main view
	// 设置MiniMap视图,嵌入主视图
    int miniMapWidth = 400;
    int miniMapHeight = 200;
    osgViewer::View* miniMapView = new osgViewer::View();// 左下角小地图
    miniMapView->getCamera()->setNearFarRatio(0.00002);
    miniMapView->getCamera()->setViewport( 0, 0, miniMapWidth, miniMapHeight);  // 设置视景器大小
    miniMapView->setCameraManipulator( new EarthManipulator() );    // 添加操作器
    miniMapView->getCamera()->setClearColor( osg::Vec4(0,0,0,0));
	// 设置适用于 该窗口尺寸的投影透视矩阵策略:
	// FIXED:保持投影矩阵固定,无论窗口大小如何。
	// HORIZONTAL:调整窗口大小时的水平视野。
	// VERTICAL:调整窗口大小时的垂直视野。
    miniMapView->getCamera()->setProjectionResizePolicy( osg::Camera::FIXED );
	// 透视矩阵参数设置
    miniMapView->getCamera()->setProjectionMatrixAsPerspective(30.0, double(miniMapWidth) / double(miniMapHeight), 1.0, 1000.0);
    //Share a graphics context with the main view
	// 将小地图绘制在主场景的绘图设备上下文中
    miniMapView->getCamera()->setGraphicsContext( mainView->getCamera()->getGraphicsContext());
	// 添加到多视景器对象
    viewer.addView( miniMapView );

    // load an earth file, and support all or our example command-line options
    // and earth file <external> tags
    osg::Node* node = MapNodeHelper().load( arguments, &viewer );
    if ( node )
    {
		// 三维地图通过earth文件读取,此句话多余了。
        MapNode* mapNode = MapNode::findMapNode(node);

        //Set the main view's scene data to the loaded earth file
        mainView->setSceneData( node );

        //Setup a group to hold the contents of the MiniMap
        osg::Group* miniMapGroup = new osg::Group;

		// 创建二维地图
        MapNode* miniMapNode = makeMiniMapNode();
        miniMapGroup->addChild( miniMapNode );

        //Get the main MapNode so we can do transformations between it and our minimap
		// 三维地图通过earth文件读取
        MapNode* mainMapNode = MapNode::findMapNode( node );

        //Set the scene data for the minimap
		// 设置小地图场景地图
        miniMapView->setSceneData( miniMapGroup );

        //Add a marker we can move around with the main view's eye point
		// 在小地图上添加标记,跟随主视图的视点移动
        Style markerStyle;
        markerStyle.getOrCreate<IconSymbol>()->url()->setLiteral( "../data/placemark32.png" );
        PlaceNode* eyeMarker = new PlaceNode("视点", markerStyle);
		// 设置初始位置
        eyeMarker->setPosition(GeoPoint(miniMapNode->getMapSRS(), 0, 0));
		// 添加到节点组管理
        miniMapGroup->addChild( eyeMarker );
		// 设置渲染细节模式
        miniMapGroup->getOrCreateStateSet()->setRenderBinDetails(100, "RenderBin");

        osg::Node* bounds = 0;

        while (!viewer.done())
        {
            //Reset the viewport so that the camera's viewport is static and doesn't resize with window resizes
			// 随窗口移动,小地图保持相对位置不变
            miniMapView->getCamera()->setViewport( 0, 0, miniMapWidth, miniMapHeight);

            //Get the eye point of the main view
			// 获取视点信息
            osg::Vec3d eye, up, center;
            mainView->getCamera()->getViewMatrixAsLookAt( eye, center, up );

            //Turn the eye into a geopoint and transform it to the minimap's SRS
            GeoPoint eyeGeo;
			// 获取主视图的点,初始化eyeGeo
            eyeGeo.fromWorld( mainMapNode->getMapSRS(), eye );
			// std::cout << "三维状态坐标:" << eyeGeo.x() << ","<< eyeGeo.y() << "," << eyeGeo.z() << std::endl;
			// 转换到地图中,更改eyeGeo
            eyeGeo.transform( miniMapNode->getMapSRS());
			// std::cout << "二维状态坐标:" << eyeGeo.x() << "," << eyeGeo.y() << "," << eyeGeo.z() << std::endl;

            //We want the marker to be positioned at elevation 0, so zero out any elevation in the eye point
            // 高度值改为0
			eyeGeo.z() = 0;

            //Set the position of the marker
			// 给标签设置坐标
            eyeMarker->setPosition( eyeGeo );

            if (bounds)
            {
                miniMapGroup->removeChild( bounds );
            }
			// 轴对齐的地理空间范围。与空间参照的坐标系对齐的边界框。
            GeoExtent extent = getExtent( mainView );
			// 根据获取到的边框范围,设置地图的包围球范围
            bounds = drawBounds( miniMapNode, extent );
            miniMapGroup->addChild( bounds );

            viewer.frame();
        }
    }
    else
    {
        OE_NOTICE
            << "\nUsage: " << argv[0] << " file.earth" << std::endl
            << MapNodeHelper().usage() << std::endl;
    }
    return 0;
}


 61
61

 被折叠的 条评论
为什么被折叠?
被折叠的 条评论
为什么被折叠?
 到【灌水乐园】发言


