


前言
osgearth_featurefilter 特征过滤器示例,通过注册自定义属性过滤器,加载earth文件时,更改特征内容。加载tests目录下的earth文件。
执行命令
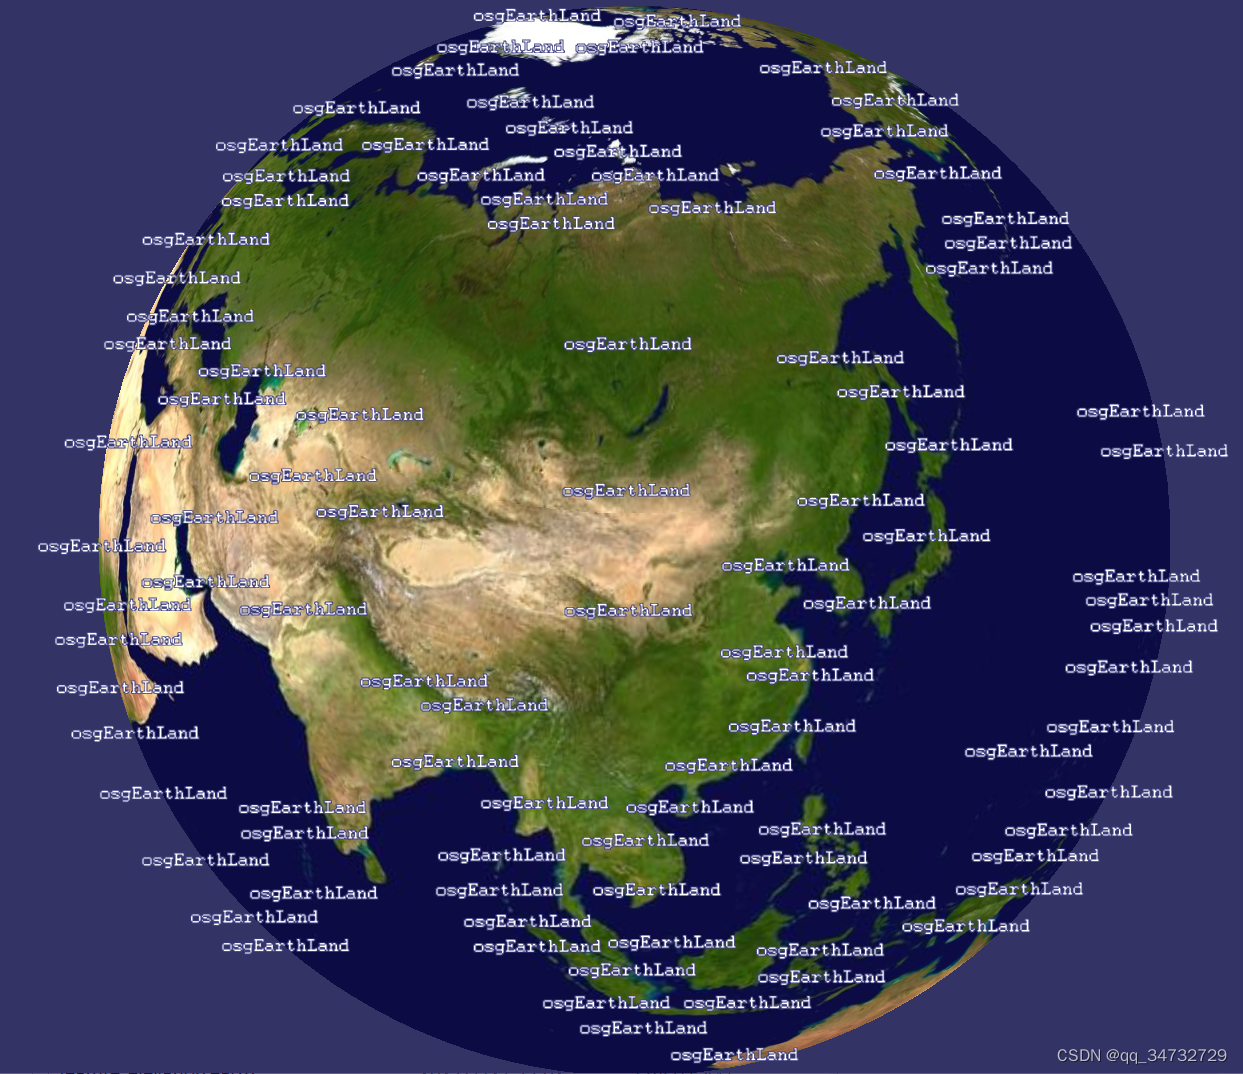
osgearth_featurefilterd.exe ..\tests\feature_custom_filters.earth执行效果
可以看得出来,加载的shp文件,城市名称被更改了。也就是通过自定义的过滤器更改的。
代码分析
本节盲点且分析不透彻的,就是earth文件的关于特征部分,如果修改特征。采用的标签<filters>,内部属性键和值,与自定义特征过滤器类相同。
<!--
osgEarth Sample
Run this example with:

  osgearth_featurefilter feature_custom_features.earth

Shows how you can use a custom FeatureFilter, even one that is defined in an Earth File!
-->

<map name="Feature Custom Filter Demo" type="geocentric" version="2">

    <image name="world" driver="gdal">
        <url>../data/world.tif</url>
    </image>

    <model name="cities" driver="feature_geom">

        <features name="cities" driver="ogr">
            <url>../data/world.shp</url>

			<!--Define a ChangeAttributeFilter, which is defined in the osgearth_featurefilter example.  This will change the cntry_name of all countries to osgEarthLand.-->
            <filters>
                <change_attribute key="cntry_name" value="osgEarthLand"/>
            </filters>
        </features>

        <styles>
            <style type="text/css">
                cities {
                   text-provider:  annotation;
                   text-content:   [cntry_name];
                   text-priority:  [pop_cntry];
                   text-halo:      #3f3f7f;
                   text-align:     center_center;
                   text-declutter: true;
                }
            </style>
        </styles>

    </model>

    <options lighting="false"/>

    <screen_space_layout>
        <out_animation_time>  0.0  </out_animation_time>
        <in_animation_time>   0.25 </in_animation_time>
        <min_animation_scale> 0.45 </min_animation_scale>
        <min_animation_alpha> 0.35 </min_animation_alpha>
        <sort_by_priority>    true </sort_by_priority>
    </screen_space_layout>

</map>
/**
 * Simple Feature Filter that changes the value of a Feature data sources attribute
 */
// 更改要素数据源属性值的简单要素过滤器。
class ChangeAttributeFilter : public FeatureFilter
{
public:
    ChangeAttributeFilter(const Config& conf)
    {
        if (conf.key() == "change_attribute")
        {
            conf.get("key", _key);
            conf.get("value", _value);
        }
    }

    virtual Config getConfig() const
    {
        // 此处设置的名称,与earth文件中的名称,需要保持一致
        Config config("change_attribute");
        config.set("key", _key);
        config.set("value", _value);
        return config;
    }


    virtual FilterContext push( FeatureList& input, FilterContext& context )
    {
        for (FeatureList::iterator itr = input.begin(); itr != input.end(); itr++)
        {
            //Change the value of the attribute
            if (_key.isSet() && _value.isSet())
            {
                itr->get()->set(*_key, std::string(*_value));
            }
        }
        return context;
    }

    optional< std::string > _key;
    optional< std::string > _value;
};

//Register our custom FeatureFilter with osgEarth
//The first
// 第一步就是要将自定义的特征过滤器注册到osgEarth中
OSGEARTH_REGISTER_SIMPLE_FEATUREFILTER(change_attribute, ChangeAttributeFilter);

int
main(int argc, char** argv)
{
    //Run this example with the feature_custom_filters.earth file in the tests directory for a simple example
	// 运行的时候,不是输入一般的earth文件,而是需要输入 feature_custom_filters.earth文件
    osg::ArgumentParser arguments(&argc,argv);

    // create a viewer:
    osgViewer::Viewer viewer(arguments);

    //Tell the database pager to not modify the unref settings
    viewer.getDatabasePager()->setUnrefImageDataAfterApplyPolicy( false, false );

    // install our default manipulator (do this before calling load)
    viewer.setCameraManipulator( new EarthManipulator() );

    // load an earth file, and support all or our example command-line options
    // and earth file <external> tags
    osg::Node* node = MapNodeHelper().load( arguments, &viewer );
    if ( node )
    {
        viewer.setSceneData( node );

        // configure the near/far so we don't clip things that are up close
        viewer.getCamera()->setNearFarRatio(0.00002);

        viewer.getCamera()->setSmallFeatureCullingPixelSize(-1.0f);

        viewer.run();
    }
    else
    {
        OE_NOTICE
            << "\nUsage: " << argv[0] << " file.earth" << std::endl
            << MapNodeHelper().usage() << std::endl;
    }
    return 0;
}


 820
820


 被折叠的 条评论
为什么被折叠?
被折叠的 条评论
为什么被折叠?
 到【灌水乐园】发言


