


1、问题背景
在图像调试过程,当发现一个问题时,很多时候都要通过 dump raw图像来分析,如果raw图像上有,那就排除了是 ISP的处理导致。
下一步就是排查 sensor 或者镜头,这样可以有效的帮我们定位问题所在。
但遇到过有些 raw, 用工具打不开或者出图不对的情况,那可能是因为 raw 的存储格式不同导致,本文主要对 raw 的格式做下介绍说明。
2、问题分析
a. 什么是 raw
raw 数据是 sensor 输出的原始数据,常用的一般有raw8, raw10, raw12等,分别表示一个像素点有 8bit、10bit、12bit 数据。
是 sensor 将光信号转化为电信号时的电平高低的原始记录,单纯地没有进行任何处理的图像数据,即表现的是 sensor 和镜头本征特性的数据。
raw 数据在输出的时候是有一定顺序的,主要有四种: GRBG、RGGB、BGGR、GBRG,如下图为BGGR格式:

b. raw 分哪几种格式,有什么区别 ?
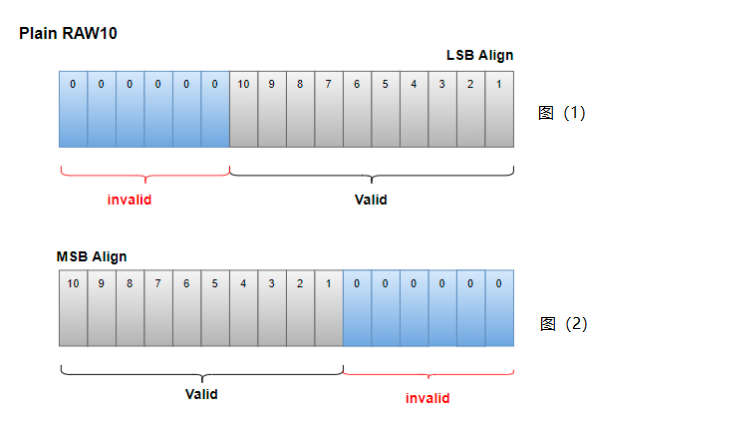
raw 一般分为 plain raw 和 mipi raw,主要是存储方式上的区别,如下图所示是 Plain raw10 的示意图。
10bit的raw,单个像素也就是10bit,需要两个字节(16bit)来存储。
那就会空出 6位用不到,因为有空余,这里就涉及到一个高位/低位对齐的问题,也就是存储数据时,右移6位低位对齐(如下图1所示),
左移6位高位对齐(如下图2所示)。这个主要看平台厂商对数据处理有什么要求,我司用的是高位对齐的数据,所以读取时,要有相应的移位操作才行。
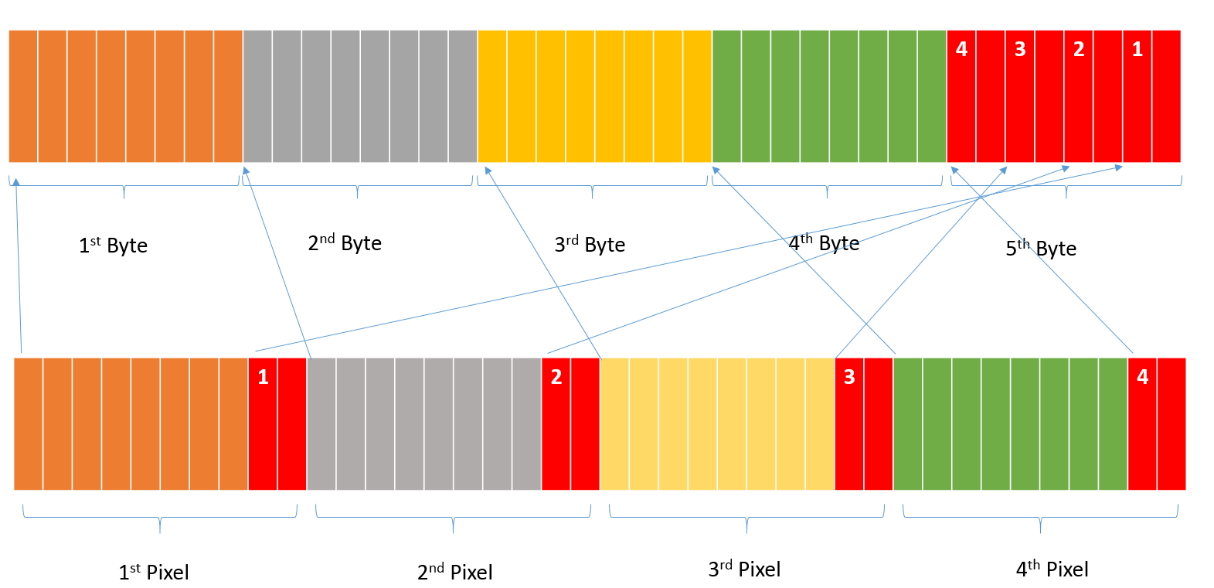
如下图所示是 mipi raw10 的示意图,以大端存储方式为例,它是把4个像素放到5个字节(40bit)中,组成一个包去存储。
前4字节依次存放 raw10图像的前4个像素的后8位,4个像素的前2位依次存放在包的第5个字节中。
所以从存储方式来看,mipi raw 的存储方式是要比 plain raw 更节省内存。
c. 怎么正确查看 raw ?
一般raw图工具打开都会要求配置一下 raw 图尺寸、位宽、bayer格式、MSB/LSB,
但一般工具支持 plain raw 打开的居多,还有些并不支持MSB和LSB的选择,所以需要我们对raw 做一下处理。
如下是mipi raw 转 plain raw 、plain raw10 MSB 转LSB 的相关 python 代码,
分析代码的处理过程,也会加深我们关于raw图像的理解,
如下代码中使用的raw图像,可以在此链接获取:
https://pan.baidu.com/s/1H-s0YDcJCmeMxVKTTa3N6g?pwd=bxm9
提取码:bxm9
# plain raw10 的读取和 MSB转LSB的处理

import numpy as np

def read_plained_file(file_path_name,height,width,shift_bits):
    frame = np.fromfile(file_path_name, dtype="uint16")
    frame=frame[0:height*width]
    frame.shape = [height, width]

    # MSB ----> LSB,  LSB存低位数据,此时是高位对齐的,则右移代表向低位移了6位,数值是减小的状态。
    frame=np.right_shift(frame, shift_bits)
    return frame

if __name__ == "__main__":
    file_name = "ov13b10_shading_4208X3120_MSB.raw"
    image = read_plained_file(file_name, 3120, 4208, 6)
    image = image / 1023

    # 将读取的 image 数据另存为 raw 数据
    output_file_name = "output_image.raw"

    # 将图像数据映射到 16 位无符号整数范围
    image_mapped = (image * 1023).astype('uint16')
    image_mapped.tofile(output_file_name)
    print(f"Image data has been saved to {output_file_name}")
# mipi raw10 转 plain raw10
import numpy as np
import math
def read_mipi10_file(file_path_name,height,width):
# 单行长度的补齐
new_width = int(math.floor((width + 3) / 4) * 4) #对四字节补齐
packet_num_L = int(new_width / 4)
width_byte_num = packet_num_L * 5 #单行byte长度
width_byte_num = int(math.floor((width_byte_num + 7) / 8) * 8)#单行做8个字节补齐
image_bytes=width_byte_num*height
frame = np.fromfile(file_path_name, count=image_bytes,dtype ="uint8")
print("b shape",frame.shape)
print('%#x'%frame[0])
frame.shape = [height, width_byte_num] #按字节整理的图像矩阵
one_byte = frame[:,0:image_bytes:5]
two_byte = frame[:,1:image_bytes:5]
three_byte = frame[:,2:image_bytes:5]
four_byte = frame[:,3:image_bytes:5]
five_byte = frame[:,4:image_bytes:5]
#数据转换防止溢出
one_byte = one_byte.astype('uint16')
two_byte = two_byte.astype('uint16')
three_byte = three_byte.astype('uint16')
four_byte = four_byte.astype('uint16')
five_byte = five_byte.astype('uint16')
#用矩阵的方法进行像素的拼接
one_byte = np.left_shift(one_byte, 2) + np.bitwise_and((five_byte), 3)
two_byte = np.left_shift(two_byte, 2) + np.right_shift(np.bitwise_and((five_byte), 12), 2)
three_byte = np.left_shift(three_byte, 2) + np.right_shift(np.bitwise_and((five_byte), 48), 4)
four_byte = np.left_shift(four_byte, 2) + np.right_shift(np.bitwise_and((five_byte), 192), 6)
#重组帧
frame_pixels=np.zeros(shape=(height,new_width))
frame_pixels[:, 0: new_width:4]=one_byte[:, 0: packet_num_L]
frame_pixels[:, 1: new_width:4]=two_byte[:, 0: packet_num_L]
frame_pixels[:, 2: new_width:4]=three_byte[:, 0: packet_num_L]
frame_pixels[:, 3: new_width:4]=four_byte[:, 0: packet_num_L]
#裁剪无用的数据,这里表示的是0-2559列,包含完整的数据了。
frame_out=frame_pixels[:,0:width]
return frame_out
if __name__ == "__main__":
file_name="imx335_2560x1440_GRBG_mipi.raw"
image=read_mipi10_file(file_name,1440, 2560)
image=image/1023
# 将读取的 image 数据另存为 raw 数据
output2_file_name = "output2_image.raw"
# 将图像数据映射到 16 位无符号整数范围
image_mapped = (image * 1023).astype('uint16')
image_mapped.tofile(output2_file_name)
print(f"Image data has been saved to {output2_file_name}")参考资料:
大话成像-数字成像算法基础课程


 2311
2311

 被折叠的 条评论
为什么被折叠?
被折叠的 条评论
为什么被折叠?
 到【灌水乐园】发言


