


RT-Thread
仅作为自己人生路上的一个笔记和回忆。
前言:
关于量化:把模型训练中的float类型转变为int 以降低模型大小,不影响准确度
关于神经网络权重文件大小:受模型的规模,参数量(float,int8),可以增强计算速度但是权重大小和推理速度不挂钩。
关于模型准确度不理想:修改模型、修改深度。
关于图像增强代码:提高图像泛化、通俗来说利用算法自己给自己增加数据集大小
目录
2.4使用 RT-AK 自动下载(进入到 RT-AK/rt_ai_tools 路径)
一.环境搭建
- 1.1环境需求
Pycharm/VScode、jupyter notebook、Tensorflow、RT-Thread studio、opencv、Anconda
- 1.2环境配置
Pycharm记得选择Anconda环境下的python
RTT studio软件包和依赖包使用最新得才不会报错,出了问题更新以后在项目更新软件包即可。
Opencv安装命令不是cv2,而是opencv-python
1.3Jupyter notebook记录:
在Anconda中安装Tensorflow得环境下进行内核添加
pip3 install --upgrade pip
pip3 install jupyter
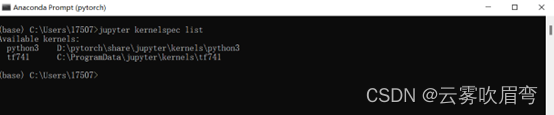
然后回到base环境,使用jupyter kernelspec list查看jupyter kernel列表。

然后base环境下使用python -m ipykernel install --name kernelname命令添加kernel
黄色部分自行改成自己喜欢的名字 这样notebook就OK了。
在base环境下输入jupyter kernelspec list 可以看见自己刚才命名的内核
1.4内核的使用:
![]()
先打开ipynb文件的目录下,复制路径,在Anconda中cd到该路径

然后会自动弹出浏览器点击一下,然后可以看到页面
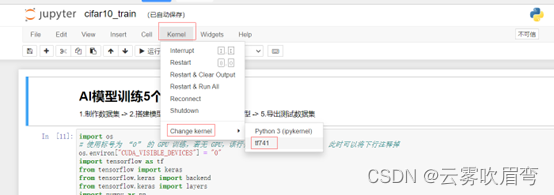
最后选择的是自己安装内核时起的名字,我起的是tf741
然后一个代码框一个代码框运行就行。
二.环境部署
2.0 Pycharm环境部署和RT-AK一键部署AI模型
2.1Pycharm部分

右下角点击选择解释器,选择Conda环境,然后选择有Tensorflow的python.exe
如果运行状态下有任何安装包没有,可以手动安装。安装不上的安装包,需要在Anconda进入该环境使用pip install 安装包名称 或者 conda install 安装包名称进行安装。
例如:![]()
![]()
直接pip install terminaltables就行。但是CV2的安装包是:pip install opencv-python
2.2RT-AK部分
RT-AK的框架:
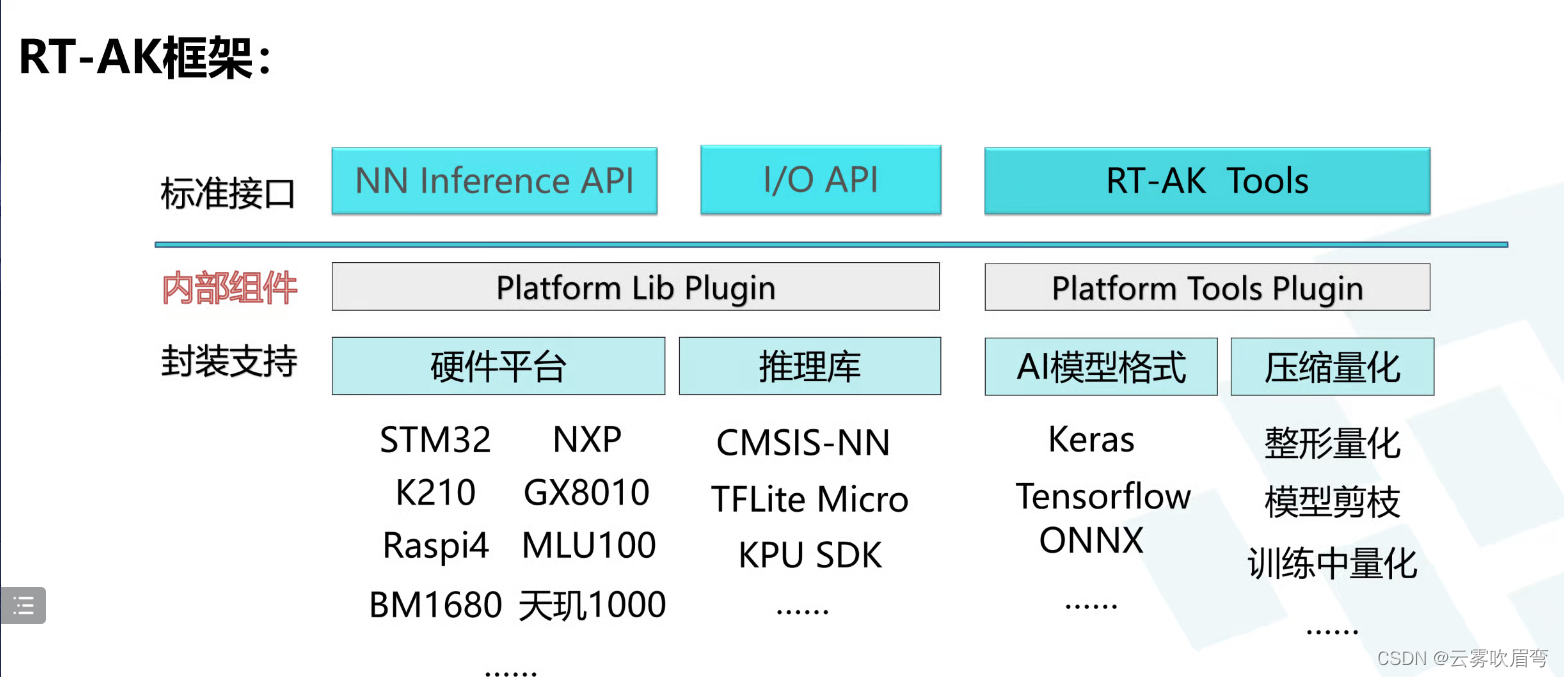
2.3软件需求:
RTT工程、.h5模型或者.tflite模型、X-CUBE-AI、RT-AK、git
2.4使用 RT-AK 自动下载(进入到 RT-AK/rt_ai_tools 路径)
python aitools.py \
--project=你的工程路径
--model=你的模型路径
--model_name=模型名字
--platform=stm32
--ext_tools=cube_ai路径(指向7.0的转换工具)
--clear --cube_ai=RT-AK-main\RT-AK\rt_ai_tools\platforms\plugin_stm32\X-CUBE-AI.7.0.0(指向7.0的运行库)
例如:
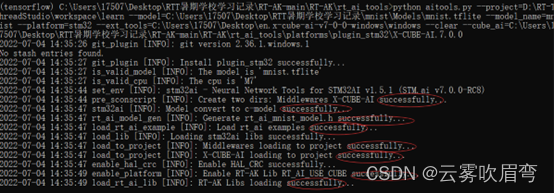
第一次部署可能会因为没有stm32工具报错,记得开翻墙,会自动下载。
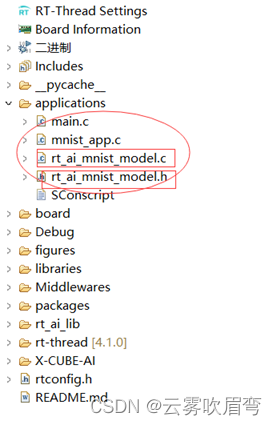
这时候打开RTT工程会发现,应用层已经部署ok了。
三.Mnist手写数字识别代码解析
#第一步引入各种需要的库
import os
os.environ["TF_CPP_MIN_LOG_LEVEL"] = "2"
os.environ["CUDA_VISIBLE_DEVICES"] = "0"
import cv2
import numpy as np
import tensorflow as tf
from tensorflow.keras import models, layers, datasets, utils
from pathlib import Path
import matplotlib.pyplot as plt
#这一步是为了显示自己tensorflow版本,显示出来就代表可以正常使用
print(f"The tensorflow version is : {tf.__version__}\n")
print(f"The numpy version is : {np.__version__}")
#声明训练模型产生的模型文件路径
model_path = Path("Models")
model_path.mkdir(exist_ok=True)
#声明数据集路径
data_path = Path("Datasets")
(x_train, y_train), (x_test, y_test) = datasets.mnist.load_data(data_path.resolve()/'train_data/mnist.npz') # resolve 变成绝对路径
print(f"x_train shape : {x_train.shape}")
print(f"y_train shape : {y_train.shape}")
#以灰色特想在pycharm里显示出来
plt.imshow(x_train[0], cmap='gray')
x_train, x_test = x_train / 255, x_test / 255
print(f"x_train shape : {x_train.shape}")
# 扩展一个维度,二维卷积需要用的输入数据是 NHWC,分别是number of batch, height, width, channels
x_train, x_test = tf.expand_dims(x_train, -1), tf.expand_dims(x_test, -1)
print(f"add dim x_train shape : {x_train.shape}")
tf.keras.backend.clear_session()
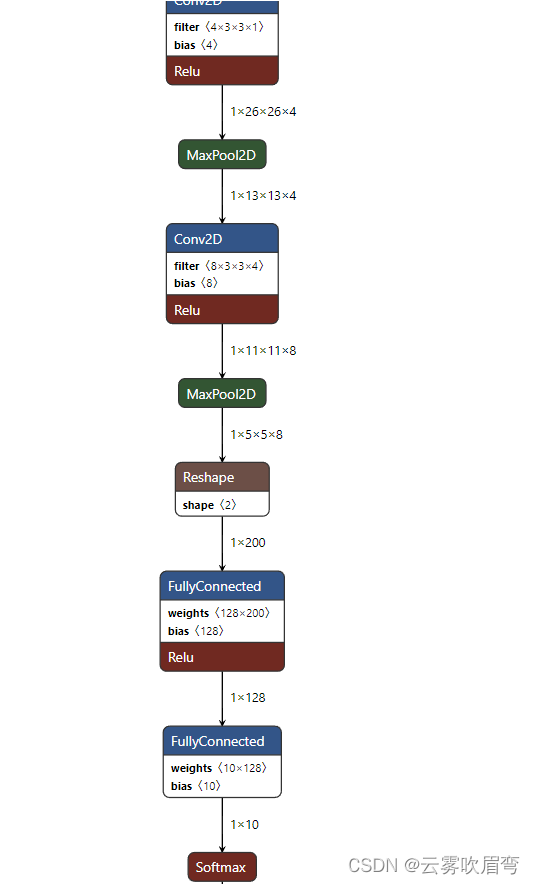
#下面是卷积层步骤,可以用Net软件看卷积之后的模型图解
model = models.Sequential()
# conv1
model.add(layers.Conv2D(input_shape=(28, 28, 1), filters=4,
kernel_size=(3, 3), activation='relu', name='conv1'))
model.add(layers.MaxPool2D(pool_size=(2,2), name='pool1'))
# conv2
model.add(layers.Conv2D(filters=8, kernel_size=(3, 3),
activation='relu', name='conv2'))
model.add(layers.MaxPool2D(pool_size=(2,2), name='pool2'))
# flattern
# model.add(layers.Dropout(rate=0.5, name='dropout'))
model.add(layers.Flatten(name='flatten'))
# FC1
model.add(layers.Dense(128, activation='relu', name='FC1'))
# FC2
model.add(layers.Dense(10, activation='softmax', name="FC2"))
model.summary()
#显示准确度,loss值,optimizer等
model.compile(optimizer='adam',
loss='sparse_categorical_crossentropy',
metrics=['accuracy',])
#模型训练10轮回,每一个轮回一次训练128张图片,可以根据自己显卡调整,要是OUT OF MEMORY 可以调小-batchsize
history = model.fit(x_train, y_train, batch_size=128, epochs=10)
history.history
print("Evaluate on test data")
results = model.evaluate(x_test, y_test, batch_size=32)
print("test loss, test acc:", results)
def plot_metric(history, metric):
train_metrics = history.history[metric]
epochs = range(1, len(train_metrics) + 1)
plt.plot(epochs, train_metrics, 'ro--')
# 相关属性
plt.title('Training ' + metric)
plt.xlabel('Epochs')
plt.ylabel(metric)
plt.legend(['train_' + metric])
plt.show()
plot_metric(history, 'loss')
plot_metric(history, 'accuracy')
for img in x_test[10:16]:
y_pred = model.predict(tf.expand_dims(img, axis=0)) # 模型推理
p = np.argmax(y_pred) # 获取概率最高的元素的索引
plt.imshow(img, cmap="gray")
plt.show()
print(f"model inference ouput:\n {y_pred}")
print(f"predict : {p}")
keras_file = model_path / 'mnist.h5'
print(keras_file)
model.save(keras_file, save_format="h5")
model_restore = models.load_model(keras_file)
# 验证模型,没有任何返回则模型加载成功
np.testing.assert_allclose(model.predict(x_test), model_restore.predict(x_test))
model_restore.summary()
for test_image in x_test[:5]:
y_pred = model_restore.predict(tf.expand_dims(test_image, axis=0))
p = np.argmax(y_pred) # 获取概率最高的元素的索引
plt.imshow(test_image, cmap="gray")
plt.show()
print(f"model inference ouput:\n {y_pred}")
print(f"predict : {p}")
model = tf.keras.models.load_model(keras_file)
converter = tf.lite.TFLiteConverter.from_keras_model(model)
tflite_model = converter.convert()
#保存训练文件路径和名称
tflite_file = model_path/ "mnist.tflite"
tflite_file.write_bytes(tflite_model)

可以看到h5文件365kb和tflite文件110kb,量化之后可以缩减很多,基本不影响准确度。
使用net软件打开训练文件可以看见卷积等信息。
四.口罩规范佩戴代码心得和详解
#和之前一样,引入自己需要的库
import os
# 当os.environ["TF_CPP_MIN_LOG_LEVEL"]=0的时候,输出信息:INFO + WARNING + ERROR + FATAL
# 当os.environ["TF_CPP_MIN_LOG_LEVEL"]=1的时候,输出信息:WARNING + ERROR + FATAL
# 当os.environ["TF_CPP_MIN_LOG_LEVEL"]=2的时候,输出信息:ERROR + FATAL
# 当os.environ["TF_CPP_MIN_LOG_LEVEL"]=3的时候,输出信息:FATAL
os.environ["TF_MIN_CPP_LEVEL_LOG"] = "2"
#导入opencv
import cv2
# 导入time,用来打时间戳
import time
# 导入random,生成随机数
import random
# 导入numpy,数值计算库
import numpy as np
# 导入 tqdm,用于显示进度条
from tqdm import tqdm
# 导入 matplotlib,画图库
from matplotlib import pyplot as plt
# 导入 pathlib,文件路径库
from pathlib import Path
import tensorflow as tf
# 导入keras.utils,一些绘制 Keras 模型的实用功能
from tensorflow.keras.utils import plot_model
# 导入kears.models,加载模型的库
from tensorflow.keras.models import load_model
# from tensorflow.keras.datasets import cifar10
# 导入图像增强
from tensorflow.keras.preprocessing.image import ImageDataGenerator
# 导入时序容器
from tensorflow.keras.models import Sequential
# 导入一些必要的算子
from tensorflow.keras.layers import Dense, Dropout, Activation, Flatten
from tensorflow.keras.layers import Conv2D, AveragePooling2D
tf.__version__
DATADIR = '../Dataset'
# 数据分类
CATEGORIES = ['mask', 'no mask','Nostand mask']
# 图像尺寸
IMG_SIZE = 64

#定义一个函数,目的是为了让图片和标签序号对应
def create_training_data():
    training_data = []
    for category in CATEGORIES:
        # print(category)
        path = os.path.join(DATADIR, category)
        class_num = CATEGORIES.index(category)  # get the classification  (0 or a 1). 0=C 1=O
        # print(class_num)
        for img in tqdm(os.listdir(path)):  # iterate over each image
            try:
                img_array = cv2.imread(os.path.join(path, img))  # convert to array
                # 强调!!!!cv2读取图像是BGR格式,这里还需要做一步处理
                img_array = cv2.cvtColor(img_array, cv2.COLOR_BGR2RGB)
                #送入AI图像变为RGB

                # resize

                new_array = cv2.resize(img_array, (IMG_SIZE, IMG_SIZE))  # resize to normalize data size
                #将图片像素变成自己想要的 即统一64*64像素  并不是裁剪而是缩放

                # 加入training_data队列
                training_data.append([new_array, class_num])  # 使每个图片和分类一一对应
            except Exception as e:  # in the interest in keeping the output clean...
                pass

    return training_data
training_data = create_training_data()
print(f"data numbers: {len(training_data)}")

# 一个列表中的元素打乱顺序
random.shuffle(training_data)
# 输出几个看看
for sample in training_data[:5]:
    print(sample[1], end=" ")

X = []
Y = []

# 输出标签和训练集
for features, label in training_data:
    X.append(features)
    Y.append(label)

# reshape
X = np.array(X).reshape(-1, IMG_SIZE, IMG_SIZE, 3)

# 归一化
#
# 每一个像素点都是0-255  归一化之后方便训练得收敛
X = X / 255.0
Y = np.array(Y)
X.shape


model = Sequential()
#开始卷积操作
model.add(Conv2D(filters=16, kernel_size=(3, 3), activation='relu', input_shape=X.shape[1:]))
model.add(AveragePooling2D())
model.add(Dropout(0.5))

model.add(Conv2D(filters=32, kernel_size=(3, 3), activation='relu'))
model.add(AveragePooling2D())
model.add(Dropout(0.5))

model.add(Conv2D(filters=64, kernel_size=(3, 3), activation='relu'))
model.add(AveragePooling2D())
model.add(Dropout(0.5))

model.add(Flatten())

model.add(Dense(units=256, activation='relu'))
model.add(Dropout(0.2))

model.add(Dense(units=128, activation='relu'))
#全连接层
model.add(Dense(units=3, activation = 'softmax'))

# 选择损失函数
# 选择优化器
# 精度评估选项
model.compile(loss='sparse_categorical_crossentropy',
              optimizer='adam',
              metrics=['accuracy'])

# print(X.shape[1:])

# model.summary()


history = model.fit(X, Y, batch_size=32, epochs=100, validation_split=0.1)

model.save('../Models/mask20220705.h5')
model = tf.keras.models.load_model("../Models/mask20220705.h5")
converter = tf.lite.TFLiteConverter.from_keras_model(model)

tflite_model = converter.convert()
open("../Models/mask20220705.tflite", "wb").write(tflite_model)
plt.plot(history.history['accuracy'])
plt.plot(history.history['val_accuracy'])
plt.title('model accuracy')
plt.ylabel('accuracy')
plt.xlabel('epoch')
plt.legend(['train', 'validation'], loc='upper left')
plt.show()
plt.plot(history.history['loss'])
plt.plot(history.history['val_loss'])
plt.title('model loss')
plt.ylabel('loss')
plt.xlabel('epoch')
plt.legend(['train', 'validation'], loc='upper left')
plt.show()
test_path = "../Images/test.jpg"#测试
image = cv2.imread(test_path)
image = cv2.resize(image, (64, 64))
image = cv2.cvtColor(image, cv2.COLOR_BGR2RGB)
image_bn = image.astype("float32") / 255.0
image = np.expand_dims(image, axis=0)
image_bn = np.expand_dims(image_bn, axis=0)
keras_file = '../Models/mask20220705.h5'
model = tf.keras.models.load_model(keras_file)
# model.summary()
# tf.autograph.set_verbosity(0)

start_time = time.time()
pred = model.predict(image_bn)
stop_time = time.time()

print(f"prediction: {pred}")
print('time: {:.3f}ms'.format((stop_time - start_time) * 1000))
print("model size: {:.2f} MB".format(os.path.getsize(keras_file)/1024/1024))
interpreter = tf.lite.Interpreter(model_content=tflite_model)
input_type = interpreter.get_input_details()[0]['dtype']
print('input: ', input_type)
output_type = interpreter.get_output_details()[0]['dtype']
print('output: ', output_type)
def representative_data_gen():
  for input_value in X[:100]:
    input_value = np.expand_dims(input_value, axis=0)
    input_value = input_value.astype(np.float32)
    yield [input_value]

converter = tf.lite.TFLiteConverter.from_keras_model(model)
converter.optimizations = [tf.lite.Optimize.DEFAULT]
converter.representative_dataset = representative_data_gen
# Ensure that if any ops can't be quantized, the converter throws an error

tflite_model = converter.convert()

tflite_file = Path("../Models/Tflites/mask_int_half.tflite")
tflite_file.write_bytes(tflite_model)
interpreter = tf.lite.Interpreter(model_path=str(tflite_file))
interpreter.allocate_tensors()

# Get input and output tensors.
input_details = interpreter.get_input_details()[0]
output_details = interpreter.get_output_details()[0]

interpreter.set_tensor(input_details['index'], image_bn)

start_time = time.time()
interpreter.invoke()
stop_time = time.time()

output_data = interpreter.get_tensor(output_details['index'])
print(f"prediction: {output_data}")
print('time: {:.3f}ms'.format((stop_time - start_time) * 1000))
print("model size: {:.2f} MB".format(os.path.getsize(tflite_file)/1024/1024))
print(X[:100].shape)
def representative_data_gen():
  for input_value in X[:100]:
    input_value = np.expand_dims(input_value, axis=0)
    input_value = input_value.astype(np.float32)
    yield [input_value]

converter = tf.lite.TFLiteConverter.from_keras_model(model)
converter.optimizations = [tf.lite.Optimize.DEFAULT]
converter.representative_dataset = representative_data_gen
# Ensure that if any ops can't be quantized, the converter throws an error
converter.target_spec.supported_ops = [tf.lite.OpsSet.TFLITE_BUILTINS_INT8]
# Set the input and output tensors to uint8 (APIs added in r2.3)
converter.inference_input_type = tf.uint8
converter.inference_output_type = tf.uint8

tflite_model = converter.convert()

tflite_file = Path("../Models/Tflites/mask_int.tflite")
tflite_file.write_bytes(tflite_model)
interpreter = tf.lite.Interpreter(model_content=tflite_model)
input_type = interpreter.get_input_details()[0]['dtype']
print('input: ', input_type)
output_type = interpreter.get_output_details()[0]['dtype']
print('output: ', output_type)
tflite_file = Path("../Models/Tflites/mask_int.tflite")
interpreter = tf.lite.Interpreter(model_path=str(tflite_file))
interpreter.allocate_tensors()

# Get input and output tensors.
input_details = interpreter.get_input_details()[0]
output_details = interpreter.get_output_details()[0]

interpreter.set_tensor(input_details['index'], image)

start_time = time.time()
interpreter.invoke()
stop_time = time.time()

output_data = interpreter.get_tensor(output_details['index'])
print(f"prediction: {output_data}")
print('time: {:.3f}ms'.format((stop_time - start_time) * 1000))
print("model size: {:.2f} MB".format(os.path.getsize(tflite_file)/1024/1024))
--------------------------ing


 353
353


 被折叠的 条评论
为什么被折叠?
被折叠的 条评论
为什么被折叠?
 到【灌水乐园】发言


