


送书活动:挑选1名粉丝同学哦 免费包邮送。
截止时间:2023/5/18号 19 : 00
参与底部评论区说说:请在评论中分享你的阅读收获。
前端工程化:基于Vue.js 3.0的设计与实践实战

页面浏览量(Page View,PV)和访客数(Unique Visitors,UV)
// index.vue
<template>
  <a-button @click="onClick">查询</a-button>
</template>

<script lang="ts">
import { Component, Vue } from 'vue-property-decorator'

@Component({})
export default class Page extends Vue {
  // PV 埋点
  mounted() {
    window.DATracker.track('page_id', {})
  }

  // 交互埋点
  onClick() {
    window.DATracker.track('event_id', {})
  }
}
</script>
针对页面交互埋点,可以统一封装一个 trackEvent 方法:
// utils/track.ts

/**
 * 日志上报
 * @param id 事件id
 * @param data 上报数据
 */
export const trackEvent = (id, data = {}) => {
  window.DATracker.track(id, data)
}
点击事件的处理相对比较简单,每次点击触发数据上报即可:
// src/directives/track/click.js
import { sendUBT } from "../../utils"

export default class Click {
  add(entry) {
    // console.log("entry", entry);
    const traceVal = entry.el.attributes["track-params"].value
    const traceKey = entry.el.attributes["trace-key"].value
    const { clickAction, detail } = JSON.parse(traceVal)
    const data = {
      action: clickAction,
      detail,
    }
    entry.el.addEventListener("click", function() {
      console.log("上报点击埋点", JSON.parse(traceVal))
      console.log("埋点key", traceKey)
      sendUBT(traceKey, data)
    })
  }
}v-track:click|exposurev-track:exposure
自动化的形式,去添加这些埋点呢?
SysLoginControllerSysLoginServiceimport org.springframework.context.annotation.Configuration;
import org.springframework.web.servlet.config.annotation.CorsRegistry;
import org.springframework.web.servlet.config.annotation.WebMvcConfigurer;
/**
* @author
*
* 跨域访问配置
*/
@Configuration
public class WebMvcConfig implements WebMvcConfigurer {
@Override
public void addCorsMappings(CorsRegistry registry) {
registry.addMapping("/**")
.allowedOrigins("*")
.allowCredentials(true)
.allowedMethods("GET", "POST", "DELETE", "PUT")
.maxAge(3600);
}
}server: {
// host: '0.0.0.0',
// 反向代理解决跨域
proxy: {
[env.VITE_APP_PORT]: {
target: 'htts://',
changeOrigin: true,
rewrite: (path) => path.replace(new RegExp('^' + env.VITE_APP_PORT), '')
}
}
// open: true, // 运行是否自动打开浏览器
// port: Number(env.VITE_APP_PORT),
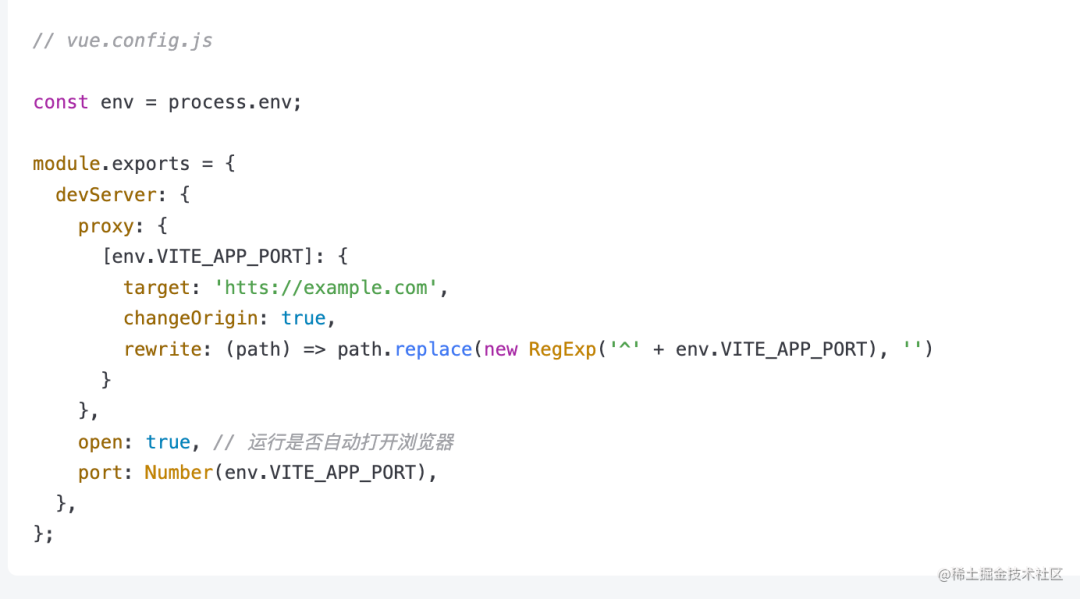
},// vue.config.js
const env = process.env;
module.exports = {
devServer: {
proxy: {
[env.VITE_APP_PORT]: {
target: 'htts://example.com',
changeOrigin: true,
rewrite: (path) => path.replace(new RegExp('^' + env.VITE_APP_PORT), '')
}
},
open: true, // 运行是否自动打开浏览器
port: Number(env.VITE_APP_PORT),
},
};
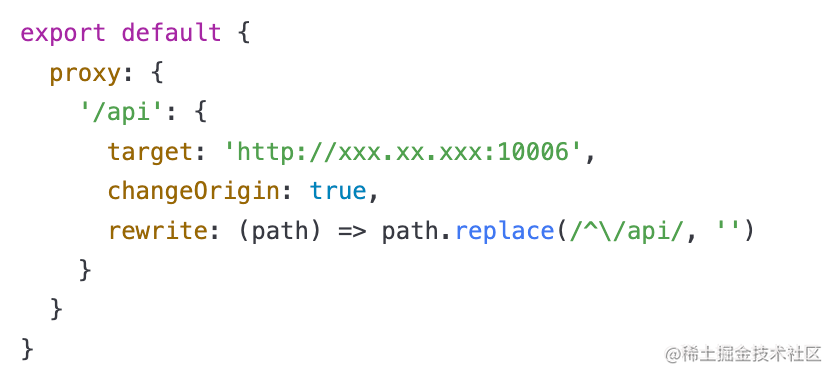
server: {
        // host: '0.0.0.0',
        // 反向代理解决跨域
        proxy: {
            '/api': {
                target: 'http://xxx:1606',
                changeOrigin: true,
                secure: false,
                rewrite: (path) => path.replace(/^\/api/, '')
            }
        }
        // open: true, // 运行是否自动打开浏览器
        // port: Number(env.VITE_APP_PORT),
    },
css: {
// CSS 预处理器
preprocessorOptions: {
//define global scss variable
scss: {
javascriptEnabled: true,
additionalData: `@use "@/styles/variables.scss" as *;`
}
}
},这是一个配置项,用于预处理 CSS 代码。在这个配置中,我们可以指定使用的预处理器以及其配置选项。其中,scss 是一种流行的 CSS 预处理器。javascriptEnabled: true 表示在 SCSS 中可以使用 JavaScript 语法。additionalData 属性允许我们定义全局的 SCSS 变量,该变量将被引入到所有的 SCSS 文件中。在这个示例中,使用 @use 指令将 variables.scss 文件引入,并将其中的所有内容作为全局变量使用。
Vue.js 的 toRaw 方法是一个用于深度遍历响应式对象并返回其非响应式原始值的方法。它可用于访问由 Vue 3 中的 reactive、ref 和 computed 创建的响应式对象中的原始数据。
在 Vue.js 中,对一个响应式对象进行操作时,Vue.js 会将其包装在一个代理对象内部,以便追踪该对象上属性的变化,并在需要时更新视图。但是有些情况下,我们需要直接访问对象的原始值而不是其代理对象。这时就可以使用 toRaw 方法来获取原始值。
例如:
import { reactive, toRaw } from 'vue'

const state = reactive({ count: 0 })

console.log(state.count) // 0
console.log(toRaw(state).count) // 0

state.count++

console.log(state.count) // 1
console.log(toRaw(state).count) // 0
在上述示例中,我们创建了一个包含计数器的响应式对象 state。然后,我们分别使用 state.count 和 toRaw(state).count 访问计数器的值。当我们增加计数器的值时,state.count 的值被更新为 1,但 toRaw(state).count 仍然为初始值 0,因为它没有受到反应性系统的管理。
在这段代码中,变量 params 被使用 toRaw 函数复制,然后使用 Object.assign 分配给一个新对象。结果对象 paramsInit 是 params 的浅拷贝。
使用 toRaw 的目的是创建一个没有响应属性的对象副本。换句话说,如果 params 是一个可响应的对象(例如使用 Vue.js 的 reactive 函数创建的对象),则生成的 paramsInit 对象将不具有响应性。
在 JavaScript 中,使用 Object.assign({}, obj) 是一种常见的创建对象浅拷贝的方法。它创建一个新的空对象,并将源对象 (obj) 的所有可枚举自有属性复制到目标对象(即空对象)中。Object.assign 中第一个参数的 {} 表示我们正在创建一个新的空对象,该对象将用作目标对象。
总体而言,这段代码创建了 params 的非响应式副本,并将其分配给一个新变量 paramsInit。
events
size-change page-size 改变时触发
current-change current-page 改变时触发
prev-click 用户点击上一页按钮改变当前页时触发
next-click 用户点击下一页按钮改变当前页时触发
background 是否为分页按钮添加背景色
page-size / v-model:page-size 每页显示条目个数
default-page-size 每页显示条目数的初始值
total 总条目数
page-count 总页数, total 和 page-count 设置任意一个就可以达到显示页码的功能;如果要支持 page-sizes 的更改,则需要使用 total 属性
pager-count 设置最大页码按钮数。 页码按钮的数量,当总页数超过该值时会折叠
current-page / v-model:current-page 当前页数
default-current-page 当前页数的初始值
layout 组件布局,子组件名用逗号分隔
page-sizes 每页显示个数选择器的选项设置
popper-class 每页显示个数选择器的下拉框类名
prev-text 替代图标显示的上一页文字
prev-icon 上一页的图标, 比 prev-text 优先级更高
next-text 替代图标显示的下一页文字
next-icon 下一页的图标, 比 next-text 优先级更高
disabled 是否禁用分页
hide-on-single-page 只有一页时是否隐藏
warning
total 和 page-count 必须传一个,不然组件无法判断总页数;优先使用 page-count;
如果传入了 current-page,必须监听 current-page 变更的事件(@update:current-page),否则分页切换不起作用;
如果传入了 page-size,且布局包含 page-size 选择器(即 layout 包含 sizes),必须监听 page-size 变更的事件(@update:page-size),否则分页大小的变化将不起作用。如果要监听 current-page 和 page-size 的改变,使用 v-model 双向绑定是个更好的选择。
定义了一个名为 pager 的常量。
computed() 函数用于创建计算属性。在此例中,通过传入一个对象给 computed() 函数来创建一个计算属性。该对象有两个方法:get 和 set。
get() 方法返回 props.modelValue,即组件的 modelValue 属性,作为计算属性的值。
set() 方法接收一个参数 value,并在调用时使用 emit() 方法触发一个事件,以更新 modelValue 属性。该事件名称是 'update:modelValue',它由 defineEmits() 函数定义。
当计算属性的值被改变时,set() 方法将被调用,并触发 'update:modelValue' 事件去更新 modelValue 属性,因此,组件的 template 中绑定到 pager 计算属性的元素会自动响应更新。
定义了一个名为 emit 的常量。
defineEmits() 函数用于类型安全地定义组件可以发出的事件。在此例中,defineEmits() 定义了两个事件:'change' 和 'update:modelValue',它们分别表示组件触发 change 事件和更新 modelValue 属性事件。
defineEmits() 函数接受一个泛型参数,它指定了所有定义的事件及其参数类型。在此例中,泛型参数指定了 change 事件没有参数、update:modelValue 事件有一个 value 参数且类型为 any。
因此,当组件使用 emit() 方法触发这些事件时,TypeScript 或 Vue.js 会对事件名称和参数类型进行验证,从而增加了代码的可靠性和可维护性。
通过 withDefaults() 和 defineProps() 函数定义了一个名为 props 的常量。
defineProps() 函数创建了一个新的 Props 类型的对象,其中 Props 表示一个 Vue.js 组件的属性(即 props)。
withDefaults() 函数接受两个参数:要合并默认值的对象和包含默认值的第二个对象。在此例中,withDefaults() 将默认的 modelValue 属性、默认的 pageSizes 数组和默认的 layout 字符串合并到 props 对象中。
modelValue 的默认值是一个返回空对象 {} 的函数,这意味着如果没有显式传入 modelValue 属性,它将默认设置为空对象。
同样,pageSizes 的默认值是一个返回数组 [20, 50, 100, 150] 的函数。这意味着如果没有显式传入 pageSizes 属性,它将默认设置为数组 [20, 50, 100, 150]。
最后,layout 的默认值是一个字符串 'total, sizes, prev, pager, next, jumper',它是一个用逗号分隔的组成分页 UI 的组件列表。
usePaging pagination
Pagination 分页
withDefaults 是 Vue 3 中一个用于合并选项对象的实用函数。它可以接收一个默认选项对象和一个新选项对象,然后将它们合并成一个新的选项对象。
示例代码:
import { withDefaults } from 'vue';

const defaultOptions = {
  color: 'blue',
  fontSize: 14,
};

const options = withDefaults(defaultOptions, {
  color: 'red',
});

console.log(options); // 输出 { color: 'red', fontSize: 14 }
在上面的例子中,我们定义了一个名为 defaultOptions 的对象作为默认选项。然后我们调用 withDefaults 函数,将其作为第一个参数传递,并将一个新的选项对象作为第二个参数传递。由于新选项对象具有一个与默认选项对象相同的属性 color,因此它将覆盖默认选项对象中的该属性值。但是,由于新选项对象没有定义属性 fontSize,因此它将获取默认选项对象中的该属性。最终的选项对象将包含这两个属性,如示例代码中 console.log 打印的结果所示。
vue3国际化
npm i vue-i18n --save
npm i vue-i18n@next
新建zh-CN.js,存放中文,例如
const Settings = {
  settings: '设置',
  search: '搜索',
  airplaneMode: '飞行模式',
  wlan: '无线局域网',
  bluetooth: '蓝牙'
}

const Maps = {
  searchPlaceHolder: '搜索地点或地址'
}
// 按功能模块导出
export default {
  Settings,
  Maps
}
新建en-US.js,存放英文,例如
const Settings = {
  settings: 'Settings',
  search: 'Search',
  airplaneMode: 'Airplane Mode',
  wlan: 'WLAN',
  bluetooth: 'Bluetooth',
}

const Maps = {
  searchPlaceHolder: 'search'
}

export default {
  Settings,
  Maps
}
// 国际化多语言
import i18n from './locales/index'
app.use(i18n).mount('#app')
<div class="page-title">{{ $t("Settings.settings") }}</div>
<template>
<button @click="changeLanguage">change language</button>
</template>
<script lang="ts">
import { defineComponent } from "vue";
import { useI18n } from "vue-i18n";
export default defineComponent({
name: "App",
components: {},
setup() {
const { locale } = useI18n({ useScope: "global" });
function changeLanguage() {
locale.value = "en-US"; // 切换成英文
}
return {
changeLanguage,
};
},
});
</script>用setup语法糖
<script setup> 是在单文件组件 (SFC) 中使用组合式 API 的编译时语法糖
解决Vue3.0中setup需要繁琐将声明的变量、函数以及 import 引入的内容通过return向外暴露,才能在<template/>使用的问题
<script setup>
//import引入的内容
import { getToday } from './utils'
// 变量
const msg = 'Hello!'
// 函数
function log() {
  console.log(msg)
}
</script>
//在template中直接使用声明的变量、函数以及import引入的内容
<template>
  <div @click="log">{{ msg }}</div>
   <p>{{getToday()}}</p>
</template>
<script setup>语法糖里面的代码会被编译成组件 setup() 函数的内容,不需要通过return暴露 声明的变量、函数以及import引入的内容,即可在<template/>使用,并且不需要写export default{}
<script setup>语法糖里面的代码会被编译成组件 setup() 函数的内容。这意味着与普通的 <script> 只在组件被首次引入的时候执行一次不同,<script setup> 中的代码会在每次组件实例被创建的时候执行
<script>
  console.log('script');//多次实例组件,只触发一次
  export default {
      setup() {
          console.log('setupFn');//每次实例化组件都触发和script-setup标签一样
      }
  }
</script>script-setup标签最终都会编译成setup() 函数的内容,每次实例化组件,就是实例化一次setup函数。script标签里面的setup函数也是一样每次实例化组件,就是实例化一次setup函数,但是script标签setup是需要写在export default{}内的,外的只是首次引入的时候执行一次
<script setup>引入组件将自动注册
<script setup>
import MyComponent from './MyComponent.vue'
//components:{MyComponent}  不需要注册直接使用
</script>
<template>
  <MyComponent />
</template>组件通信:在<script setup>中必须使用 defineProps 和 defineEmits API 来替代 props 和 emits
defineProps 和 defineEmits具备完整的类型推断并且在 <script setup> 中是直接可用的
defineProps 代替props,接收父组件传递的数据(父组件向子组件传参)
<template>
  <div>父组件</div>
  <Child :title="msg" />
</template>
<script setup>
import {ref} from 'vue'
import Child from './child.vue'
const msg = ref('父的值')  //自动返回,在template直接解套使用
</script>
<template/> 中可以直接使用父组件传递的props
<script-setup> 需要通过props.xx获取父组件传递过来的props
<template>
  <div>子组件</div>
  <div>父组件传递的值:{{title}}</div>
</template>
<script setup>
//import {defineProps} from 'vue'   不需要引入
//语法糖必须使用defineProps替代props
const  props = defineProps({
  title: {
    type: String
  }
});
//script-setup 需要通过props.xx获取父组件传递过来的props
console.log(props.title) //父的值
</script>
defineEmit 代替emit,子组件向父组件传递数据(子组件向外暴露数据)
<template>
  <div>子组件</div>
  <button @click="toEmits">子组件向外暴露数据</button>
</template>
<script setup>
import {ref} from 'vue'
const name = ref('我是子组件')
//1、暴露内部数据
const  emits = defineEmits(['childFn']);
const  toEmits = () => {
  //2、触发父组件中暴露的childFn方法并携带数据
  emits('childFn',name)
}
</script>

父组件代码:

<template>
  <div>父组件</div>
  <Child  @childFn='childFn' />
  <p>接收子组件传递的数据{{childData}} </p>
</template>
<script setup>
import {ref} from 'vue'
import Child from './child.vue'

const childData = ref(null)
const childFn=(e)=>{
    console.log('子组件触发了父组件childFn,并传递了参数e')
    childData=e.value
}

</script>

<pagination v-model="pager" @change="getLists" />
<script setup>需主动向父组件暴露子组件属性 :defineExpose
使用 <script setup> 的组件,父组件是无法通过ref 或者 $parent 获取到子组件的ref等响应数据,需要通过defineExpose 主动暴露
<script setup>
import { ref } from 'vue'
const a = 1
const b = ref(2)
//主动暴露组件属性
defineExpose({
  a,
  b
})
</script>

父组件代码:

<template>
  <div>父组件</div>
  <Child  ref='childRef' />
  <button @click='getChildData'>通过ref获取子组件的属性 </button>
</template>
<script setup>
import {ref} from 'vue'
import Child from './child.vue'
const childRef= ref()  //注册响应数据
const getChildData =()=>{
  //子组件接收暴露出来得值
  console.log(childRef.value.a) //1
  console.log(childRef.value.b) //2  响应式数据
}
</script>
useSlots 和 useAttrs (少用,由于大部分人是SFC模式开发,在<template/>通过<slot/>标签就可以渲染插槽)
如果需要在script-setup中使用 slots 和 attrs 需要用useSlots 和 useAttrs替代
需要引入:import { useSlots ,useAttrs } form 'vue'
在<template/>中通过 $slots 和 $attrs 来访问更方便(attrs用来获取父组件中非props的传递到子组件的参数/方法,attrs 用来获取父组件中非props的传递到子组件的参数/方法,attrs用来获取父组件中非props的传递到子组件的参数/方法,slots可以获取父组件中插槽传递的虚拟dom对象,在SFC模式应该用处不大,在JSX /TSX使用比较多)
父组件:
<template>
  <Child msg="非porps传值子组件用attrs接收" >
    <!-- 匿名插槽 -->
    <span >默认插槽</span>
    <!-- 具名插槽 -->
    <template #title>
      <h1>具名插槽</h1>
    </template>
    <!-- 作用域插槽 -->
    <template #footer="{ scope }">
      <footer>作用域插槽——姓名:{{ scope.name }},年龄{{ scope.age }}</footer>
    </template>
  </Child>
</template>
<script setup>
// 引入子组件
import Child from './child.vue'
</script>
子组件:
<template>
  <!-- 匿名插槽 -->
  <slot />
  <!-- 具名插槽 -->
  <slot name="title" />
  <!-- 作用域插槽 -->
  <slot name="footer" :scope="state" />
  <!-- $attrs 用来获取父组件中非props的传递到子组件的参数 -->
  <p>{{ attrs.msg == $attrs.msg }}</p>
  <!--true  没想到有啥作用... -->
  <p>{{ slots == $slots }}</p>
</template>
<script setup>
import { useSlots, useAttrs, reactive, toRef } from 'vue'
const state = reactive({
  name: '张三',
  age: '18'
})
const slots = useSlots()
console.log(slots.default()); //获取到默认插槽的虚拟dom对象
console.log(slots.title());   //获取到具名title插槽的虚拟dom对象
// console.log(slots.footer()); //报错  不知道为啥有插槽作用域的无法获取
//useAttrs() 用来获取父组件传递的过来的属性数据的(也就是非 props 的属性值)。
const attrs = useAttrs()
</script>
useSlots 可以获取父组件传递过来插槽的虚拟dom对象,可以用来渲染插槽内容
<script lang='jsx'>
import { defineComponent, useSlots } from "vue";
export default defineComponent({
  setup() {
    // 获取插槽数据
    const slots = useSlots();
    // 渲染组件
    return () => (
      <div>
        {slots.default?slots.default():''}
        {slots.title?slots.title():''}
      </div>
    );
  },
});
</script>
访问路由实例组件信息:route和router
setup 里不能访问 this,不能再直接访问 this.$router 或 this.$route。(getCurrentInstance可以替代this但不推荐)
推荐:使用useRoute 函数和useRouter函数替代this.$route 和 this.$router
<script setup>
import { useRouter, useRoute } from 'vue-router'
    const route = useRoute()
    const router = useRouter()

    function pushWithQuery(query) {
      router.push({
        name: 'search',
        query: {
          ...route.query,
        },
      })
    }
  <script/>
import router from './router'
router.beforeEach((to,from,next)=>{
})也可以使用组合式api的导航守卫onBeforeRouteLeave, onBeforeRouteUpdate
<script setup>
import { onBeforeRouteLeave, onBeforeRouteUpdate } from 'vue-router'

    // 与 beforeRouteLeave 相同,无法访问 `this`
    onBeforeRouteLeave((to, from) => {
      const answer = window.confirm(
        'Do you really want to leave? you have unsaved changes!'
      )
      // 取消导航并停留在同一页面上
      if (!answer) return false
    })

    const userData = ref()

    // 与 beforeRouteUpdate 相同,无法访问 `this`
    onBeforeRouteUpdate(async (to, from) => {
      //仅当 id 更改时才获取用户,例如仅 query 或 hash 值已更改
      if (to.params.id !== from.params.id) {
        userData.value = await fetchUser(to.params.id)
      }
    })
 <script/>
组合式 API 守卫也可以用在任何由 <router-view> 渲染的组件中,它们不必像组件内守卫那样直接用在路由组件上。
<template>
  <div class="watch-test">
    <div>ref定义数组:{{arrayRef}}</div>
    <div>reactive定义数组:{{arrayReactive}}</div>
  </div>
  <div>
    <button @click="changeArrayRef">改变ref定义数组第一项</button>
    <button @click="changeArrayReactive">改变reactive定义数组第一项</button>
  </div>
</template>

<script>
  import {ref, reactive, watch} from 'vue'

  export default {
    name: 'WatchTest',
    setup() {
      const arrayRef = ref([1, 2, 3, 4])
      const arrayReactive = reactive([1, 2, 3, 4])

      //ref not deep
      const arrayRefWatch = watch(arrayRef, (newValue, oldValue) => {
        console.log('newArrayRefWatch', newValue, 'oldArrayRefWatch', oldValue)
      })

      //ref deep
      const arrayRefDeepWatch = watch(arrayRef, (newValue, oldValue) => {
        console.log('newArrayRefDeepWatch', newValue, 'oldArrayRefDeepWatch', oldValue)
      }, {deep: true})

      //reactive,源不是函数
      const arrayReactiveWatch = watch(arrayReactive, (newValue, oldValue) => {
        console.log('newArrayReactiveWatch', newValue, 'oldArrayReactiveWatch', oldValue)
      })

      // 数组监听的最佳实践- reactive且源采用函数式返回,返回拷贝后的数据
      const arrayReactiveFuncWatch = watch(() => [...arrayReactive], (newValue, oldValue) => {
        console.log('newArrayReactiveFuncWatch', newValue, 'oldArrayReactiveFuncWatch', oldValue)
      })

      const changeArrayRef = () => {
        arrayRef.value[0] = 6
      }
      const changeArrayReactive = () => {
        arrayReactive[0] = 6
      }
      return {
        arrayRef,
        arrayReactive,
        changeArrayRef,
        changeArrayReactive
      }
    }
  }
</script>
国际化自动工具
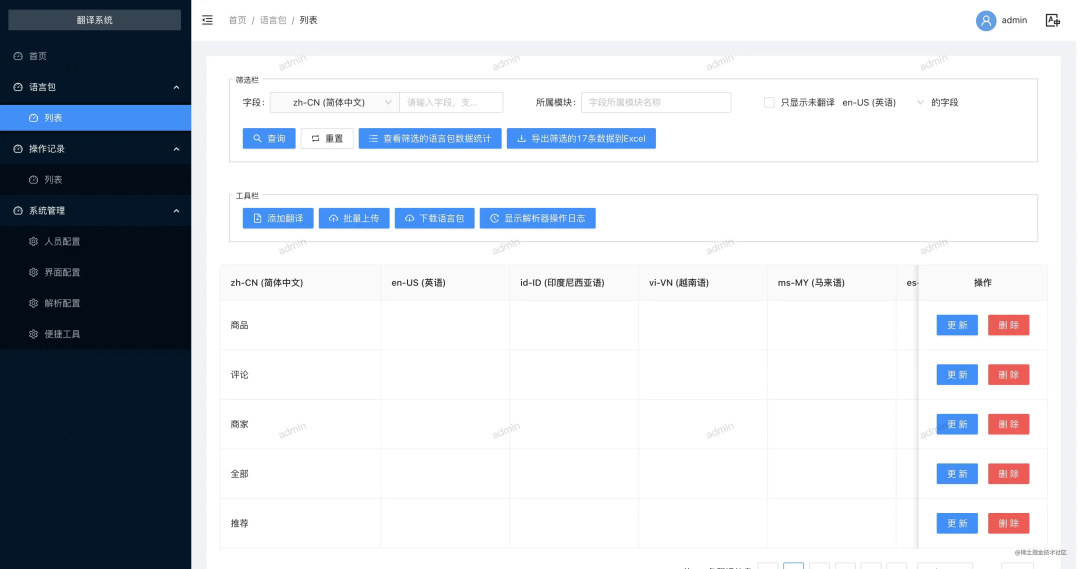
vue 项目使用的是 [vue-i18n],而 react 项目使用 [react-i18next],这些插件原理都是根据前端提供的一套语言包json文件(例如en-US.json,zh-CN.json), 每份语言包都以key:value对象形式存储代码标记:实际渲染的语言文案一一对应的数据
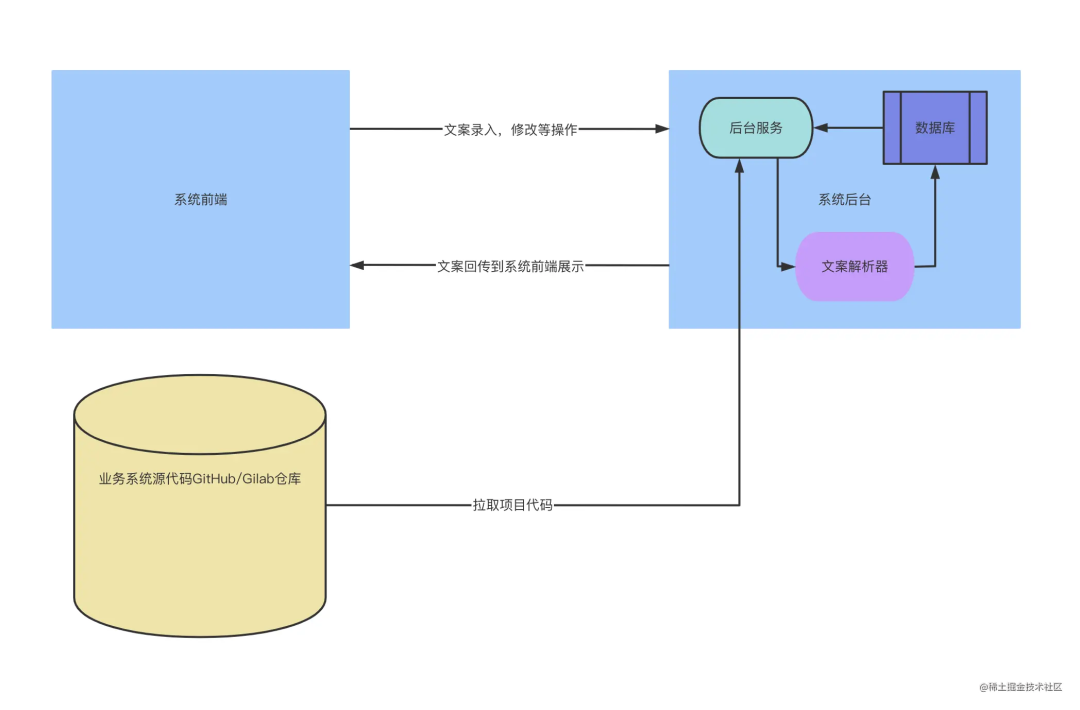
前端开发使用辅助插件 [@mango-scripts/i18n-scripts] 进行一键下载、导入语言包到业务系统本地代码中
支持使用辅助插件 [@mango-scripts/i18n-scripts]进行一键下载、导入语言包到业务系统本地代码中
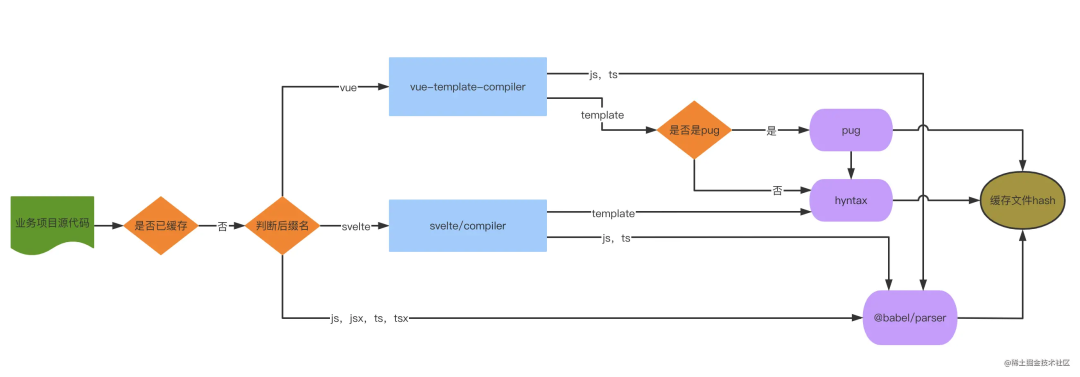
文案解析器:[@mango-scripts/i18n-utils]基于 babel, vue-template-compiler, hyntax, pug, svelte/compiler 等 对目标源码进行 AST 解析
辅助插件:[@mango-scripts/i18n-scripts]基于 commander,fs-extra,glob,inquirer 等
https://github.com/AlbertLin0923/mango-i18n-system
https://github.com/AlbertLin0923/mango-scripts/tree/main/packages/i18n-scripts
Vue3的8种和Vue2的12种组件通信
// Parent.vue 传送
<child :msg1="msg1" :msg2="msg2"></child>
<script>
import child from "./child.vue"
import { ref, reactive } from "vue"
export default {
    data(){
        return {
            msg1:"这是传级子组件的信息1"
        }
    },
    setup(){
        // 创建一个响应式数据

        // 写法一 适用于基础类型  ref 还有其他用处,下面章节有介绍
        const msg2 = ref("这是传级子组件的信息2")

        // 写法二 适用于复杂类型,如数组、对象
        const msg2 = reactive(["这是传级子组件的信息2"])

        return {
            msg2
        }
    }
}
</script>

// Child.vue 接收
<script>
export default {
  props: ["msg1", "msg2"],// 如果这行不写,下面就接收不到
  setup(props) {
    console.log(props) // { msg1:"这是传给子组件的信息1", msg2:"这是传给子组件的信息2" }
  },
}
</script>
// Parent.vue 传送
<child :msg2="msg2"></child>
<script setup>
import child from "./child.vue"
import { ref, reactive } from "vue"
const msg2 = ref("这是传给子组件的信息2")
// 或者复杂类型
const msg2 = reactive(["这是传级子组件的信息2"])
</script>
// Child.vue 接收
<script setup>
// 不需要引入 直接使用
// import { defineProps } from "vue"
const props = defineProps({
// 写法一
msg2: String
// 写法二
msg2:{
type:String,
default:""
}
})
console.log(props) // { msg2:"这是传级子组件的信息2" }
</script>// Child.vue 派发
<template>
// 写法一
<button @click="emit('myClick')">按钮</buttom>
// 写法二
<button @click="handleClick">按钮</buttom>
</template>
<script setup>
// 方法一 适用于Vue3.2版本 不需要引入
// import { defineEmits } from "vue"
// 对应写法一
const emit = defineEmits(["myClick","myClick2"])
// 对应写法二
const handleClick = ()=>{
emit("myClick", "这是发送给父组件的信息")
}
// 方法二 不适用于 Vue3.2版本,该版本 useContext()已废弃
import { useContext } from "vue"
const { emit } = useContext()
const handleClick = ()=>{
emit("myClick", "这是发送给父组件的信息")
}
</script>
// Parent.vue 响应
<template>
<child @myClick="onMyClick"></child>
</template>
<script setup>
import child from "./child.vue"
const onMyClick = (msg) => {
console.log(msg) // 这是父组件收到的信息
}
</script>// Child.vue
<script setup>
// 方法一 不适用于Vue3.2版本,该版本 useContext()已废弃
import { useContext } from "vue"
const ctx = useContext()
// 对外暴露属性方法等都可以
ctx.expose({
childName: "这是子组件的属性",
someMethod(){
console.log("这是子组件的方法")
}
})
// 方法二 适用于Vue3.2版本, 不需要引入
// import { defineExpose } from "vue"
defineExpose({
childName: "这是子组件的属性",
someMethod(){
console.log("这是子组件的方法")
}
})
</script>
// Parent.vue 注意 ref="comp"
<template>
<child ref="comp"></child>
<button @click="handlerClick">按钮</button>
</template>
<script setup>
import child from "./child.vue"
import { ref } from "vue"
const comp = ref(null)
const handlerClick = () => {
console.log(comp.value.childName) // 获取子组件对外暴露的属性
comp.value.someMethod() // 调用子组件对外暴露的方法
}
</script>// Parent.vue 传送
<child :msg1="msg1" :msg2="msg2" title="3333"></child>
<script setup>
import child from "./child.vue"
import { ref, reactive } from "vue"
const msg1 = ref("1111")
const msg2 = ref("2222")
</script>
// Child.vue 接收
<script setup>
import { defineProps, useContext, useAttrs } from "vue"
// 3.2版本不需要引入 defineProps,直接用
const props = defineProps({
msg1: String
})
// 方法一 不适用于 Vue3.2版本,该版本 useContext()已废弃
const ctx = useContext()
// 如果没有用 props 接收 msg1 的话就是 { msg1: "1111", msg2:"2222", title: "3333" }
console.log(ctx.attrs) // { msg2:"2222", title: "3333" }
// 方法二 适用于 Vue3.2版本
const attrs = useAttrs()
console.log(attrs) // { msg2:"2222", title: "3333" }
</script>// Parent.vue
<child v-model:key="key" v-model:value="value"></child>
<script setup>
import child from "./child.vue"
import { ref, reactive } from "vue"
const key = ref("1111")
const value = ref("2222")
</script>
// Child.vue
<template>
<button @click="handlerClick">按钮</button>
</template>
<script setup>
// 方法一 不适用于 Vue3.2版本,该版本 useContext()已废弃
import { useContext } from "vue"
const { emit } = useContext()
// 方法二 适用于 Vue3.2版本,不需要引入
// import { defineEmits } from "vue"
const emit = defineEmits(["key","value"])
// 用法
const handlerClick = () => {
emit("update:key", "新的key")
emit("update:value", "新的value")
}
</script>// Parent.vue
<script setup>
import { provide } from "vue"
provide("name", "沐华")
</script>
// Child.vue
<script setup>
import { inject } from "vue"
const name = inject("name")
console.log(name) // 沐华
</script>// store/index.js
import { createStore } from "vuex"
export default createStore({
state:{ count: 1 },
getters:{
getCount: state => state.count
},
mutations:{
add(state){
state.count++
}
}
})
// main.js
import { createApp } from "vue"
import App from "./App.vue"
import store from "./store"
createApp(App).use(store).mount("#app")
// Page.vue
// 方法一 直接使用
<template>
<div>{{ $store.state.count }}</div>
<button @click="$store.commit('add')">按钮</button>
</template>
// 方法二 获取
<script setup>
import { useStore, computed } from "vuex"
const store = useStore()
console.log(store.state.count) // 1
const count = computed(()=>store.state.count) // 响应式,会随着vuex数据改变而改变
console.log(count) // 1
</script>EventBus 跨组件通信
Vue3 中没有了 EventBus 跨组件通信
先安装 npm i mitt -S
mitt.js
import mitt from 'mitt'
const mitt = mitt()
export default mitt
// 组件 A
<script setup>
import mitt from './mitt'
const handleClick = () => {
mitt.emit('handleChange')
}
</script>
// 组件 B
<script setup>
import mitt from './mitt'
import { onUnmounted } from 'vue'
const someMethed = () => { ... }
mitt.on('handleChange',someMethed)
onUnmounted(()=>{
mitt.off('handleChange',someMethed)
})
</script>Vue2.x 组件通信共有12种
props
$emit / v-on
.sync
v-model
ref
parent
listeners
provide / inject
EventBus
Vuex
$root
slot
父子组件通信可以用:
props
$emit / v-on
listeners
ref
.sync
v-model
parent
兄弟组件通信可以用:
EventBus
Vuex
$parent
跨层级组件通信可以用:
provide/inject
EventBus
Vuex
listeners
$root
使用readonly包裹的数据,深层都是只读的,shallowReadonly只有最外面那层才是只读的
toRaw与markRaw
toRaw可以将由reactive或readonly函数转换成响应式代理的普通对象,对普通对象的属性值进行修改,就不会更新视图界面。一般用于渲染具有不可变数据源的大列表,跳过代理转换可以提高性能。
markRaw标记一个对象,使其永远不会转换为响应式数据,只能返回这个对象本身,一般用于某些值不该被设置为响应式的,比如第三方类实例或vue对象等场景。
markRaw标记一个永远不是响应式的数据, 哪怕后面用reactive转也是不响应式的
toRef为响应式对象上的某个属性创建一个Ref引用,更新时引用对象会同步更新,注意如果通过toRef创建的数据修改时,并不会触发视图界面的更新,因为toRef的本质是引用,与原始数据有关联。
从一个对象中拿出一个属性,操作这个属性
使用toRef使其成为响应式
let count =toRef(objA,'count')
          count.value++
加群联系作者vx:xiaoda0423
仓库地址:https://github.com/webVueBlog/WebGuideInterview


 241
241


 被折叠的 条评论
为什么被折叠?
被折叠的 条评论
为什么被折叠?
 到【灌水乐园】发言


