


onShow() {
 uni.checkSession({
     success: (data) => {
         this.getSessionId()
     },
     fail: () => {
         this.getSessionId()
     }
 })
},
// 获取用户的手机号
getPhoneNumber(info) {
    let wxAuth = {
        encryptedData: info.detail.encryptedData,
        iv: info.detail.iv,
        sessionId: uni.getStorageSync("sessionId")
    }
    this.$http("/user/authLogin", "post", wxAuth).then((res) => {
        if (res.data.code == 0 && res.data.data.token) {
            uni.setStorage({
                key: 'token',
                data: res.data.data.token,
                success: function({
                    uni.reLaunch({
                        url: '../home/home?isLogin=true'
                    })
                }
            })
        } else {
            uni.showToast({
                title: res.data.message,
                icon: "none"
            })
        }
    })
},

// 获取sessionId
getSessionId() {
    uni.login({
        provider: 'weixin',
        success: (res3) => {
            this.$http("/user/getSessionId", "get", {
                code: res3.code
            }).then(res2 => {
                if (res2.data.data.sessionId) {
                    uni.setStorageSync("sessionId", res2.data.data.sessionId)
                }
            })
        }
    })
}
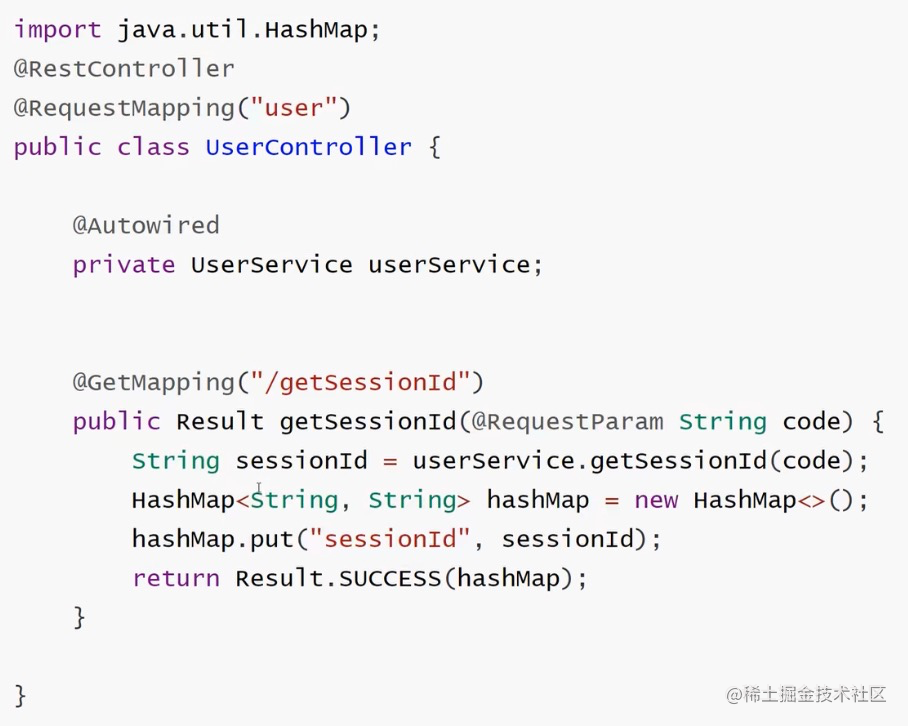

UserController.java
@RestController
@RequestMapping("user")
public class UserController {
@Autowired
private UserService userService;
// getSessionId
@GetMapping("getSessionId")
public Result getSessionId(String code) {
return userService.getSessionId(code);
}
}
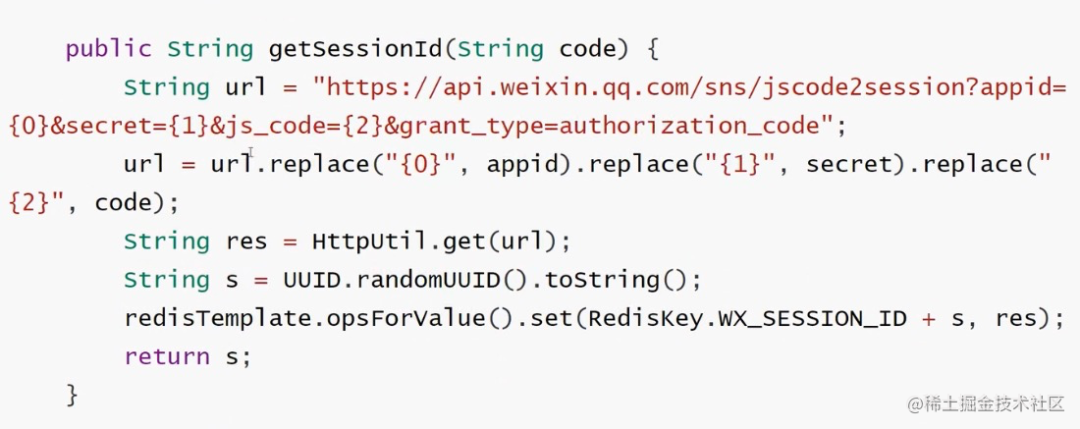
service UserService.java
@Service
public class UserService {
@Autowired
private StringRedisTemplate redisTemplate;
@Value("${wxmini.secret}")
private String secret;
@Value("${wxmini.appid}")
private String appid;
public Result getSessionId(String code) {
//
}
}npm i --save-dev @types/websocket
特定的错误信息 "Invalid argument" 表明可能存在一个参数传递给数据库加载过程中的问题。
要解决这个问题,您可以考虑以下步骤:
检查加载数据库的代码,并检查是否存在传递错误或无效的参数。
验证数据库所需的依赖项或库是否已正确安装并更新。
确保数据库配置(如连接设置或文件路径)准确有效。
检查最近是否有代码、依赖项或环境的更改或更新可能导致此问题。
查找任何相关的错误日志或堆栈跟踪,提供关于错误的更详细信息。这有助于确定问题的具体原因。
如果根据提供的信息无法解决问题,请提供更多详细信息,例如与数据库加载过程相关的具体代码和任何相关的错误日志或消息。
一、brew 安装脚本 (自动选择软件源)
/bin/zsh -c "$(curl -fsSL https://gitee.com/cunkai/HomebrewCN/raw/master/Homebrew.sh)"
二、brew 卸载脚本
/bin/zsh -c "$(curl -fsSL https://gitee.com/cunkai/HomebrewCN/raw/master/HomebrewUninstall.sh)"
三、常用命令
安装软件:brew install xxx
卸载软件:brew uninstall xxx
搜索软件:brew search xxx
更新软件:brew upgrade xxx
查看列表:brew list
更新brew:brew update
清理所有包的旧版本:brew cleanup
清理指定包的旧版本:brew cleanup $FORMULA
查看可清理的旧版本包,不执行实际操作:brew cleanup -n
Brotli 是一种数据压缩算法,它能够提供高效的压缩和解压缩性能。它由谷歌开发,并于2015年发布。Brotli 压缩算法在压缩比率和压缩速度方面都具有很好的表现,尤其在处理文本和网络传输数据时效果显著。
在 macOS 上,Homebrew(brew)是一个常用的包管理器,用于安装和管理各种开源软件包。brew brotli 是用于在 macOS 上安装 Brotli 压缩算法的 Homebrew 命令。通过运行该命令,您可以方便地从 Homebrew 仓库中获取 Brotli 并进行安装。
要安装 Brotli,请打开终端并运行以下命令:
brew install brotli这将下载 Brotli 的二进制文件,并将其安装到您的 macOS 系统中。安装完成后,您可以使用 Brotli 命令行工具执行压缩和解压缩操作。
例如,要压缩文件,可以使用以下命令:
brotli -o compressed_file.br original_file要解压缩文件,可以使用以下命令:
brotli -d -o decompressed_file original_file.br通过使用 brew brotli 命令安装 Brotli,您可以轻松地在 macOS 上使用该压缩算法,并将其应用于您的项目或数据处理需求。
压缩文件:
brotli -o compressed_file.br original_file这将使用 Brotli 压缩算法将 original_file 文件压缩,并将压缩后的结果保存为 compressed_file.br。
解压缩文件:
brotli -d -o decompressed_file original_file.br这将使用 Brotli 压缩算法解压缩 original_file.br 文件,并将解压缩后的结果保存为 decompressed_file。
请确保在运行以上命令时,将 original_file 替换为要压缩或解压缩的实际文件名,并提供适当的目标文件名。
Name Status User File
redis started jeskson ~/Library/LaunchAgents/homebrew.mxcl.redis.plist
安装 Redis 之后,你可以使用以下命令来启动 Redis 服务:
brew services start redis这将启动 Redis 服务,并使其在后台运行。你可以通过以下命令来检查 Redis 服务是否正在运行:
brew services list你应该看到 Redis 服务的状态为 "started"。
一旦 Redis 服务正在运行,你可以使用以下命令来连接到 Redis 服务器:
redis-cli这将打开 Redis 命令行界面,你可以在其中执行各种 Redis 命令和操作。例如,你可以使用以下命令来设置和获取键值对:
set mykey "Hello, Redis"
get mykey
这些命令将设置键名为 "mykey" 的键值对,并从 Redis 中获取它的值。
当你完成使用 Redis 后,可以使用以下命令来停止 Redis 服务:
brew services stop redis这将停止 Redis 服务,并使其不再运行。
const connectWebSocket = () => {
    socket.value = new WebSocket('') // 替换为你的 WebSocket 服务器地址

    socket.value.onopen = () => {
        console.log('WebSocket 连接已建立')
        const message = JSON.stringify({
        })
        socket.value.send(message)
    }

    socket.value.onmessage = (event: { data: any }) => {
        console.log('接收到 WebSocket 消息:', event.data)
        // 处理接收到的消息
    }

    socket.value.onclose = () => {
        console.log('WebSocket 连接已关闭')
    }

    socket.value.onerror = (error: any) => {
        console.error('WebSocket 错误:', error)
    }
}
重新连接
如果 WebSocket 连接断开,可以通过重新创建 WebSocket 实例来重新连接。
socket.value.onclose = () => {
  console.log('WebSocket disconnected');
  // 重新连接
  socket.value = useWebSocket('wss://example.com/socket');
};
为了保持 WebSocket 连接的活跃状态,可以使用心跳机制定期发送心跳消息。
// 心跳消息
const heartbeatMessage = 'ping'
// 定时发送心跳消息
setInterval(() => {
    socket.value.send(heartbeatMessage)
}, 5000000000)
// 监听消息事件
socket.value.onmessage = (event: { data: any }) => {
    const message = event.data
    console.log('定时发送心跳消息:', event.data)

    if (message === heartbeatMessage) {
        // 收到心跳消息,做相应处理
    } else {
        // 处理其他消息
    }
}
定期发送心跳消息,并在收到心跳消息时进行相应处理。
微信小程序登录流程前后端描述,小程序通过wx.login()获取code,如0f14dT0w3P2bT03Pgz0w3ugqsE44dxxx,
const { code }: any = await uni.login({
    provider: 'weixin'
})
const data = await mnpLogin({
    code
})
loginHandle(data)
通过wx.request()发送code,后端的接口带入参数code,获取getSessionId,后端通过登录凭证校验接口 appid + appsecret + code 去微信接口服务拿取数据 如:session_key+openid等 然后 后端 可以(自定义登录态)与openid,session_key关联,返回前端-返回自定义登录态 (不关紧要的内容:自定义登录状态存入storage,wx.request()发起业务请求,携带 自定义登录态,后端通过自定义登录态,查询openid和session_key,返回业务数据)
server {
    listen    8080;
        # 用户访问 ip:8080/test 下的所有路径代理到 github
        location /test {
         proxy_pass   https://github.com;
        }

        # 所有 /api 下的接口访问都代理到本地的 8888 端口
        # 例如你本地运行的 java 服务的端口是 8888,接口都是以 /api 开头
        location /api {
            proxy_pass   http://127.0.0.1:8888;
        }

}
反向代理
我们最常说的反向代理的是通过反向代理解决跨域问题。
其实反向代理还可以用来控制缓存(代理缓存 proxy cache),进行访问控制等等,以及后面说的负载均衡其实都是通过反向代理来实现的。
server {
    listen    8080;
        # 用户访问 ip:8080/test 下的所有路径代理到 github
        location /test {
         proxy_pass   https://github.com;
        }

        # 所有 /api 下的接口访问都代理到本地的 8888 端口
        # 例如你本地运行的 java 服务的端口是 8888,接口都是以 /api 开头
        location /api {
            proxy_pass   http://127.0.0.1:8888;
        }

}
负载均衡
通过负载均衡充利用服务器资源,nginx 目前支持自带 4 种负载均衡策略,还有 2 种常用的第三方策略。
轮询策略(默认)
每个请求按时间顺序逐一分配到不同的后端服务器,如果有后端服务器挂掉,能自动剔除。但是如果其中某一台服务器压力太大,出现延迟,会影响所有分配在这台服务器下的用户。
http {
    upstream test.com {
        server 192.168.1.12:8887;
        server 192.168.1.13:8888;
    }
    server {
        location /api {
            proxy_pass  http://test.com;
        }
    }
}
根据服务器权重
例如要配置:10 次请求中大概 1 次访问到 8888 端口,9 次访问到 8887 端口:
http {
    upstream test.com {
        server 192.168.1.12:8887 weight=9;
        server 192.168.1.13:8888 weight=1;
    }
    server {
        location /api {
            proxy_pass  http://test.com;
        }
    }
}
客户端 ip 绑定(ip_hash)
来自同一个 ip 的请求永远只分配一台服务器,有效解决了动态网页存在的 session 共享问题。例如:比如把登录信息保存到了 session 中,那么跳转到另外一台服务器的时候就需要重新登录了。
所以很多时候我们需要一个客户只访问一个服务器,那么就需要用 ip_hash 了。
http {
    upstream test.com {
     ip_hash;
        server 192.168.1.12:8887;
        server 192.168.1.13:8888;
    }
    server {
        location /api {
            proxy_pass  http://test.com;
        }
    }
}
最小连接数策略
将请求优先分配给压力较小的服务器,它可以平衡每个队列的长度,并避免向压力大的服务器添加更多的请求。
http {
    upstream test.com {
     least_conn;
        server 192.168.1.12:8887;
        server 192.168.1.13:8888;
    }
    server {
        location /api {
            proxy_pass  http://test.com;
        }
    }
}
最快响应时间策略(依赖于第三方 NGINX Plus)
依赖于 NGINX Plus,优先分配给响应时间最短的服务器。
http {
    upstream test.com {
     fair;
        server 192.168.1.12:8887;
        server 192.168.1.13:8888;
    }
    server {
        location /api {
            proxy_pass  http://test.com;
        }
    }
}
Provide/Inject 调用
main.ts
import axios from 'axios'
import VueAxios from 'vue-axios'
app.use(VueAxios, axios)
app.provide('axios', app.config.globalProperties.axios)
App.vue
const axios: any = inject('axios')  // inject axios
axios({url,data,...其他配置}).then() // 同上
什么是 hook ?
在 React 中的意思是将一个以 use 开头,含react 状态和 effect 纯函数的外部代码挂入到它的节点当中。
<template>
    <div class="demo1-container">
        <div ref="sectionRef" class="ref-section"></div>
    </div>
</template>

<script setup lang="ts">
import {ref} from 'vue'
const sectionRef = ref()
</script>
<template>
<div class="demo1-container">
<p>通过ref直接拿到dom</p>
<div ref="sectionRef" class="ref-section"></div>
<button @click="higherAction" class="btn">变高</button>
</div>
</template>
<script setup lang="ts">
import {ref} from 'vue'
const sectionRef = ref()
let height = 100;
const higherAction = () => {
height += 50;
sectionRef.value.style = `height: ${height}px`;
}
</script>
<style lang="scss" scoped>
.demo1-container {
width: 100%;
height: 100%;
.ref-section {
width: 200px;
height: 100px;
background-color: pink;
transition: all .5s ease-in-out;
}
.btn {
width: 200px;
height: 50px;
background-color: gray;
color: #fff;
margin-top: 100px;
}
}
</style><template>
<div class="demo2-container">
<p>通过父容器遍历拿到dom</p>
<div ref="listRef" class="list-section">
<div @click="higherAction(index)" class="list-item" v-for="(item, index) in state.list" :key="index">
<span>{{item}}</span>
</div>
</div>
</div>
</template>
<script setup lang="ts">
import { ref, reactive } from 'vue'
const listRef = ref()
const state = reactive({
list: [1, 2, 3, 4, 5, 6, 7, 8]
})
const higherAction = (index: number) => {
let height = listRef.value.children[index].style.height ? listRef.value.children[index].style.height : '20px';
height = Number(height.replace('px', ''));
listRef.value.children[index].style = `height: ${height + 20}px`;
}
</script>
<style lang="scss" scoped>
.demo2-container {
width: 100%;
height: 100%;
.list-section {
width: 200px;
.list-item {
width: 200px;
height: 20px;
background-color: pink;
color: #333;
transition: all .5s ease-in-out;
display: flex;
justify-content: center;
align-items: center;
}
}
}
</style><template>
<img alt="Vue logo" src="./assets/logo.png" />
<p>{{ message }}</p>
<button @click="changeMsg">更改 message</button>
</template>
<script setup lang="ts">
import { ref, watch } from "vue";
const message = ref("小猪课堂");
watch(message, (newValue, oldValue) => {
console.log("新的值:", newValue);
console.log("旧的值:", oldValue);
});
const changeMsg = () => {
message.value = "张三";
};
</script>第一次渲染页面的时候,watch 监听器里面的回调函数就执行一遍。
watchEffect 也是一个监听器,只不过它不会像 watch 那样接收一个明确的数据源,它只接收一个回调函数。而在这个回调函数当中,它会自动监听响应数据,当回调函数里面的响应数据发生变化,回调函数就会立即执行。
如果我们想要在回调函数里面获取更新后的 DOM,非常简单,我们只需要再给监听器多传递一个参数选项即可:flush: 'post'
const unwatch = watchEffect(() => {}) // ...当该侦听器不再需要时 unwatch()加群联系作者vx:xiaoda0423
仓库地址:https://github.com/webVueBlog/WebGuideInterview


 2667
2667


 被折叠的 条评论
为什么被折叠?
被折叠的 条评论
为什么被折叠?
 到【灌水乐园】发言


