


前言: 坑点太多了,以至于需要单独写篇博客记录一下。
网上教程五花八门且不声明版本,文档不对应以及seata本身的bug,就造成了部署时各种踩坑,如果你和博主一样,已经又恰好很久没碰过nacos了,那可能对些配置就更陌生了,为尽可能避免部署,项目启动、运行后报错 或者服务重启后开始报错,请尽可能按照博主步骤操作,下面进入正题。
注:本文暂未博包含高可用教程,适用于demo及开发环境。
本文由csdn博主:孟秋与你 编写 ,花费许多精力排坑,主打一个让小白也能轻松入门,转载请声明出处
文章目录
环境
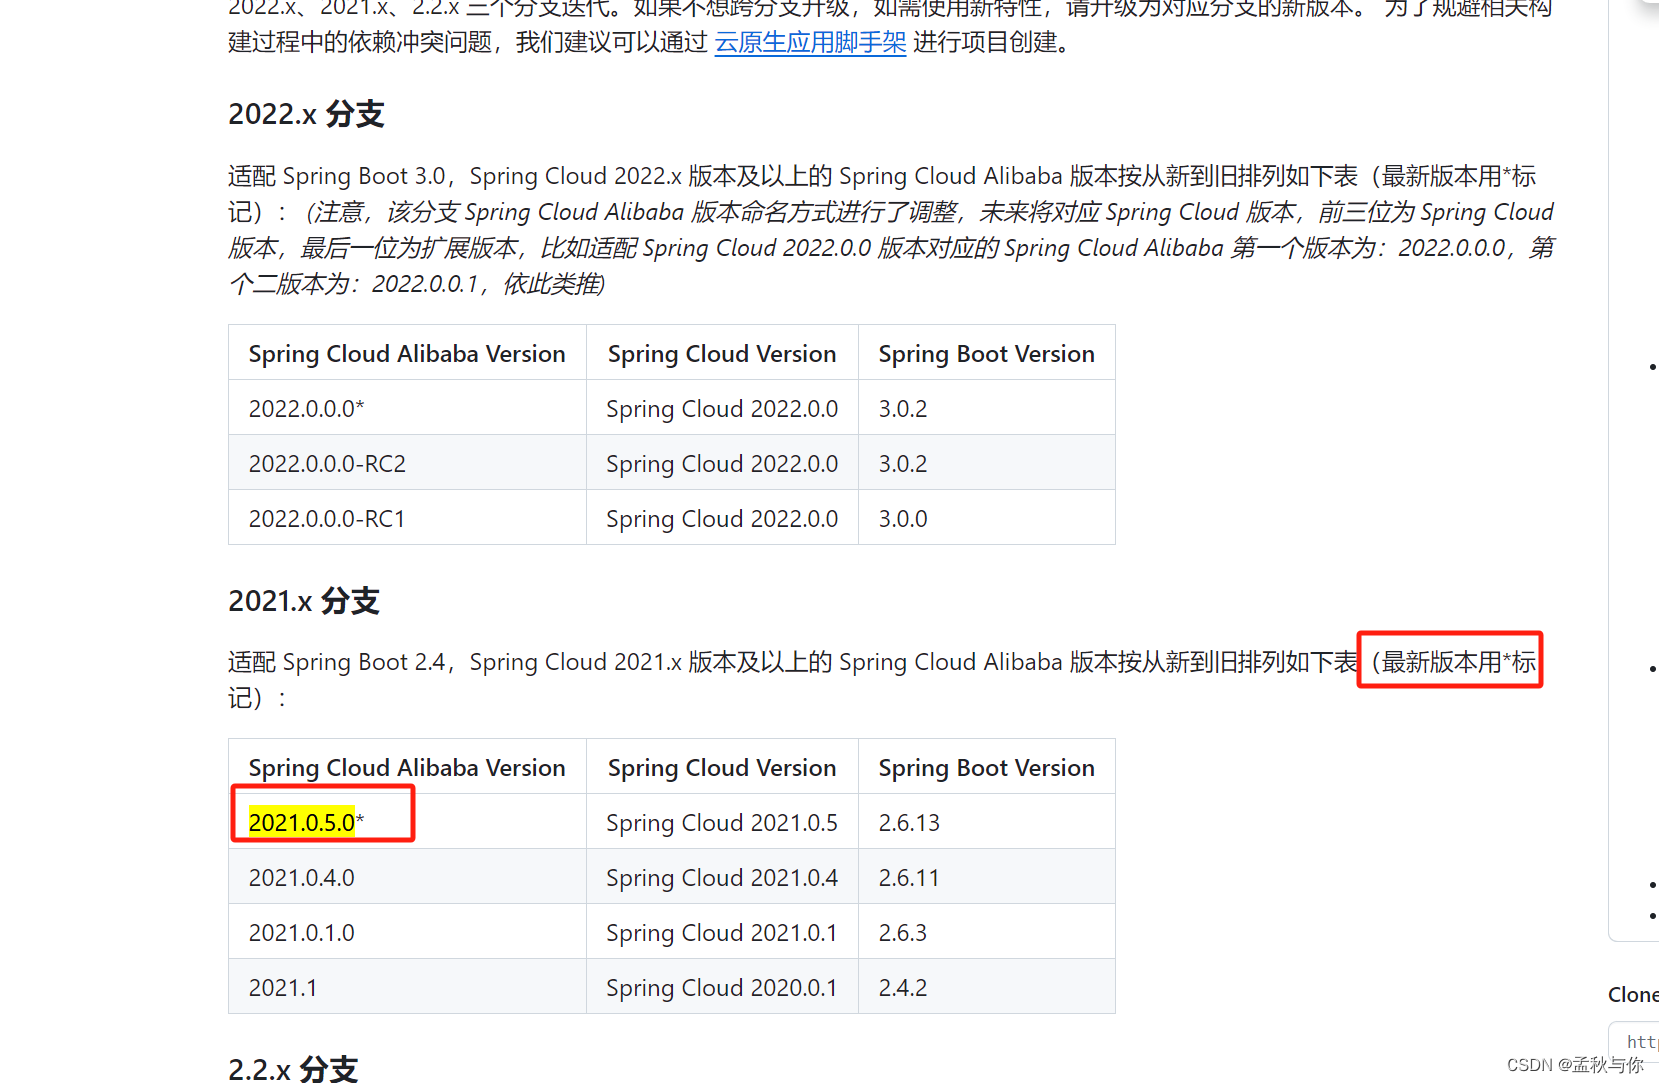
本文环境采用的是2021.x中最新的版本,也是springboot 2中 最新的版本对应关系,
亲测可行,阅读教程前请先核对自己的版本。
(如果是2022.x版本 则与springboot3对应,springboot3需要jdk17)
nacos版本:2.2.0
seata版本:1.6.1
springboot: 2.6.13
spring-cloud: 2021.0.5
spring-cloud-alibaba: 2021.0.5.0
其它:
mybatis plus: 3.5.1
openfeign: 3.1.5
loadbalancer: 3.1.5 (openfeign要用到)
nacos服务端配置
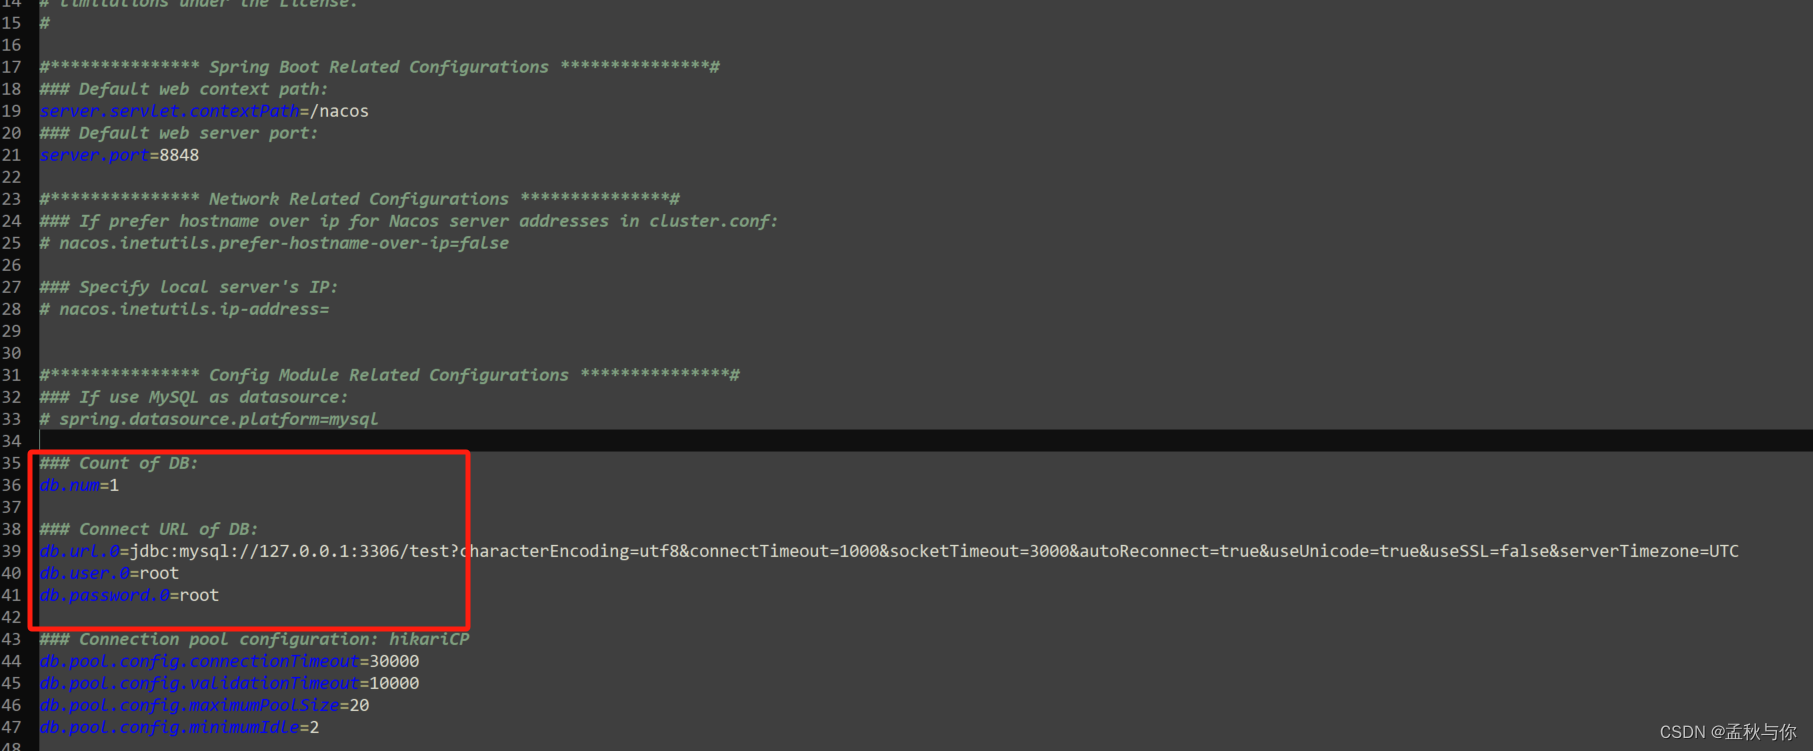
- 修改nacos/application.properties文件
主要就是改一下数据库的东西,比较简单
#*************** Spring Boot Related Configurations ***************#
### Default web context path:
server.servlet.contextPath=/nacos
### Default web server port:
server.port=8848

#*************** Network Related Configurations ***************#
### If prefer hostname over ip for Nacos server addresses in cluster.conf:
# nacos.inetutils.prefer-hostname-over-ip=false

### Specify local server's IP:
# nacos.inetutils.ip-address=


#*************** Config Module Related Configurations ***************#
### If use MySQL as datasource:
# spring.datasource.platform=mysql

### Count of DB:
db.num=1

### Connect URL of DB:
db.url.0=jdbc:mysql://127.0.0.1:3306/test?characterEncoding=utf8&connectTimeout=1000&socketTimeout=3000&autoReconnect=true&useUnicode=true&useSSL=false&serverTimezone=UTC
db.user.0=root
db.password.0=root

### Connection pool configuration: hikariCP
db.pool.config.connectionTimeout=30000
db.pool.config.validationTimeout=10000
db.pool.config.maximumPoolSize=20
db.pool.config.minimumIdle=2

#*************** Naming Module Related Configurations ***************#
### Data dispatch task execution period in milliseconds: Will removed on v2.1.X, replace with nacos.core.protocol.distro.data.sync.delayMs
# nacos.naming.distro.taskDispatchPeriod=200

### Data count of batch sync task: Will removed on v2.1.X. Deprecated
# nacos.naming.distro.batchSyncKeyCount=1000

### Retry delay in milliseconds if sync task failed: Will removed on v2.1.X, replace with nacos.core.protocol.distro.data.sync.retryDelayMs
# nacos.naming.distro.syncRetryDelay=5000

### If enable data warmup. If set to false, the server would accept request without local data preparation:
# nacos.naming.data.warmup=true

### If enable the instance auto expiration, kind like of health check of instance:
# nacos.naming.expireInstance=true

### will be removed and replaced by `nacos.naming.clean` properties
nacos.naming.empty-service.auto-clean=true
nacos.naming.empty-service.clean.initial-delay-ms=50000
nacos.naming.empty-service.clean.period-time-ms=30000

### Add in 2.0.0
### The interval to clean empty service, unit: milliseconds.
# nacos.naming.clean.empty-service.interval=60000

### The expired time to clean empty service, unit: milliseconds.
# nacos.naming.clean.empty-service.expired-time=60000

### The interval to clean expired metadata, unit: milliseconds.
# nacos.naming.clean.expired-metadata.interval=5000

### The expired time to clean metadata, unit: milliseconds.
# nacos.naming.clean.expired-metadata.expired-time=60000

### The delay time before push task to execute from service changed, unit: milliseconds.
# nacos.naming.push.pushTaskDelay=500

### The timeout for push task execute, unit: milliseconds.
# nacos.naming.push.pushTaskTimeout=5000

### The delay time for retrying failed push task, unit: milliseconds.
# nacos.naming.push.pushTaskRetryDelay=1000

### Since 2.0.3
### The expired time for inactive client, unit: milliseconds.
# nacos.naming.client.expired.time=180000

#*************** CMDB Module Related Configurations ***************#
### The interval to dump external CMDB in seconds:
# nacos.cmdb.dumpTaskInterval=3600

### The interval of polling data change event in seconds:
# nacos.cmdb.eventTaskInterval=10

### The interval of loading labels in seconds:
# nacos.cmdb.labelTaskInterval=300

### If turn on data loading task:
# nacos.cmdb.loadDataAtStart=false


#*************** Metrics Related Configurations ***************#
### Metrics for prometheus
#management.endpoints.web.exposure.include=*

### Metrics for elastic search
management.metrics.export.elastic.enabled=false
#management.metrics.export.elastic.host=http://localhost:9200

### Metrics for influx
management.metrics.export.influx.enabled=false
#management.metrics.export.influx.db=springboot
#management.metrics.export.influx.uri=http://localhost:8086
#management.metrics.export.influx.auto-create-db=true
#management.metrics.export.influx.consistency=one
#management.metrics.export.influx.compressed=true

#*************** Access Log Related Configurations ***************#
### If turn on the access log:
server.tomcat.accesslog.enabled=true

### The access log pattern:
server.tomcat.accesslog.pattern=%h %l %u %t "%r" %s %b %D %{User-Agent}i %{Request-Source}i

### The directory of access log:
server.tomcat.basedir=

#*************** Access Control Related Configurations ***************#
### If enable spring security, this option is deprecated in 1.2.0:
#spring.security.enabled=false

### The ignore urls of auth, is deprecated in 1.2.0:
nacos.security.ignore.urls=/,/error,/**/*.css,/**/*.js,/**/*.html,/**/*.map,/**/*.svg,/**/*.png,/**/*.ico,/console-ui/public/**,/v1/auth/**,/v1/console/health/**,/actuator/**,/v1/console/server/**

### The auth system to use, currently only 'nacos' and 'ldap' is supported:
nacos.core.auth.system.type=nacos

### If turn on auth system:
nacos.core.auth.enabled=false

### worked when nacos.core.auth.system.type=ldap,{0} is Placeholder,replace login username
# nacos.core.auth.ldap.url=ldap://localhost:389
# nacos.core.auth.ldap.userdn=cn={0},ou=user,dc=company,dc=com

### The token expiration in seconds:
nacos.core.auth.default.token.expire.seconds=18000

### The default token:
nacos.core.auth.default.token.secret.key=SecretKey012345678901234567890123456789012345678901234567890123456789

### Turn on/off caching of auth information. By turning on this switch, the update of auth information would have a 15 seconds delay.
nacos.core.auth.caching.enabled=true

### Since 1.4.1, Turn on/off white auth for user-agent: nacos-server, only for upgrade from old version.
nacos.core.auth.enable.userAgentAuthWhite=false

### Since 1.4.1, worked when nacos.core.auth.enabled=true and nacos.core.auth.enable.userAgentAuthWhite=false.
### The two properties is the white list for auth and used by identity the request from other server.
nacos.core.auth.server.identity.key=serverIdentity
nacos.core.auth.server.identity.value=security

#*************** Istio Related Configurations ***************#
### If turn on the MCP server:
nacos.istio.mcp.server.enabled=false

#*************** Core Related Configurations ***************#

### set the WorkerID manually
# nacos.core.snowflake.worker-id=

### Member-MetaData
# nacos.core.member.meta.site=
# nacos.core.member.meta.adweight=
# nacos.core.member.meta.weight=

### MemberLookup
### Addressing pattern category, If set, the priority is highest
# nacos.core.member.lookup.type=[file,address-server]
## Set the cluster list with a configuration file or command-line argument
# nacos.member.list=192.168.16.101:8847?raft_port=8807,192.168.16.101?raft_port=8808,192.168.16.101:8849?raft_port=8809
## for AddressServerMemberLookup
# Maximum number of retries to query the address server upon initialization
# nacos.core.address-server.retry=5
## Server domain name address of [address-server] mode
# address.server.domain=jmenv.tbsite.net
## Server port of [address-server] mode
# address.server.port=8080
## Request address of [address-server] mode
# address.server.url=/nacos/serverlist

#*************** JRaft Related Configurations ***************#

### Sets the Raft cluster election timeout, default value is 5 second
# nacos.core.protocol.raft.data.election_timeout_ms=5000
### Sets the amount of time the Raft snapshot will execute periodically, default is 30 minute
# nacos.core.protocol.raft.data.snapshot_interval_secs=30
### raft internal worker threads
# nacos.core.protocol.raft.data.core_thread_num=8
### Number of threads required for raft business request processing
# nacos.core.protocol.raft.data.cli_service_thread_num=4
### raft linear read strategy. Safe linear reads are used by default, that is, the Leader tenure is confirmed by heartbeat
# nacos.core.protocol.raft.data.read_index_type=ReadOnlySafe
### rpc request timeout, default 5 seconds
# nacos.core.protocol.raft.data.rpc_request_timeout_ms=5000

#*************** Distro Related Configurations ***************#

### Distro data sync delay time, when sync task delayed, task will be merged for same data key. Default 1 second.
# nacos.core.protocol.distro.data.sync.delayMs=1000

### Distro data sync timeout for one sync data, default 3 seconds.
# nacos.core.protocol.distro.data.sync.timeoutMs=3000

### Distro data sync retry delay time when sync data failed or timeout, same behavior with delayMs, default 3 seconds.
# nacos.core.protocol.distro.data.sync.retryDelayMs=3000

### Distro data verify interval time, verify synced data whether expired for a interval. Default 5 seconds.
# nacos.core.protocol.distro.data.verify.intervalMs=5000

### Distro data verify timeout for one verify, default 3 seconds.
# nacos.core.protocol.distro.data.verify.timeoutMs=3000

### Distro data load retry delay when load snapshot data failed, default 30 seconds.
# nacos.core.protocol.distro.data.load.retryDelayMs=30000
-
初始化mysql数据库,创建数据库表,数据库初始化文件:mysql-schema.sql
(mysql版本要求:5.6.5+) -
单机启动命令:
startup.cmd -m standalone
- 启动报错可能原因分析:
数据库没配置好,库表没创建好,或者数据库名和url后的库名不一致
data目录是之前测试时用过的,可能冲突了,测试环境下直接把data目录删除
nacos客户端配置
server:
  port: 9910

spring:

  datasource:
    # MySql
    url: jdbc:mysql://127.0.0.1:3306/test?useSSL=false&useUnicode=true&characterEncoding=utf-8&zeroDateTimeBehavior=convertToNull&transformedBitIsBoolean=true&serverTimezone=GMT%2B8&nullCatalogMeansCurrent=true&allowPublicKeyRetrieval=true
    username: root
    password: root
    driver-class-name: com.mysql.cj.jdbc.Driver

  application:
    name: file
  cloud:
    nacos:
      config:
        import-check:
          enabled: false
      discovery:
        # server in local can only be 127.0.0.1 but not localhost or ip
        server-addr: 127.0.0.1:8848
        group: SEATA_GROUP
seata服务端配置
- 创建seata\script\server\db sql脚本中的库表
(如果按照博主的教程 需自行创建test库) - 修改seata\conf配置
下面配置中,注释了的 都是非常要小心的 因为客户端以及nacos控制台配置中,需要相对应!
server:
  port: 7091

spring:
  application:
  	# seata 服务端名字 , 客户端配置时 需要一致
    name: seata-server

logging:
  config: classpath:logback-spring.xml
  file:
    path: ${user.home}/logs/seata
  extend:
    logstash-appender:
      destination: 127.0.0.1:4560
    kafka-appender:
      bootstrap-servers: 127.0.0.1:9092
      topic: logback_to_logstash

console:
  user:
    username: seata
    password: seata
seata:
  config:
    # support: nacos, consul, apollo, zk, etcd3
    type: nacos
    nacos:
      # nacos 地址
      server-addr: 127.0.0.1:8848
      # nacos中需要创建该namespace
      namespace: fbb5b0a8-7b5f-413e-80b9-4010646e6378
      # seata server在nacos的组 客户端配置时 需要一致
      group: SEATA_GROUP
      username: nacos
      password: nacos
      # nacos中需要创建该配置
      data-id: seataServer.properties


  registry:
    # support: nacos, eureka, redis, zk, consul, etcd3, sofa
    # 类型指定为nacos, 下面
    type: nacos
    nacos:
      # 与application name保持一致
      application: seata-server
      server-addr: 127.0.0.1:8848
      # nacos中需要创建该namespace
      namespace: fbb5b0a8-7b5f-413e-80b9-4010646e6378
      # seata server在nacos的组 客户端配置时 需要一致
      group: SEATA_GROUP
      username: nacos
      password: nacos

  store:
    # support: file 、 db 、 redis
    # 设置为db模式 记得要创建数据库表
    mode: db
    db:
      datasource: druid
      dbType: mysql
      driverClassName: com.mysql.cj.jdbc.Driver
      url: jdbc:mysql://127.0.0.1:3306/test?useSSL=false&useUnicode=true&characterEncoding=utf-8&zeroDateTimeBehavior=convertToNull&transformedBitIsBoolean=true&serverTimezone=GMT%2B8&nullCatalogMeansCurrent=true&allowPublicKeyRetrieval=true
      user: root
      password: root

  server:
    service-port: 8091 #If not configured, the default is '${server.port} + 1000'

  security:
    secretKey: SeataSecretKey0c382ef121d778043159209298fd40bf3850a017
    tokenValidityInMilliseconds: 1800000
    ignore:
      urls: /,/**/*.css,/**/*.js,/**/*.html,/**/*.map,/**/*.svg,/**/*.png,/**/*.jpeg,/**/*.ico,/api/v1/auth/login
-
启动seata
启动报错可能原因:
a. 数据库配置错误
b. nacos中创建过或使用过seata提供的脚本导入至nacos配置,没有删除
(例如nacos中旧配置指向数据库aaa, 现在我们在seata的application配置文件中改为数据库bbb, 是会优先读取nacos里面的配置的,这个时候如果我们把数据库aaa删除了,启动seata就会报错aaa.xxx table not exist, 我们只要在nacos中将旧配置删除即可)c. 没有seata/lib/jdbc目录下多余的jar包删除, 例如我们mysql版本为8 , 需要将lib包下的mysql5的驱动给手动删掉
(博主测试发现 seata1.6需要手动删除, seata1.7不需要)
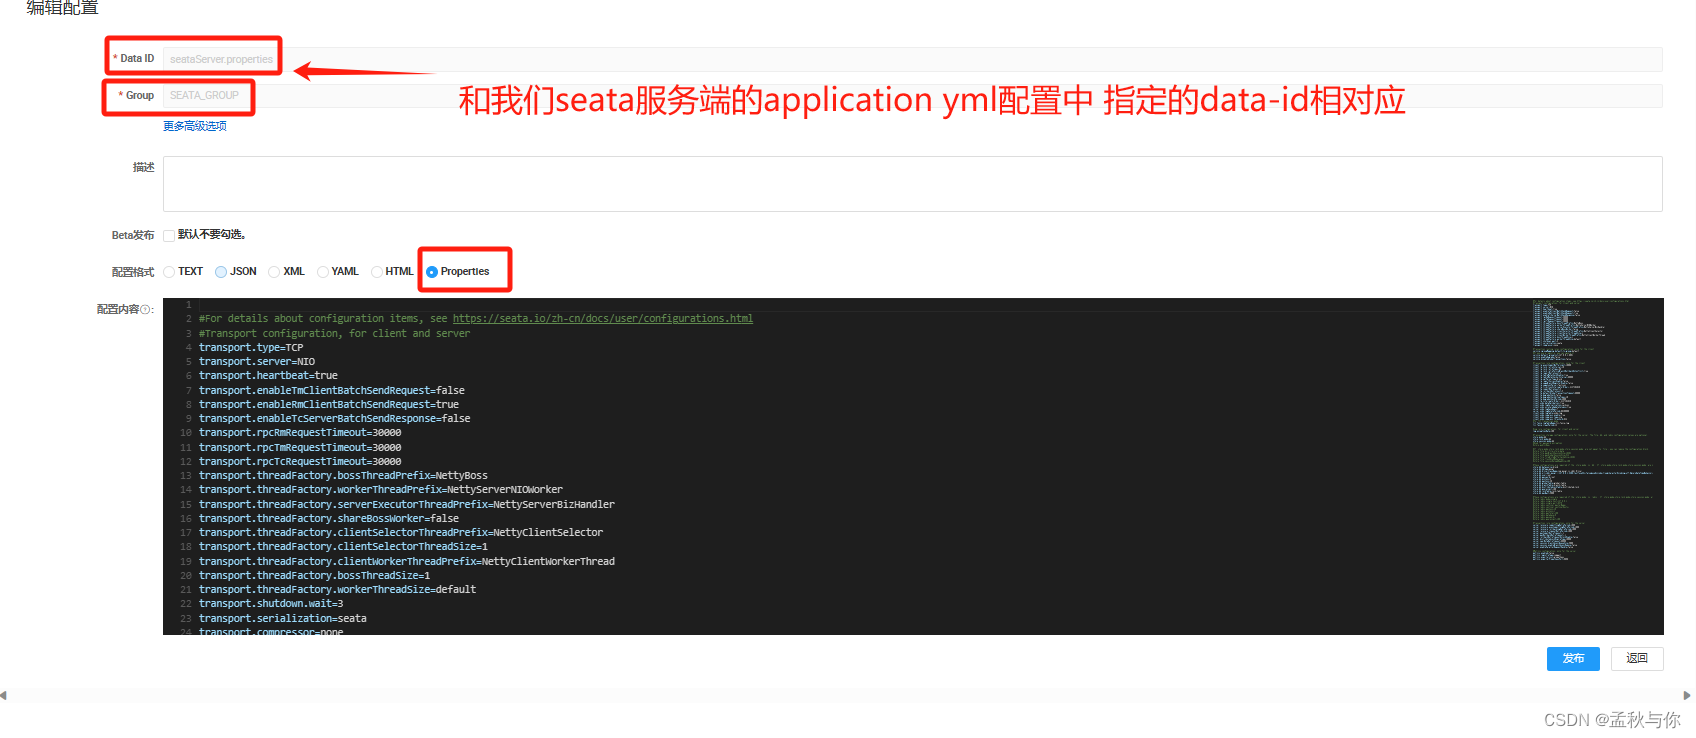
nacos中创建seata相关配置
-
在nacos中创建 namespace和data-id为seataServer.properties的配置
【警告】本步骤非常重要,不想部署一次调一次源码,最好不要节外生枝,有些版本的seata,即使客户端中yml配置正确,节点也没写错,但是不在nacos中配置是会报错的, 配置文件错误报的错 包括不限于:can not get cluster name in registry config
no available service
seata :Failed to get available servers:错误可能出现在启动时,也可能出现在项目运行后控制台报错,也可能在java代码调用时抛异常,这取决于我们配置错的有多离谱(后文还会提到客户端配置不当 也可能导致该错误)
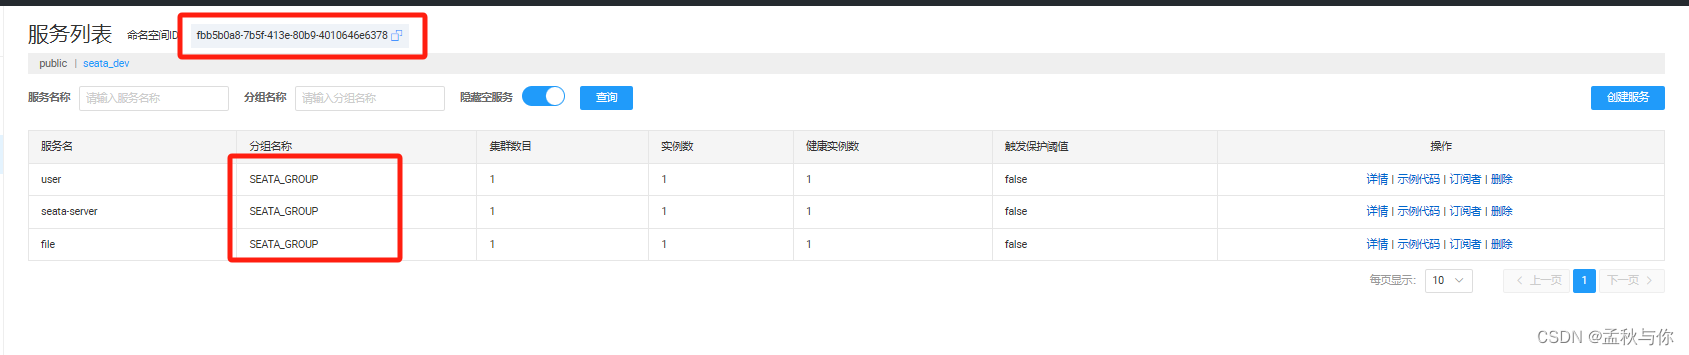
a. 创建namespace
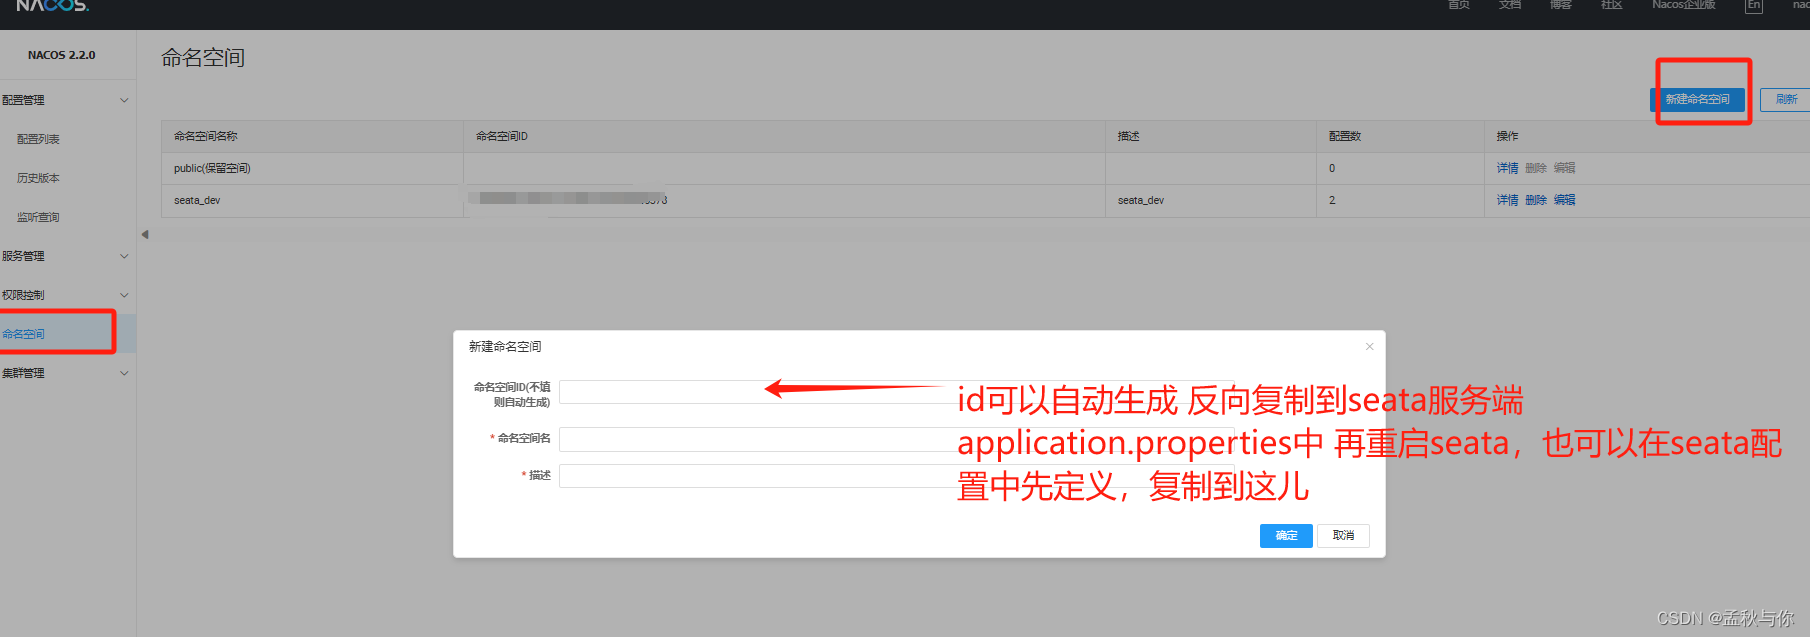
如果是按博主教程来的,这儿的id填写 (注意有空格需要去空格)
fbb5b0a8-7b5f-413e-80b9-4010646e6378
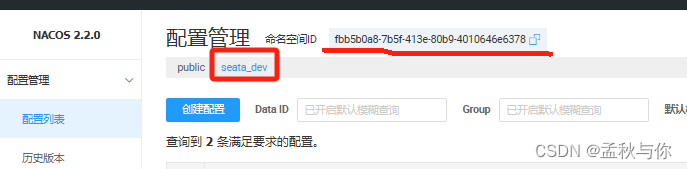
b.切换命名空间 创建data id为seataServer.properties的配置
(配置模板在seata服务端目录 seata\script\config-center的config.txt下 ,我们可以先在config中修改好,再复制到naocs)

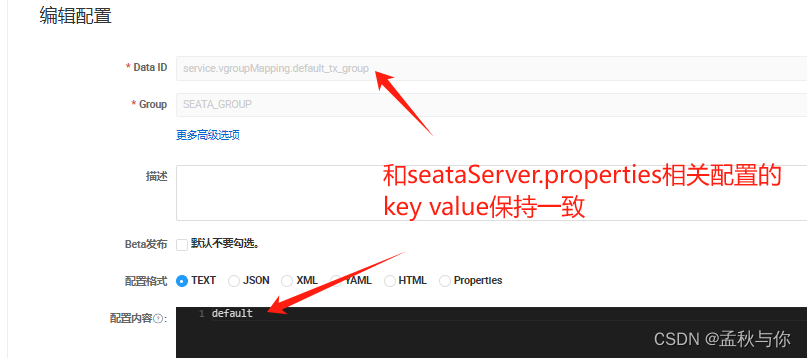
特别需要注意 service.vgroupMapping.default_tx_group=default 这个配置
(default_tx_group和default 是可以修改的,我知道同学你想改 但是现在先别改,等熟练之后再改,不然很容易出错)
#For details about configuration items, see https://seata.io/zh-cn/docs/user/configurations.html
#Transport configuration, for client and server
transport.type=TCP
transport.server=NIO
transport.heartbeat=true
transport.enableTmClientBatchSendRequest=false
transport.enableRmClientBatchSendRequest=true
transport.enableTcServerBatchSendResponse=false
transport.rpcRmRequestTimeout=30000
transport.rpcTmRequestTimeout=30000
transport.rpcTcRequestTimeout=30000
transport.threadFactory.bossThreadPrefix=NettyBoss
transport.threadFactory.workerThreadPrefix=NettyServerNIOWorker
transport.threadFactory.serverExecutorThreadPrefix=NettyServerBizHandler
transport.threadFactory.shareBossWorker=false
transport.threadFactory.clientSelectorThreadPrefix=NettyClientSelector
transport.threadFactory.clientSelectorThreadSize=1
transport.threadFactory.clientWorkerThreadPrefix=NettyClientWorkerThread
transport.threadFactory.bossThreadSize=1
transport.threadFactory.workerThreadSize=default
transport.shutdown.wait=3
transport.serialization=seata
transport.compressor=none

#Transaction routing rules configuration, only for the client
service.vgroupMapping.default_tx_group=default
#If you use a registry, you can ignore it
service.default.grouplist=127.0.0.1:8091
service.enableDegrade=false
service.disableGlobalTransaction=false

#Transaction rule configuration, only for the client
client.rm.asyncCommitBufferLimit=10000
client.rm.lock.retryInterval=10
client.rm.lock.retryTimes=30
client.rm.lock.retryPolicyBranchRollbackOnConflict=true
client.rm.reportRetryCount=5
client.rm.tableMetaCheckEnable=true
client.rm.tableMetaCheckerInterval=60000
client.rm.sqlParserType=druid
client.rm.reportSuccessEnable=false
client.rm.sagaBranchRegisterEnable=false
client.rm.sagaJsonParser=fastjson
client.rm.tccActionInterceptorOrder=-2147482648
client.tm.commitRetryCount=5
client.tm.rollbackRetryCount=5
client.tm.defaultGlobalTransactionTimeout=60000
client.tm.degradeCheck=false
client.tm.degradeCheckAllowTimes=10
client.tm.degradeCheckPeriod=2000
client.tm.interceptorOrder=-2147482648
client.undo.dataValidation=true
client.undo.logSerialization=jackson
client.undo.onlyCareUpdateColumns=true
server.undo.logSaveDays=7
server.undo.logDeletePeriod=86400000
client.undo.logTable=undo_log
client.undo.compress.enable=true
client.undo.compress.type=zip
client.undo.compress.threshold=64k
#For TCC transaction mode
tcc.fence.logTableName=tcc_fence_log
tcc.fence.cleanPeriod=1h

#Log rule configuration, for client and server
log.exceptionRate=100

#Transaction storage configuration, only for the server. The file, db, and redis configuration values are optional.
store.mode=db
store.lock.mode=db
store.session.mode=db
#Used for password encryption
#store.publicKey=

#If `store.mode,store.lock.mode,store.session.mode` are not equal to `file`, you can remove the configuration block.
#store.file.dir=file_store/data
#store.file.maxBranchSessionSize=16384
#store.file.maxGlobalSessionSize=512
#store.file.fileWriteBufferCacheSize=16384
#store.file.flushDiskMode=async
#store.file.sessionReloadReadSize=100

#These configurations are required if the `store mode` is `db`. If `store.mode,store.lock.mode,store.session.mode` are not equal to `db`, you can remove the configuration block.
store.db.datasource=druid
store.db.dbType=mysql
store.db.driverClassName=com.mysql.cj.jdbc.Driver
store.db.url=jdbc:mysql://127.0.0.1:3306/test?useSSL=false&useUnicode=true&characterEncoding=utf-8&zeroDateTimeBehavior=convertToNull&transformedBitIsBoolean=true&serverTimezone=GMT%2B8&nullCatalogMeansCurrent=true&allowPublicKeyRetrieval=true
store.db.user=root
store.db.password=root
store.db.minConn=5
store.db.maxConn=30
store.db.globalTable=global_table
store.db.branchTable=branch_table
store.db.distributedLockTable=distributed_lock
store.db.queryLimit=100
store.db.lockTable=lock_table
store.db.maxWait=5000

#These configurations are required if the `store mode` is `redis`. If `store.mode,store.lock.mode,store.session.mode` are not equal to `redis`, you can remove the configuration block.
#store.redis.mode=single
#store.redis.single.host=127.0.0.1
#store.redis.single.port=6379
#store.redis.sentinel.masterName=
#store.redis.sentinel.sentinelHosts=
#store.redis.maxConn=10
#store.redis.minConn=1
#store.redis.maxTotal=100
#store.redis.database=0
#store.redis.password=
#store.redis.queryLimit=100

#Transaction rule configuration, only for the server
server.recovery.committingRetryPeriod=1000
server.recovery.asynCommittingRetryPeriod=1000
server.recovery.rollbackingRetryPeriod=1000
server.recovery.timeoutRetryPeriod=1000
server.maxCommitRetryTimeout=-1
server.maxRollbackRetryTimeout=-1
server.rollbackRetryTimeoutUnlockEnable=false
server.distributedLockExpireTime=10000
server.xaerNotaRetryTimeout=60000
server.session.branchAsyncQueueSize=5000
server.session.enableBranchAsyncRemove=false
server.enableParallelRequestHandle=false

#Metrics configuration, only for the server
metrics.enabled=false
metrics.registryType=compact
metrics.exporterList=prometheus
metrics.exporterPrometheusPort=9898
c. nacos中创建data id 为 service.vgroupMapping.default_tx_group 的配置
(这也是为什么上一步说要特别注意这个配置,只在客户端配置这个是不生效的)
此时我们先检查seata服务端是否接入nacos,如果没问题再往下(记得切换命名空间)

seata客户端配置
nacos整合seata之后的完整配置
server:
  port: 9910

spring:

  datasource:
    # MySql
    url: jdbc:mysql://127.0.0.1:3306/test?useSSL=false&useUnicode=true&characterEncoding=utf-8&zeroDateTimeBehavior=convertToNull&transformedBitIsBoolean=true&serverTimezone=GMT%2B8&nullCatalogMeansCurrent=true&allowPublicKeyRetrieval=true
    username: root
    password: root
    driver-class-name: com.mysql.cj.jdbc.Driver

  application:
    name: file
  cloud:
    nacos:
      config:
        import-check:
          enabled: false
      discovery:
        # server in local can only be 127.0.0.1 but not localhost or ip
        server-addr: 127.0.0.1:8848
        # nacos控制台中 我们看到的分组
        group: SEATA_GROUP
        # nacos控制台中 我们看到的namespace
        namespace: fbb5b0a8-7b5f-413e-80b9-4010646e6378
feign:
  # 降级: 替代旧版本的 feign.hystrix.enabled配置 (开启会导致seata失效 )
  circuitbreaker:
    enabled: true

# Seata 配置
seata:
  application-id: seata-server
  # 这个配置节点的value熟悉吗 是的 前文提醒过要注意的地方了
  tx-service-group: default_tx_group
  # 是否启用数据源bean的自动代理  默认AT模式,依赖seata-starter时 自动代理即可
  # 非常重要:AT(默认)模式下,必须要有代理才能完成全局回滚!!
  # 如果为false 必须手动创建代理对象!
  enable-auto-data-source-proxy: true
  registry:
    type: nacos
    nacos:
      # Nacos 服务地址
      server-addr: 127.0.0.1:8848
      group: SEATA_GROUP
      application: seata-server # 必须和服务端保持一致
      username: nacos
      password: nacos
      cluster: default
      namespace: fbb5b0a8-7b5f-413e-80b9-4010646e6378

  config:
    type: nacos
    nacos:
      server-addr: ${spring.cloud.nacos.discovery.server-addr}
#      namespace: ${spring.cloud.nacos.discovery.namespace}
      group: SEATA_GROUP
      data-id: seataServer.properties
      namespace: fbb5b0a8-7b5f-413e-80b9-4010646e6378
  service:
    vgroup-mapping:
      # 这个key value熟悉吧(虽然客户端配置不生效)是的这个配置有点怪, 把用户可以自定义的值作为key
      default_tx_group: default
    disable-global-transaction: false
  client:
    rm:
      # 是否上报成功状态
      report-success-enable: true
      # 重试次数
      report-retry-count: 5
mybatis-plus:
  mapper-locations: classpath*:mapper/*.xml
logging:
  level:
    root: info
项目中使用seata方式补充
- 创建我们的业务表,创建java项目
- 还需要创建undo_log表
CREATE TABLE `undo_log` (
  `id` bigint NOT NULL AUTO_INCREMENT,
  `branch_id` bigint NOT NULL,
  `xid` varchar(100) NOT NULL,
  `context` varchar(128) NOT NULL,
  `rollback_info` longblob NOT NULL,
  `log_status` int NOT NULL,
  `log_created` datetime NOT NULL,
  `log_modified` datetime NOT NULL,
  `ext` varchar(100) DEFAULT NULL,
  PRIMARY KEY (`id`),
  UNIQUE KEY `ux_undo_log` (`xid`,`branch_id`)
) ENGINE=InnoDB AUTO_INCREMENT=8 DEFAULT CHARSET=utf8mb3;
-
业务方法前加上 @GlobalTransactional
-
pom文件示例(仅做参考 )
父模块:
<?xml version="1.0" encoding="UTF-8"?>
<project xmlns="http://maven.apache.org/POM/4.0.0" xmlns:xsi="http://www.w3.org/2001/XMLSchema-instance"
         xsi:schemaLocation="http://maven.apache.org/POM/4.0.0 https://maven.apache.org/xsd/maven-4.0.0.xsd">
    <modelVersion>4.0.0</modelVersion>
    <parent>
        <groupId>org.springframework.boot</groupId>
        <artifactId>spring-boot-starter-parent</artifactId>
        <version>2.6.13</version>
        <relativePath/> <!-- lookup parent from repository -->
    </parent>
    <!-- 子项目继承父项目pom文件时 父项目需要packing指定为pom
    daclare the packing:pom when child extends this moudule-->
    <packaging>pom</packaging>
    <groupId>com.demo</groupId>
    <artifactId>MySpringCloud</artifactId>
    <version>0.0.1-SNAPSHOT</version>
    <name>MySpringCloud</name>
    <description>Demo project for Spring Boot</description>

    <!-- 配置版本 version config 用于依赖管理版本号el表达式取值
  act on dependencyManagement-dependencies-dependency-version by ${xxx.version}-->
    <properties>
        <java.version>11</java.version>
        <project.build.sourceEncoding>UTF-8</project.build.sourceEncoding>
        <project.reporting.outputEncoding>UTF-8</project.reporting.outputEncoding>

        <spring-cloud.version>2021.0.5</spring-cloud.version>
        <spring-cloud-alibaba.version>2021.0.5.0</spring-cloud-alibaba.version>

        <nacos.client.version>2.2.0</nacos.client.version>
        <sentinel.version>1.8.6</sentinel.version>
        <netflix-hystrix.version>2.2.10.RELEASE</netflix-hystrix.version>
        <mybatis-plus.version>3.5.1</mybatis-plus.version>
        <fastjson.version>1.2.76</fastjson.version>
        <servlet.version>4.0.1</servlet.version>
        <skywalking.version>8.5.0</skywalking.version>
        <seata.version>1.6.1</seata.version>
        <mysql.version>8.0.32</mysql.version>
        <lombok.version>1.18.12</lombok.version>

    </properties>

    <!-- author by qkj-->
    <!-- 声明依赖及其版本 但不引入, 子模块进行引入 (但子模块无需声明版本 否则会使用声明的版本号)-->
    <!-- note: dependencyManagement only declare the dependency and version but not import,
    child moudule should import again without declare the version when need dependency  -->

    <!-- 注意:dependencyManagement与dependencies区别 如果在父模块使用dependencies,子模块都继承,不管用不用得上-->
    <!-- note: difference with dependencies:child moudule extends dependencies unconditional   -->
    <dependencyManagement>

        <dependencies>
            <!-- diff:cloud-dependencies and cloud-starter?
            dependencies only declare the version and download jar with starter -->
            <!-- cloud-dependencies and cloud-starter 的区别 一般带 dependencies 的 artifactId 都是声明版本
            点进去看就能发现 里面是声明的dependencyManagement, 而starter则是我们要下载具体的xxx-starter.jar包-->
            <dependency>
                <groupId>org.springframework.cloud</groupId>
                <artifactId>spring-cloud-dependencies</artifactId>
                <version>${spring-cloud.version}</version>
                <!-- 需要加上type 否则在阿里云可能下载不了
                declare type:pom  or maybe download fall in alibaba maven
                type pom: 已打包为pom-->
                <type>pom</type>
                <scope>import</scope>
            </dependency>


            <!-- alibaba与cloud整合 -->
            <dependency>
                <groupId>com.alibaba.cloud</groupId>
                <artifactId>spring-cloud-alibaba-dependencies</artifactId>
                <version>${spring-cloud-alibaba.version}</version>
                <type>pom</type>
                <!-- scope:import can only declare in dependencyManagement; resolve the problem of single extends -->
                <!--<scope>import</scope> 只会在dependencyManagement中出现-->
                <!-- 解决单继承问题 换句话说 加上import 可以使用spring-cloud-alibaba-dependencies面的dependencyManagement -->
                <!-- such as spring-cloud-alibaba-dependencies already include spring-cloud-starter-alibaba-nacos-discovery
                  child module can declare spring-cloud-starter-alibaba-nacos-discovery without version-->
                <scope>import</scope>
            </dependency>

            <!--lombok-->
            <dependency>
                <groupId>org.projectlombok</groupId>
                <artifactId>lombok</artifactId>
                <optional>true</optional>
                <version>${lombok.version}</version>
            </dependency>

            <!--fastjson 注意过低版本会有漏洞(建议关注新版) low version such as 1.2.71 before with remote bug-->
            <dependency>
                <groupId>com.alibaba</groupId>
                <artifactId>fastjson</artifactId>
                <version>${fastjson.version}</version>
            </dependency>

            <!-- nacos注册中心客户端 内置ribbon-->
            <dependency>
                <groupId>com.alibaba.nacos</groupId>
                <artifactId>nacos-client</artifactId>
                <version>${nacos.client.version}</version>
            </dependency>


            <!-- sentinel-->
            <dependency>
                <groupId>com.alibaba.csp</groupId>
                <artifactId>sentinel-core</artifactId>
                <version>${sentinel.version}</version>
            </dependency>

            <!-- sentinel控制台-->
            <dependency>
                <groupId>com.alibaba.csp</groupId>
                <artifactId>sentinel-transport-simple-http</artifactId>
                <version>${sentinel.version}</version>
            </dependency>


            <!-- feign集成hystrix豪猪降级-->
            <dependency>
                <groupId>org.springframework.cloud</groupId>
                <artifactId>spring-cloud-starter-netflix-hystrix</artifactId>
                <version>${netflix-hystrix.version}</version>
            </dependency>

            <!-- servlet -->
            <dependency>
                <groupId>javax.servlet</groupId>
                <artifactId>javax.servlet-api</artifactId>
                <version>${servlet.version}</version>
            </dependency>

            <!-- skywalking工具类:自定义链路追踪等-->
            <dependency>
                <groupId>org.apache.skywalking</groupId>
                <artifactId>apm-toolkit-trace</artifactId>
                <!-- 与sw版本对应 -->
                <version>${skywalking.version}</version>
            </dependency>

            <!-- skywalking和logback整合-->
            <dependency>
                <groupId>org.apache.skywalking</groupId>
                <artifactId>apm-toolkit-logback-1.x</artifactId>
                <version>${skywalking.version}</version>
            </dependency>


            <!--mybatis plus-->
            <dependency>
                <groupId>com.baomidou</groupId>
                <artifactId>mybatis-plus-boot-starter</artifactId>
                <version>${mybatis-plus.version}</version>
            </dependency>

            <!-- mybatis plus 动态数据源 -->
            <dependency>
                <groupId>com.baomidou</groupId>
                <artifactId>dynamic-datasource-spring-boot-starter</artifactId>
                <version>${mybatis-plus.version}</version>
            </dependency>

            <!-- seata -->
            <dependency>
                <groupId>io.seata</groupId>
                <artifactId>seata-spring-boot-starter</artifactId>
                <version>${seata.version}</version>
            </dependency>

            <!--解决seata序列化问题(jackson版本冲突问题)-->
            <dependency>
                <groupId>io.seata</groupId>
                <artifactId>seata-serializer-kryo</artifactId>
                <version>${seata.version}</version>
            </dependency>

            <!-- mysql -->
            <dependency>
                <groupId>com.mysql</groupId>
                <artifactId>mysql-connector-j</artifactId>
                <version>${mysql.version}</version>
            </dependency>

        </dependencies>
    </dependencyManagement>

    <!-- 可以理解为声明子类(子模块) -->
    <modules>
        <module>common</module>
        <module>product</module>
        <module>gateway</module>
        <module>user</module>
        <module>file</module>
    </modules>

    <!--注意 子模块有工具类(没有main方法) 不能在父模块这里声明maven插件 子模块继承 会导致打包报找不到main方法(unalbe to find main class) -->


</project>
子模块:
<?xml version="1.0" encoding="UTF-8"?>
<project xmlns="http://maven.apache.org/POM/4.0.0" xmlns:xsi="http://www.w3.org/2001/XMLSchema-instance"
         xsi:schemaLocation="http://maven.apache.org/POM/4.0.0 https://maven.apache.org/xsd/maven-4.0.0.xsd">
    <modelVersion>4.0.0</modelVersion>

    <parent>
        <groupId>com.demo</groupId>
        <artifactId>MySpringCloud</artifactId>
        <version>0.0.1-SNAPSHOT</version>
    </parent>

    <!-- 因为user是我们的业务模块 通俗点说是一个小项目 到时候要打包java -jar运行的 所以打包方式为jar(可以不写 默认为jar) 而不是pom-->
    <packaging>jar</packaging>
    <groupId>com.qkj</groupId>
    <artifactId>user</artifactId>
    <version>0.0.1-SNAPSHOT</version>
    <name>user</name>
    <description>Demo project for Spring Boot</description>
    <properties>
        <java.version>1.8</java.version>
    </properties>
    <dependencies>

        <dependency>
            <groupId>org.springframework.cloud</groupId>
            <artifactId>spring-cloud-dependencies</artifactId>
            <!-- 父模块该依赖为pom 子模块该依赖也尽量定义为pom
            父模块该依赖未使用<scope>import</scope>:当前模块如果还有子模块必须声明为pom 没有则随意 -->
            <!-- 但是父模块该依赖使用了import 可以理解为继承了该依赖内置的dependencyManagement 必须使用pom 且声明版本号-->
            <!-- must declare type:pom when child module exist or parent module dependency declare scope:import;
            version should be declared if parent module dependency declare scope:import,else type could be default or other-->
            <!-- so shoule better declare the type: pom -->
            <version>${spring-cloud.version}</version>
            <type>pom</type>
        </dependency>

        <!-- alibaba与cloud整合 -->
        <dependency>
            <groupId>com.alibaba.cloud</groupId>
            <artifactId>spring-cloud-alibaba-dependencies</artifactId>
            <version>${spring-cloud-alibaba.version}</version>
            <type>pom</type>
        </dependency>

        <!-- SpringBoot Web 来源于cloud-dependencies >> cloud-common >> cloud-starter >> boot-starter -->
        <dependency>
            <groupId>org.springframework.boot</groupId>
            <artifactId>spring-boot-starter-web</artifactId>
        </dependency>


        <!--lombok-->
        <dependency>
            <groupId>org.projectlombok</groupId>
            <artifactId>lombok</artifactId>
            <optional>true</optional>
        </dependency>

        <!--fastjson 注意过低版本会有漏洞 low version such as 1.2.71 before with remote bug-->
        <dependency>
            <groupId>com.alibaba</groupId>
            <artifactId>fastjson</artifactId>
            <version>1.2.76</version>
        </dependency>

        <!-- nacos注册中心客户端 内置ribbon-->
        <dependency>
            <groupId>com.alibaba.nacos</groupId>
            <artifactId>nacos-client</artifactId>
        </dependency>

        <!-- sentinel-->
        <dependency>
            <groupId>com.alibaba.csp</groupId>
            <artifactId>sentinel-core</artifactId>
        </dependency>

        <!-- sentinel控制台-->
        <dependency>
            <groupId>com.alibaba.csp</groupId>
            <artifactId>sentinel-transport-simple-http</artifactId>
        </dependency>

        <!--feign 依赖-->
        <dependency>
            <groupId>org.springframework.cloud</groupId>
            <artifactId>spring-cloud-starter-openfeign</artifactId>
        </dependency>

        <!-- 载入open feign 要用到-->
        <dependency>
            <groupId>org.springframework.cloud</groupId>
            <artifactId>spring-cloud-loadbalancer</artifactId>
        </dependency>

        <!-- 豪猪熔断 -->
        <dependency>
            <groupId>org.springframework.cloud</groupId>
            <artifactId>spring-cloud-starter-netflix-hystrix</artifactId>
        </dependency>


        <!--Nacos Discovery-->
        <!-- 在spring-cloud-alibaba-dependencies里面声明了版本 又因为设置了scope:import 所以在我们自己写的父模块pom文件中 不能显式看到-->
        <!-- declare in spring-cloud-alibaba-dependencies-->
        <dependency>
            <groupId>com.alibaba.cloud</groupId>
            <artifactId>spring-cloud-starter-alibaba-nacos-discovery</artifactId>
        </dependency>

        <!--实现配置的动态变更-->
        <dependency>
            <groupId>com.alibaba.cloud</groupId>
            <artifactId>spring-cloud-starter-alibaba-nacos-config</artifactId>
        </dependency>

        <!-- skywalking工具类:自定义链路追踪等-->
        <dependency>
            <groupId>org.apache.skywalking</groupId>
            <artifactId>apm-toolkit-trace</artifactId>
        </dependency>

        <!-- skywalking和logback整合 print traceId in our logs-->
        <dependency>
            <groupId>org.apache.skywalking</groupId>
            <artifactId>apm-toolkit-logback-1.x</artifactId>
        </dependency>


        <!-- seata -->
        <dependency>
            <groupId>io.seata</groupId>
            <artifactId>seata-spring-boot-starter</artifactId>
        </dependency>

        <!--解决seata序列化问题(jackson版本冲突)-->
        <dependency>
            <groupId>io.seata</groupId>
            <artifactId>seata-serializer-kryo</artifactId>
        </dependency>

        <!-- Seata 与 cloud alibaba整合 -->
        <dependency>
            <groupId>com.alibaba.cloud</groupId>
            <artifactId>spring-cloud-starter-alibaba-seata</artifactId>
            <exclusions>
                <exclusion>
                    <groupId>io.seata</groupId>
                    <artifactId>seata-spring-boot-starter</artifactId>
                </exclusion>
            </exclusions>
        </dependency>

        <!-- validation -->
        <dependency>
            <groupId>org.springframework.boot</groupId>
            <artifactId>spring-boot-starter-validation</artifactId>
        </dependency>

        <dependency>
            <groupId>com.mysql</groupId>
            <artifactId>mysql-connector-j</artifactId>
        </dependency>

        <dependency>
            <groupId>com.baomidou</groupId>
            <artifactId>mybatis-plus-boot-starter</artifactId>
        </dependency>
        <dependency>
            <groupId>com.qkj</groupId>
            <artifactId>file-api</artifactId>
            <version>0.0.1-SNAPSHOT</version>
            <scope>compile</scope>
        </dependency>


    </dependencies>

    <build>
        <plugins>
            <plugin>
                <groupId>org.springframework.boot</groupId>
                <artifactId>spring-boot-maven-plugin</artifactId>
                <configuration>
                    <excludes>
                        <exclude>
                            <groupId>org.projectlombok</groupId>
                            <artifactId>lombok</artifactId>
                        </exclude>
                    </excludes>
                </configuration>
                <version>2.3.4.RELEASE</version>
            </plugin>
        </plugins>

        <resources>
            <resource>
                <directory>src/main/java</directory>
                <filtering>false</filtering>
                <includes>
                    <include>**/*.xml</include>
                </includes>
            </resource>
        </resources>
    </build>

</project>
全局事务失效原因
-
配置出问题,或本文中提到需要在nacos创建的配置 并未创建
can not get cluster name in registry config
(no available service)
服务找不到,自然全局回滚也会失效 -
如项目中 开启降级或全局异常,可能会导致全局事务失败 ,同理 自己catch了异常 事务也不回滚,不管八股文怎么说,降级无非是一个解耦的try catch
-
引入了动态数据源 例如dynamic-datasource-spring-boot-starter
dynamic时 ,客户端(java项目)的yml 配置有点区别,自行百度。 -
检查是否创建undo_log表以及是否开启数据源代理(以AT模式举例 不管是手动还是自动代理,必须要有一个代理数据源,引入了seata-spring-boot-starter 用自动代理即可 上文教程中有写)
-
据说继承了WebMvcConfigurationSupport类 ,也会导致失效,好像是被拦截了,改为实现WebMvcConfigurer (有具体代码的同学 感兴趣可以调试一下)
-
在不同服务之间打印输出 xid ,xid获取方法:
String xid = RootContext.getXID();
如果为null 那毫无疑问会失效,以上原因(但不限于) 都会导致xid为null
开启降级时 seata失效的解决方法
我们上文提到过,xid为null事务回滚是会失败的,因为seata就是通过在请求头里面传递一个全局的xid。
-
开启降级时,因为降级是异步的,会导致xid为null
-
降级其实就是一个异步解耦的try catch 异常被捕获了,自然也不能回滚。
所以我们解决失效问题,需要同时解决以上两点,网上的教程几乎都是只解决了其中一点; -
还有说在降级时抛异常 ,回滚的…
我们来简单分析一下为什么不可行:
如果没有额外代码编写,降级是异步的,RootContext.getXID()怎么可能获取到值呢?自行debug就能发现为null
可能有的教程刚好是这里报错了 中断运行 当做回滚了吧;
此外,在降级里面回滚和抛异常 似乎改变了降级原本的设计用途
Java代码:
首先编写两个传递xid的类,(解决openfeign降级时 xid为空的问题 )
import feign.RequestInterceptor;
import feign.RequestTemplate;
import io.seata.core.context.RootContext;
import org.springframework.stereotype.Component;
import org.springframework.web.context.request.RequestContextHolder;
import org.springframework.web.context.request.ServletRequestAttributes;

import javax.servlet.http.HttpServletRequest;
import java.util.*;

/**
 * feign 熔断器开启之后 传递 token验证header 头使用
 */
@Component
@ConditionalOnProperty(value = "feign.circuitbreaker.enabled", havingValue = "true",matchIfMissing = false)

public class FeignRequestInterceptor implements RequestInterceptor {

    @Override
    public void apply(RequestTemplate requestTemplate) {
        HttpServletRequest request = getHttpServletRequest();
        if (Objects.isNull(request)) {
            return;
        }
        Map<String, String> headers = getHeaders(request);
        if (headers.size() > 0) {
            Iterator<Map.Entry<String, String>> iterator = headers.entrySet().iterator();
            while (iterator.hasNext()) {
                Map.Entry<String, String> entry = iterator.next();
                requestTemplate.header(entry.getKey(), entry.getValue());
            }
        }
    }

    private HttpServletRequest getHttpServletRequest() {
        try {
            // 这种方式获取的HttpServletRequest是线程安全的
            return ((ServletRequestAttributes) (RequestContextHolder.currentRequestAttributes())).getRequest();
        } catch (Exception e) {

            return null;
        }
    }

    private Map<String, String> getHeaders(HttpServletRequest request) {
        Map<String, String> map = new LinkedHashMap<>();
        Enumeration<String> enums = request.getHeaderNames();
        String kid = (String) request.getAttribute(RootContext.KEY_XID);
        while (enums.hasMoreElements()) {
            String key = enums.nextElement();
            String value = request.getHeader(key);
            map.put(key, value);
        }
        if (kid != null && !kid.equals("")) {
            map.put(RootContext.KEY_XID, kid);
        }
        return map;
    }
}
import com.netflix.hystrix.HystrixThreadPoolKey;
import com.netflix.hystrix.HystrixThreadPoolProperties;
import com.netflix.hystrix.strategy.HystrixPlugins;
import com.netflix.hystrix.strategy.concurrency.HystrixConcurrencyStrategy;
import com.netflix.hystrix.strategy.concurrency.HystrixRequestVariable;
import com.netflix.hystrix.strategy.concurrency.HystrixRequestVariableLifecycle;
import com.netflix.hystrix.strategy.eventnotifier.HystrixEventNotifier;
import com.netflix.hystrix.strategy.executionhook.HystrixCommandExecutionHook;
import com.netflix.hystrix.strategy.metrics.HystrixMetricsPublisher;
import com.netflix.hystrix.strategy.properties.HystrixPropertiesStrategy;
import com.netflix.hystrix.strategy.properties.HystrixProperty;
import io.seata.core.context.RootContext;
import org.slf4j.Logger;
import org.slf4j.LoggerFactory;
import org.springframework.stereotype.Component;
import org.springframework.web.context.request.RequestAttributes;
import org.springframework.web.context.request.RequestContextHolder;

import java.util.concurrent.BlockingQueue;
import java.util.concurrent.Callable;
import java.util.concurrent.ThreadPoolExecutor;
import java.util.concurrent.TimeUnit;

@Component
@ConditionalOnProperty(value = "feign.circuitbreaker.enabled", havingValue = "true",matchIfMissing = false)

public class RequestAttributeHystrixConcurrencyStrategy extends HystrixConcurrencyStrategy {
    private final Logger log = LoggerFactory.getLogger(getClass());

    private HystrixConcurrencyStrategy delegate;

    public RequestAttributeHystrixConcurrencyStrategy() {
        try {
            this.delegate = HystrixPlugins.getInstance().getConcurrencyStrategy();
            if (this.delegate instanceof RequestAttributeHystrixConcurrencyStrategy) {
                // Welcome to singleton hell...
                return;
            }
            HystrixCommandExecutionHook commandExecutionHook = HystrixPlugins
                    .getInstance().getCommandExecutionHook();
            HystrixEventNotifier eventNotifier = HystrixPlugins.getInstance()
                    .getEventNotifier();
            HystrixMetricsPublisher metricsPublisher = HystrixPlugins.getInstance()
                    .getMetricsPublisher();
            HystrixPropertiesStrategy propertiesStrategy = HystrixPlugins.getInstance()
                    .getPropertiesStrategy();
            this.logCurrentStateOfHystrixPlugins(eventNotifier, metricsPublisher,
                    propertiesStrategy);
            HystrixPlugins.reset();
            HystrixPlugins.getInstance().registerConcurrencyStrategy(this);
            HystrixPlugins.getInstance()
                    .registerCommandExecutionHook(commandExecutionHook);
            HystrixPlugins.getInstance().registerEventNotifier(eventNotifier);
            HystrixPlugins.getInstance().registerMetricsPublisher(metricsPublisher);
            HystrixPlugins.getInstance().registerPropertiesStrategy(propertiesStrategy);
        }
        catch (Exception e) {

        }
    }

    private void logCurrentStateOfHystrixPlugins(HystrixEventNotifier eventNotifier,
                                                 HystrixMetricsPublisher metricsPublisher,
                                                 HystrixPropertiesStrategy propertiesStrategy) {
        if (log.isDebugEnabled()) {
            log.debug("Current Hystrix plugins configuration is ["
                    + "concurrencyStrategy [" + this.delegate + "]," + "eventNotifier ["
                    + eventNotifier + "]," + "metricPublisher [" + metricsPublisher + "],"
                    + "propertiesStrategy [" + propertiesStrategy + "]," + "]");
            log.debug("Registering Sleuth Hystrix Concurrency Strategy.");
        }
    }

    @Override
    public <T> Callable<T> wrapCallable(Callable<T> callable) {
        RequestAttributes requestAttributes = RequestContextHolder.getRequestAttributes();
        String xid = RootContext.getXID();
        requestAttributes.setAttribute(RootContext.KEY_XID,xid, RequestAttributes.SCOPE_REQUEST);
        return new WrappedCallable<>(callable, requestAttributes);
    }

    @Override
    public ThreadPoolExecutor getThreadPool(HystrixThreadPoolKey threadPoolKey,
                                            HystrixProperty<Integer> corePoolSize,
                                            HystrixProperty<Integer> maximumPoolSize,
                                            HystrixProperty<Integer> keepAliveTime, TimeUnit unit,
                                            BlockingQueue<Runnable> workQueue) {
        return this.delegate.getThreadPool(threadPoolKey, corePoolSize, maximumPoolSize,
                keepAliveTime, unit, workQueue);
    }

    @Override
    public ThreadPoolExecutor getThreadPool(HystrixThreadPoolKey threadPoolKey,
                                            HystrixThreadPoolProperties threadPoolProperties) {
        return this.delegate.getThreadPool(threadPoolKey, threadPoolProperties);
    }

    @Override
    public BlockingQueue<Runnable> getBlockingQueue(int maxQueueSize) {
        return this.delegate.getBlockingQueue(maxQueueSize);
    }

    @Override
    public <T> HystrixRequestVariable<T> getRequestVariable(
            HystrixRequestVariableLifecycle<T> rv) {
        return this.delegate.getRequestVariable(rv);
    }

    static class WrappedCallable<T> implements Callable<T> {

        private final Callable<T> target;
        private final RequestAttributes requestAttributes;

        public WrappedCallable(Callable<T> target, RequestAttributes requestAttributes) {
            this.target = target;
            this.requestAttributes = requestAttributes;
        }

        @Override
        public T call() throws Exception {
            try {
                RequestContextHolder.setRequestAttributes(requestAttributes);
                return target.call();
            }
            finally {
                RequestContextHolder.resetRequestAttributes();
            }
        }
    }
}
大致逻辑为:
RequestAttributeHystrixConcurrencyStrategy设置xid至request,FeignRequestInterceptor从request里面获取到xid,并设置到requestTemplate的header里面。

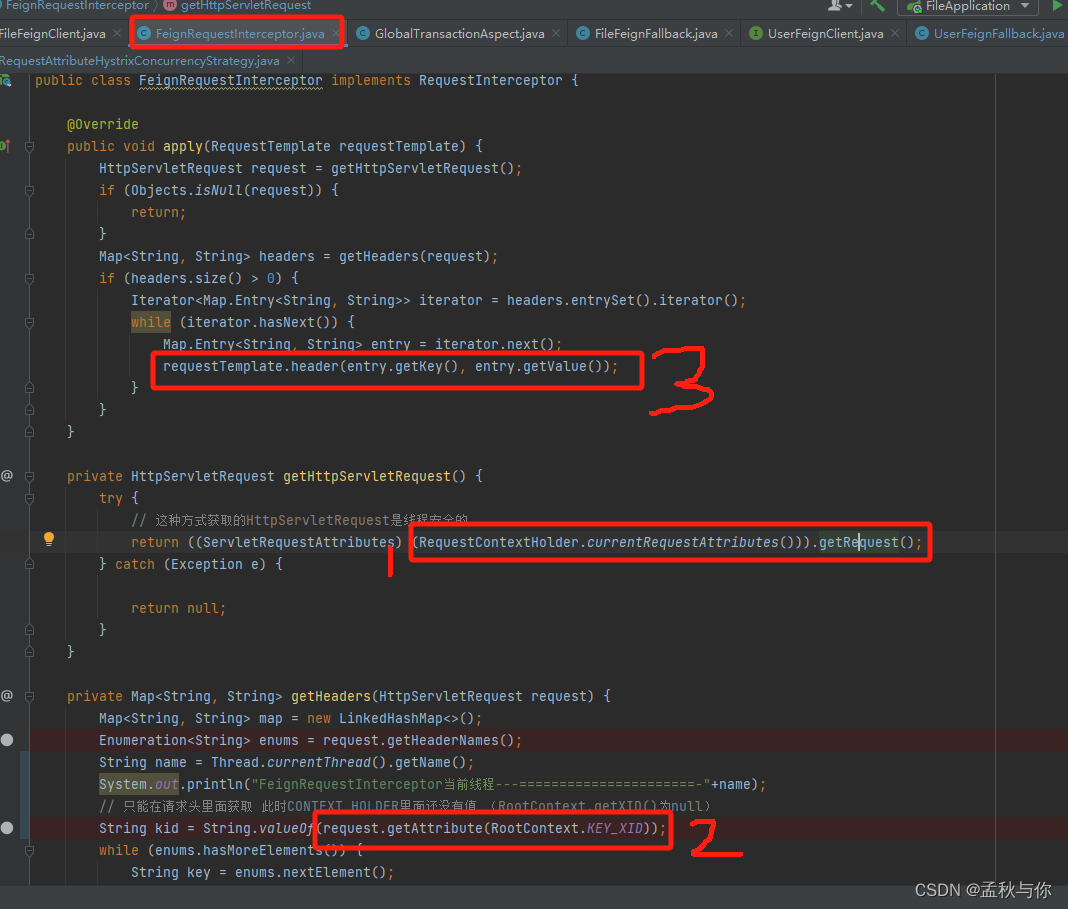
重要:为什么FeignRequestInterceptor里面不能通过RootContext(本质是threadLocal)获取到xid, 我们应该比较容易联想到是不是降级异步线程导致的?于是输出线程名 发现果然不一致。

凡是异步 都可能导致RootContext.getXid()获取不到值,很多教程用这个代码 那是因为他们未开启降级,上游服务至RequestInterceptor (实现类) 都是在同一个线程下。
当没开启降级时,不需要额外的操作 spring-cloud-starter-alibaba-seata 包 通过SPI机制帮我们配置好了

所以我们自己写的这些类 都需要加上条件 仅作用于开启了降级,否则也会导致传递xid至下游失败
**@ConditionalOnProperty(value = "feign.circuitbreaker.enabled", havingValue = "true",matchIfMissing = false**)
以上两个类只是解决了xid为空的问题,那我们还得解决如何回滚的问题:
import io.seata.common.util.StringUtils;
import io.seata.core.context.RootContext;
import io.seata.core.exception.TransactionException;
import io.seata.tm.api.GlobalTransaction;
import io.seata.tm.api.GlobalTransactionContext;
import org.aspectj.lang.JoinPoint;
import org.aspectj.lang.annotation.AfterReturning;
import org.aspectj.lang.annotation.AfterThrowing;
import org.aspectj.lang.annotation.Aspect;
import org.aspectj.lang.annotation.Before;
import org.aspectj.lang.reflect.MethodSignature;
import org.springframework.stereotype.Component;

import java.lang.reflect.Method;

/**
 * @author qkj
 */
@Aspect
@Component
@ConditionalOnProperty(value = "feign.circuitbreaker.enabled", havingValue = "true",matchIfMissing = false)
public class GlobalTransactionAspect {
    @Before("execution(* com.qkj.*.service.*.*(..))")
    public void before(JoinPoint joinPoint) throws TransactionException {
        MethodSignature signature = (MethodSignature) joinPoint.getSignature();
        Method method = signature.getMethod();
        System.out.println("拦截到需要分布式事务的方法," + method.getName());
        // 此处可用redis或者定时任务来获取一个key判断是否需要关闭分布式事务
        if (StringUtils.isBlank(RootContext.getXID())) {
            GlobalTransaction tx = GlobalTransactionContext.getCurrentOrCreate();
            tx.begin(300000, "test-client");
            String xid = tx.getXid();
            // 模拟动态关闭分布式事务
            //if(contains.key(enable=false){ do nothing // 不手动开启即为关闭})
            System.out.println("分布式事务id:" + xid);
        } else {
            System.out.println("分布式事务id:" + RootContext.getXID());
        }


    }

    @AfterThrowing(throwing = "e", pointcut = "execution(* com.qkj.*.service.*.*(..))")
    public void doRecoveryActions(Throwable e) throws TransactionException {

        System.out.println("方法执行异常: " + e.getMessage());

        if (!StringUtils.isBlank(RootContext.getXID())) {
            System.out.println("方法执行异常 上游切面获取的xid:---------- " + RootContext.getXID());
            GlobalTransactionContext.reload(RootContext.getXID()).rollback();
        }
    }

    @AfterReturning(value = "execution(* com.qkj.*.service.*.*(..))", returning = "result")
    public void afterReturning(JoinPoint point, Object result) throws TransactionException {

        System.out.println("方法执行结束: " + result);

        if ((Boolean) result) {
            if (!StringUtils.isBlank(RootContext.getXID())) {

                System.out.println("分布式事务Id: " + RootContext.getXID());
                GlobalTransactionContext.reload(RootContext.getXID()).commit();
            }
        }

    }

}
这样还是不够, 我们稍微看一下切面代码就可以发现 ,异常时通过执行doRecoveryActions 进行事务回滚,正常结束时通过执行afterReturning进行事务提交, 所以我们关键在于如何让代码出现异常,
首先我们业务代码肯定不能内部去try catch , catch了还怎么回滚呢
网上有些教程是这种状态码去判断,错误示例:
String resCode;
try{
     service.doSomething();
     resCode = "200";
  }catch(Excepton e){
   resCode = "500";
 }
我们可以用一种些比较巧妙的方式 例如以下是上游service里面的方法:
(下游代码略 代码很容易推出来)
    public Boolean addFile() {
        String str = "";
        File file = new File();
        file.setId(1);
        file.setName("test");
        fileMapper.insert(file);
        Boolean insert = userFeignClient.insert();
        String xid = RootContext.getXID();
        System.out.println("业务方法:上游调用 xid: " + xid + "===============================================");
        // 通过openfeign调用,如果发生了异常 Boolean类型的update结果为null(不是boolean)
        Boolean update = userFeignClient.update();
        str = "11";
        // 这里就会出现异常 切面就能够捕获到
        return insert && update && StringUtils.isNotBlank(str);

    }
至此,一个相对健全的代码编写完毕。
那如果非得在降级里面回滚 我们可以以下方式处理:
(及其不推荐!容易出问题 可以不看)
其实就一行核心代码:GlobalTransactionContext.reload(RootContext.getXID()).rollback();
其它都是模拟的业务代码 不是完整的。
但是要注意GlobalTransactionContext.reload(RootContext.getXID()).rollback();需要放在方法最后,
且需要注意 ,我们以下是通过回调的方式
(在feign降级里面按照通常的方式导包 很可能会有Maven循环依赖问题, 因为我们feign相关的maven子模块 一般都是轻量级的, 业务层所在的Maven模块,很可能已经导入过了feign相关模块,如果在feign又导入业务层 就会循环)
而且function里面 不要再传com..service. 底下的方法,因为我们在切面中开启的事务扫描了service包,切面是异步,降级也是异步,降级里面回调的方法如果还走切面 很可能会导致获取锁失败!
如果听不懂博主在说什么,那么就按照在切面的时候来处理,不要在降级里面整花活,除非确保降级里面没有数据库相关的操作 ,比如只是些 utils处理

@Component
public class UserFeignFallback implements FallbackFactory<UserFeignClient> {

    public static ConcurrentMap<String, Function> fallbackFactoryMap = new ConcurrentHashMap<>();

    @Override
    public UserFeignClient create(Throwable throwable) {
        // 模拟补偿业务
//        FileDTO file = new FileDTO();
//        file.setId(666);
//        file.setName("我是降级");

//        Function function = fallbackFactoryMap.get(FallbackConstant.USER_FALLBACK_KEY);
//        function.apply(file);

        System.out.println("---UserFeignFallback捕获  UserFeign发生异常 实现降级--"+throwable.getMessage()+" --- "+throwable.getCause());

        /**
         *  已在切面中进行捕获
         * {@link com.qkj.file.config.GlobalTransactionAspect#doRecoveryActions(Throwable)}
         *
         *  以下代码注释, 如果不在切面 doRecoveryActions 方法中捕获,想在这边回滚  则打开本类注释
         */
        // 模拟手动在降级中手动回滚 (放在补偿业务下面,防止回滚导致线程直接中断)
//        try {
//            GlobalTransactionContext.reload(RootContext.getXID()).rollback();
//        } catch (TransactionException e) {
//            e.printStackTrace();
//        }
        return null;
    }
}
关于如何正确的验证分布式事务
我们写demo时, 要确保自己的例子有代表性 例如正确举例:
	// 切面手动开启时 则不用@GlobalTransactional
	@GlobalTransactional
    @Transactional(rollbackFor = Exception.class)
	public Boolean test(){
		// 上游服务的方法
  		fileMapper.insert(file);
  		// 远程调用方法 成功
        Boolean insert = userFeignClient.insert();
  		// 远程调用方法 在该方法里面制造异常 失败
        Boolean update = userFeignClient.update();
        return xxx;
        }
我们再看看seata-samples/springcloud-nacos-seata 里面 官方的误导性举例:
在这个例子里面 有没有@GlobalTransactional 结果都是一样的(尽管框架源码执行逻辑不一样),这对初学的同学会造成误导,
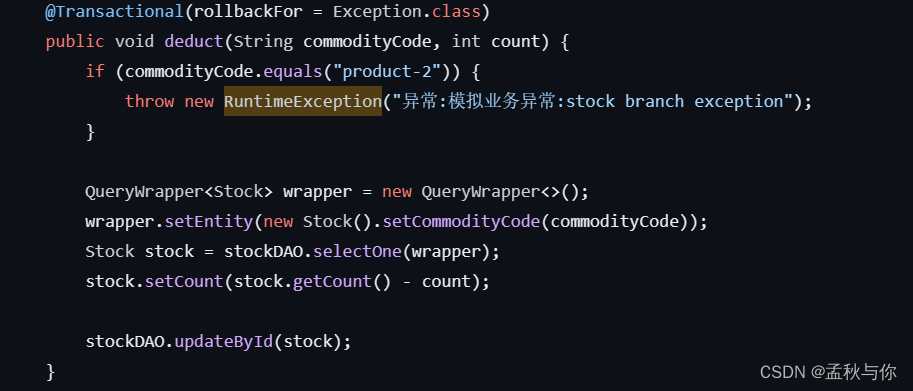
上游方法(placeOrder)调用下游方法,下游方法(reduce)报错,
下游方法本身有@Transactional注解,发生了异常 stock表它本身就会回滚(虽然这个例子中 还执行不到操作数据库) ,
上游方法placeOrder中 也有@Transactional注解, stockFeignClient.deduce(commodityCode,count) 这行代码会报错,所以order表也会回滚。
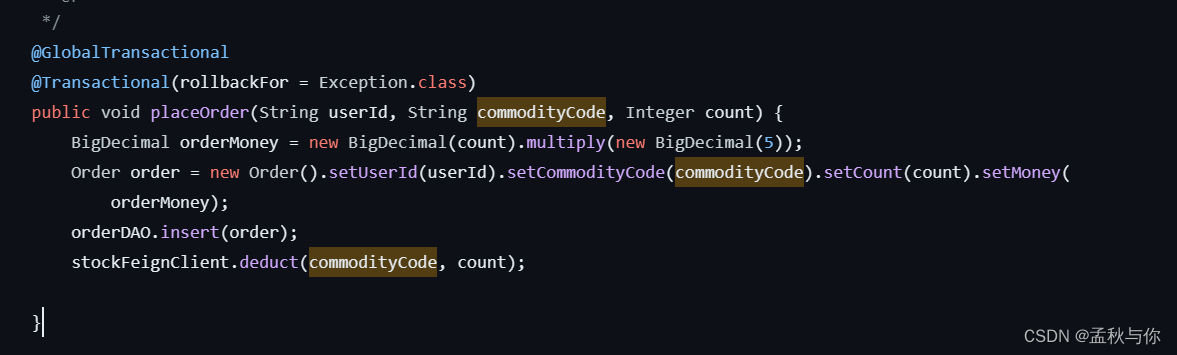
博主的例子,多了个insert的操作,如果我们insert方法写的没问题的前提下,参与了回滚 说明seata的回滚生效了
openfeign配置超时时间
通常情况下 我们是这么配置的:
feign:
  client:
    config:
      default:
        connectTimeout: 16000   # 连接超时时间,单位毫秒
        readTimeout: 20000     # 读取超时时间,单位毫秒
  # 降级: 替代旧版本的 feign.hystrix.enabled配置 (开启会导致seata失效 )
  circuitbreaker:
    enabled: true
当我们A项目通过openfeign调用B项目时 B项目thread.sleep(10s) 模拟业务执行时间,会发现A项目很快就收到了返回值null
这是因为项目引入了
       <dependency>
            <groupId>org.springframework.cloud</groupId>
            <artifactId>spring-cloud-starter-netflix-hystrix</artifactId>
        </dependency>
超时配置就需要变更为配置hystrix的超时时间:
feign:
  # 降级: 替代旧版本的 feign.hystrix.enabled配置 (开启会导致seata失效 )
  circuitbreaker:
    enabled: true

# 注: 如果引入了 spring-cloud-starter-netflix-hystrix 超时配置则变为配置 hystrix
hystrix:
  command:
    default:
      execution:
        isolation:
          thread:
            timeoutInMilliseconds: 16000
Q: 如何得出这个结论?
A:FallbackFactory异常信息

gateway gateway No servers available for service问题
可能原因:
-
版本依赖不匹配问题,按照官网文档或者网上已有项目修改版本即可
-
微服务不在同一命名空间 比如user服务、 order服务 、gateway服务,它们不处于同一个namespace、group里面。
一般如果搭建了seata 我们会自己定义namespace和group,gateway服务通常不涉及事务 比较容易忽略相关配置,漏配就会出现No servers available for service
spring:
  application:
    name: gateway

  cloud:
    nacos:
      discovery:
        # server in local can only be 127.0.0.1 but not localhost or ip
        server-addr: 127.0.0.1:8848
        # nacos控制台中 我们看到的分组
        group: SEATA_GROUP
        # nacos控制台中 我们看到的namespace
        namespace: fbb5b0a8-7b5f-413e-80b9-4010646e6378


 754
754


 被折叠的 条评论
为什么被折叠?
被折叠的 条评论
为什么被折叠?
 到【灌水乐园】发言


