


转载自:https://blog.csdn.net/qq_36958104/article/details/111604665
既然我们要移植Rt-thread 首先就要了解RT-thread
RT-Thread Nano 简介
RT-Thread Nano 是一个极简版的硬实时内核,它是由 C 语言开发,采用面向对象的编程思维,具有良好的代码风格,是一款可裁剪的、抢占式实时多任务的 RTOS。其内存资源占用极小,功能包括任务处理、软件定时器、信号量、邮箱和实时调度等相对完整的实时操作系统特性。适用于家电、消费电子、医疗设备、工控等领域大量使用的 32 位 ARM 入门级 MCU 的场合。
下图是 RT-Thread Nano 的软件框图,包含支持的 CPU 架构与内核源码,还有可拆卸的 FinSH 组件:

支持架构:ARM:Cortex M0/ M3/ M4/ M7 等、RISC-V 及其他。
功能:线程管理、线程间同步与通信、时钟管理、中断管理、内存管理。
官网地址
https://www.rt-thread.org/document/site/

源码下载地址
https://www.rt-thread.org/download/nano/rt-thread-3.1.3.zip
源码


1 从官网下载RT-Thread源码,里面包含stm32f1xx的例程。https://www.rt-thread.org/page/download.html
建议使用最新的源码。很多功能老版本的代码里面都没有,比如之前使用3.1.2的源码,想使用ADC功能,发现源码里没有这部分,更新到4.0.0就有了,并且4.0版本也是现在官方推荐使用的,配合ENV工具开发很方便,现在RTT的社区有很多软件包了,通过ENV就可以很轻松的使用这些功能。
BSP 文件夹内

此版本是基于 HAL 的例程 大家如果熟悉使用HAL库 可直接在此使用

下面开始正式的介绍移植过程
本例程是基于标准库的 keil 移植的
https://download.rt-thread.org/download/mdk/RealThread.RT-Thread.3.1.3.pack
Nano Pack 安装
Nano Pack 可以通过在 Keil MDK IDE 内进行安装,也可以手动安装。下面开始介绍两种安装方式。
方法一:在 IDE 内安装
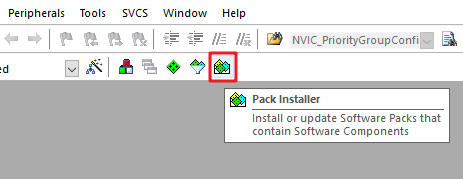
打开 MDK 软件,点击工具栏的 Pack Installer 图标:
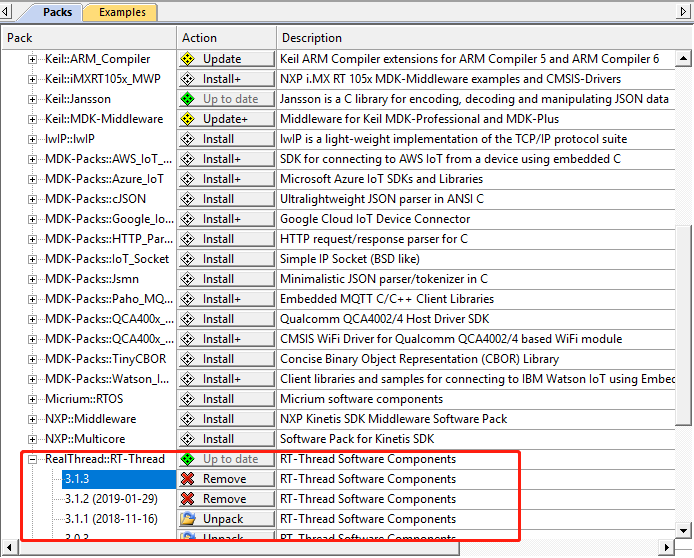
点击右侧的 Pack,展开 Generic,可以找到 RealThread::RT-Thread,点击 Action 栏对应的 Install ,就可以在线安装 Nano Pack 了。另外,如果需要安装其他版本,则需要展开 RealThread::RT-Thread,进行选择。
方法二:手动安装
我们也可以从官网下载安装文件,RT-Thread Nano 离线安装包下载,下载结束后双击文件进行安装:

添加 RT-Thread Nano 到工程
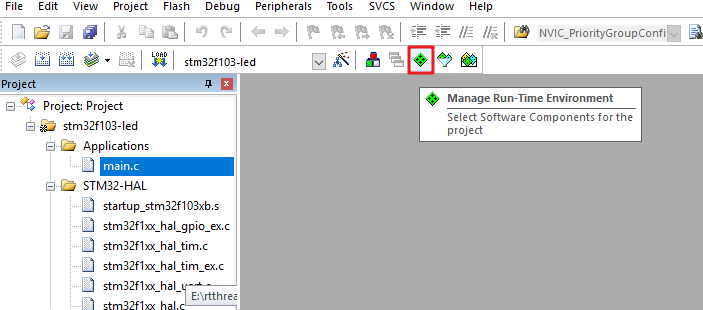
打开已经准备好的可以运行的裸机程序,将 RT-Thread 添加到工程。如下图,点击 Manage Run-Time Environment。
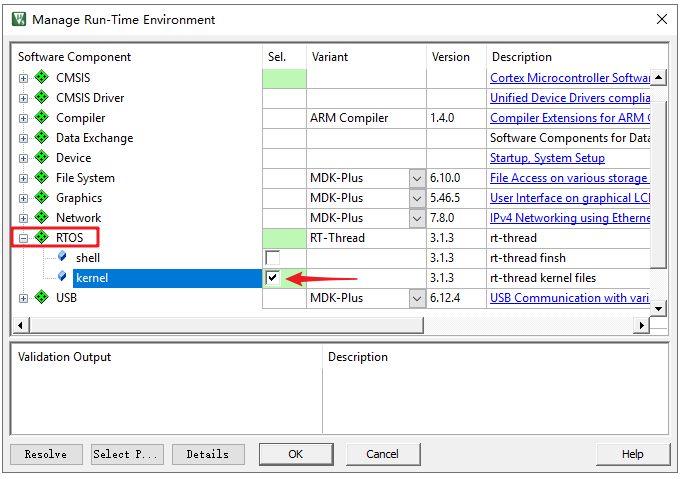
在 Manage Rum-Time Environment 里 "Software Component" 栏找到 RTOS,Variant 栏选择 RT-Thread,然后勾选 kernel,点击 "OK" 就添加 RT-Thread 内核到工程了。
现在可以在 Project 看到 RT-Thread RTOS 已经添加进来了,展开 RTOS,可以看到添加到工程的文件:
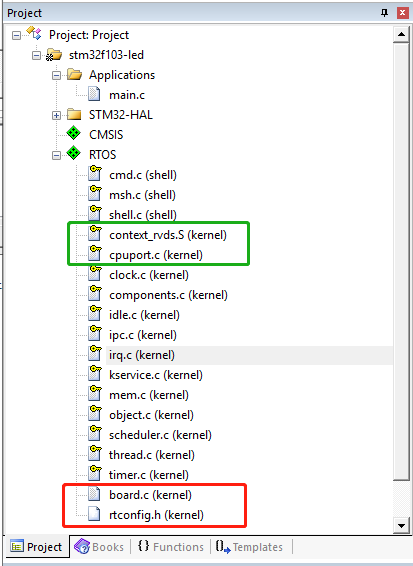
移植完 打开过程文件是错误的

适配 RT-Thread Nano
中断与异常处理
RT-Thread 会接管异常处理函数 HardFault_Handler() 和悬挂处理函数 PendSV_Handler(),这两个函数已由 RT-Thread 实现,所以需要删除工程里中断服务例程文件中的这两个函数,避免在编译时产生重复定义。如果此时对工程进行编译,没有出现函数重复定义的错误,则不用做修改。
系统时钟配置
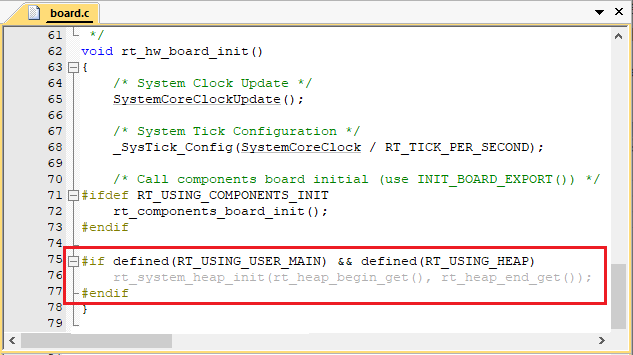
需要在 board.c 中实现 系统时钟配置(为 MCU、外设提供工作时钟)与 os tick 的配置(为操作系统提供心跳 / 节拍)。
如下代码所示, HAL_Init() 初始化 HAL 库, SystemClock_Config()配置了系统时钟, SystemCoreClockUpdate() 对系统时钟进行更新,_SysTick_Config() 配置了 OS Tick。此处 OS Tick 使用滴答定时器 systick 实现,需要用户在 board.c 中实现 SysTick_Handler() 中断服务例程,调用 RT-Thread 提供的 rt_tick_increase() ,如下图所示。
-
/* board.c */
-
void
rt_hw_board_init()
-
{
-
HAL_Init();
-
SystemClock_Config();
-
-
/* System Clock Update */
-
SystemCoreClockUpdate();
-
-
/* System Tick Configuration */
-
_SysTick_Config(SystemCoreClock / RT_TICK_PER_SECOND);
-
-
/* Call components board initial (use INIT_BOARD_EXPORT()) */
-
#ifdef
RT_USING_COMPONENTS_INIT
-
rt_components_board_init();
-
#endif
-
-
#if
defined(RT_USING_USER_MAIN)
&
&
defined(RT_USING_HEAP)
-
rt_system_heap_init(rt_heap_begin_get(), rt_heap_end_get());
-
#endif
-
}
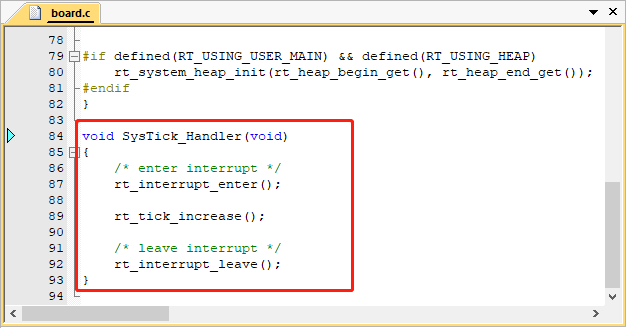
由于 SysTick_Handler() 中断服务例程由用户在 board.c 中重新实现,做了系统 OS Tick,所以还需要删除工程里中原本已经实现的 SysTick_Handler() ,避免在编译时产生重复定义。如果此时对工程进行编译,没有出现函数重复定义的错误,则不用做修改。
内存堆初始化
系统内存堆的初始化在 board.c 中的 rt_hw_board_init() 函数中完成,内存堆功能是否使用取决于宏 RT_USING_HEAP 是否开启,RT-Thread Nano 默认不开启内存堆功能,这样可以保持一个较小的体积,不用为内存堆开辟空间。
开启系统 heap 将可以使用动态内存功能,如使用 rt_malloc、rt_free 以及各种系统动态创建对象的 API。若需要使用系统内存堆功能,则打开 RT_USING_HEAP 宏定义即可,此时内存堆初始化函数 rt_system_heap_init() 将被调用,如下所示:
初始化内存堆需要堆的起始地址与结束地址这两个参数,系统中默认使用数组作为 heap,并获取了 heap 的起始地址与结束地址,该数组大小可手动更改,如下所示:

注意:开启 heap 动态内存功能后,heap 默认值较小,在使用的时候需要改大,否则可能会有申请内存失败或者创建线程失败的情况,修改方法有以下两种:
- 可以直接修改数组中定义的 RT_HEAP_SIZE 的大小,至少大于各个动态申请内存大小之和,但要小于芯片 RAM 总大小。
- 也可以参考《RT-Thread Nano 移植原理》——实现动态内存堆 章节进行修改,使用 RAM ZI 段结尾处作为 HEAP 的起始地址,使用 RAM 的结尾地址作为 HEAP 的结尾地址,这是 heap 能设置的最大值的方法。
编写第一个应用
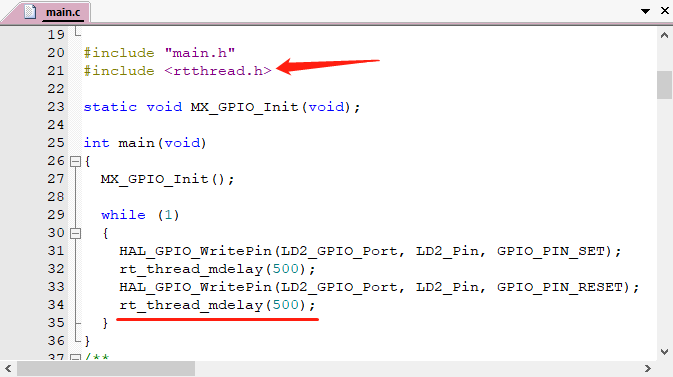
移植好 RT-Thread Nano 之后,则可以开始编写第一个应用代码验证移植结果。此时 main() 函数就转变成 RT-Thread 操作系统的一个线程,现在可以在 main() 函数中实现第一个应用:板载 LED 指示灯闪烁,这里直接基于裸机 LED 指示灯进行修改。
- 首先在文件首部增加 RT-Thread 的相关头文件
<rtthread.h>。 - 在 main() 函数中(也就是在 main 线程中)实现 LED 闪烁代码:初始化 LED 引脚、在循环中点亮 / 熄灭 LED。
- 将延时函数替换为 RT-Thread 提供的延时函数 rt_thread_mdelay()。该函数会引起系统调度,切换到其他线程运行,体现了线程实时性的特点。
编译程序之后下载到芯片就可以看到基于 RT-Thread 的程序运行起来了,LED 正常闪烁。
注意事项:当添加 RT-Thread 之后,裸机中的 main() 函数会自动变成 RT-Thread 系统中 main 线程 的入口函数。由于线程不能一直独占 CPU,所以此时在 main() 中使用 while(1) 时,需要有让出 CPU 的动作,比如使用
rt_thread_mdelay()系列的函数让出 CPU。
与裸机 LED 闪烁应用代码的不同:
1). 延时函数不同: RT-Thread 提供的 rt_thread_mdelay() 函数可以引起操作系统进行调度,当调用该函数进行延时时,本线程将不占用 CPU,调度器切换到系统的其他线程开始运行。而裸机的 delay 函数是一直占用 CPU 运行的。
2). 初始化系统时钟的位置不同:移植好 RT-Thread Nano 之后,不需要再在 main() 中做相应的系统配置(如 hal 初始化、时钟初始化等),这是因为 RT-Thread 在系统启动时,已经做好了系统时钟初始化等的配置,这在上一小节 “系统时钟配置” 中有讲解。
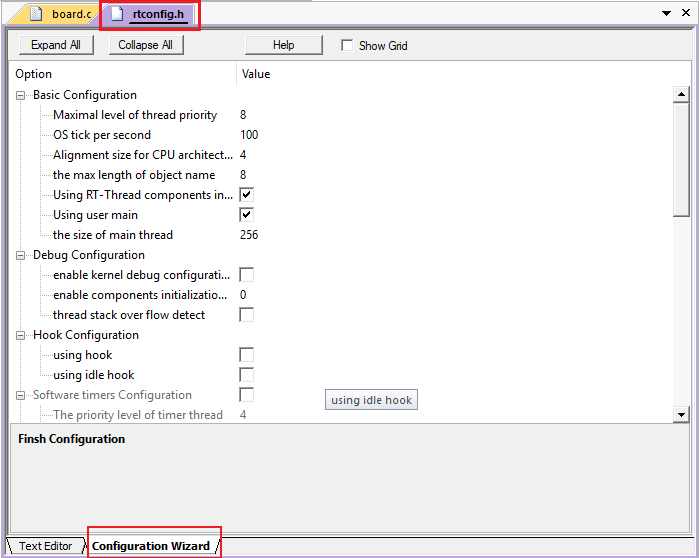
配置 RT-Thread Nano
用户可以根据自己的需要通过修改 rtconfig.h 文件里面的宏定义配置相应功能。
RT-Thread Nano 默认未开启宏 RT_USING_HEAP,故只支持静态方式创建任务及信号量。若要通过动态方式创建对象则需要在 rtconfig.h 文件里开启 RT_USING_HEAP 宏定义。
MDK 的配置向导 configuration Wizard 可以很方便的对工程进行配置,Value 一栏可以选中对应功能及修改相关值,等同于直接修改配置文件 rtconfig.h。更多细节配置详见 《 RT-Thread Nano 配置》。
实现动态内存堆
RT-Thread Nano 默认不开启动态内存堆功能,开启 RT_USING_HEAP 将可以使用动态内存功能,即可以使用 rt_malloc、rt_free 以及各种系统动态创建对象的 API。动态内存堆管理功能的初始化是通过 rt_system_heap_init() 函数完成的,动态内存堆的初始化需要指定堆内存的起始地址和结束地址,函数原型如下:
void rt_system_heap_init(void *begin_addr, void *end_addr)
开启 RT_USING_HEAP 后,系统默认使用数组作为 heap,heap 的起始地址与结束地址作为参数传入 heap 初始化函数,heap 初始化函数 rt_system_heap_init() 将在 rt_hw_board_init() 中被调用。
开启 heap 后,系统中默认使用数组作为 heap(heap 默认较小,实际使用时请根据芯片 RAM 情况改大),获得的 heap 的起始地址与结束地址,作为参数传入 heap 初始化函数:
-
#define RT_HEAP_SIZE 1024
-
static
uint32_t rt_heap[RT_HEAP_SIZE];
-
RT_WEAK void *rt_heap_begin_get(void)
-
{
-
return rt_heap;
-
}
-
-
RT_WEAK void *rt_heap_end_get(void)
-
{
-
return rt_heap + RT_HEAP_SIZE;
-
}
-
-
void rt_hw_board_init(void)
-
{
-
....
-
#if defined(RT_USING_USER_MAIN) && defined(RT_USING_HEAP)
-
rt_system_heap_init(rt_heap_begin_get(), rt_heap_end_get());
//传入 heap 的起始地址与结束地址
-
#endif
-
....
-
}
如果不想使用数组作为动态内存堆,则可以重新指定系统 HEAP 的大小,例如使用 RAM ZI 段结尾处作为 HEAP 的起始地址(这里需检查与链接脚本是否对应),使用 RAM 的结尾地址作为 HEAP 的结尾地址,这样可以将空余RAM 全部作为动态内存 heap 使用。如下示例重新定义了 HEAP 的起始地址与结尾地址,并作为初始化参数进行系统 HEAP 初始化。
-
#define STM32_SRAM1_START (0x20000000)
-
#define STM32_SRAM1_END (STM32_SRAM1_START + 20 * 1024) // 结束地址 = 0x20000000(基址) + 20K(RAM大小)
-
-
#if defined(__CC_ARM) || defined(__CLANG_ARM)
-
extern
int Image$$RW_IRAM1$$ZI$$Limit;
// RW_IRAM1,需与链接脚本中运行时域名相对应
-
#define HEAP_BEGIN ((void *)&Image$$RW_IRAM1$$ZI$$Limit)
-
#endif
-
-
#define HEAP_END STM32_SRAM1_END
-
void rt_hw_board_init(void)
-
{
-
....
-
#if defined(RT_USING_USER_MAIN) && defined(RT_USING_HEAP)
-
rt_system_heap_init((
void *)HEAP_BEGIN, (
void *)HEAP_END);
-
#endif
-
....
-
}
链接脚本
链接脚本,也称分散加载文件,决定在生成 image 文件时如何来分配相关数据的存放基址,如果不指定特定的链接脚本,连接器就会自动采用默认的链接脚本来生成镜像。
举例 stm32 在 KEIL MDK 开发环境下的链接脚本文件 xxx.sct:
-
LR_IROM1
0x08000000
0x00020000 {
;
load
region
size_region
-
ER_IROM1
0x08000000
0x00020000 {
;
load
address
=
execution
address
-
*.o
(RESET,
+First)
-
*(InRoot$$Sections)
-
.ANY
(+RO)
-
}
-
RW_IRAM1
0x20000000
0x00005000 {
;
RW
data
-
.ANY
(+RW
+ZI)
-
}
-
}
其中 RW_IRAM1 0x20000000 0x00005000 表示定义一个运行时域 RW_IRAM1(默认域名),域基址为 0x20000000,域大小为 0x00005000(即 20K ),对应实际 RAM 大小。.ANY (+RW +ZI) 表示加载所有匹配目标文件的可读写数据 RW-Data、清零数据 ZI-Data。所以运行时所占内存的结尾处就是 ZI 段结尾处,可以将 ZI 结尾处之后的内存空间作为系统动态内存堆使用。

获取示例代码
Keil MDK 中集成的 RT-Thread Nano 软件包附带示例代码,如果需要参照示例代码,则可以在 Keil 中打开相应的示例代码工程。
首先点击 Pack Installer,进入下图所示界面:
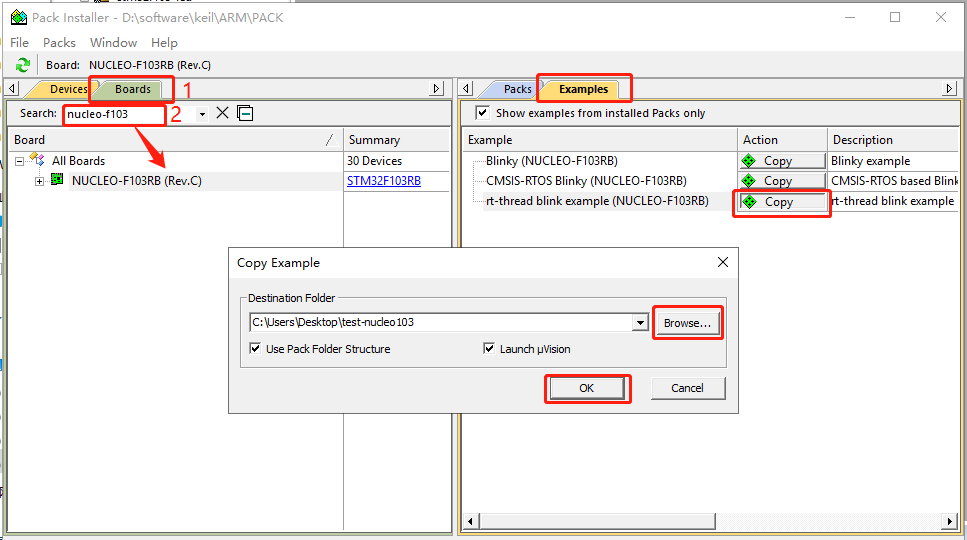
右侧界面切换到 Examples,然后在左侧界面搜索 Device 或者 Boards,点击搜索出的芯片或者开发板,会显示与其相关的所有示例代码,同时可以看到 RT-Thread 的示例代码也在其中,点击 Copy,选择一个路径,然后点击 OK 即可打开示例代码工程

打开 keil 的安装路径 将 RT-Thread Package 到裸机工程根目录


1、拷贝 rtconfig.h 文件到 user 文件夹
将 RT-Thread/3.0.3/bsp 文件夹下面的 rtconfig.h 文件拷贝到工程根目录下面的 user文件夹, 可以通过修改这个 RT-Thread 内核的配置头文件来裁剪 RT-Thread 的功能
2、拷贝 board.c 文件到 user 文件夹下(新建RTE )
将 RT-Thread/3.0.3/bsp 文件夹下面的 board.c 文件拷贝到工程根目录下面的 user 文件夹, 等下我们需要对这个 board.c 进行修改。


3、添加 RT-Thread 源码到工程组文件夹
新建 rtt/source 和 rtt/cpu 两个组文件夹,其中 rtt/source 用于存放 src 文件夹的内容, rtt/cpu用于存放 libcpu/arm/cortex-m? 文件夹的内容,“?”表示0 3、 4 或者 7。内核文件 我们移植的为stm32f103 内核选择 Cortex-M3

指定 RT-Thread 头文件的路径
RT-Thread 的 源 码 里 面 只 有
RT-Thread\3.1.3\include\libcpu
RTThread\3.1.3\include
RTThread\3.1.3\src
RTThread\3.1.3\components\finsh
和 user 文件夹下(RTE) rtconfig.h 有头文件,只需要将这头文件的路径在开发环境里面指定即可。

这些都做完之后 编译还是有两个错误
因为还没有配置 RT-Thread Nano
参考上面讲述的配置 步骤


rtconfig.H
-
/* RT-Thread config file */
-
-
#ifndef __RTTHREAD_CFG_H__
-
#define __RTTHREAD_CFG_H__
-
-
#include "RTE_Components.h"
-
-
// <<< Use Configuration Wizard in Context Menu >>>
-
// <h>Basic Configuration
-
// <o>Maximal level of thread priority <8-256>
-
// <i>Default: 32
-
#define RT_THREAD_PRIORITY_MAX 32
-
// <o>OS tick per second
-
// <i>Default: 1000 (1ms)
-
#define RT_TICK_PER_SECOND 1000
-
// <o>Alignment size for CPU architecture data access
-
// <i>Default: 4
-
#define RT_ALIGN_SIZE 4
-
// <o>the max length of object name<2-16>
-
// <i>Default: 8
-
#define RT_NAME_MAX 8
-
// <c1>Using RT-Thread components initialization
-
// <i>Using RT-Thread components initialization
-
#define RT_USING_COMPONENTS_INIT
-
// </c>
-
// <c1>Using user main
-
// <i>Using user main
-
#define RT_USING_USER_MAIN
-
// </c>
-
// <o>the size of main thread<1-4086>
-
// <i>Default: 512
-
#define RT_MAIN_THREAD_STACK_SIZE 256
-
-
// </h>
-
-
// <h>Debug Configuration
-
// <c1>enable kernel debug configuration
-
// <i>Default: enable kernel debug configuration
-
//#define RT_DEBUG
-
// </c>
-
// <o>enable components initialization debug configuration<0-1>
-
// <i>Default: 0
-
#define RT_DEBUG_INIT 0
-
// <c1>thread stack over flow detect
-
// <i> Diable Thread stack over flow detect
-
//#define RT_USING_OVERFLOW_CHECK
-
// </c>
-
// </h>
-
-
// <h>Hook Configuration
-
// <c1>using hook
-
// <i>using hook
-
//#define RT_USING_HOOK
-
// </c>
-
// <c1>using idle hook
-
// <i>using idle hook
-
//#define RT_USING_IDLE_HOOK
-
// </c>
-
// </h>
-
-
// <e>Software timers Configuration
-
// <i> Enables user timers
-
#define RT_USING_TIMER_SOFT 0
-
#if RT_USING_TIMER_SOFT == 0
-
#undef RT_USING_TIMER_SOFT
-
#endif
-
// <o>The priority level of timer thread <0-31>
-
// <i>Default: 4
-
#define RT_TIMER_THREAD_PRIO 4
-
// <o>The stack size of timer thread <0-8192>
-
// <i>Default: 512
-
#define RT_TIMER_THREAD_STACK_SIZE 512
-
// <o>The soft-timer tick per second <0-1000>
-
// <i>Default: 100
-
#define RT_TIMER_TICK_PER_SECOND 1000
-
// </e>
-
-
// <h>IPC(Inter-process communication) Configuration
-
// <c1>Using Semaphore
-
// <i>Using Semaphore
-
#define RT_USING_SEMAPHORE
-
// </c>
-
// <c1>Using Mutex
-
// <i>Using Mutex
-
//#define RT_USING_MUTEX
-
// </c>
-
// <c1>Using Event
-
// <i>Using Event
-
//#define RT_USING_EVENT
-
// </c>
-
// <c1>Using MailBox
-
// <i>Using MailBox
-
//#define RT_USING_MAILBOX
-
// </c>
-
// <c1>Using Message Queue
-
// <i>Using Message Queue
-
//#define RT_USING_MESSAGEQUEUE
-
// </c>
-
// </h>
-
-
// <h>Memory Management Configuration
-
// <c1>Using Memory Pool Management
-
// <i>Using Memory Pool Management
-
//#define RT_USING_MEMPOOL
-
// </c>
-
// <c1>Dynamic Heap Management
-
// <i>Dynamic Heap Management
-
#define RT_USING_HEAP
-
// </c>
-
// <c1>using small memory
-
// <i>using small memory
-
#define RT_USING_SMALL_MEM
-
// </c>
-
// <c1>using tiny size of memory
-
// <i>using tiny size of memory
-
//#define RT_USING_TINY_SIZE
-
// </c>
-
// </h>
-
-
-
// <h>Device System Configuration
-
// <c1>Using Device System
-
// <i>Using Device System
-
//#define RT_USING_DEVICE
-
// </c>
-
// <c1>Using device communication
-
// <i>Using device communication
-
//#define RT_USING_DEVICE_IPC
-
// </c>
-
// <c1>Using Serial
-
// <i>Using Serial
-
//#define RT_USING_SERIAL
-
// </c>
-
// </h>
-
-
// <h>Console Configuration
-
// <c1>Using console
-
// <i>Using console
-
#define RT_USING_CONSOLE
-
// </c>
-
// <o>the buffer size of console <1-1024>
-
// <i>the buffer size of console
-
// <i>Default: 128 (128Byte)
-
#define RT_CONSOLEBUF_SIZE 128
-
// <s>The device name for console
-
// <i>The device name for console
-
// <i>Default: uart1
-
#define RT_CONSOLE_DEVICE_NAME "uart1"
-
// </h>
-
-
-
#if defined(RTE_FINSH_USING_FINSH) || defined(RTE_FINSH_USING_MSH)
-
#define RT_USING_FINSH
-
// <h>Finsh Configuration
-
// <o>the priority of finsh thread <1-7>
-
// <i>the priority of finsh thread
-
// <i>Default: 6
-
#define __FINSH_THREAD_PRIORITY 5
-
#define FINSH_THREAD_PRIORITY (RT_THREAD_PRIORITY_MAX / 8 * __FINSH_THREAD_PRIORITY + 1)
-
// <o>the stack of finsh thread <1-4096>
-
// <i>the stack of finsh thread
-
// <i>Default: 4096 (4096Byte)
-
#define FINSH_THREAD_STACK_SIZE 512
-
// <o>the history lines of finsh thread <1-32>
-
// <i>the history lines of finsh thread
-
// <i>Default: 5
-
#define FINSH_HISTORY_LINES 1
-
// <c1>Using symbol table in finsh shell
-
// <i>Using symbol table in finsh shell
-
#define FINSH_USING_SYMTAB
-
// </c>
-
// </h>
-
#endif
-
-
#if defined(RTE_FINSH_USING_MSH)
-
#define FINSH_USING_MSH
-
#endif
-
-
#if !defined(RTE_FINSH_USING_FINSH) && defined(RTE_FINSH_USING_MSH)
-
#define FINSH_USING_MSH_ONLY
-
#endif
-
-
// <<< end of configuration section >>>
-
-
#define RT_USING_UART
-
#define RT_USING_UART1
-
-
#endif
board.c
-
/*
-
* File : application.c
-
* This file is part of RT-Thread RTOS
-
* COPYRIGHT (C) 2006, RT-Thread Development Team
-
*
-
* The license and distribution terms for this file may be
-
* found in the file LICENSE in this distribution or at
-
* http://www.rt-thread.org/license/LICENSE
-
*
-
* Change Logs:
-
* Date Author Notes
-
* 2017-07-24 Tanek the first version
-
*/
-
#include <rthw.h>
-
#include <rtthread.h>
-
-
#include "usart.h"
-
#include "delay.h"
-
#include "led.h"
-
-
// rtthread tick configuration
-
// 1. include header files
-
// 2. configure rtos tick and interrupt
-
// 3. add tick interrupt handler
-
-
// rtthread tick configuration
-
// 1. include some header file as need
-
#include <stm32f10x.h>
-
-
#ifdef __CC_ARM
-
extern
int Image$$RW_IRAM1$$ZI$$Limit;
-
#define HEAP_BEGIN (&Image$$RW_IRAM1$$ZI$$Limit)
-
#elif __ICCARM__
-
#pragma section="HEAP"
-
#define HEAP_BEGIN (__segment_end("HEAP"))
-
#else
-
extern
int __bss_end;
-
#define HEAP_BEGIN (&__bss_end)
-
#endif
-
-
#define SRAM_SIZE 8
-
#define SRAM_END (0x20000000 + SRAM_SIZE * 1024)
-
-
extern uint8_t OSRunning;
-
-
/**
-
* This function will initial STM32 board.
-
*/
-
void rt_hw_board_init()
-
{
-
// rtthread tick configuration
-
// 2. Configure rtos tick and interrupt
-
SysTick_Config(SystemCoreClock / RT_TICK_PER_SECOND);
-
-
//串口初始化
-
uart_init(
115200);
-
-
delay_init(
72);
-
-
//初始化LED
-
LED_Init();
-
-
//tips:把硬件初始化放上面
-
-
-
-
OSRunning=
1;
-
-
-
/* Call components board initial (use INIT_BOARD_EXPORT()) */
-
#ifdef RT_USING_COMPONENTS_INIT
-
rt_components_board_init();
-
#endif
-
-
#if defined(RT_USING_CONSOLE) && defined(RT_USING_DEVICE)
-
rt_console_set_device(RT_CONSOLE_DEVICE_NAME);
-
#endif
-
-
#if defined(RT_USING_USER_MAIN) && defined(RT_USING_HEAP)
-
rt_system_heap_init((
void*)HEAP_BEGIN, (
void*)SRAM_END);
-
#endif
-
}
-
-
// rtthread tick configuration
-
// 3. add tick interrupt handler
-
void SysTick_Handler(
void)
-
{
-
/* enter interrupt */
-
rt_interrupt_enter();
-
-
rt_tick_increase();
-
-
/* leave interrupt */
-
rt_interrupt_leave();
-
}
修改完rtconfig.h 和board.c 编译通过


移植好的工程文件
链接:https://pan.baidu.com/s/1Jrxe9AtDGs9q2ZIF-mXd9A
提取码:lchq
复制这段内容后打开百度网盘手机App,操作更方便哦


 2321
2321


 被折叠的 条评论
为什么被折叠?
被折叠的 条评论
为什么被折叠?
 到【灌水乐园】发言


