


2. 组件
2.1 组件作用
作用:复用、项目模块化便于管理。
2.2 如何拆分组件
拆分依据:
- 查看页面,那个某块是可以复用的。
- 拆分可以由粗到细,逐步细化。
- 定义数据存放的位置:
- 自已用:本组件内部
- 多个组件共用:父组件或vuex store state中
- 样式拆分:
- 自己用:stype中,加scoped 避免通其他组件冲突了。
- 公共的:App.vue的style中
2.3 组件使用
步骤:
1. 创建components文件夹,专门存放子组件。
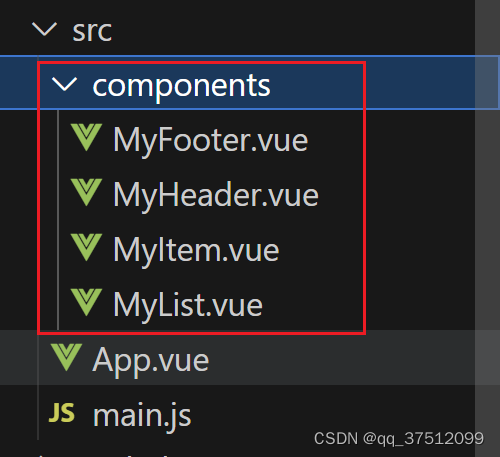
2. 父组件中使用:import引入组件、 components中配置、template中使用
<template>
	<div id="root">
		<div class="todo-container">
			<div class="todo-wrap">
                <!--使用--->
				<MyHeader/>
				<MyList/>
				<MyFooter/>
			</div>
		</div>
	</div>
</template>

<script>
    //引入
	import MyHeader from './components/MyHeader'
	import MyList from './components/MyList'
	import MyFooter from './components/MyFooter.vue'

	export default {
		name:'App',
        //注册
		components:{MyHeader,MyList,MyFooter},
	}
</script>
2.4 组件间通信
2.4.1 props-->父给子传数据
2.4.1.1 注意事项
props使用:
- 父组件给子组件传递数据,如果父给孙传,只能先传子。
- 通过在父组件给子组件标签加属性传参。一般属性或v-bind都行。
- 子组件中使用props定义接受的参数,可以定义类型(类型不一致时不强制转,控制台报错提醒),是否必填等。
- 接收后的参数,子组件template中可以直接使用。
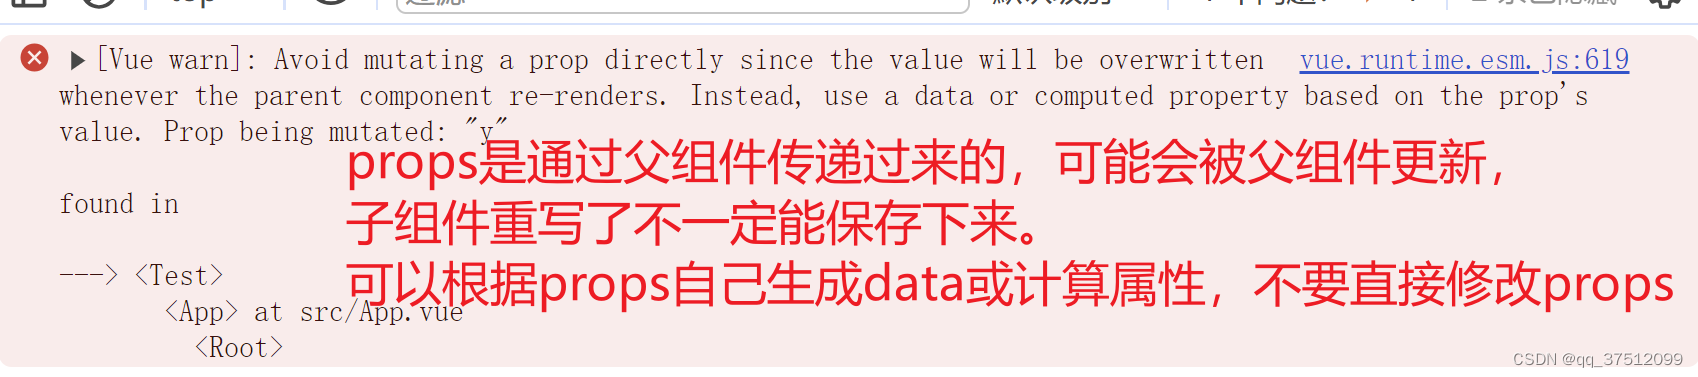
- props外部传入的,vue建议不要修改。如果要对props数据进行加工,根据props值添加data或计算属性,使用加工后的数据,不要直接改props,props值是由父组件决定的,避免造成数据不一致。
2.4.1.2 代码示例
//父组件
<template>
	<div>
        <!--父组件中通过标签属性传参  x为默认值,y为data中属性-动态的-->
		<Test x="100" :y="sum"></Test>
	</div>
</template>


//子组件
<template>
    <div>
        <!--可直接使用插值语法-->
        <h2>{{x}}</h2>
        <h2>{{y}}</h2>
    </div>
</template>

<script>
export default {
    name:'Test',
    //props中定义要接受的属性
    props:['x','y'],
    //props对类型进行校验
    props:{
        x:Number,
        y:String,
    }
    //详细定义props的数据类型,是否必填
    props:{
        x:{
            type:Number,
            required:true,
        },
        y:{
            type:Number,
            required:true,
        }
    }
}
</script>
2.4.1.3 常见错误
props属性数据类型不一致时报错,但页面会正常加载:属性默认以字符串形式传递,改为:x="100"后,会将引号内的js表达式的值,数字100传给子组件。注意区分!

修改props值报错
2.4.2 自定义事件->子给父传数据
自定义事件: 非@click@keyup@keydown等系统规定的事件,用户自己定义事件名和方法体,所以叫自定义事件。
原理或步骤:
- 父组件自己定义操作data的方法,如addItem
- 父组件在使用子组件时,通过@addItem="addItem" 给子组件开启了这个方法的监听的通道。
- 子组件自己内部满足一定条件或执行某些操作时,可以在对应的方法中this.$emit(addItem,params);
代码示例:
1、标签内绑定
//父组件-- 直接绑定
<template>
	<div id="app">
		<!-- 02 在使用子组件时通过v-on @绑定自定义事件 -->
		<MyHeader @addItem="addItem"></MyHeader>
		<ul>
			<li v-for="( n, index) in list" :key="index">{{ n }}</li>
		</ul>
	</div>
</template>

<script>
import MyHeader from './components/MyHeader.vue'
export default {
	name: 'App',
	components: { MyHeader },
	data() {
		return {
			list: [1, 2, 3]
		}
	},
	methods: {
		//01 定义函数--操作数据的方法
		addItem(item) {
			this.list.push(item);
		}
	}
}
</script>
2、引用+mounted中手动$on
this.$refs.子组件引用名.$on('方法名',methods中的方法);
代码示例:
<template>
	<div id="app">
		<!-- 01 添加引用 -->
		<MyHeader ref="myHeader"></MyHeader>
		<ul>
			<li v-for="( n, index) in list" :key="index">{{ n }}</li>
		</ul>
	</div>
</template>

<script>
import MyHeader from './components/MyHeader.vue'
export default {
	name: 'App',
	components: { MyHeader },
	data() {
		return {
			list: [1, 2, 3]
		}
	},
	methods: {
		//02 定义函数--操作数据的方法
		addItem(item) {
			this.list.push(item);
		}
	},
	mounted(){
        //03 父组件挂载完成后,给子组件绑定事件  方法名,方法体
		this.$refs.myHeader.$on('addItem',this.addItem);
		console.log('App',this);
	}
}
</script>
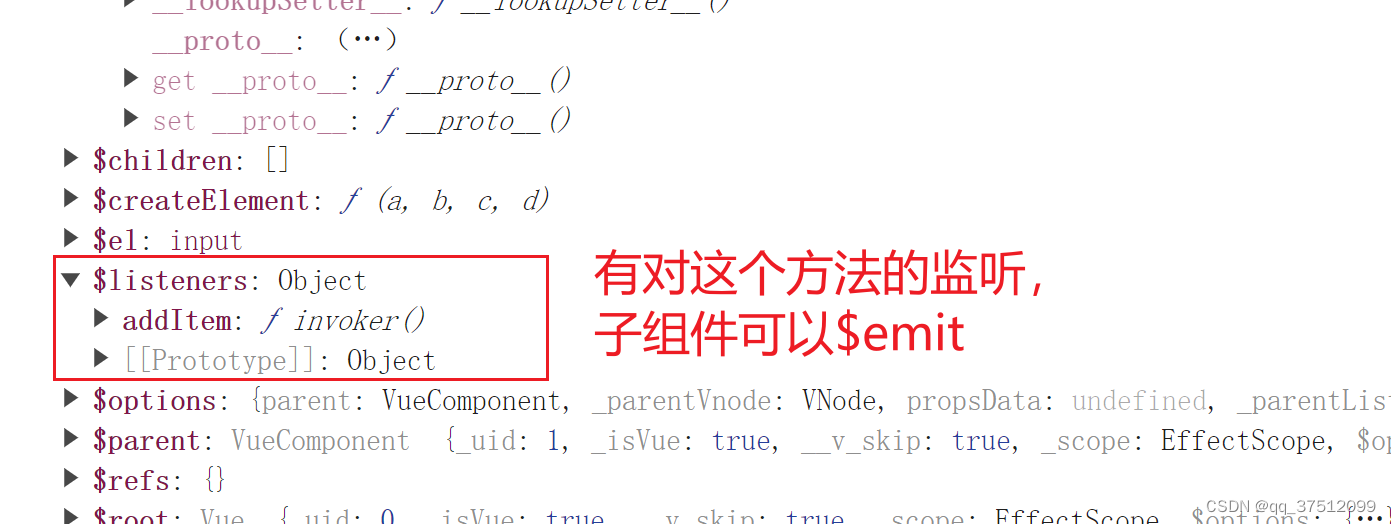
添加后App组件中$refs

绑定后子组件多出的属性:this.$listeners.addItem
3、子组件触发addItem事件:
//子组件
<template>
    <!-- 01 定义触发的函数 -->
    <input type="text" v-model="n" @keydown.enter="handleAddItem" >
</template>

<script>
export default {
    name:'MyHeader',
    data() {
        return {
            n:null,
        }
    },
    methods:{
        handleAddItem(){
            // 02 触发父组件中的addItem方法,并将新元素作为参数传递给父组件
            this.$emit('addItem',this.n);
            this.n = null;
        }
    }
}
</script>
2.4.3 事件总线
作用:$bus 所有组件都可见,且有$emit $on功能,所有组件都跟$bus通信,借此实现任意组件间通信。
原理:
- A中定义具体方法体,绑定到$bus上。
- B中合适契机,触发$bus上的方法,传递A需要的参数
- 方法定义在A中,所以最后执行A中的方法,收到了B的参数。
- 事件绑定在$bus上,也由$bus触发。
2.4.3.1 main.js中配置事件总线
//创建vm
new Vue({
	el:'#app',
	render: h => h(App),
	beforeCreate() {
        //vm 添加$bus属性,指向本身
		Vue.prototype.$bus = this
	},
})
2.4.3.2 真正执行方法的组件中给$bus绑定事件
例如App.vue中,绑定及设置销毁时机
$bus是公共的,组件销毁时,组件绑定的事件应当解绑。
export default {
	name:'App',
	components:{MyHeader,MyList,MyFooter},
	data() {
		return {
			todos:JSON.parse(localStorage.getItem('todos')) || []
		}
	},
	methods: {
		//01 定义操作todos的具体方法
		checkTodo(id){
			this.todos.forEach((todo)=>{
				if(todo.id === id) todo.done = !todo.done
			})
		},
		deleteTodo(id){
			this.todos = this.todos.filter( todo => todo.id !== id )
		},

	},
	mounted() {
		//挂载成功后绑定事件到$bus
		this.$bus.$on('checkTodo',this.checkTodo)
		this.$bus.$on('deleteTodo',this.deleteTodo)
	},
	beforeDestroy() {
		//销毁前接触绑定,$bus实在vm上的,不会随着某个组件销毁而消失
		this.$bus.$off('checkTodo')
		this.$bus.$off('deleteTodo')
	},
}
2.4.3.3 子组件中合适时机触发事件this.$bus.$emit()
export default {
	name:'MyItem',
	//声明接收todo
	props:['todo'],
	methods: {
		//对应的方法中/时机,$bus触发事件,传递参数
		handleCheck(id){
			this.$bus.$emit('checkTodo',id)
		},
		handleDelete(id){
			if(confirm('确定删除吗?')){
				this.$bus.$emit('deleteTodo',id)
			}
		}
	},
}
2.4.4 消息订阅与发布
使用第三方库,例如:pubsub-js
//A组件,数据接收方,真正执行方法的组件
//01 引入第三方库
import pubsub from 'pubsub-js';

//options中绑定及解绑
mounted() {
	//02 订阅消息
	this.pubId = pubsub.subscribe('deleteTodo',this.deleteTodo)
},
beforeDestroy() {
	//02 销毁前取消订阅
	pubsub.unsubscribe(this.pubId)
},
//
methods: {
	//03 具体要执行的方法,对应的删除方法,第一个为消息名占位符
	deleteTodo(_,id){
		this.todos = this.todos.filter( todo => todo.id !== id )
	},
},


//B组件,生产消息
//02 同样引入第三方库
import pubsub from 'pubsub-js'

//相应的方法中publish发布消息
methods: {
	handleDelete(id){
		if(confirm('确定删除吗?')){
			//02 发布消息,传递要删除的id
			pubsub.publish('deleteTodo',id)
		}
	}
},
3. Ajax请求
全程:Asynchronous JavaScript And XML
作用:不刷新页面,向服务器发送、请求和接收数据,用来局部刷新页面。
3.1 常用的发送ajax请求的技术
- xhr
- jQuery
- axios vue作者推荐
3.1.1 axios使用
//01 引入第三方库
import axios from 'axios'

//组件methods中调用get/post请求数据
export default {
	name:'Search',
	data() {
		return {
			keyWord:'',
            users:[],
		}
	},
	methods: {
		searchUsers(){
            //02 调用axios.get请求数据,注意响应数据的结构
			axios.get(`https://api.github.com/search/users?q=${this.keyWord}`).then(
				response => {
                    users=response.data.items;
				},
				error => {

				}
			)
		}
	},
}
3.2 跨域问题
3.2.1什么是跨域
http/https路径中:协议、域名、端口不一致时,就是跨域,浏览器不信任响应回的数据,不会加载。
3.2.2如何解决
1、后端响应加特殊请求头
2、做代理
- Nginx代理服务器
- vue-cli 配置代理
请求流程:

代码逻辑:请求地址还是写的8080,做了配置,代理服务器自动转换。

4. 插槽
作用:同一组件类型,不同组件实例,展示不同的内容、样式。
4.1 插槽基础使用
步骤:
- 子组件中定义<slot>要展示的位置
- 父组件中<School>定义要展示的内容</School>
代码示例:
//子组件中定义插槽
<template>
	<div class="category">
		<h3>{{title}}分类</h3>
		<!-- 01 定义一个插槽(挖个坑,等着组件的使用者进行填充) -->
		<slot>我是一些默认值,当使用者没有传递具体结构时,我会出现</slot>
	</div>
</template>


//父组件中标签中间设置不同的内容,标签中的内容会替换子组件中slot位置
<Category title="美食" >
	<img src="https://s3.ax1x.com/2021/01/16/srJlq0.jpg" alt="">
</Category>

<Category title="游戏" >
	<ul>
		<li v-for="(g,index) in games" :key="index">{{g}}</li>
	</ul>
</Category>

<Category title="电影">
	<video controls src="http://clips.vorwaerts-gmbh.de/big_buck_bunny.mp4"></video>
</Category>
4.2 插槽的类别
4.2.1 默认插槽
4.2.2 具名插槽
给插槽定义名称
子组件template中配置插槽位置,添加name属性,给插槽命名
<!-- 定义具名插槽,可对应位置放多个元素,加载匹配到的 -->
<slot name="center"></slot>
<slot name="footer"></slot>
<!-- 没有传具体值时,显示插槽中的默认值 -->
<slot name="ex">默认值</slot>


父组件中 slot="slotName" 来对应各个插槽来传数据
<Category title="美食">
	<img slot="center" src="https://s3.ax1x.com/2021/01/16/srJlq0.jpg" alt="">
	<a slot="footer" class="foot"  href="http://www.baidu.com">百度更多美食</a>
</Category>
4.2.3 作用域插槽
概念:子组件传递数据给父组件,父组件定义怎么用,即展示的样式
//子组件传递数据
<template>
	<div class="category">
		<h3>{{title}}分类</h3>
        //通过:games传递data中的games
		<slot :games="games" msg="hello">我是默认的一些内容</slot>
	</div>
</template>

<script>
	export default {
		name:'Category',
		props:['title'],
		data() {
			return {
				games:['红色警戒','穿越火线','劲舞团','超级玛丽'],
			}
		},
	}
</script>

//父组件接受定义如何展示
//直接用atguigu变量接收
<Category title="游戏">
	<template scope="atguigu">
		<ul>
			<li v-for="(g,index) in atguigu.games" :key="index">{{g}}</li>
		</ul>
	</template>
</Category>

//类似结构赋值
<Category title="游戏">
	<template scope="{games}">
		<ol>
			<li style="color:red" v-for="(g,index) in games" :key="index">{{g}}</li>
		</ol>
	</template>
</Category>
//新写法
<Category title="游戏">
	<template slot-scope="{games}">
		<h4 v-for="(g,index) in games" :key="index">{{g}}</h4>
	</template>
</Category>
5. vuex插件
5.1 vuex是什么
插件、组件间数据共享、数据管理(读写)
5.2 vuex原理图
三大组成部分:
- Actions: 逻辑处理或请求外部数据
- Mutations:直接操作state数据
- State:存储数据
-
getters:对state中的数据进行加工,类似计算属性

5.3 vuex基本使用
5.3.1 定义store,vm初始化时配置
文件位置:
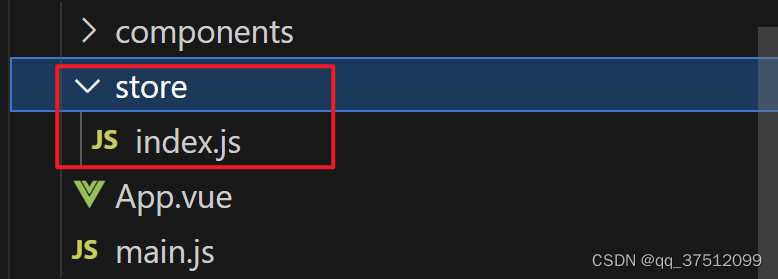
index.js 文件配置
//该文件用于创建Vuex中最为核心的store
import Vue from 'vue'
//引入Vuex
import Vuex from 'vuex'
//应用Vuex插件
Vue.use(Vuex)

//准备actions——用于响应组件中的动作
const actions = {
    //没有任何操作纯调用,可以省略,组件中直接commit
	/* jia(context,value){
		console.log('actions中的jia被调用了')
		context.commit('JIA',value)
	},
	jian(context,value){
		console.log('actions中的jian被调用了')
		context.commit('JIAN',value)
	}, */
	jiaOdd(context,value){
		console.log('actions中的jiaOdd被调用了')
		if(context.state.sum % 2){
			context.commit('JIA',value)
		}
	},
	jiaWait(context,value){
		console.log('actions中的jiaWait被调用了')
		setTimeout(()=>{
			context.commit('JIA',value)
		},500)
	}
}
//准备mutations——用于操作数据(state)
const mutations = {
	JIA(state,value){
		console.log('mutations中的JIA被调用了')
		state.sum += value
	},
	JIAN(state,value){
		console.log('mutations中的JIAN被调用了')
		state.sum -= value
	}
}
//准备state——用于存储数据
const state = {
	sum:0 //当前的和
}
//准备getters——用于将state中的数据进行加工
const getters = {
	bigSum(state){
		return state.sum*10
	}
}

//创建并暴露store
export default new Vuex.Store({
	actions,
	mutations,
	state,
	getters
})
main.js中引入配置
//引入store
import store from './store'


//创建vm,配置store
new Vue({
	el:'#app',
	render: h => h(App),
	store,
	beforeCreate() {
		Vue.prototype.$bus = this
	}
})
5.3.1 组件中使用
5.3.1.1 自定义方法
程序员自定义方法,手动写方法体,通过this.$store.dispatch()调用store中方法
vm中配置了store后,vc实例上都有$store属性,可以调用store中的方法和属性。
computed:{
    sum(){
        return this.$store.state.sum;
    },
	bigSum(){
		return this.$store.getters.bigSum;
	}
},
methods: {
    //直接commit,调用mutations中的方法
	increment(){
		this.$store.commit('JIA',this.n)
	},
	decrement(){
		this.$store.commit('JIAN',this.n)
	},
    //有逻辑判断,dispatch 调用actions中的方法
	incrementOdd(){
		this.$store.dispatch('jiaOdd',this.n)
	},
	incrementWait(){
		this.$store.dispatch('jiaWait',this.n)
	},
},
5.3.1.1 通mapXXX 生成方法,自动调用
<template>
    <div>
        <!--直接使用state和getter属性-->
        <h1>当前求和为:{{sum }}</h1>
        <h2>当前求和值扩大10倍{{bigSum}}</h2>
        <!--直接使用方法-->
        <button @click="increment">+</button>
        <button @click="decrement">-</button>
        <button @click="incrementOdd">当前和为奇数再加</button>
        <button @click="incrementWait">等一等再加</button>
    </div>
</template>


<script>
import { mapActions, mapGetters, mapMutations, mapState } from 'vuex';
export default {
	name: 'Count',
	data() {
		return {
			n: 1,//下拉框选的数值
		}
	},
	computed:{
		//借助mapState生成计算属性,从state中读取数据
		// ...mapState({sum:'sum'}),
		...mapState(['sum']),

		//借助mapGetters生成计算属性,从store的getters中读取数据  会将store中getters中对应方法,自动添加到this上
		// ...mapGetters({bigSum:"bigSum"})
		...mapGetters(['bigSum'])
	},
	methods: {
		...mapMutations({increment:'JIA',decrement:'JIAN'}),
		...mapActions({incrementOdd:'incrementOdd',incrementWait:'incrementWait'}),
	},
}
</script>
5.4 vuex模块化
多个不想关的actions,mutations,state数据,配在一起乱,还有命名冲突的风险,模块化解决。
5.4.1 创建多个store结构文件
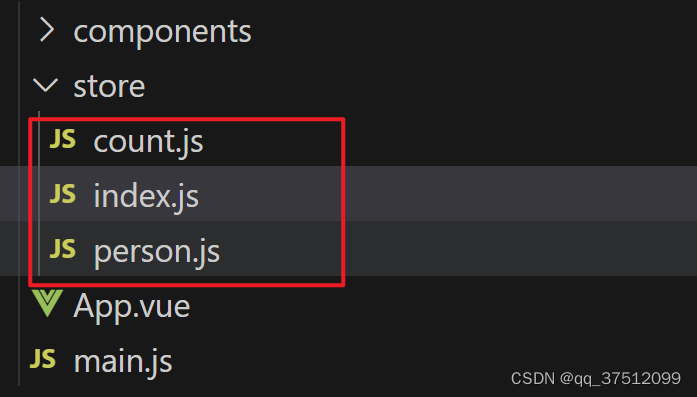
5.4.2 store文件加namespaced属性
export default {
    //命名空间,namespaced
    namespaced: 'countAbout',
    actions: {

    },
    mutations: {

    },
    state: { sum: 0, },
    getters: {
        bigSum(state) {
            return state.sum * 10;
        }
    },
}
5.4.3 index中引入store文件
//该文件用于创建Vuex中最为核心的store
import Vue from 'vue'
//引入Vuex
import Vuex from 'vuex'
//引入其他store文件
import countOptions from './count'
import personOptions from './person'
//应用Vuex插件
Vue.use(Vuex)

//创建并暴露store,模块化 modules
export default new Vuex.Store({
	modules:{
		countAbout:countOptions,
		personAbout:personOptions
	}
})
5.4.4 组件中使用
5.4.4.1 自定义属性、方法 this.$store调用
通过this.$store.commit('模块名/方法名',params);
computed: {
	personList() {
		return this.$store.state.personAbout.personList
	},
	sum(){
		return this.$store.state.countAbout.sum;
	},
	firstPersonName(){
		return this.$store.getters['personAbout/firstPersonName'].name;
	}
},
methods: {
	addPerson() {
		let personObj = { id: nanoid(), name: this.name }
		this.$store.commit('personAbout/ADD_PERSON',personObj);
		this.name = '';
	},
	addWang(){
		let personObj = { id: nanoid(), name: this.name }
		this.$store.dispatch('personAbout/addWang',personObj)
		this.name = '';
	},
	addPersonServer(){
		this.$store.dispatch('personAbout/addPersonServer')
	}
}
5.5.4.2 通过map生成
<template>
    <div>
        <h1>当前求和为:{{ sum }}</h1>
        <h2>当前求和值扩大10倍{{bigSum}}</h2>
        <h3>人员总数是{{ personList.length }}</h3>

        <button @click="increment(n)">+</button>
        <button @click="decrement(n)">-</button>
        <button @click="incrementOdd(n)">当前和为奇数再加</button>
        <button @click="incrementWait(n)">等一等再加</button>
    </div>
</template>


<script>
import { mapActions, mapGetters, mapMutations, mapState } from 'vuex';
export default {
    name: 'Count',
    computed: {
        // 标明命名空间
        ...mapState('countAbout', ['sum']),
        ...mapState('personAbout', ['personList']),

        ...mapGetters('countAbout', ['bigSum'])
    },
    methods: {
        ...mapMutations('countAbout', { increment: 'JIA', decrement: 'JIAN' }),
        ...mapActions('countAbout', ['incrementOdd', 'incrementWait']),
    },
}
</script>
6. router 路由插件
6.1 基本概念
SPA:单页面应用,点击菜单切换展示的组件,不刷新页面。
routes:路径和组件的对应关系
router:路由器,管理路径切换及组件展示。
6.2 路由的基础使用
6.2.1 文件结构
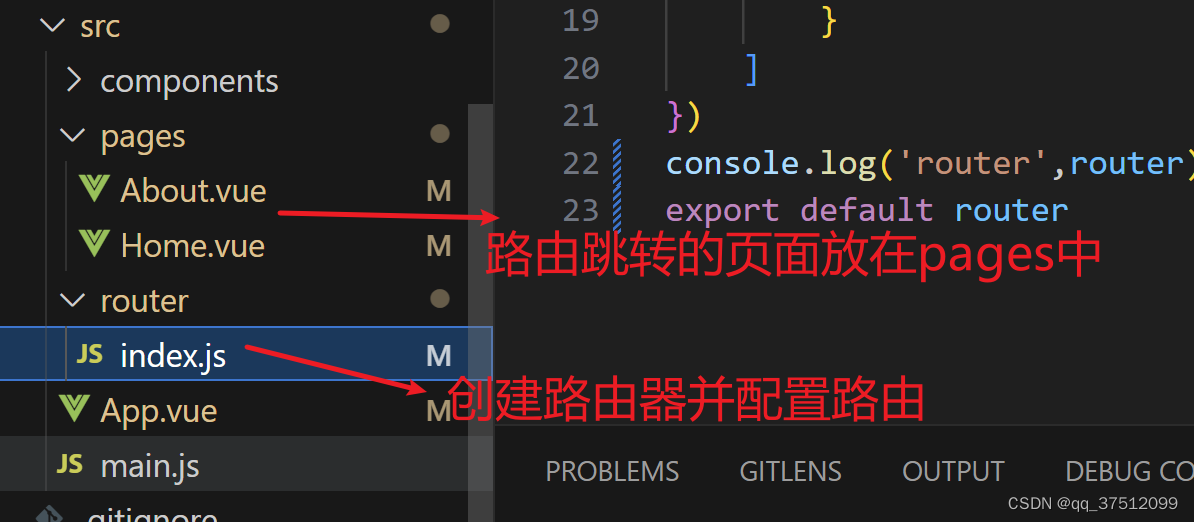
6.2.2 路由配置及使用
router->index.js6.3.2
//引入路由插件
import VueRouter from 'vue-router'
//引入路径中使用到的组件
import About from '../pages/About.vue'
import Home from '../pages/Home.vue'

//创建路由器
export default new VueRouter({
    //配置路径和组件的对应关系
    routes: [
        {
            name: 'Home',
            path: '/home',
            component: Home,
        },
        {
            name:'About',
            path:'/about',
            component:About,
        }
    ]
})
main.js
- 引入vue-router插件,并Vue.use()
- 引入路由器,并配置在new Vue({options})中
// 入口文件
import Vue from 'vue'
import App from './App.vue'
//引入vue-router
import VueRouter from 'vue-router'
import router from './router/index'

Vue.config.productionTip = false
//使用路由
Vue.use(VueRouter)
/**
 * 使用VueRouter
 * use后,vm身上就有route和router了,但如果new Vue时,不传入router配置项,这两个属性为空
 *
 * */

//02 创建Vue实例
new Vue({
  render: h => h(App),
  router,
}).$mount('#app')
App.vue 使用
router-link:配置跳转的链接 to
<!-- 使用router-link 配置要跳转的路径,切换路径时,加载不同组件时,原先的组件被销毁 -->
<router-link class="list-group-item" active-class="active" to="/about">About</router-link>
<router-link class="list-group-item" active-class="active" to="/home">Home</router-link>

<!--使用router-view定义路由组件放置的位置 -->
<router-view></router-view>
6.3 路由常用配置
命名路由 name
多级路由:children,注意path不加/,仅一级路由path已/开始
params参数:routes -> path:'detail/:x/:y',
query参数:传递时配置 &a=xx 或对象写法
props:参数配置
{
	name: 'xiaoxi',
	path: 'messages',
	component: Messages,
	children: [
		{
			name: 'xiangqing',
			//配置params参数
			path: 'detail/:x/:y',
			component: Detail,
			//方式一:传固定值
			props:{a:100}
			//方式二:转params的值,会将params已props形式传给组件,组件中props显示声明params的变量名
			props:true,
			//方式三:自定义数据,query params 其他
			props($route) {
				return {
					id: $route.query.id,
					title: $route.query.title,
					x: $route.params.x,
					y: $route.params.y,
					a: 100,
					b: 500,
				}
			}
		}
	]
}
6.4 template
6.4.1 to: 配置具体跳转路径
//路径
<router-link class="list-group-item" active-class="active" to="/about">About</router-link>

//name
<router-link class="list-group-item" active-class="active" :to="{name:'xiaoxi'}">Messages</router-link>

//params & query
<router-link :to="{
	//命名路由
	name:'xiangqing',
	//params传参
	params:{
		y:20,
		x:10,
	},
	//query 传参
	query:{
		id:msg.id,
		title:msg.title,
	}
}">{{msg.title}}</router-link>
props 组件中接受参数,便于插值语法直接使用,注意要在组件props中声明变量
//未启用props时
<li>{{$route.query.id}}</li>
<li>{{$route.query.title}}</li>

//启用props后
<li>{{id}}</li>
<li>{{title}}</li>


//使用props后,注意凡是props要接受的数据,都要先声明
export default {
    // routes 中props:true,但组件中也要显示声明变量,用来接收
    props:['a','x','y','b','id','title'],
    mounted(){
        console.log('Detail',this)
    }
}
6.4.2 keep-alive
切换路由换组件时,原有组件被销毁,如果输入了信息,也会跟着消失。
用keep-alive可以保护组件不被销毁,只是隐藏。
<keep-alive include="News,Messages">
	<router-view></router-view>
</keep-alive>
6.5 路由跳转
浏览器地址栈
可以跳转至任意组件:push,replace(只跳转不保留在浏览器地址栈)
根据浏览器地址栈跳转:forward(),back(),go(num)
methods:{
	forward(){
		this.$router.forward();
	},
	back(){
		this.$router.back();
	},
	go(){
		this.$router.go(-3);
	},
	goToNews(){
        //options配置通to
		this.$router.push({
			name:'xinwen',
		})
	},
}
6.6 两个路由相关生命周期钩子
假若使用了keep-alive,组件一直存活,不被销毁,但是某些函数只需要在组件出于正在页面展示时,才使用,所以vue配置了两个新的生命周期钩子:activated(),deactivated()
//激活状态,正在展示、使用
activated(){
	this.timer = setInterval(() => {
		console.log('@@@')
		this.opacity -= 0.1;
		if(this.opacity <=0){
			this.opacity = 1;
		}
	}, 100);
},
//失活时
deactivated(){
	clearInterval(this.timer)
},
6.7 路由守卫
6.7.1 全局路由守卫
// 全局前置路由守卫--初始化时及每次路由切换之前被调用(可用来鉴定权限,但一般不用,细化到后端接口鉴权)
router.beforeEach((to, from, next) => {
    // console.log('前置路由守卫被调用', to, from, next);
    //加了方法后页面跳转失败,后置路由守卫console未执行,没有next(),所有跳转都被卡住了
    // to.name === "news" 很多需要鉴权的路由时不好写,可以通过meta配置统一标识
    if (to.meta.isAuth) {
        if (localStorage.getItem('school') === 'atguigu') {
            next();
        } else {
            alert('您没有访问该页面的权限!')
        }
    } else {
        next();
    }
})

// 全局后置路由守卫--初始化,及路由切换完成后被调用,可以用来展示现有页面路径,实现便捷跳转
router.afterEach((to, from) => {
    console.log('后置路由守卫被调用', to, from)
    document.title = to.meta.title ||'硅谷系统'
})
6.7.2 独享路由守卫
配置在routes中
children: [
	{
		path: 'news',
		component: News,
		meta: { isAuth: true, title: '新闻' },
		// 独享路由守卫,添加在单独的路由中,进入路由前被调用
		beforeEnter: (to, from, next) => {
			console.log('独享路由守卫')
			if (to.meta.isAuth) {
				if (localStorage.getItem('school') === 'atguigu') {
					next();
				} else {
					alert('您没有访问该页面的权限!')
				}
			} else {
				next();
			}
		},
	}
]
6.7.3 组件内路由守卫
// 通过路由规则,进入该组件时被调用
beforeRouteEnter(to, from, next) {
	console.log('组件内路由beforeRouteEnter被调用')
	if (to.meta.isAuth) {
		if (localStorage.getItem('school') === 'atguigu') {
			next();
		} else {
			alert('您没有访问该页面的权限!')
		}
	} else {
		next();
	}
},
// 通过路由离开该组件时被调用
beforeRouteLeave(to, from, next) {
	console.log('组件内路由beforeRouteLeave被调用')
	next();
}


 3万+
3万+


 被折叠的 条评论
为什么被折叠?
被折叠的 条评论
为什么被折叠?
 到【灌水乐园】发言


