


1.介绍
图像分类是计算机视觉中的一个关键任务,而猫种类识别作为一个有趣且实用的应用场景,通过卷积神经网络(CNN)的模型能够识别猫的不同品种。在这篇博客中,将详细介绍如何利用深度学习技术构建模型,从而实现猫种类的自动识别。将探讨数据集的获取和预处理、模型的构建与训练,以及模型的评估和应用。
2.数据集准备与预处理
使用的数据集包含布偶猫、橘猫、蓝猫和虎斑猫等四种猫的图片。这个数据集包含了多个角度和不同环境下的猫的图像。在数据预处理阶段,加载了图像数据,并进行了多方面的处理:图片大小调整、灰度处理、归一化和标签编码等。致力于创建一个高质量、多样性和均衡性的数据集,以保证模型的有效性和泛化能力。
2.1 数据集准备
百度图片搜索猫咪图片 ——放到对应文件夹下
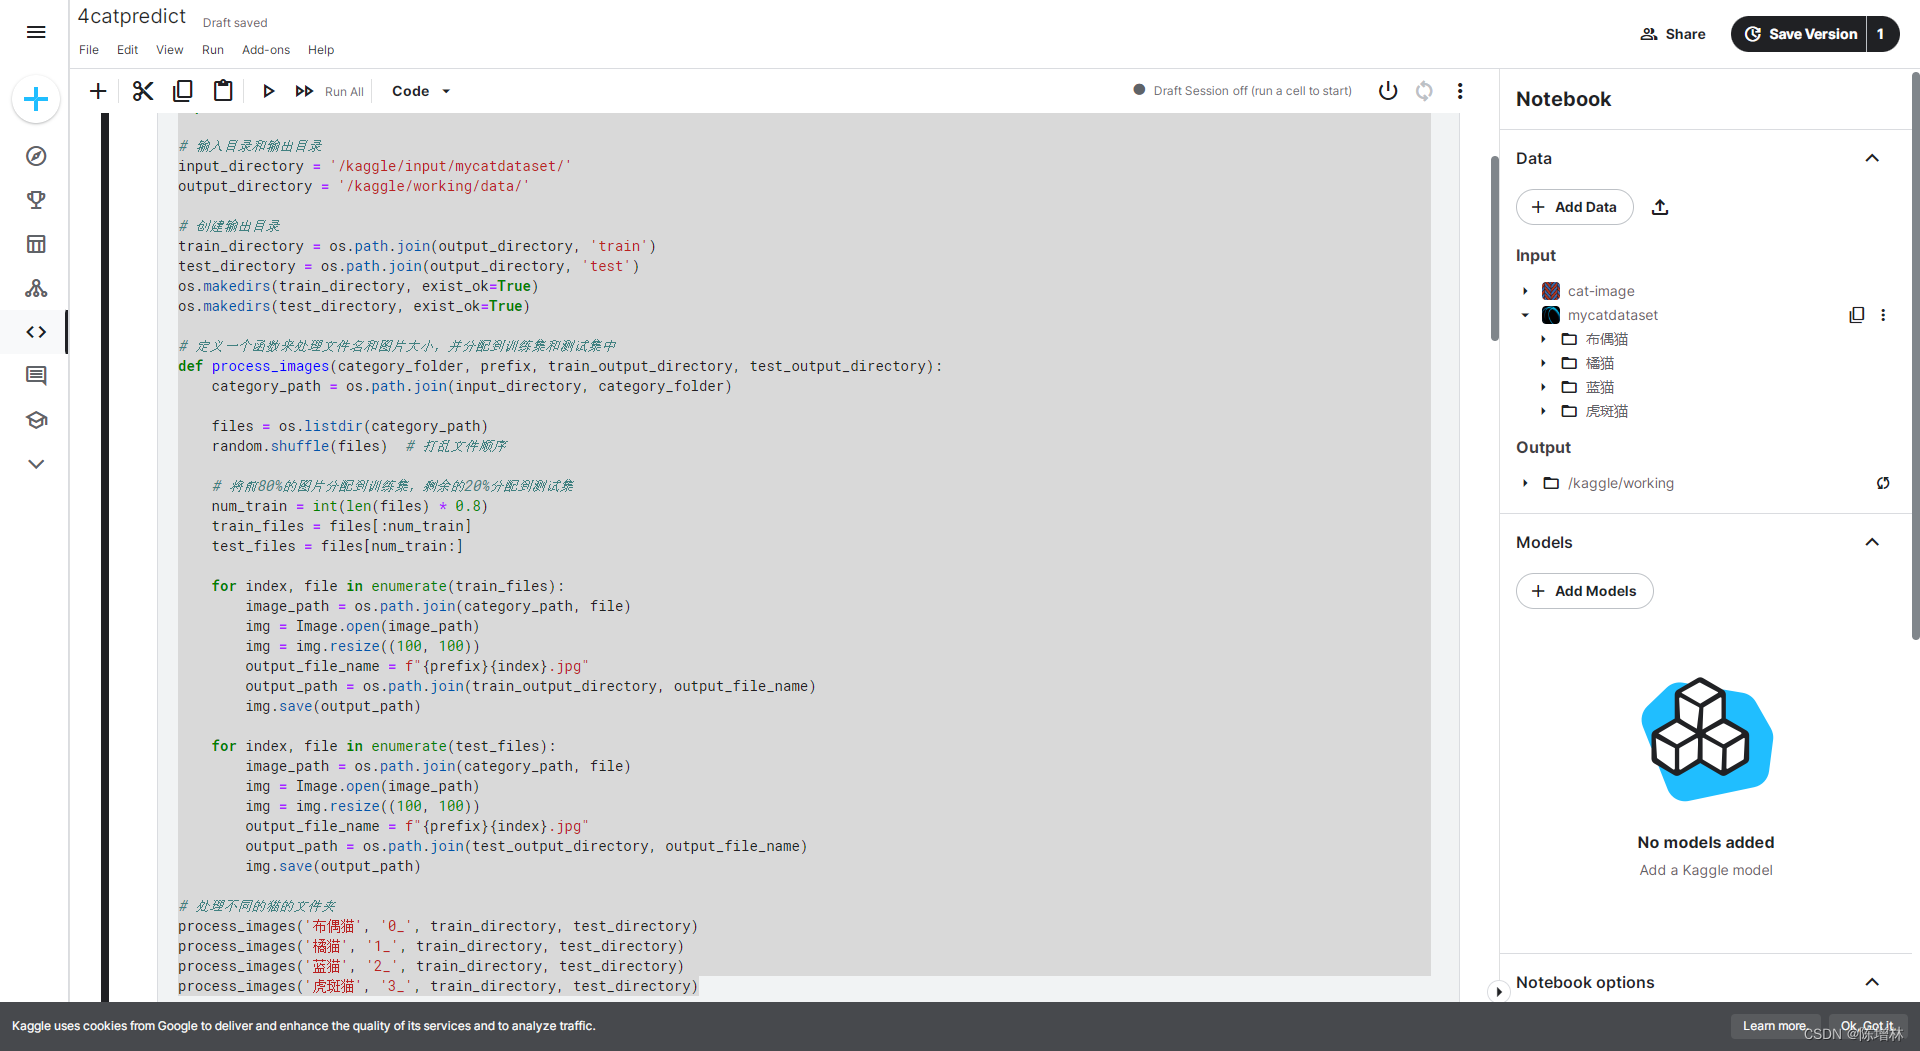
2.2 预处理 统一图片大小及后缀名
预处理是图像处理中至关重要的步骤之一,特别是在图像分类任务中。在进行猫种类识别之前,我们需要对图像进行预处理,以确保数据的一致性和适应模型的需求。在这个任务中,我们执行了两个关键的预处理步骤:统一图片大小和统一图片后缀名。
统一图片大小: 图像大小的不一致会对模型训练产生影响。因此,我们将所有的图像调整为相同的尺寸,例如将所有图像调整为100x100像素大小。通过这样的处理,我们确保了训练数据的一致性,使模型能够更好地学习和识别特征。
统一图片后缀名: 在数据收集过程中,不同来源的图像可能具有不同的后缀名或格式。为了方便统一处理,我们将所有图像的后缀名或格式转换为相同的格式,例如将所有图像统一保存为.jpg格式。这样做有利于数据加载和处理,并减少了数据集混乱性和不一致性所带来的问题。
import os
from PIL import Image
import random
import shutil

# 输入目录和输出目录
input_directory = '/kaggle/input/mycatdataset/'
output_directory = '/kaggle/working/data/'

# 创建输出目录
train_directory = os.path.join(output_directory, 'train')
test_directory = os.path.join(output_directory, 'test')
os.makedirs(train_directory, exist_ok=True)
os.makedirs(test_directory, exist_ok=True)

# 定义一个函数来处理文件名和图片大小,并分配到训练集和测试集中
def process_images(category_folder, prefix, train_output_directory, test_output_directory):
    category_path = os.path.join(input_directory, category_folder)

    files = os.listdir(category_path)
    random.shuffle(files)  # 打乱文件顺序

    # 将前80%的图片分配到训练集,剩余的20%分配到测试集
    num_train = int(len(files) * 0.8)
    train_files = files[:num_train]
    test_files = files[num_train:]

    for index, file in enumerate(train_files):
        image_path = os.path.join(category_path, file)
        img = Image.open(image_path)
        img = img.resize((100, 100))
        output_file_name = f"{prefix}{index}.jpg"
        output_path = os.path.join(train_output_directory, output_file_name)
        img.save(output_path)

    for index, file in enumerate(test_files):
        image_path = os.path.join(category_path, file)
        img = Image.open(image_path)
        img = img.resize((100, 100))
        output_file_name = f"{prefix}{index}.jpg"
        output_path = os.path.join(test_output_directory, output_file_name)
        img.save(output_path)

# 处理不同的猫的文件夹
process_images('布偶猫', '0_', train_directory, test_directory)
process_images('橘猫', '1_', train_directory, test_directory)
process_images('蓝猫', '2_', train_directory, test_directory)
process_images('虎斑猫', '3_', train_directory, test_directory)
3.训练
参考采用VGG模型
设计了一个深度卷积神经网络来处理猫种类的分类任务。该模型由卷积层、池化层和全连接层组成,具有良好的特征提取和抽象能力。使用了ReLU激活函数、Dropout层和Softmax输出层,并且选择了合适的损失函数和优化器。通过对模型进行反复调整和优化,确保了模型在处理猫图像时的有效性和鲁棒性。
import os
import numpy as np
from PIL import Image
import tensorflow as tf
import matplotlib.pyplot as plt

# 获取训练集和测试集的图片路径列表
train_path = '/kaggle/working/data/train'
test_path = '/kaggle/working/data/test'
train_images = os.listdir(train_path)
test_images = os.listdir(test_path)

# 读取图像并转换为Numpy数组的函数
def load_images(path, image_list):
    images = []
    labels = []
    for img in image_list:
        image = Image.open(os.path.join(path, img)).convert('RGB')
        image = image.resize((100, 100))  # 调整图像大小为100x100
        images.append(np.array(image))
        label = int(img.split('_')[0])  # 根据文件名提取标签
        labels.append(label)
    return np.array(images), np.array(labels)

# 读取训练集和测试集图像数据
x_train, y_train = load_images(train_path, train_images)
x_test, y_test = load_images(test_path, test_images)

# 数据预处理
x_train = x_train.astype('float32') / 255.0  # 将图像像素值缩放到[0, 1]范围内
x_test = x_test.astype('float32') / 255.0

y_train = tf.keras.utils.to_categorical(y_train)  # 将训练集标签进行one-hot编码
y_test = tf.keras.utils.to_categorical(y_test)

# 构建卷积神经网络模型
model = tf.keras.Sequential([
    tf.keras.layers.Conv2D(32, (3, 3), activation='relu', input_shape=(100, 100, 3)),
    tf.keras.layers.Conv2D(32, (3, 3), activation='relu'),
    tf.keras.layers.MaxPooling2D(pool_size=(2, 2)),
    tf.keras.layers.Dropout(0.25),

    tf.keras.layers.Conv2D(64, (3, 3), activation='relu'),
    tf.keras.layers.Conv2D(64, (3, 3), activation='relu'),
    tf.keras.layers.MaxPooling2D(pool_size=(2, 2)),
    tf.keras.layers.Dropout(0.25),

    tf.keras.layers.Flatten(),
    tf.keras.layers.Dense(256, activation='relu'),
    tf.keras.layers.Dropout(0.5),
    tf.keras.layers.Dense(4, activation='softmax')
])

# 编译模型
model.compile(loss='categorical_crossentropy', optimizer='adam', metrics=['accuracy'])

# 训练模型
history = model.fit(x_train, y_train, batch_size=20, epochs=50, validation_data=(x_test, y_test))

# 保存模型
model.save('/kaggle/working/cat_model.h5')

# 评估模型
score = model.evaluate(x_test, y_test)
print('Test loss:', score[0])
print('Test accuracy:', score[1])
# 可视化测试结果
plt.figure(figsize=(12, 6))

# 绘制训练集和验证集的损失
plt.subplot(1, 2, 1)
plt.plot(history.history['loss'], label='Training Loss')
plt.plot(history.history['val_loss'], label='Validation Loss')
plt.xlabel('Epochs')
plt.ylabel('Loss')
plt.title('Training and Validation Loss')
plt.legend()

# 绘制训练集和验证集的准确率
plt.subplot(1, 2, 2)
plt.plot(history.history['accuracy'], label='Training Accuracy')
plt.plot(history.history['val_accuracy'], label='Validation Accuracy')
plt.xlabel('Epochs')
plt.ylabel('Accuracy')
plt.title('Training and Validation Accuracy')
plt.legend()

plt.tight_layout()
plt.show()
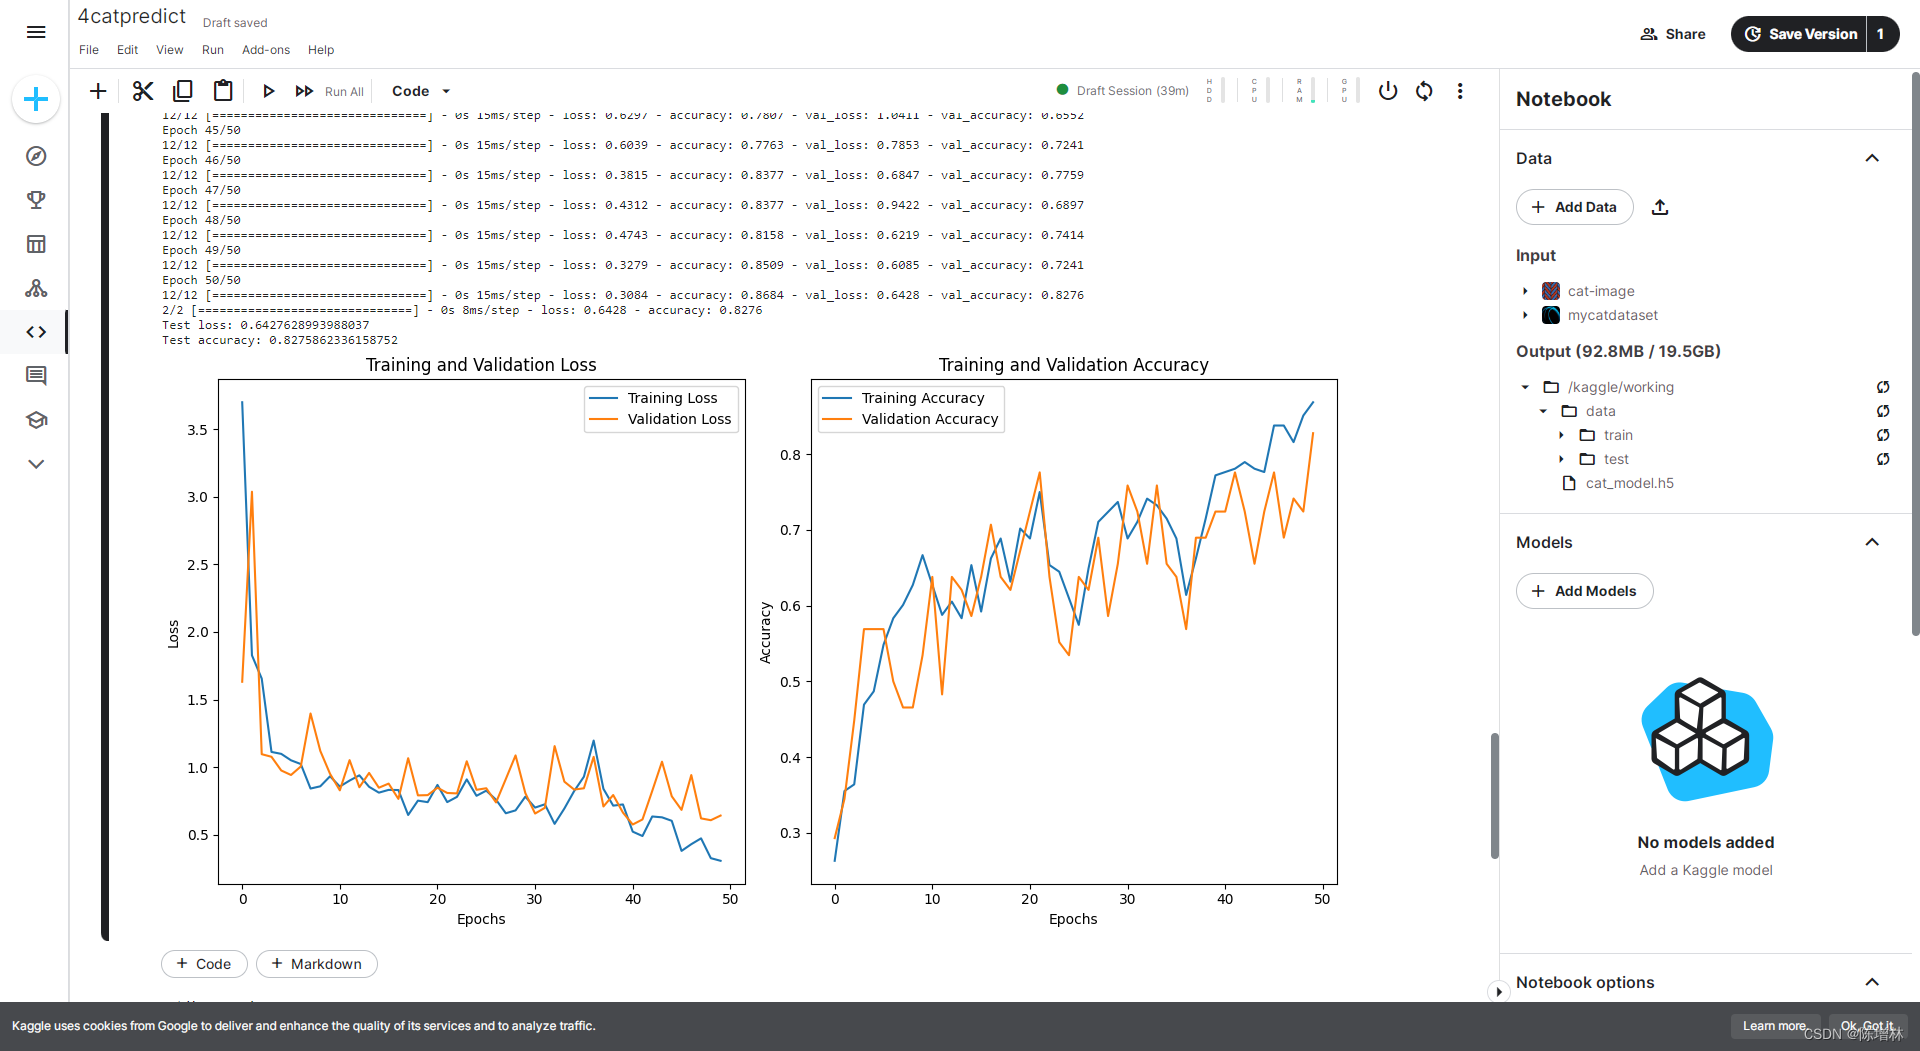
在训练过程中,将数据集划分为训练集和验证集,并对模型进行了多轮次的训练。记录了训练和验证集上的损失值和准确率,以便了解模型的训练情况和性能表现。通过使用验证集进行评估,检查了模型的泛化能力和过拟合情况。
训练结果:
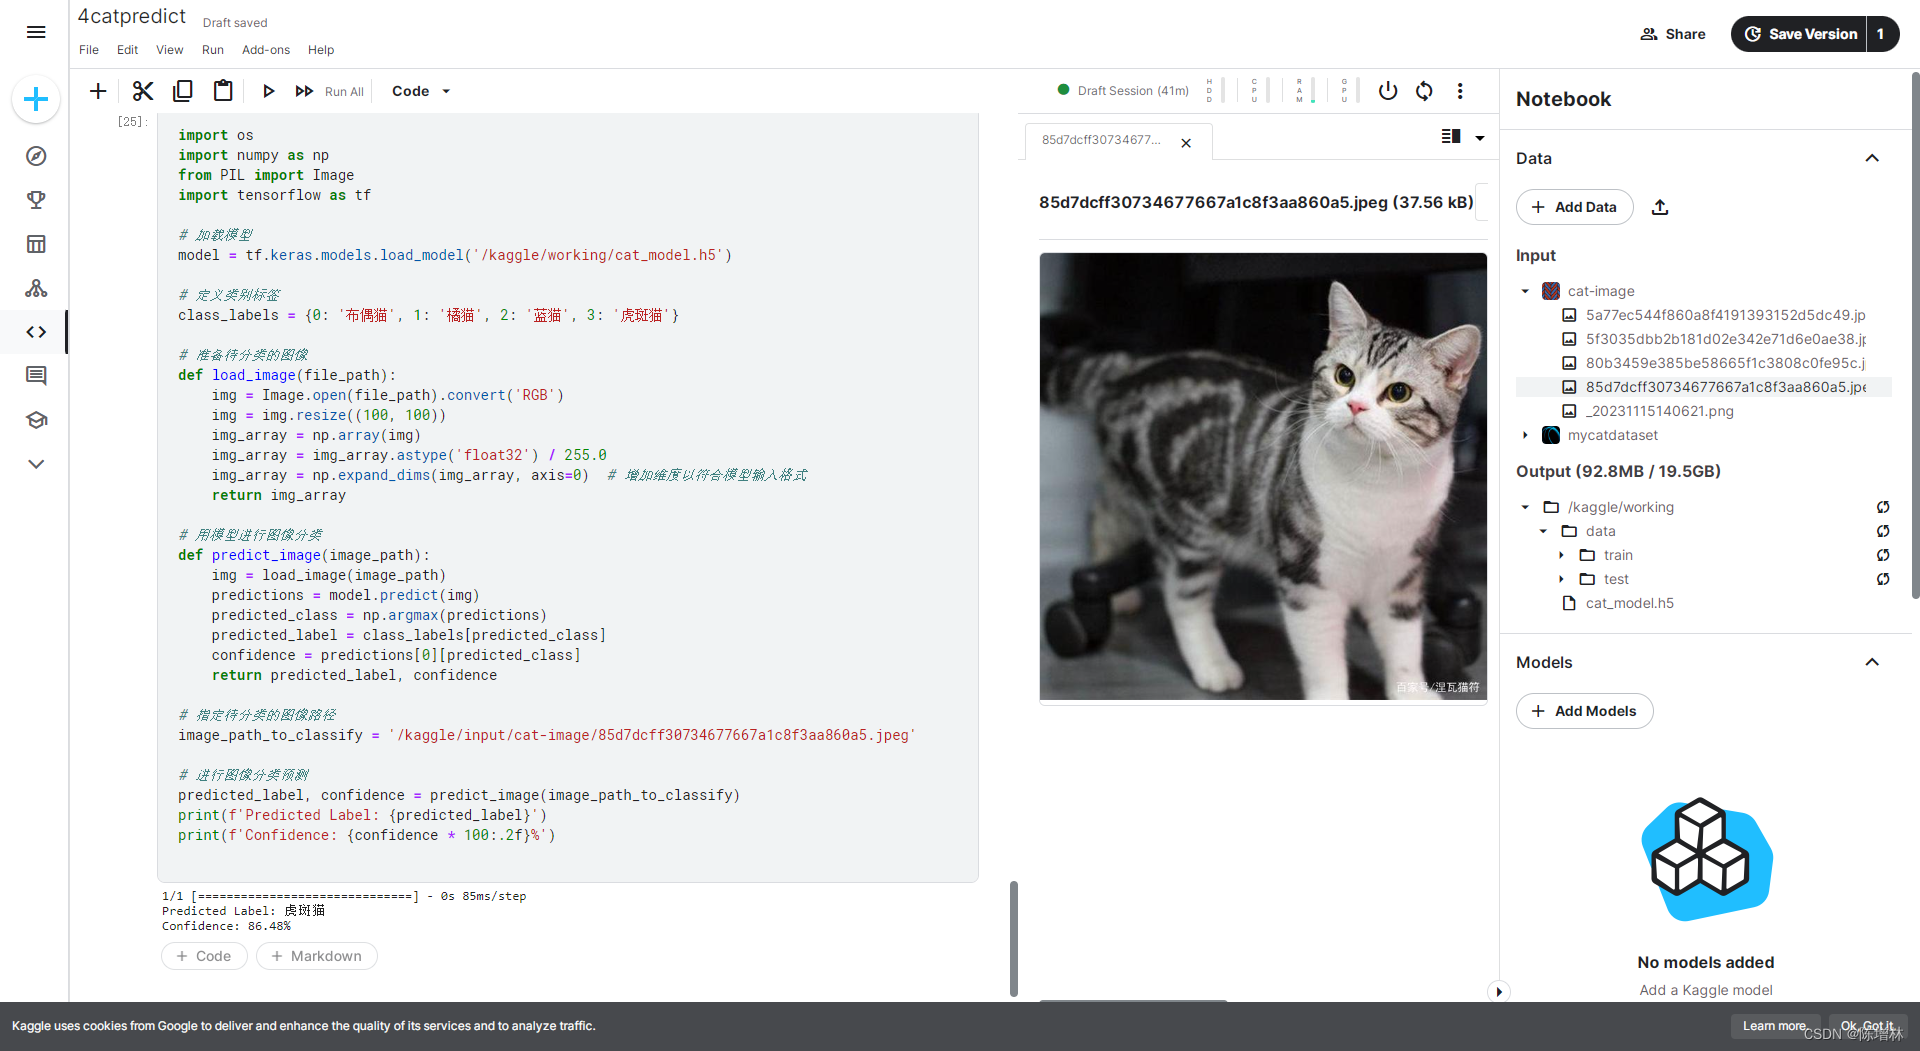
4.图像识别与预测
最后,使用训练好的模型对新的猫图像进行了预测。通过加载模型并使用其对待识别的图像进行预处理和推理,得到了预测的猫种类标签和模型对该标签的置信度。这项实验展示了模型在实际应用中的效果和可靠性。
import os
import numpy as np
from PIL import Image
import tensorflow as tf

# 加载模型
model = tf.keras.models.load_model('/kaggle/working/cat_model.h5')

# 定义类别标签
class_labels = {0: '布偶猫', 1: '橘猫', 2: '蓝猫', 3: '虎斑猫'}

# 准备待分类的图像
def load_image(file_path):
    img = Image.open(file_path).convert('RGB')
    img = img.resize((100, 100))
    img_array = np.array(img)
    img_array = img_array.astype('float32') / 255.0
    img_array = np.expand_dims(img_array, axis=0)  # 增加维度以符合模型输入格式
    return img_array

# 用模型进行图像分类
def predict_image(image_path):
    img = load_image(image_path)
    predictions = model.predict(img)
    predicted_class = np.argmax(predictions)
    predicted_label = class_labels[predicted_class]
    confidence = predictions[0][predicted_class]
    return predicted_label, confidence

# 指定待分类的图像路径
image_path_to_classify = '/kaggle/input/cat-image/85d7dcff30734677667a1c8f3aa860a5.jpeg'

# 进行图像分类预测
predicted_label, confidence = predict_image(image_path_to_classify)
print(f'Predicted Label: {predicted_label}')
print(f'Confidence: {confidence * 100:.2f}%')
模型下载:传送门


 3250
3250

 被折叠的 条评论
为什么被折叠?
被折叠的 条评论
为什么被折叠?
 到【灌水乐园】发言


