


1. 服务器文件
服务器地址可以参考用 artemis 生成的 myboker 中的broker.xml文件,该文件也是 bootstrap.xml 中标记的服务器文件
<!-- bootstrap.xml-->
<broker xmlns="http://activemq.apache.org/schema">
   <jaas-security domain="activemq"/>
   <!-- artemis.URI.instance is parsed from artemis.instance by the CLI startup.
        This is to avoid situations where you could have spaces or special characters on this URI -->
   <server configuration="file:/D:/ProgramFiles/apache-artemis-2.26.0-bin/apache-artemis-2.26.0/bin/myboker/etc//broker.xml"/>
   <!-- The web server is only bound to localhost by default -->
   <web path="web" rootRedirectLocation="console">
       <binding uri="http://localhost:8161">
           <app url="activemq-branding" war="activemq-branding.war"/>
           <app url="artemis-plugin" war="artemis-plugin.war"/>
           <app url="console" war="console.war"/>
       </binding>
   </web>


</broker>

<!-- broker.xml -->
 <acceptors>
     <!-- Acceptor for every supported protocol -->
     <acceptor name="artemis">tcp://0.0.0.0:61616?tcpSendBufferSize=1048576;tcpReceiveBufferSize=1048576;amqpMinLargeMessageSize=102400;protocols=CORE,AMQP,STOMP,HORNETQ,MQTT,OPENWIRE;useEpoll=true;amqpCredits=1000;amqpLowCredits=300;amqpDuplicateDetection=true;supportAdvisory=false;suppressInternalManagementObjects=false</acceptor>
     <!-- AMQP Acceptor.  Listens on default AMQP port for AMQP traffic.-->
     <acceptor name="amqp">tcp://0.0.0.0:5672?tcpSendBufferSize=1048576;tcpReceiveBufferSize=1048576;protocols=AMQP;useEpoll=true;amqpCredits=1000;amqpLowCredits=300;amqpMinLargeMessageSize=102400;amqpDuplicateDetection=true</acceptor>

     <!-- STOMP Acceptor. -->
     <acceptor name="stomp">tcp://0.0.0.0:61613?tcpSendBufferSize=1048576;tcpReceiveBufferSize=1048576;protocols=STOMP;useEpoll=true</acceptor>

     <!-- HornetQ Compatibility Acceptor.  Enables HornetQ Core and STOMP for legacy HornetQ clients. -->
     <acceptor name="hornetq">tcp://0.0.0.0:5445?anycastPrefix=jms.queue.;multicastPrefix=jms.topic.;protocols=HORNETQ,STOMP;useEpoll=true</acceptor>
     <!-- MQTT Acceptor -->
     <acceptor name="mqtt">tcp://0.0.0.0:1883?tcpSendBufferSize=1048576;tcpReceiveBufferSize=1048576;protocols=MQTT;useEpoll=true</acceptor>

</acceptors>
可以看到上述 mqtt 使用的端口是1883,协议标识符用的都是tcp
2. 配置依赖
-
按照eclipse/paho.mqtt.android的指导,完成依赖
repositories { maven { url "https://repo.eclipse.org/content/repositories/paho-snapshots/" } } implementation 'org.eclipse.paho:org.eclipse.paho.client.mqttv3:1.1.0' implementation 'org.eclipse.paho:org.eclipse.paho.android.service:1.1.1' -
AndroidManifest.xml添加相应权限<uses-permission android:name="android.permission.INTERNET" /> <uses-permission android:name="android.permission.ACCESS_NETWORK_STATE" /> <uses-permission android:name="android.permission.WAKE_LOCK" /> -
AndroidManifest.xml注册Service<service android:name="org.eclipse.paho.android.service.MqttService" tools:ignore="MissingClass" />
3. 示例代码
我们以本机为服务器
package com.monk.test
import android.content.Context
import android.net.ConnectivityManager
import android.util.Log
import android.widget.Toast
import com.h3c.client.global.GlobalContext
import org.eclipse.paho.android.service.MqttAndroidClient
import org.eclipse.paho.client.mqttv3.*
/**
* @since 2022/6/2 19:58
* @author monk
*/
class MyMqtt {
private var mqttAndroidClient: MqttAndroidClient
// 本机ip + mqtt端口号
private val serverUri = "tcp://10.213.122.137:1883"
// 其它客户端主题,自己订阅
private val publishTopic = "home/garden/fountain"
// 自己主题,其它客户端订阅
private var responseTopc ="responseTopic"
private val TAG ="MyMqtt"
private val mqttConnectOptions = MqttConnectOptions()
init {
mqttAndroidClient = MqttAndroidClient(GlobalContext.getContext(), serverUri, "Android")
mqttAndroidClient.setCallback(object : MqttCallback {
override fun connectionLost(cause: Throwable?) {
// 连接断开
// connect()
Log.e(TAG,"connectionLost")
}
override fun messageArrived(topic: String?, message: MqttMessage?) {
// 收到消息
val msg = String(message?.payload!!)
Toast.makeText(GlobalContext.getContext(), msg, Toast.LENGTH_LONG).show()
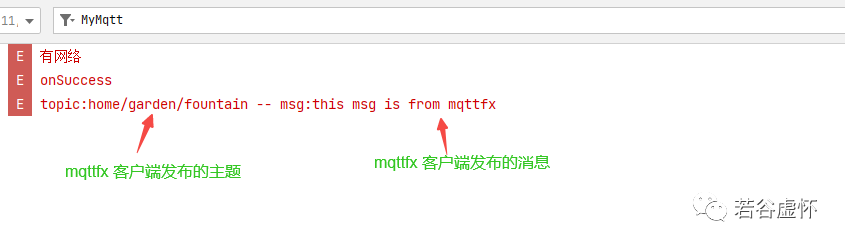
Log.e(TAG, "topic:$topic -- msg:$msg")
// 响应给对方
mqttAndroidClient.publish(responseTopc, "I get it!!".toByteArray(), 2, false)
}
override fun deliveryComplete(token: IMqttDeliveryToken?) {
// 消息传递完成并收到所有确认
}
})
// 设置是否清除缓存
mqttConnectOptions.isCleanSession = true
mqttConnectOptions.connectionTimeout = 10
// 心跳包发送间隔
mqttConnectOptions.keepAliveInterval = 20
mqttConnectOptions.userName = "monk"
mqttConnectOptions.password = "123456".toCharArray()
val message = "{terminal_uid:Android}"
try {
mqttConnectOptions.setWill(publishTopic, message.toByteArray(), 2, false)
} catch (e: Exception) {
println(e.message)
// connect()
}
connect()
}
private fun connect() {
if (!mqttAndroidClient.isConnected && isConnected()) {
mqttAndroidClient.connect(mqttConnectOptions, null, object : IMqttActionListener {
override fun onSuccess(asyncActionToken: IMqttToken?) {
// 订阅主题
Log.e(TAG,"onSuccess")
mqttAndroidClient.subscribe(publishTopic, 2)
}
override fun onFailure(asyncActionToken: IMqttToken?, exception: Throwable?) {
exception?.printStackTrace()
Log.e(TAG,"onFailure")
// connect()
}
})
Log.e(TAG,"有网络")
}else{
Log.e(TAG,"无网络")
}
}
private fun isConnected(): Boolean {
val cm = GlobalContext.getContext().getSystemService(Context.CONNECTIVITY_SERVICE) as ConnectivityManager
return cm.activeNetworkInfo != null && (cm.activeNetworkInfo)?.isAvailable!!
}
fun disconnect(){
mqttAndroidClient.disconnect()
}
}
简单说明下,mqtt基于发布/订阅模型:
- 订阅:
mqttAndroidClient.subscribe(其它客户机主题, qos) - 发布:
mqttAndroidClient.publish(自己主题, "自己发布消息".toByteArray(), qos, false)
通过这种模型,就可以去其它客户端进行 mqtt 通信,客户端分别是mqttfx和大屏设备
-
mqttfx 发布消息,发布主题、消息,发布出去
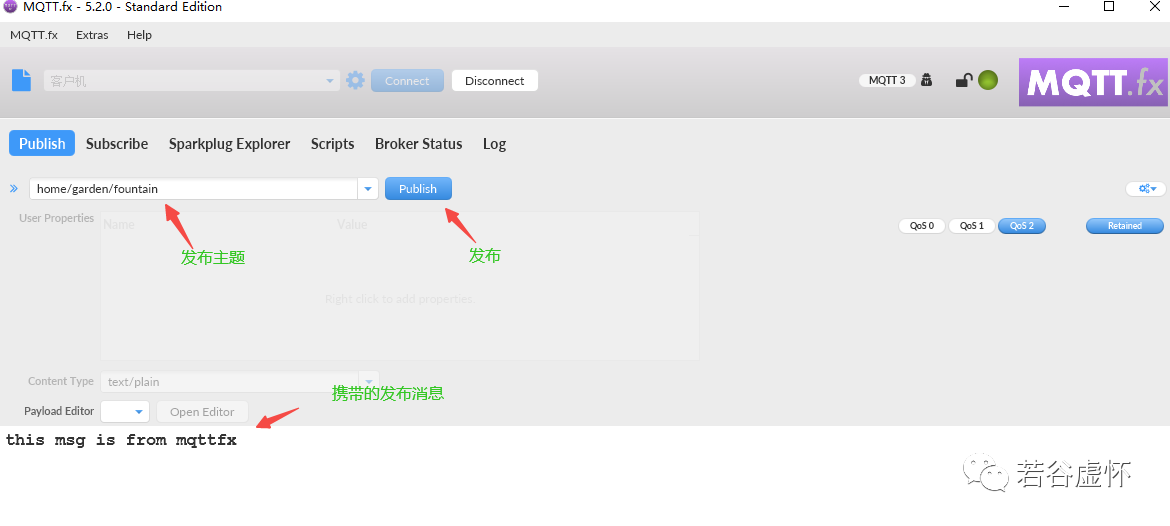
-
大屏设备接收消息,并且响应给 mqttfx
-
mqttfx接收消息

由于用的是本机服务器,所以l两个客户端需要处于同一网段,否则无法通信
以上就通过一个案例展示了 mqtt 的通信过程,希望对大家有所帮助


 3万+
3万+


 被折叠的 条评论
为什么被折叠?
被折叠的 条评论
为什么被折叠?
 到【灌水乐园】发言


