


/etc/sysconfig/network 文件中保存了是否连接互联网,和主机名
配置网络
打开/etc/sysconfig/network-scripts/ifcfg-eth0 将文件修改为如下,IP地址跟VMware的vmnet8在一个网段

输入service network restart若出现3个OK,则表示网通了
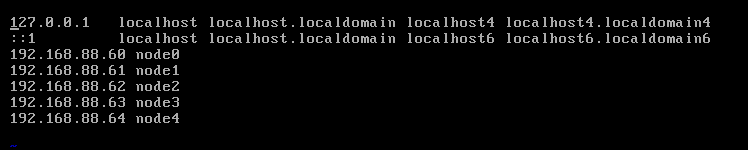
打开/etc/hosts文件,修改为如下:
由于2020年底各大厂的centOS 6版本的yum源已经不能用了,可以将/etc/yum.repos.d/CentOS-Base.repo文件修改为如下:
# CentOS-Base.repo
#
# The mirror system uses the connecting IP address of the client and the
# update status of each mirror to pick mirrors that are updated to and
# geographically close to the client.  You should use this for CentOS updates
# unless you are manually picking other mirrors.
#
# If the mirrorlist= does not work for you, as a fall back you can try the
# remarked out baseurl= line instead.
#
#

[base]
name=CentOS-6.10 - Base - mirrors.aliyun.com
failovermethod=priority
baseurl=http://mirrors.aliyun.com/centos-vault/6.10/os/$basearch/
gpgcheck=1
gpgkey=http://mirrors.aliyun.com/centos-vault/RPM-GPG-KEY-CentOS-6

#released updates
[updates]
name=CentOS-6.10 - Updates - mirrors.aliyun.com
failovermethod=priority
baseurl=http://mirrors.aliyun.com/centos-vault/6.10/updates/$basearch/
gpgcheck=1
gpgkey=http://mirrors.aliyun.com/centos-vault/RPM-GPG-KEY-CentOS-6

#additional packages that may be useful
[extras]
name=CentOS-6.10 - Extras - mirrors.aliyun.com
failovermethod=priority
baseurl=http://mirrors.aliyun.com/centos-vault/6.10/extras/$basearch/
gpgcheck=1
gpgkey=http://mirrors.aliyun.com/centos-vault/RPM-GPG-KEY-CentOS-6

#additional packages that extend functionality of existing packages
[centosplus]
name=CentOS-6.10 - Plus - mirrors.aliyun.com
failovermethod=priority
baseurl=http://mirrors.aliyun.com/centos-vault/6.10/centosplus/$basearch/
gpgcheck=1
enabled=0
gpgkey=http://mirrors.aliyun.com/centos-vault/RPM-GPG-KEY-CentOS-6

#contrib - packages by Centos Users
[contrib]
name=CentOS-6.10 - Contrib - mirrors.aliyun.com
failovermethod=priority
baseurl=http://mirrors.aliyun.com/centos-vault/6.10/contrib/$basearch/
gpgcheck=1
enabled=0
gpgkey=http://mirrors.aliyun.com/centos-vault/RPM-GPG-KEY-CentOS-6
输入命令:
# yum clean all
# yum makecache
使用yum安装ntp和vim
使用chkconfig可以查看安装软件的打开状态
输入命令service ntpd start 打开ntp,用于时间同步
输入chkconfig ntpd on 在系统重启后ntpd依旧会启动
输入chkconfig iptables off 将防火墙关闭
输入getenforce查看selinux(增强Linux的安全子系统)的状态,需要将selinux关闭,进入/etc/selinux/config将文件修改为:

进入/etc/ssh/sshd_config,定位UserDNS将yes改为no,如下图:

输入命令
rm -rf /etc/udev/rules.d/70-persistent-net.rules
删除之后拍摄快照
克隆虚拟机,根据之前拍摄的快照进行克隆:

点击克隆,一直点击下一步,最后更改一下路径和虚拟机名字就克隆成功了
打开node1,vim /etc/sysconfig/network将里面的node0改成node1
打开文件/etc/sysconfig/network-scripts/ifcfg-eth0将IP地址从60改成61
若ifconfig时出现eth0不在的情况,则需要将/etc/udev/rules.d/70-persistent-net.rules文件删除,在重启即可
相同步骤拷贝node2,node3


 2402
2402


 被折叠的 条评论
为什么被折叠?
被折叠的 条评论
为什么被折叠?
 到【灌水乐园】发言


