第一步:更新yum源:安装nginx官方rpm仓库 [root@web01 ~]# rpm -ivh http://nginx.org/packages/centos/7/noarch/RPMS/nginx-release-centos-7-0.el7.ngx.noarch.rpm第二步:安装nginx [root@web01 ~]# yum install nginx -y第三步:启动、开机自启 [root@web01 ~]# systemctl start nginx
[root@web01 ~]# systemctl enable nginx第四步:配置nginx:修改配置文件 [root@web01 ~]# vim /etc/nginx/conf.d/www.conf
server {
listen 0.0.0.0:80; #监听端口
server_name www.blog.com; #网站地址
location /{
root /var/www/html/; #网站目录
index index.php index.html; #网站首页
}
location ~ \.php$ { #添加 PHP 服务(前提已装PHP)
root /var/www/html/; #网站目录
fastcgi_index index.php;
fastcgi_param SCRIPT_FILENAME $document_root$fastcgi_script_name;
fastcgi_pass 127.0.0.1:9000;
include fastcgi_params;
}
}
反向代理模块
server {
     listen       80;
     server_name  localhost;
     location / {
       proxy_pass http://10.0.0.7;        # 需要代理的服务器,可为域名或者IP+端口
       proxy_set_header Host $host;       # 调用用户请求头
       proxy_set_header X-Forward-For $remote_addr;    #获取用户真实IP
     }
}
#可选参数
#client_max_body_size 10m;        用户请求最大单文件字节数
#client_body_buffer_size 128k;    缓冲区代理缓冲用户端请求的最大字节数
#proxy_connect_timeout 90;        nginx跟后端服务器连接超时时间(代理连接超时) #proxy_send_timeout 90;           后端服务器数据回传时间(代理发送超时)
#proxy_read_timeout 90;           连接成功后,后端服务器响应时间(代理接收超时)
#proxy_buffer_size 4k;            设置代理服务器(nginx)保存用户头信息的缓冲区大小
#proxy_buffers 4 32k;             proxy_buffers缓冲区,网页平均在32k以下的话,这样设置
#proxy_busy_buffers_size 64k;     高负荷下缓冲大小(proxy_buffers*2)
#proxy_temp_file_write_size 64k;  设定缓存文件夹大小,大于这个值,将从upstream服务器传
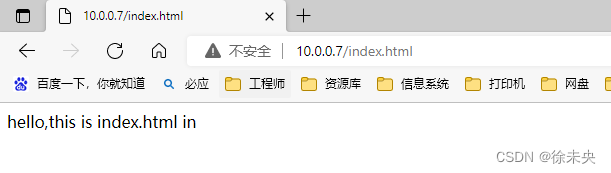
第五步:创建网站测试文件 [root@web01 ~]# echo "hello,this is index.html" >/var/www/html/index.txt
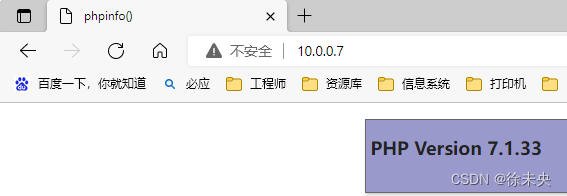
[root@web01 ~]# echo "<?php phpinfo(); ?>" >/var/www/html/index.php第六步:测试配置文件,重启nginx服务 [root@web01 ~]# nginx -t
nginx: the configuration file /etc/nginx/nginx.conf syntax is ok
nginx: configuration file /etc/nginx/nginx.conf test is successful
[root@web01 ~]# systemctl restart nginx ps:查看nginx服务 + 端口号
[root@web01 ~]# ps -ef|grep "nignx"
root       3280      1  0 17:39 ?        00:00:00 nginx: master process /usr/sbin/nginx
www        3281   3280  0 17:39 ?        00:00:00 nginx: worker process
www        3282   3280  0 17:39 ?        00:00:00 nginx: worker process
root       3288   1697  0 17:46 pts/0    00:00:00 grep --color=auto nginx

[root@web01 ~]# netstat -lnp|grep "80"
tcp     0    0 0.0.0.0:80       0.0.0.0:*     LISTEN    3280/nginx: master
tcp     0    0 0.0.0.0:8080     0.0.0.0:*     LISTEN    3280/nginx: master
tcp6    0    0 :::80            :::*          LISTEN    3280/nginx: master
第七步:打开浏览器测试
ps:关闭 防火墙 + selinux [root@web01 ~]# systemctl stop firewalld
[root@web01 ~]# systemctl disable firewalld
[root@web01 ~]# setenforce 0
[root@web01 ~]# sed -i 's#enforcing#disable#g' /etc/selinux/config


 6893
6893


 被折叠的 条评论
为什么被折叠?
被折叠的 条评论
为什么被折叠?
 到【灌水乐园】发言


