ESP32的开发环境SDK4.3.1版本和编译环境搭建

首先:

到乐鑫的官网下载一个最完整的安装包,地址为:

https://dl.espressif.com/dl/esp-idf/?idf=4.3

在这分为两种:在线安装和离线安装:

在线安装与离线安装的区别

在线安装程序非常小,可以安装 ESP-IDF 的所有版本。在安装过程中,安装程序只下载必要的依赖文件,包括 Git For Windows 安装器。在线安装程序会将下载的文件存储在缓存目录 %userprofile%/espressif 中。

离线安装程序不需要任何网络连接。安装程序中包含了所有需要的依赖文件,包括 Git For Windows 安装器。

我在这里选用的离线安装,比较方便一点。

 下载完就是这个:

 然后进行安装操作,基本一直同意就可以安装完成。

安装完成后会有这几个东西:

 其实到这一步就有了最新的4.3.1的SDK——esp-idf了,然后使用CMD也可以完成例程的编译。
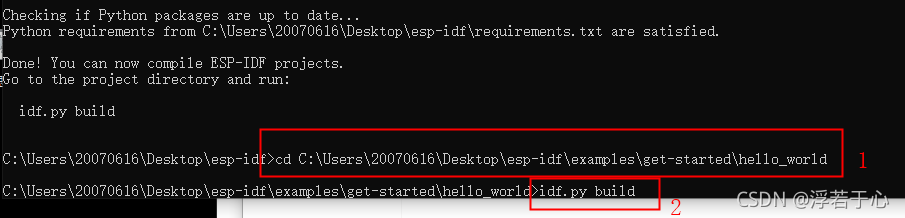
比如打开后显示这样:

 然后先输入cd到达要编译的文件,最后以直接输入idf.py build就可以直接编译了

 这是一种编译方法,不过我个人还是喜欢使用Msys32进行编译,感觉使用的更加舒服。

然后后面介绍怎么配置Msys32编译会更加舒服一点。

再上面安装了的基础上继续进行一个操作。。。注:要是没有上面的安装,会需要配置很多东西比较麻烦。

这时候咋们先下载一个Msys32,这是要下载和ESP32配套的,官网的使用不了

下载地址:Windows 平台工具链的标准设置(传统 GNU Make) - ESP32 - — ESP-IDF 编程指南 v4.3.1 文档

 这个也是最新的用于配套SDK4.3.1版本。

下载完后就是这么个东西:

 这时候先操作第一步:

按照这个路径进入到这个文件里面,这个里面一般是设置的环境。

D:\esp32_win32_msys2_environment_and_esp2020r2_toolchain-20200601\msys32\etc\profile.d

这时候需要在这个里面添加一个文件为这个:自己创建自己命名

 然后在文件里面添加自己的esp-idf的路径:export IDF_PATH="D:\esp-idf",,可以使用notepad++打开文件。

 因为为了便于操作,我从桌面复制了一份esp-idf的文件放到了D盘:

 然后操作第二步:

打开电脑系统的环境变量的位置添加上这个环境变量:

 记得变量名要保持一致,后面的路径就是放置esp-idf的路径。

如果忘记添加就编译会出现:IDF_PYTHON_ENV_PATH: (not set)

好的,添加完毕后确认,最后打开Msys32文件夹,点开

 然后看到了:

 这个时候同样cd到你要编译的文件目录下面:记得目录的文件符要由\改为/这样才能到文件目录

 然后make一下,会遇到这样的报错:

这时候根据上面的提示进行操作:please run ........../install.sh

然后cd到esp-idf的路径下 直接输入./install.sh:

 后面出现这样:

 根据提示继续操作输入. ./export.sh:

但是如果后面打开MSYS2一直需要你执行上面的两步,则需要在esp-idf路径下执行python -m pip install --user -r $IDF_PATH/requirements.txt,执行完成后应该就没有问题了。

 后面出现了1,后面进行操作2,最后操作3直接make就圆满成功了。

 最后编译完成是这样的:版本为4.3.1

 文件夹就多了一个build文件夹:这样就成功了。

  • 3
    点赞
  • 6
    收藏
    觉得还不错? 一键收藏
  • 打赏
    打赏
  • 0
    评论
esp32-freertos-sdk 工具包 See the Getting Started guide links above for a detailed setup guide. This is a quick reference for common commands when working with ESP-IDF projects: Setup Build Environment (See Getting Started guide for a full list of required steps with details.) Install host build dependencies mentioned in Getting Started guide. Add tools/ directory to the PATH Run python -m pip install -r requirements.txt to install Python dependencies Configuring the Project idf.py menuconfig Opens a text-based configuration menu for the project. Use up & down arrow keys to navigate the menu. Use Enter key to go into a submenu, Escape key to go out or to exit. Type ? to see a help screen. Enter key exits the help screen. Use Space key, or Y and N keys to enable (Yes) and disable (No) configuration items with checkboxes "[*]" Pressing ? while highlighting a configuration item displays help about that item. Type / to search the configuration items. Once done configuring, press Escape multiple times to exit and say "Yes" to save the new configuration when prompted. Compiling the Project idf.py build ... will compile app, bootloader and generate a partition table based on the config. Flashing the Project When the build finishes, it will print a command line to use esptool.py to flash the chip. However you can also do this automatically by running: idf.py -p PORT flash Replace PORT with the name of your serial port (like COM3 on Windows, /dev/ttyUSB0 on Linux, or /dev/cu.usbserial-X on MacOS. If the -p option is left out, idf.py flash will try to flash the first available serial port. This will flash the entire project (app, bootloader and partition table) to a new chip. The settings for serial port flashing can be configured with idf.py menuconfig. You don't need to run idf.py build before running idf.py flash, idf.py flash will automatically rebuild anything which needs it. Viewing Serial Output The idf.py monitor target uses the idf_monitor tool to display se

“相关推荐”对你有帮助么?

  • 非常没帮助
  • 没帮助
  • 一般
  • 有帮助
  • 非常有帮助
提交
评论
添加红包

请填写红包祝福语或标题

红包个数最小为10个

红包金额最低5元

当前余额3.43前往充值 >
需支付:10.00
成就一亿技术人!
领取后你会自动成为博主和红包主的粉丝 规则
hope_wisdom
发出的红包

打赏作者

浮若于心

你的鼓励将是我创作的最大动力

¥1 ¥2 ¥4 ¥6 ¥10 ¥20
扫码支付:¥1
获取中
扫码支付

您的余额不足,请更换扫码支付或充值

打赏作者

实付
使用余额支付
点击重新获取
扫码支付
钱包余额 0

抵扣说明:

1.余额是钱包充值的虚拟货币,按照1:1的比例进行支付金额的抵扣。
2.余额无法直接购买下载,可以购买VIP、付费专栏及课程。

余额充值