


自动下载电路 dtr rts ;WCH 提供了相应的芯片,实现自动下载 CH340X (*不要使用天问的下载器,电压为5V,下载前会重启电源,导致无法识别ESP芯片,修改,将电源线重引出
(*内置FLASH了,不需外接FLASH
测试:
空芯片正常上电 UART0
ESP-ROM:esp8684-api2-20220127
Build:Jan 27 2022
rst:0x1 (POWERON),boot:0x4 (DOWNLOAD(UART0))
waiting for download
烧录:
FLASH DOWNLOAD
选择芯片;ESP32 C2
COM口正确(***)
Stub is already running. No upload is necessary.
Changing baud rate to 115200
Changed.
NO XMC flash  detected!
SPI_BOOT_CRYPT_CNT 0
SECURE_BOOT_EN False
Compressed 2097152 bytes to 665269...

 is stub and send flash finish
uart0 用于烧录程序 (26M晶振下,为74880波特率,40M 115200
uart1用于输入输出 115200
uart0 rx 19 tx 20
uar1 rx 12(mtck) tx 13 (mtdo)
烧录
使用IDF编辑完成后(IDF.PY BUILD)后 在文件目录内有BOOTLOADER,分区表PARTIONS,和主文件 如下最后二行,地直 0X0 0X8000 0X10000 在FLASH LOBADER工具中
PS D:\espc2test\hello_world> idf.py build
Executing action: all (aliases: build)
Running ninja in directory D:\ESPC2TEST\hello_world\build
Executing "ninja all"...
[1/4] cmd.exe /C "cd /D D:\ESPC2TEST\hello_world\build\esp...-table.bin D:/ESPC2TEST/hello_world/build/hello_world.bin"hello_world.bin binary size 0x19c60 bytes. Smallest app partition is 0x100000 bytes. 0xe63a0 bytes (90%) free.
[1/1] cmd.exe /C "cd /D D:\ESPC2TEST\hello_world\build\boo... D:/ESPC2TEST/hello_world/build/bootloader/bootloader.bin"Bootloader binary size 0x4850 bytes. 0x37b0 bytes (44%) free.

Project build complete. To flash, run this command:
D:\Espressif\python_env\idf5.0_py3.11_env\Scripts\python.exe ..\..\Espressif\frameworks\esp-idf-v5.0.4\components\esptool_py\esptool\esptool.py -p (PORT) -b 460800 --before default_reset --after hard_reset --chip esp32c2  write_flash --flash_mode dio --flash_size 2MB --flash_freq 60m 0x0 build\bootloader\bootloader.bin 0x8000 build\partition_table\partition-table.bin 0x10000 build\hello_world.bin
or run 'idf.py -p (PORT) flash'
测试
空白芯片,电路正常运行下,下载模式 UART0应该输出 WAIT FOR ...... (74880)FLASH启动下,会打印出芯片信息;
为简化搭建电路的复杂度,建议选择内置FLASH的芯片;请查看手册,只写了ESP32..后面没有H N R 的一般不带FLASH需要外配FLASH (C2 8266 S2 只支持到16M,其它未知)
写复杂了
天线那边加个电感(不加at+cwlap反回空)
烧录程序需要 io8 上拉 io9下载 (加10k电阻下拉)
烧录口为uart0 (烧at固件,输出为uart1)
chip_en 加10k 1uf(o.1uf) 电容电阻,加个开关 (或手动复位)
烧录好后 io9县空,从flash启动
idf.py -p com24不知为什么烧录总错误,使用flash downloader(at固件烧录工具却可以)
arduino 上没有c2的板;只有8266 c3 s2 s3 ; (所以只能用idf烧录或是flash downloader烧录)
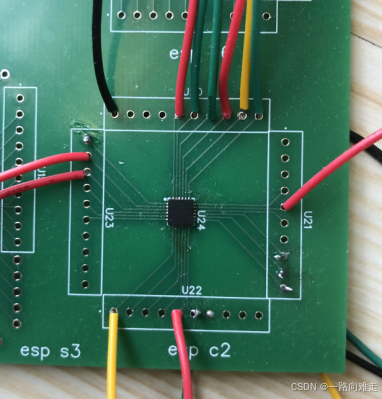
硬件
晶振,没有晶振晶片运行不了;26M晶振下 uart0使用的波物率为74880; uart1为 115200 ; 40M下都为115200 (官方手册 (可以用源晶振,也可以无缘晶振 XLAT_N 输入 3 ;2 脚GND 3 out 4 vdd 3.3 1NC )
电源,每个电源都需要接上,你可以不接电容,电感,但都需要接上电源3.3


可以运行,但建议用官方电路,更稳定
1C2内置flash不需要外加flash模块;但在arduino上没有相应的开发板可选择 (使用at固件的下载工具 flashdownloader 或是idf开发包的下载工具)
GitHub - espressif/arduino-esp32: Arduino core for the ESP32
http://t.csdnimg.cn/3B6ZH AT指令使用

(**应该也是支持C2的,但需设置
GitHub - espressif/arduino-esp32: Arduino core for the ESP32
2有两个串口uart0 用于下载固件,uart1 用于输入输出 信息 utx io8用于输出测试信息(查看at固件烧写教程)
硬件,原理图分散在多个文件中,查看模组文件或开发板文件
硬件指南
没有内部振荡器,需外加晶振,26M或40M,1.0含1.0的版本,只能使用26M晶振)
供电需要全部供上,否则无法正常工作
原理图设计 - ESP32-C2 - — ESP 硬件设计指南 latest 文档

4 UART0 用于烧写固件
3 io9 10k 下拉 io8 10k上拉 用于下载模式;
5 uart1 rx tx 用于at 外部输出输出交互
2需要一1个10k 1uf(0.1uf)电容,使用en上电时间 迟于vcc
1.晶振,必须,否则无法运行
BOOT引脚
dtr dcr 启动


正常烧录的话应该显示下列信息
12:35:39: Error: Unable to set default locale: 'unsupported locale setting'
C:\Users\Administrator\Desktop\ESP32-C2-2MB-AT-V3.3.0.0\ESP32-C2-2MB-AT-V3.3.0.0\factory
D:\ESPC2TEST\hello_world\build\bootloader\bootloader.bin
D:\ESPC2TEST\hello_world\build\bootloader
D:\ESPC2TEST\hello_world\build\partition_table\partition-table.bin
D:\ESPC2TEST\hello_world\build\partition_table
D:\ESPC2TEST\hello_world\build\hello_world.bin
null
null
2 kill
test offset :  0 0x0
case ok
2 kill
test offset :  32768 0x8000
case ok
3 kill
test offset :  65536 0x10000
case ok
test offset :  0 0x0
case ok
test offset :  32768 0x8000
case ok
test offset :  65536 0x10000
case ok
dl_list:
 [['D:\\ESPC2TEST\\hello_world\\build\\bootloader\\bootloader.bin', 0], ['D:\\ESPC2TEST\\hello_world\\build\\partition_table\\partition-table.bin', 32768], ['D:\\ESPC2TEST\\hello_world\\build\\hello_world.bin', 65536]]
[0, 32768, 65536]
['D:\\ESPC2TEST\\hello_world\\build\\bootloader\\bootloader.bin', 'D:\\ESPC2TEST\\hello_world\\build\\partition_table\\partition-table.bin', 'D:\\ESPC2TEST\\hello_world\\build\\hello_world.bin']
i:  0
size_speed : 16
i:  1
i:  2
test offset :  0 0x0
case ok
test offset :  32768 0x8000
case ok
test offset :  65536 0x10000
case ok
.......................................................................................
Uploading stub...
Running stub...
Packet content transfer stopped (received 0 bytes)
[2024-07-31 12:37:13,128][ESP8266Loader_spi[1]][espDownloader.py][line:775][ERROR]: ESP32C2 Chip stub error esp_stub_and_set_baud.
no log file output ...
test offset :  0 0x0
case ok
test offset :  32768 0x8000
case ok
test offset :  65536 0x10000
case ok

Stub is already running. No upload is necessary.
Changing baud rate to 115200
Changed.
NO XMC flash  detected!
SPI_BOOT_CRYPT_CNT 0
SECURE_BOOT_EN False
Compressed 18512 bytes to 11283...
Compressed 3072 bytes to 103...
Compressed 105568 bytes to 56589...

 is stub and send flash finish
串口肋手程序内应显示如下内容 Helloword
[0;32mI (264) cpu_start: Pro cpu up.[0m
[0;32mI (276) cpu_start: Pro cpu start user code[0m
[0;32mI (276) cpu_start: cpu freq: 120000000 Hz[0m
[0;32mI (276) cpu_start: Application information:[0m
[0;32mI (281) cpu_start: Project name:     hello_world[0m
[0;32mI (289) cpu_start: App version:      1[0m
[0;32mI (296) cpu_start: Compile time:     Jul 30 2024 16:30:27[0m
[0;32mI (305) cpu_start: ELF file SHA256:  097d4462693816bf...[0m
[0;32mI (315) cpu_start: ESP-IDF:          v5.0.4-dirty[0m
[0;32mI (323) cpu_start: Min chip rev:     v1.0[0m
[0;32mI (330) cpu_start: Max chip rev:     v1.99 [0m
[0;32mI (338) cpu_start: Chip rev:         v1.2[0m
[0;32mI (345) heap_init: Initializing. RAM available for dynamic allocation:[0m
[0;32mI (356) heap_init: At 3FCAACA0 len 00031ED0 (199 KiB): D/IRAM[0m
[0;32mI (366) heap_init: At 3FCDCB70 len 0000294C (10 KiB): STACK/DRAM[0m
[0;32mI (378) spi_flash: detected chip: generic[0m
[0;32mI (383) spi_flash: flash io: dio[0m
[0;32mI (390) app_start: Starting scheduler on CPU0[0m
[0;32mI (397) main_task: Started on CPU0[0m
[0;32mI (397) main_task: Calling app_main()[0m
Hello world!
This is esp32c2 chip with 1 CPU core(s), WiFi/BLE, silicon revision v1.2, 2MB embedded flash
Minimum free heap size: 200400 bytes
Restarting in 10 seconds...
Restarting in 9 seconds...
Restarting in 8 seconds...
Restarting in 7 seconds...
Restarting in 6 seconds...
Restarting in 5 seconds...
Restarting in 4 seconds...
Restarting in 3 seconds...
Restarting in 2 seconds...
arduino 上没有对应的开发板类型(官网上有介绍,可以加,但要修改github GitHub - espressif/arduino-esp32: Arduino core for the ESP32
使用Idf开发软件支持部下载,或是使用flash downloader 下载(at固件下载的工具
快速入门 - ESP32-C2 - — ESP-IDF 编程指南 v5.3 文档
下载
idf下载,flash downloader 下载
at固件下载,有两种方式,分散的与单一一个下载
硬件连接 - ESP32-C2 - — ESP-AT 用户指南 latest 文档
(c2 有两个uart口一个用于下载,一个用于外部命令响应)使用uart0只能下载,不会有输出

AT固件下载方式有两种,单文件下载;多文件下载
下载指导 - ESP32-C2 - — ESP-AT 用户指南 latest 文档


c2版本的有一个2m和4m的内部flash (其它版本的有的不含内部flash需要加外flash 8266 c3 ...
选型:
自带晶振,电阻,电容,flash的芯片 esp32-pico
低功耗的
双核
频率
语音,视频


 1517
1517

 被折叠的 条评论
为什么被折叠?
被折叠的 条评论
为什么被折叠?
 到【灌水乐园】发言


