


<Linux开发>驱动开发 -之-platform 驱动
交叉编译环境搭建:
<Linux开发> linux开发工具-之-交叉编译环境搭建
uboot移植可参考以下:
<Linux开发> -之-系统移植 uboot移植过程详细记录(第一部分)
<Linux开发> -之-系统移植 uboot移植过程详细记录(第二部分)
<Linux开发> -之-系统移植 uboot移植过程详细记录(第三部分)(uboot移植完结)
Linux内核及设备树移植可参考以下:
<Linux开发>系统移植 -之- linux内核移植过程详细记录(第一部分)
<Linux开发>系统移植 -之- linux内核移植过程详细记录(第二部分完结)
Linux文件系统构建移植参考以下:
<Linux开发>系统移植 -之- linux构建BusyBox根文件系统及移植过程详细记录
<Linux开发>系统移植 -之-使用buildroot构建BusyBox根文件系统
Linux驱动开发参考以下:
<Linux开发>驱动开发 -之-pinctrl子系统
<Linux开发>驱动开发 -之-gpio子系统
<Linux开发>驱动开发 -之-基于pinctrl/gpio子系统的LED驱动
<Linux开发>驱动开发 -之-基于pinctrl/gpio子系统的beep驱动
<Linux开发>驱动开发 -之-资源的并发与竞争处理
<Linux开发>驱动开发 -之-内核定时器与中断
<Linux开发>驱动开发 -之-阻塞、非阻塞IO和异步通知
一 前言
在前面几篇文章讲解分析编写的设备驱动是相对简单,都是对 IO进行最简单的读写操作。那么如果像I2C、SPI、LCD 等,这类比较复杂外设的驱动就不能这么去写了,如果每一个I2C芯片都单独写一个I2C驱动对应IO的话,这样内核代码会很累赘,所以Linux 系统要考虑到驱动的可重用性,因此提出了驱动的分离与分层这样的软件思路,在这个思路下诞生了platform 设备驱动,也叫做平台设备驱动。本文主要分析一下 Linux 下的驱动分离与分层,以及 platform 框架下的设备驱动该如何编写。
二 驱动的分离和分层
2.1 驱动的分离
对于 Linux 这样一个成熟、庞大、复杂的操作系统,代码的重用性非常重要,否则的话就会在 Linux 内核中存在大量无意义的重复代码。尤其是驱动程序,因为驱动程序占用了 Linux内核代码量的大头,如果不对驱动程序加以管理,任由重复的代码肆意增加,那么用不了多久Linux 内核的文件数量就庞大到无法接受的地步。
假如现在有三个平台 A、B 和 C,这三个平台(这里的平台说的是 SOC)上都有 MPU6050 这个 I2C接口的六轴传感器,如果按照写裸机 I2C 驱动的思路,每个平台都有一个 MPU6050的驱动,因此编写出来的最简单的驱动框架如下图所示:
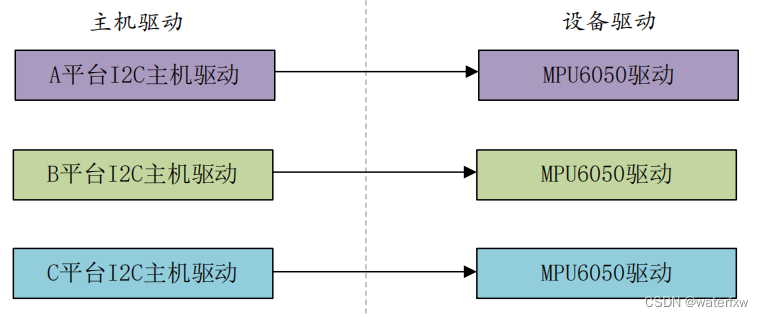
从上图可以看出,每种平台下都有一个主机驱动和设备驱动,主机驱动肯定是必须要的,毕竟不同的平台其 I2C 控制器不同。但是右侧的设备驱动就没必要每个平台都写一个,因为不管对于那个 SOC 来说,MPU6050 都是一样,通过 I2C 接口读写数据就行了,只需要一个 MPU6050 的驱动程序即可。
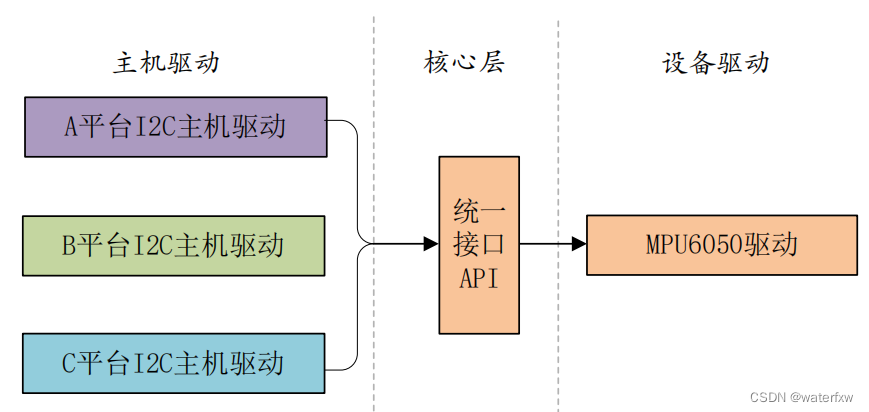
如果再来几个 I2C 设备,比如AT24C02、FT5206(电容触摸屏)等,如果按照上图中的写法,那么设备端的驱动将会重复的编写好几次。显然在 Linux 驱动程序中这种写法是不推荐的,最好的做法就是每个平台的 I2C 控制器都提供一个统一的接口(也叫做主机驱动),每个设备的话也只提供一个驱动程序(设备驱动),每个设备通过统一的 I2C接口驱动来访问,这样就可以大大简化驱动文件,比如上图中三种平台下的 MPU6050 驱动框架就可以简化为下图所示:
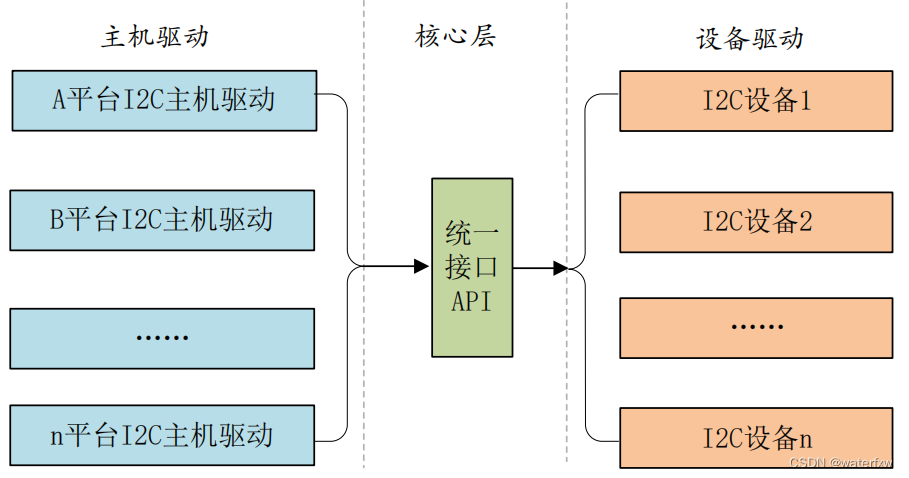
实际的 I2C 驱动设备肯定有很多种,不止 MPU6050 这一个,那么实际的驱动架构如下图所示:
这个就是驱动的分隔,也就是将主机驱动和设备驱动分隔开来,比如 I2C、SPI 等等都会采用驱动分隔的方式来简化驱动的开发。在实际的驱动开发中,一般 I2C 主机控制器驱动已经由半导体厂家编写好了,而设备驱动一般也由设备器件的厂家编写好了,我们只需要提供设备信息即可,比如 I2C 设备的话提供设备连接到了哪个 I2C 接口上,I2C 的速度是多少等等。相当于将设备信息从设备驱动中剥离开来,驱动使用标准方法去获取到设备信息(比如从设备树中获取到设备信息),然后根据获取到的设备信息来初始化设备。 这样就相当于驱动只负责驱动,设备只负责设备,想办法将两者进行匹配即可。这个就是 Linux 中的总线(bus)、驱动(driver)和设备(device)模型,也就是常说的驱动分离。总线就是驱动和设备信息的月老,负责给两者牵线搭桥,如下图所示:
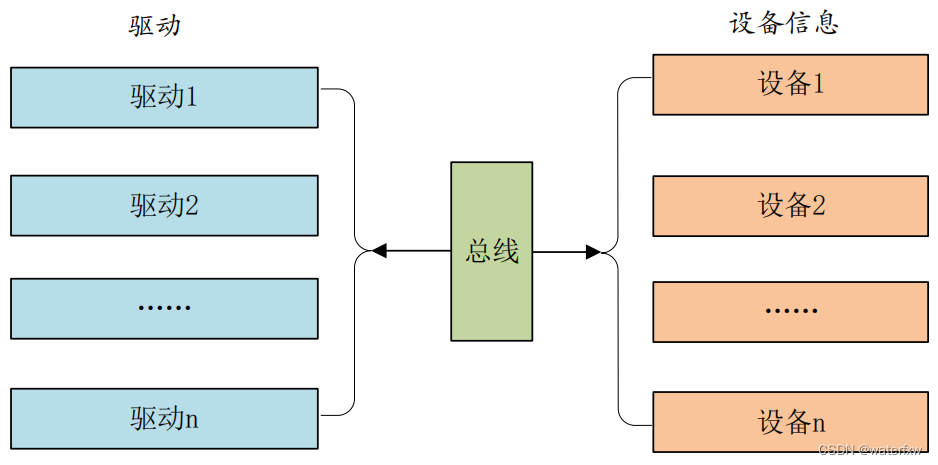
当我们向系统注册一个驱动的时候,总线就会在右侧的设备中查找,看看有没有与之匹配的设备,如果有的话就将两者联系起来。同样的,当向系统中注册一个设备的时候,总线就会在左侧的驱动中查找看有没有与之匹配的设备,有的话也联系起来。Linux 内核中大量的驱动程序都采用总线、驱动和设备模式,我们一会要重点讲解的 platform 驱动就是这一思想下的产物。
2.2 驱动的分层
上一小节讲了驱动的分隔与分离,本节我们来简单看一下驱动的分层,大家应该听说过网络的 7 层模型,不同的层负责不同的内容。同样的,Linux 下的驱动往往也是分层的,分层的目的也是为了在不同的层处理不同的内容。以其他书籍或者资料常常使用到的input(输入子系统)为例,简单介绍一下驱动的分层。input 子系统负责管理所有跟输入有关的驱动,包括键盘、鼠标、触摸等,最底层的就是设备原始驱动,负责获取输入设备的原始值,获取到的输入事件上报给 input 核心层。input 核心层会处理各种 IO 模型,并且提供 file_operations 操作集合。我们在编写输入设备驱动的时候只需要处理好输入事件的上报即可,至于如何处理这些上报的输入事件那是上层去考虑的,我们不用管。可以看出借助分层模型可以极大的简化我们的驱动编写,对于驱动编写来说非常的友好。
三 platform 平台驱动模型简介
前面我们讲了设备驱动的分离,并且引出了总线(bus)、驱动(driver)和设备(device)模型,比如 I2C、SPI、USB 等总线。但是在 SOC 中有些外设是没有总线这个概念的,但是又要使用总线、驱动和设备模型该怎么办呢?为了解决此问题,Linux 提出了 platform 这个虚拟总线,相应
的就有 platform_driver 和 platform_device。
3.1 platform 总线
Linux系统内核使用bus_type 结构体表示总线,bus_type 结构体内容如下:
路径:include\linux\device.h

/**
 * struct bus_type - The bus type of the device
 *
 * @name:	The name of the bus.
 * @dev_name:	Used for subsystems to enumerate devices like ("foo%u", dev->id).
 * @dev_root:	Default device to use as the parent.
 * @dev_attrs:	Default attributes of the devices on the bus.
 * @bus_groups:	Default attributes of the bus.
 * @dev_groups:	Default attributes of the devices on the bus.
 * @drv_groups: Default attributes of the device drivers on the bus.
 * @match:	Called, perhaps multiple times, whenever a new device or driver
 *		is added for this bus. It should return a nonzero value if the
 *		given device can be handled by the given driver.
 * @uevent:	Called when a device is added, removed, or a few other things
 *		that generate uevents to add the environment variables.
 * @probe:	Called when a new device or driver add to this bus, and callback
 *		the specific driver's probe to initial the matched device.
 * @remove:	Called when a device removed from this bus.
 * @shutdown:	Called at shut-down time to quiesce the device.
 *
 * @online:	Called to put the device back online (after offlining it).
 * @offline:	Called to put the device offline for hot-removal. May fail.
 *
 * @suspend:	Called when a device on this bus wants to go to sleep mode.
 * @resume:	Called to bring a device on this bus out of sleep mode.
 * @pm:		Power management operations of this bus, callback the specific
 *		device driver's pm-ops.
 * @iommu_ops:  IOMMU specific operations for this bus, used to attach IOMMU
 *              driver implementations to a bus and allow the driver to do
 *              bus-specific setup
 * @p:		The private data of the driver core, only the driver core can
 *		touch this.
 * @lock_key:	Lock class key for use by the lock validator
 *
 * A bus is a channel between the processor and one or more devices. For the
 * purposes of the device model, all devices are connected via a bus, even if
 * it is an internal, virtual, "platform" bus. Buses can plug into each other.
 * A USB controller is usually a PCI device, for example. The device model
 * represents the actual connections between buses and the devices they control.
 * A bus is represented by the bus_type structure. It contains the name, the
 * default attributes, the bus' methods, PM operations, and the driver core's
 * private data.
 */
struct bus_type {
	const char		*name;				/* 总线名字 */
	const char		*dev_name;
	struct device		*dev_root;
	struct device_attribute	*dev_attrs;	/* use dev_groups instead */
	const struct attribute_group **bus_groups;		/* 总线属性 */
	const struct attribute_group **dev_groups;		/* 设备属性 */
	const struct attribute_group **drv_groups;		/* 驱动属性 */

	int (*match)(struct device *dev, struct device_driver *drv);
	int (*uevent)(struct device *dev, struct kobj_uevent_env *env);
	int (*probe)(struct device *dev);
	int (*remove)(struct device *dev);
	void (*shutdown)(struct device *dev);

	int (*online)(struct device *dev);
	int (*offline)(struct device *dev);

	int (*suspend)(struct device *dev, pm_message_t state);
	int (*resume)(struct device *dev);

	const struct dev_pm_ops *pm;

	const struct iommu_ops *iommu_ops;

	struct subsys_private *p;
	struct lock_class_key lock_key;
};
第 55行,match 函数,此函数很重要,单词 match 的意思就是“匹配、相配”,因此此函数就是完成设备和驱动之间匹配的,总线就是使用 match 函数来根据注册的设备来查找对应的驱动,或者根据注册的驱动来查找相应的设备,因此每一条总线都必须实现此函数。match 函数有两个参数:dev 和 drv,这两个参数分别为 device 和 device_driver 类型,也就是设备和驱动。
platform 总线是 bus_type 的一个具体实例,platform 总线定义如下:
路径:drivers\base\platform.c

struct bus_type platform_bus_type = {
	.name		= "platform",
	.dev_groups	= platform_dev_groups,
	.match		= platform_match,
	.uevent		= platform_uevent,
	.pm		= &platform_dev_pm_ops,
};
platform_bus_type 就是 platform 平台总线,其中 platform_match 就是匹配函数。我们来看一下驱动和设备是如何匹配的,platform_match 函数定义在文件 drivers/base/platform.c 中,函数内容如下所示:
路径:drivers\base\platform.c

/**
 * platform_match - bind platform device to platform driver.
 * @dev: device.
 * @drv: driver.
 *
 * Platform device IDs are assumed to be encoded like this:
 * "<name><instance>", where <name> is a short description of the type of
 * device, like "pci" or "floppy", and <instance> is the enumerated
 * instance of the device, like '0' or '42'.  Driver IDs are simply
 * "<name>".  So, extract the <name> from the platform_device structure,
 * and compare it against the name of the driver. Return whether they match
 * or not.
 */
static int platform_match(struct device *dev, struct device_driver *drv)
{
	struct platform_device *pdev = to_platform_device(dev);
	struct platform_driver *pdrv = to_platform_driver(drv);

	/* When driver_override is set, only bind to the matching driver */
	/*设置driver_override时,仅绑定到匹配的驱动程序*/
	if (pdev->driver_override)
		return !strcmp(pdev->driver_override, drv->name);

	/* Attempt an OF style match first */
	/*先尝试OF风格的匹配*/
	if (of_driver_match_device(dev, drv))
		return 1;

	/* Then try ACPI style match */
	/*然后试试ACPI风格的搭配*/
	if (acpi_driver_match_device(dev, drv))
		return 1;

	/* Then try to match against the id table */
	/*然后尝试与id表匹配*/
	if (pdrv->id_table)
		return platform_match_id(pdrv->id_table, pdev) != NULL;

	/* fall-back to driver name match */
	return (strcmp(pdev->name, drv->name) == 0);
}
第 23~24行,这个属性平常工作中基本上碰不到,因为大体拥有这种属性的devicec大体不是由设备树上配置自动生成的,而是由手动分配platform_device内存而产生的,这样就不会存在compatible属性节点。大体的用法如下:
platform_device *pdev;
pdev = platform_device_alloc()
driver_set_override(&pdev->dev, &pdev->driver_override, xxx, len)
platform_device_add(pdev)
1、分配platform_device内存,传参的时候会把name传进去。name可以为“”,但是为了确保加载成功最好设置成与driver名一样的,这样就算第一级匹配由于失误字符写错了,在第五级匹配的时候依然能成功加载
2、设置driver_override属性值
3、将pdev->dev添加到platform总线上去,并尝试绑定
根据该函数内的注释我们可以知道,驱动和设备的匹配有四种方法,我们依次来看一下:
第 28~29行,第一种匹配方式, OF 类型的匹配,也就是设备树采用的匹配方式,of_driver_match_device 函数定义在文件 include/linux/of_device.h 中。device_driver 结构体(表示设备驱动)中有个名为of_match_table的成员变量,此成员变量保存着驱动的compatible匹配表,设备树中的每个设备节点的 compatible 属性会和 of_match_table 表中的所有成员比较,查看是否有相同的条目,如果有的话就表示设备和此驱动匹配,设备和驱动匹配成功以后 probe 函数就会执行。
调用如下:
of_driver_match_device(dev, drv)
-> of_match_device(drv->of_match_table,dev)
->of_match_node(of_match_table,dev->of_node)
->_of_match_node(matches, node)
->_of_device_is_compatible(node, matches->compatible)

在__of_device_is_compatible()函数中进行具体的匹配工作。
路径:drivers\of\base.c
/**
 * __of_device_is_compatible() - Check if the node matches given constraints
 * @device: pointer to node
 * @compat: required compatible string, NULL or "" for any match
 * @type: required device_type value, NULL or "" for any match
 * @name: required node name, NULL or "" for any match
 *
 * Checks if the given @compat, @type and @name strings match the
 * properties of the given @device. A constraints can be skipped by
 * passing NULL or an empty string as the constraint.
 *
 * Returns 0 for no match, and a positive integer on match. The return
 * value is a relative score with larger values indicating better
 * matches. The score is weighted for the most specific compatible value
 * to get the highest score. Matching type is next, followed by matching
 * name. Practically speaking, this results in the following priority
 * order for matches:
 *
 * 1. specific compatible && type && name
 * 2. specific compatible && type
 * 3. specific compatible && name
 * 4. specific compatible
 * 5. general compatible && type && name
 * 6. general compatible && type
 * 7. general compatible && name
 * 8. general compatible
 * 9. type && name
 * 10. type
 * 11. name
 */
static int __of_device_is_compatible(const struct device_node *device,
				     const char *compat, const char *type, const char *name)
{
	struct property *prop;
	const char *cp;
	int index = 0, score = 0;

	/* Compatible match has highest priority */
	if (compat && compat[0]) {
		prop = __of_find_property(device, "compatible", NULL);
		for (cp = of_prop_next_string(prop, NULL); cp;
		     cp = of_prop_next_string(prop, cp), index++) {
			if (of_compat_cmp(cp, compat, strlen(compat)) == 0) {
				score = INT_MAX/2 - (index << 2);
				break;
			}
		}
		if (!score)
			return 0;
	}

	/* Matching type is better than matching name */
	if (type && type[0]) {
		if (!device->type || of_node_cmp(type, device->type))
			return 0;
		score += 2;
	}

	/* Matching name is a bit better than not */
	if (name && name[0]) {
		if (!device->name || of_node_cmp(name, device->name))
			return 0;
		score++;
	}

	return score;
}
这里代码就是核心实现部分了:读取device的compatible属性值并与driver的of_match_table数组的compatible字段一一进行字符串比较,只要比较成功那么分数就不会为0,就算匹配成功,至于最优匹配这个就看谁的得分高了。
第 33~34 行,第二种匹配方式,ACPI 匹配方式。
这个是专门针对acpi设备的,一般的platform总线设备是无法匹配成功的在这里。由于acpi的驱动基本没怎么接触过,这里就不介绍了。
第 38~39 行,第三种匹配方式,id_table 匹配,每个 platform_driver 结构体有一个 id_table成员变量,顾名思义,保存了很多 id 信息。这些 id 信息存放着这个 platformd 驱动所支持的驱动类型。
函数如下:
路径:drivers\base\platform.c
static const struct platform_device_id *platform_match_id(
			const struct platform_device_id *id,
			struct platform_device *pdev)
{
	while (id->name[0]) {
		if (strcmp(pdev->name, id->name) == 0) {
			pdev->id_entry = id;
			return id;
		}
		id++;
	}
	return NULL;
}
其匹配规则看起来比较简单,只要name属性完全相等则匹配成功。在这里需要特点注意一点,pdev->name这个属性的赋值大体可以分成两种情况:
(1)由dts自己生成,那个这个pdev->name值一般情况是空""而不是compatible属性值(如下面所示),所以要是解析DTS自动生成的device一般情况下不会匹配成功。
路径:drivers\of\platform.c
/**
 * of_device_alloc - Allocate and initialize an of_device
 * @np: device node to assign to device
 * @bus_id: Name to assign to the device.  May be null to use default name.
 * @parent: Parent device.
 */
struct platform_device *of_device_alloc(struct device_node *np,
				  const char *bus_id,
				  struct device *parent)
{
	struct platform_device *dev;
	int rc, i, num_reg = 0, num_irq;
	struct resource *res, temp_res;

	dev = platform_device_alloc("", -1);
	if (!dev)
		return NULL;
....................
(2)通过platform_device_alloc手动分配platform_device时其中一个参数为pdev->name的值,由于是自己手动调用的所以只要填对字符串就能匹配。
下面举例一个驱动:
路径:drivers\input\touchscreen\wm97xx-core.c
static int wm97xx_probe(struct device *dev)
{
..........
	/* register our battery device */
	wm->battery_dev = platform_device_alloc("wm97xx-battery", -1);
	if (!wm->battery_dev) {
		ret = -ENOMEM;
		goto batt_err;
	}
..........
ret = platform_device_add(wm->battery_dev);
...........
第 42行,第四种匹配方式,如果第三种匹配方式的 id_table 不存在的话就直接比较驱动和设备的 name 字段,看看是不是相等,如果相等的话就匹配成功。对于支持设备树的 Linux 版本号,一般设备驱动为了兼容性都支持设备树和无设备树两种匹配方式。也就是第一种匹配方式一般都会存在,第三种和第四种只要存在一种就可以,一般用的最多的还是第四种,也就是直接比较驱动和设备的 name 字段,毕竟这种方式最简单了。
3.2 platform 驱动
platform_driver 结构体表示 platform 驱动,结构体内容如下:
路径:include\linux\platform_device.h
struct platform_driver {
	int (*probe)(struct platform_device *);
	int (*remove)(struct platform_device *);
	void (*shutdown)(struct platform_device *);
	int (*suspend)(struct platform_device *, pm_message_t state);
	int (*resume)(struct platform_device *);
	struct device_driver driver;
	const struct platform_device_id *id_table;
	bool prevent_deferred_probe;
};
第 3 行,probe 函数,当驱动与设备匹配成功以后 probe 函数就会执行,非常重要的函数。一般驱动的提供者会编写,如果自己要编写一个全新的驱动,那么 probe 就需要自行实现。
第 8 行,driver 成员,为 device_driver 结构体变量,Linux 内核里面大量使用到了面向对象的思维,device_driver 相当于基类,提供了最基础的驱动框架。plaform_driver 继承了这个基类,然后在此基础上又添加了一些特有的成员变量。
第 9 行,id_table 表,也就是我们上一小节讲解 platform 总线匹配驱动和设备的时候采用的第三种方法,id_table 是个表( 也就是数组) ,每个元素的类型为 platform_device_id,platform_device_id 结构体内容如下:
路径:include\linux\mod_devicetable.h
struct platform_device_id {
	char name[PLATFORM_NAME_SIZE];
	kernel_ulong_t driver_data;
};
接着我们来看下device_driver 结构体,device_driver 结构体内容如下:
路径:include\linux\device.h
/**
 * struct device_driver - The basic device driver structure
 * @name:	Name of the device driver.
 * @bus:	The bus which the device of this driver belongs to.
 * @owner:	The module owner.
 * @mod_name:	Used for built-in modules.
 * @suppress_bind_attrs: Disables bind/unbind via sysfs.
 * @of_match_table: The open firmware table.
 * @acpi_match_table: The ACPI match table.
 * @probe:	Called to query the existence of a specific device,
 *		whether this driver can work with it, and bind the driver
 *		to a specific device.
 * @remove:	Called when the device is removed from the system to
 *		unbind a device from this driver.
 * @shutdown:	Called at shut-down time to quiesce the device.
 * @suspend:	Called to put the device to sleep mode. Usually to a
 *		low power state.
 * @resume:	Called to bring a device from sleep mode.
 * @groups:	Default attributes that get created by the driver core
 *		automatically.
 * @pm:		Power management operations of the device which matched
 *		this driver.
 * @p:		Driver core's private data, no one other than the driver
 *		core can touch this.
 *
 * The device driver-model tracks all of the drivers known to the system.
 * The main reason for this tracking is to enable the driver core to match
 * up drivers with new devices. Once drivers are known objects within the
 * system, however, a number of other things become possible. Device drivers
 * can export information and configuration variables that are independent
 * of any specific device.
 */
struct device_driver {
	const char		*name;
	struct bus_type		*bus;

	struct module		*owner;
	const char		*mod_name;	/* used for built-in modules */

	bool suppress_bind_attrs;	/* disables bind/unbind via sysfs */

	const struct of_device_id	*of_match_table;
	const struct acpi_device_id	*acpi_match_table;

	int (*probe) (struct device *dev);
	int (*remove) (struct device *dev);
	void (*shutdown) (struct device *dev);
	int (*suspend) (struct device *dev, pm_message_t state);
	int (*resume) (struct device *dev);
	const struct attribute_group **groups;

	const struct dev_pm_ops *pm;

	struct driver_private *p;
};
第 43行,of_match_table 就是采用设备树的时候驱动使用的匹配表,同样是数组,每个匹配项都为 of_device_id 结构体类型,此结构体定义内容如下:
路径:include\linux\mod_devicetable.h
/*
 * Struct used for matching a device
 */
struct of_device_id {
	char	name[32];
	char	type[32];
	char	compatible[128];
	const void *data;
};
第 8 行的 compatible 非常重要,因为对于设备树而言,就是通过设备节点的 compatible 属性值和 of_match_table 中每个项目的 compatible 成员变量进行比较,如果有相等的就表示设备和此驱动匹配成功。
题外话:mod_devicetable.h中定义了很多平台设备ID有关的结构体,如struct serio_device_id、struct vio_device_id、struct input_device_id、struct sdio_device_id、struct i2c_device_id、struct spi_device_id等等。
在编写 platform 驱动的时候,首先定义一个 platform_driver 结构体变量,然后实现结构体中的各个成员变量,重点是实现匹配方法以及 probe 函数。当驱动和设备匹配成功以后 probe函数就会执行,具体的驱动程序在 probe 函数里面编写,比如字符设备驱动等等。
当我们定义并初始化好 platform_driver 结构体变量以后,需要在驱动入口函数里面调用platform_driver_register 函数向 Linux 内核注册一个 platform 驱动,platform_driver_register 函数原型如下所示:
int platform_driver_register (struct platform_driver *driver)
函数参数和返回值含义如下:
driver:要注册的 platform 驱动。
返回值:负数,失败;0,成功。
还需要在驱动卸载函数中通过 platform_driver_unregister 函数卸载 platform 驱动,platform_driver_unregister 函数原型如下:
void platform_driver_unregister(struct platform_driver *drv)
函数参数和返回值含义如下:
drv:要卸载的 platform 驱动。
返回值:无。
对于platform 驱动的编写,有大致框架可以参考如下所示:
/* 设备结构体 */
struct xxx_dev{
	struct cdev cdev;
	.......
	/* 设备结构体其他具体内容 */
}

struct xxx_dev xxxdev; /* 定义个设备结构体变量 */

static int xxx_open(struct inode *inode, struct file *filp)
{
	.............
	return 0;
}

static ssize_t xxx_write(struct file *filp, const char __user *buf, size_t cnt, loff_t *offt)
{
	...........
	return 0;
}


/* 字符设备驱动操作集 */
static struct file_operations xxx_fops = {
	.owner = THIS_MODULE,
	.open = xxx_open,
	.write = xxx_write,
	....其它操作函数......
};


/* platform 驱动的 probe 函数  驱动与设备匹配成功以后此函数就会执行  */
static int xxx_probe(struct platform_device *dev)
{
	......
	cdev_init(&xxxdev.cdev, &xxx_fops); /* 注册字符设备驱动 */
	......
	return 0;
}

static int xxx_remove(struct platform_device *dev)
{
	......
	cdev_del(&xxxdev.cdev, &xxx_fops); /* 删除字符设备驱动 */
	......
	return 0;
}

/* 匹配列表 */
static const struct of_device_id xxx_of_match[] = {
	{ .compatible = "xxx-gpio" }, //与设备树节点compatible 属性值匹配的字符串
	{ /* Sentinel */ }
};

/* platform 平台驱动结构体 */
static struct platform_driver xxx_driver = {
	.driver = {
		.name = "xxx",
		.of_match_table = xxx_of_match,
	},
	.probe = xxx_probe,
	.remove = xxx_remove,
};

/* 驱动模块加载 */
static int __init xxxdriver_init(void)
{
	return platform_driver_register(&xxx_driver);
}

/* 驱动模块卸载 */
static void __exit xxxdriver_exit(void)
{
	platform_driver_unregister(&xxx_driver);
}

module_init(xxxdriver_init);
module_exit(xxxdriver_exit);
MODULE_LICENSE("GPL");
MODULE_AUTHOR("water");
第 1~29 行,传统的字符设备驱动,所谓的 platform 驱动并不是独立于字符设备驱动、块设备驱动和网络设备驱动之外的其他种类的驱动。platform 只是为了驱动的分离与分层而提出来的一种框架,其驱动的具体实现还是需要字符设备驱动、块设备驱动或网络设备驱动。
第 33~39 行,xxx_probe 函数,当驱动和设备匹配成功以后此函数就会执行,以前在驱动入口 init 函数里面编写的字符设备驱动程序就全部放到此 probe 函数里面。比如注册字符设备驱动、添加 cdev、创建类等等。
第 41~47 行,xxx_remove 函数,platform_driver 结构体中的 remove 成员变量,当关闭 platform设备驱动的时候此函数就会执行,以前在驱动卸载 exit 函数里面要做的事情就放到此函数中来。比如,使用 iounmap 释放内存、删除 cdev,注销设备号等等。
第 50~53 行,xxx_of_match 匹配表,如果使用设备树的话将通过此匹配表进行驱动和设备的匹配。
第 51 行设置了一个匹配项,此匹配项的 compatible 值为“xxx-gpio”,因此当设备树中设备节点的 compatible 属性值为“xxx-gpio”的时候此设备就会与此驱动匹配。
第 52 行是一个标记,of_device_id 表最后一个匹配项必须是空的。
第 56-63 行,定义一个 platform_driver 结构体变量 xxx_driver,表示 platform 驱动,
第 57~60行设置 paltform_driver 中的 device_driver 成员变量的 name 和 of_match_table 这两个属性。
其中name 属性用于传统的驱动与设备匹配,也就是检查驱动和设备的 name 字段是不是相同(3.1小节介绍的第4种方法)。
of_match_table 属性就是用于设备树下的驱动与设备检查(3.1小节介绍的第1种方法)。
对于一个完整的驱动程序,必须提供有设备树和无设备树两种匹配方法。最后 61 和 62 这两行设置 probe 和 remove 这两成员变量。
第66~69行,驱动入口函数,调用platform_driver_register函数向Linux内核注册一个platform驱动,也就是上面定义的 xxx_driver 结构体变量。
第 72~75 行,驱动出口函数,调用 platform_driver_unregister 函数卸载前面注册的 platform驱动。
总体来说,platform 驱动还是传统的字符设备驱动、块设备驱动或网络设备驱动,只是披着一张“platform”的皮,目的是为了使用总线、驱动和设备这个驱动模型来实现驱动的分离与分层。
3.3 platform 设备
在3.2小节中我们可以知道,如果platform 驱动已经准备好了,我们还需要 platform 设备,否则的话单单一个驱动也做不了什么。platform_device 这个结构体表示 platform 设备,根据3.1小节的四种匹配过程,这里我们要注意,如果内核支持设备树的话就不要再使用 platform_device 来描述设备了,因为改用设备树去描述了。当然了,你如果一定要用 platform_device 来描述设备信息的话也是可以的。platform_device 结构体定义内容如下:
路径:include/linux/platform_device.h
struct platform_device {
	const char	*name;
	int		id;
	bool		id_auto;
	struct device	dev;
	u32		num_resources;
	struct resource	*resource;

	const struct platform_device_id	*id_entry;
	char *driver_override; /* Driver name to force a match */

	/* MFD cell pointer */
	struct mfd_cell *mfd_cell;

	/* arch specific additions */
	struct pdev_archdata	archdata;
};
第 3 行,name 表示设备名字,要和所使用的 platform 驱动的 name 字段相同,否则的话设备就无法匹配到对应的驱动。比如对应的 platform 驱动的 name 字段为“xxx-gpio”,那么此 name字段也要设置为“xxx-gpio”。
第 7 行,num_resources 表示资源数量,一般为第 28 行 resource 资源的大小。
第 8 行,resource 表示资源,也就是设备信息,比如外设寄存器等。Linux 内核使用 resource结构体表示资源,resource 结构体内容如下:
路径:include\linux\ioport.h
/*
 * Resources are tree-like, allowing
 * nesting etc..
 */
struct resource {
	resource_size_t start;
	resource_size_t end;
	const char *name;
	unsigned long flags;
	struct resource *parent, *sibling, *child;
};
start 和 end 分别表示资源的起始和终止信息,对于内存类的资源,就表示内存起始和终止地址,name 表示资源名字,flags 表示资源类型,可选的资源类型都定义在了文件include/linux/ioport.h 里面,如下所示:
路径:include\linux\ioport.h
/*
 * IO resources have these defined flags.
 */
#define IORESOURCE_BITS		0x000000ff	/* Bus-specific bits */

#define IORESOURCE_TYPE_BITS	0x00001f00	/* Resource type */
#define IORESOURCE_IO		0x00000100	/* PCI/ISA I/O ports */
#define IORESOURCE_MEM		0x00000200
#define IORESOURCE_REG		0x00000300	/* Register offsets */
#define IORESOURCE_IRQ		0x00000400
#define IORESOURCE_DMA		0x00000800
#define IORESOURCE_BUS		0x00001000

#define IORESOURCE_PREFETCH	0x00002000	/* No side effects */
#define IORESOURCE_READONLY	0x00004000
#define IORESOURCE_CACHEABLE	0x00008000
#define IORESOURCE_RANGELENGTH	0x00010000
#define IORESOURCE_SHADOWABLE	0x00020000

#define IORESOURCE_SIZEALIGN	0x00040000	/* size indicates alignment */
#define IORESOURCE_STARTALIGN	0x00080000	/* start field is alignment */

#define IORESOURCE_MEM_64	0x00100000
#define IORESOURCE_WINDOW	0x00200000	/* forwarded by bridge */
#define IORESOURCE_MUXED	0x00400000	/* Resource is software muxed */

#define IORESOURCE_EXCLUSIVE	0x08000000	/* Userland may not map this resource */
#define IORESOURCE_DISABLED	0x10000000
#define IORESOURCE_UNSET	0x20000000	/* No address assigned yet */
#define IORESOURCE_AUTO		0x40000000
#define IORESOURCE_BUSY		0x80000000	/* Driver has marked this resource busy */

/* PnP IRQ specific bits (IORESOURCE_BITS) */
#define IORESOURCE_IRQ_HIGHEDGE		(1<<0)
#define IORESOURCE_IRQ_LOWEDGE		(1<<1)
#define IORESOURCE_IRQ_HIGHLEVEL	(1<<2)
#define IORESOURCE_IRQ_LOWLEVEL		(1<<3)
#define IORESOURCE_IRQ_SHAREABLE	(1<<4)
#define IORESOURCE_IRQ_OPTIONAL 	(1<<5)

/* PnP DMA specific bits (IORESOURCE_BITS) */
#define IORESOURCE_DMA_TYPE_MASK	(3<<0)
#define IORESOURCE_DMA_8BIT		(0<<0)
#define IORESOURCE_DMA_8AND16BIT	(1<<0)
#define IORESOURCE_DMA_16BIT		(2<<0)

#define IORESOURCE_DMA_MASTER		(1<<2)
#define IORESOURCE_DMA_BYTE		(1<<3)
#define IORESOURCE_DMA_WORD		(1<<4)

#define IORESOURCE_DMA_SPEED_MASK	(3<<6)
#define IORESOURCE_DMA_COMPATIBLE	(0<<6)
#define IORESOURCE_DMA_TYPEA		(1<<6)
#define IORESOURCE_DMA_TYPEB		(2<<6)
#define IORESOURCE_DMA_TYPEF		(3<<6)

/* PnP memory I/O specific bits (IORESOURCE_BITS) */
#define IORESOURCE_MEM_WRITEABLE	(1<<0)	/* dup: IORESOURCE_READONLY */
#define IORESOURCE_MEM_CACHEABLE	(1<<1)	/* dup: IORESOURCE_CACHEABLE */
#define IORESOURCE_MEM_RANGELENGTH	(1<<2)	/* dup: IORESOURCE_RANGELENGTH */
#define IORESOURCE_MEM_TYPE_MASK	(3<<3)
#define IORESOURCE_MEM_8BIT		(0<<3)
#define IORESOURCE_MEM_16BIT		(1<<3)
#define IORESOURCE_MEM_8AND16BIT	(2<<3)
#define IORESOURCE_MEM_32BIT		(3<<3)
#define IORESOURCE_MEM_SHADOWABLE	(1<<5)	/* dup: IORESOURCE_SHADOWABLE */
#define IORESOURCE_MEM_EXPANSIONROM	(1<<6)

/* PnP I/O specific bits (IORESOURCE_BITS) */
#define IORESOURCE_IO_16BIT_ADDR	(1<<0)
#define IORESOURCE_IO_FIXED		(1<<1)

/* PCI ROM control bits (IORESOURCE_BITS) */
#define IORESOURCE_ROM_ENABLE		(1<<0)	/* ROM is enabled, same as PCI_ROM_ADDRESS_ENABLE */
#define IORESOURCE_ROM_SHADOW		(1<<1)	/* ROM is copy at C000:0 */
#define IORESOURCE_ROM_COPY		(1<<2)	/* ROM is alloc'd copy, resource field overlaid */
#define IORESOURCE_ROM_BIOS_COPY	(1<<3)	/* ROM is BIOS copy, resource field overlaid */

/* PCI control bits.  Shares IORESOURCE_BITS with above PCI ROM.  */
#define IORESOURCE_PCI_FIXED		(1<<4)	/* Do not move resource */
在以前Linux版本中不支持设备树的时候,编写驱动时需要开发人员编写platform_device变量来描述设备信息,然后使用 platform_device_register 函数将设备信息注册到 Linux 内核中,此函数原型如下所示:
int platform_device_register(struct platform_device *pdev)
函数参数和返回值含义如下:
pdev:要注册的 platform 设备。
返回值:负数,失败;0,成功。
如果不再使用 platform 的话可以通过 platform_device_unregister 函数注销掉相应的 platform设备,platform_device_unregister 函数原型如下:
void platform_device_unregister(struct platform_device *pdev)
函数参数和返回值含义如下:
pdev:要注销的 platform 设备。
返回值:无。
platform 设备信息框架如下所示:
/* 寄存器地址定义*/
#define PERIPH1_REGISTER_BASE 	(0X20000000) /* 外设 1 寄存器首地址 */
#define PERIPH2_REGISTER_BASE 	(0X020E0068) /* 外设 2 寄存器首地址 */
#define REGISTER_LENGTH 		4

/* 资源 */
static struct resource xxx_resources[] = {
	[0] = {
		.start = PERIPH1_REGISTER_BASE,
		.end = (PERIPH1_REGISTER_BASE + REGISTER_LENGTH - 1),
		.flags = IORESOURCE_MEM,
	},
	[1] = {
		.start = PERIPH2_REGISTER_BASE,
		.end = (PERIPH2_REGISTER_BASE + REGISTER_LENGTH - 1),
		.flags = IORESOURCE_MEM,
	},
};

/* platform 设备结构体 */
static struct platform_device xxxdevice = {
	.name = "xxx-gpio",
	.id = -1,
	.num_resources = ARRAY_SIZE(xxx_resources),
	.resource = xxx_resources,
};

/* 设备模块加载 */
static int __init xxxdevice_init(void)
{
	return platform_device_register(&xxxdevice);
}

/* 设备模块注销 */
static void __exit xxx_resourcesdevice_exit(void)
{
	platform_device_unregister(&xxxdevice);
}


module_init(xxxdevice_init);
module_exit(xxxdevice_exit);
MODULE_LICENSE("GPL");
MODULE_AUTHOR("water");
第 7~18 行,数组 xxx_resources 表示设备资源,一共有两个资源,分别为设备外设 1 和外设 2 的寄存器信息。因此 flags 都为 IORESOURCE_MEM,表示资源为内存类型的。
第 21~26 行,platform 设备结构体变量,注意 name 字段要和所使用的驱动中的 name 字段一致,否则驱动和设备无法匹配成功。num_resources 表示资源大小,其实就是数组 xxx_resources的元素数量,这里用 ARRAY_SIZE 来测量一个数组的元素个数。
第 29~32 行,设备模块加载函数,在此函数中调用 platform_device_register 向 Linux 内核注册 platform 设备。
第 35~38 行,设备模块卸载函数,在此函数中调用 platform_device_unregister 从 Linux 内核中卸载 platform 设备。
上述代码主要是在不支持设备树的 Linux 版本中使用的,当 Linux 内核支持了设备树以后就不需要用户手动去注册 platform 设备了。因为设备信息都放到了设备树中去描述,Linux 内核启动的时候会从设备树中读取设备信息,然后将其组织成 platform_device 形式,至于设备树到 platform_device 的具体过程就不去详细的追究了,感兴趣的可以去看一下,网上也有很多博客详细的讲解了整个过程。 后续笔者有空再分享设备树具体的流程细节。
四 无设备树platform 驱动编写与验证
4.1 编写无设备树驱动硬件信息
本节主要以beep蜂鸣器来写一个没有设备树的platform 驱动;有设备树的platform 驱动将在下一节分析;beep硬件信息如下:
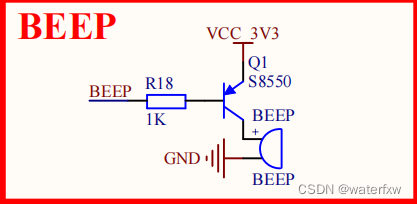

beep是接在 SNVS_TAMPER1这个IO上的;
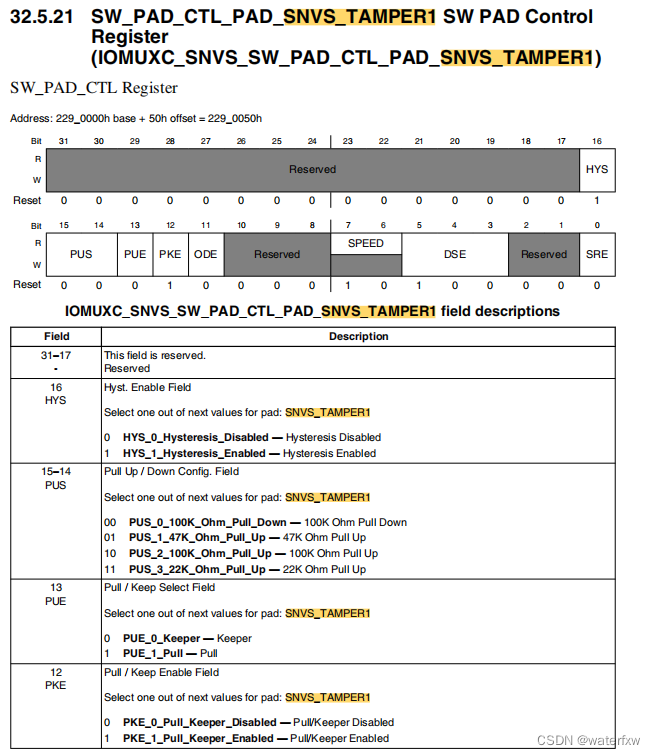
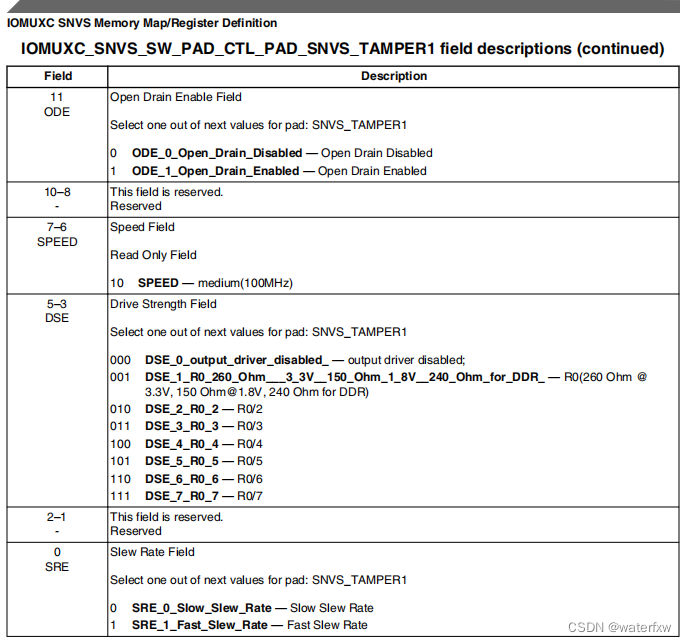
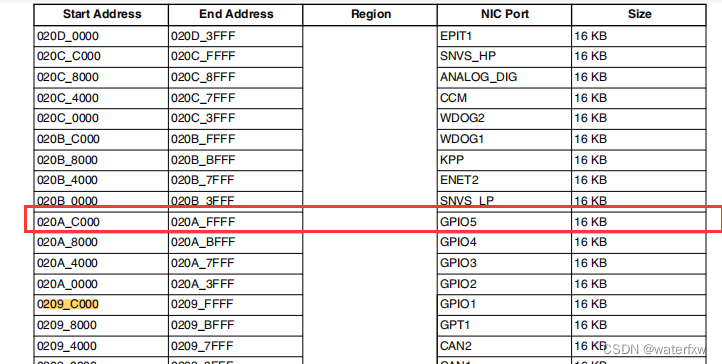
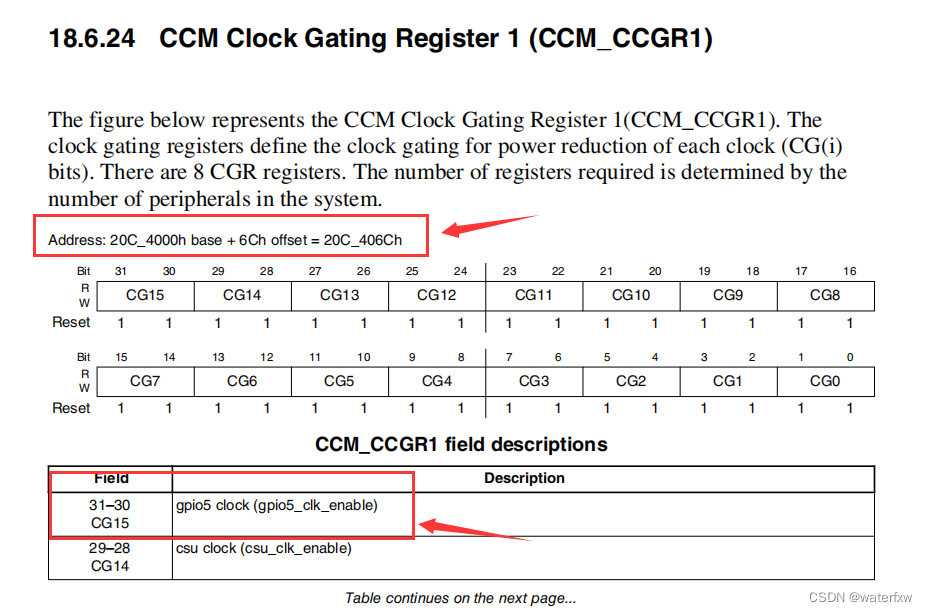
根据“IMX6UL参考手册.pdf”可知其相关寄存器描述如下:


4.2 编写无设备树驱动
为了方便,本次就以编译ko文件的方式,通过手动挂载驱动。驱动源码编写如下:
新建文件名为 beep_platform_driver.c
#include <linux/types.h>
#include <linux/kernel.h>
#include <linux/delay.h>
#include <linux/ide.h>
#include <linux/init.h>
#include <linux/module.h>
#include <linux/errno.h>
#include <linux/gpio.h>
#include <linux/cdev.h>
#include <linux/device.h>
#include <linux/of_gpio.h>
#include <linux/semaphore.h>
#include <linux/timer.h>
#include <linux/irq.h>
#include <linux/wait.h>
#include <linux/poll.h>
#include <linux/fs.h>
#include <linux/fcntl.h>
#include <linux/platform_device.h>
#include <asm/mach/map.h>
#include <asm/uaccess.h>
#include <asm/io.h>
/***************************************************************
Copyright © OneFuCo., Ltd. 2018-2023. All rights reserved.
文件名		: beep_platform_driver.c
作者	  	: water
版本	   	: V1.0
描述	   	: 无设备树platform驱动
其他	   	: 无
日志	   	: 初版V1.0 2023/06/17  water创建
***************************************************************/

#define BEEPDEV_CNT		1			/* 设备号长度 	*/
#define BEEPDEV_NAME	"PlatformBeep"	/* 设备名字 	*/
#define BEEPOFF 		0
#define BEEPON 			1

/* 寄存器名 */
static void __iomem *IMX6U_CCM_CCGR1;
static void __iomem *SW_MUX_GPIO5_IO01;
static void __iomem *SW_PAD_GPIO5_IO01;
static void __iomem *GPIO5_DR;
static void __iomem *GPIO5_GDIR;

/* beepdev设备结构体 */
struct beepdev_dev{
	dev_t devid;			/* 设备号	*/
	struct cdev cdev;		/* cdev		*/
	struct class *class;	/* 类 		*/
	struct device *device;	/* 设备		*/
	int major;				/* 主设备号	*/
};

struct beepdev_dev beepdev; 	/* beep 设备 */

/*
 * @description		: beep打开/关闭
 * @param - sta 	: BEEPON(0) 打开BEEP,BEEPOFF(1) 关闭BEEP
 * @return 			: 无
 */
void beep_switch(u8 sta)
{
	u32 val = 0;
	if(sta == BEEPON){
		val = readl(GPIO5_DR);
		val &= ~(1 << 1);	    //GPIO5的第1个IO
		writel(val, GPIO5_DR);
	}else if(sta == BEEPOFF){
		val = readl(GPIO5_DR);
		val|= (1 << 1);	        //GPIO5的第1个IO
		writel(val, GPIO5_DR);
	}
}

/*
 * @description		: 打开设备
 * @param - inode 	: 传递给驱动的inode
 * @param - filp 	: 设备文件,file结构体有个叫做private_data的成员变量
 * 					  一般在open的时候将private_data指向设备结构体。
 * @return 			: 0 成功;其他 失败
 */
static int beep_open(struct inode *inode, struct file *filp)
{
	filp->private_data = &beepdev; /* 设置私有数据  */
	return 0;
}

/*
 * @description		: 向设备写数据
 * @param - filp 	: 设备文件,表示打开的文件描述符
 * @param - buf 	: 要写给设备写入的数据
 * @param - cnt 	: 要写入的数据长度
 * @param - offt 	: 相对于文件首地址的偏移
 * @return 			: 写入的字节数,如果为负值,表示写入失败
 */
static ssize_t beep_write(struct file *filp, const char __user *buf, size_t cnt, loff_t *offt)
{
	int retvalue;
	unsigned char databuf[1];
	unsigned char beepstat;

	retvalue = copy_from_user(databuf, buf, cnt);
	if(retvalue < 0) {
		return -EFAULT;
	}

	beepstat = databuf[0];		/* 获取状态值 */
	if(beepstat == BEEPON) {
		beep_switch(BEEPON);		/* 打开BEEP灯 */
	}else if(beepstat == BEEPOFF) {
		beep_switch(BEEPOFF);	/* 关闭BEEP灯 */
	}
	return 0;
}

/* 设备操作函数 */
static struct file_operations beep_fops = {
	.owner = THIS_MODULE,
	.open = beep_open,
	.write = beep_write,
};

/*
 * @description		: flatform驱动的probe函数,当驱动与
 * 					  设备匹配以后此函数就会执行
 * @param - dev 	: platform设备
 * @return 			: 0,成功;其他负值,失败
 */
static int beep_probe(struct platform_device *dev)
{
	int i = 0;
	int ressize[5];
	u32 val = 0;
	struct resource *beepsource[5];

	printk("beep driver and device has matched!\r\n");
	/* 1、获取资源 */
	for (i = 0; i < 5; i++) {
		beepsource[i] = platform_get_resource(dev, IORESOURCE_MEM, i); /* 依次MEM类型资源 */
		if (!beepsource[i]) {
			dev_err(&dev->dev, "No MEM resource for always on\n");
			return -ENXIO;
		}
		ressize[i] = resource_size(beepsource[i]);
	}

	/* 2、初始化LED */
	/* 寄存器地址映射 */
 	IMX6U_CCM_CCGR1 = ioremap(beepsource[0]->start, ressize[0]);
	SW_MUX_GPIO5_IO01 = ioremap(beepsource[1]->start, ressize[1]);
  	SW_PAD_GPIO5_IO01 = ioremap(beepsource[2]->start, ressize[2]);
	GPIO5_DR = ioremap(beepsource[3]->start, ressize[3]);
	GPIO5_GDIR = ioremap(beepsource[4]->start, ressize[4]);

	val = readl(IMX6U_CCM_CCGR1);
	val &= ~(3 << 30);				/* 清除以前的设置 */
	val |= (3 << 30);				/* 设置新值 */
	writel(val, IMX6U_CCM_CCGR1);

	/* 设置GPIO5_IO01复用功能,将其复用为GPIO5_IO01 */
	writel(5, SW_MUX_GPIO5_IO01);
	writel(0x10B0, SW_PAD_GPIO5_IO01); // 0001 0000 1011 0000

	/* 设置GPIO5_IO01为输出功能 */
	val = readl(GPIO5_GDIR);
	val &= ~(1 << 1);			/* 清除以前的设置 */
	val |= (1 << 1);			/* 设置为输出 */
	writel(val, GPIO5_GDIR);

	/* 默认关闭BEEP */
	val = readl(GPIO5_DR);
	val |= (1 << 1) ;	        //GPIO5的第1个IO
	writel(val, GPIO5_DR);

	/* 注册字符设备驱动 */
	/*1、创建设备号 */
	if (beepdev.major) {		/*  定义了设备号 */
		beepdev.devid = MKDEV(beepdev.major, 0);
		register_chrdev_region(beepdev.devid, BEEPDEV_CNT, BEEPDEV_NAME);
	} else {						/* 没有定义设备号 */
		alloc_chrdev_region(&beepdev.devid, 0, BEEPDEV_CNT, BEEPDEV_NAME);	/* 申请设备号 */
		beepdev.major = MAJOR(beepdev.devid);	/* 获取分配号的主设备号 */
	}

	/* 2、初始化cdev */
	beepdev.cdev.owner = THIS_MODULE;
	cdev_init(&beepdev.cdev, &beep_fops);

	/* 3、添加一个cdev */
	cdev_add(&beepdev.cdev, beepdev.devid, BEEPDEV_CNT);

	/* 4、创建类 */
	beepdev.class = class_create(THIS_MODULE, BEEPDEV_NAME);
	if (IS_ERR(beepdev.class)) {
		return PTR_ERR(beepdev.class);
	}

	/* 5、创建设备 */
	beepdev.device = device_create(beepdev.class, NULL, beepdev.devid, NULL, BEEPDEV_NAME);
	if (IS_ERR(beepdev.device)) {
		return PTR_ERR(beepdev.device);
	}

	return 0;
}

/*
 * @description		: platform驱动的remove函数,移除platform驱动的时候此函数会执行
 * @param - dev 	: platform设备
 * @return 			: 0,成功;其他负值,失败
 */
static int beep_remove(struct platform_device *dev)
{
	iounmap(IMX6U_CCM_CCGR1);
	iounmap(SW_MUX_GPIO5_IO01);
	iounmap(SW_PAD_GPIO5_IO01);
	iounmap(GPIO5_DR);
	iounmap(GPIO5_GDIR);

	cdev_del(&beepdev.cdev);/*  删除cdev */
	unregister_chrdev_region(beepdev.devid, BEEPDEV_CNT); /* 注销设备号 */
	device_destroy(beepdev.class, beepdev.devid);
	class_destroy(beepdev.class);
	return 0;
}

/* platform驱动结构体 */
static struct platform_driver beep_driver = {
	.driver		= {
		.name	= "water-beep",			/* 驱动名字,用于和设备匹配 */
	},
	.probe		= beep_probe,
	.remove		= beep_remove,
};

/*
 * @description	: 驱动模块加载函数
 * @param 		: 无
 * @return 		: 无
 */
static int __init beep_driver_init(void)
{
	return platform_driver_register(&beep_driver);
}

/*
 * @description	: 驱动模块卸载函数
 * @param 		: 无
 * @return 		: 无
 */
static void __exit beep_driver_exit(void)
{
	platform_driver_unregister(&beep_driver);
}

module_init(beep_driver_init);
module_exit(beep_driver_exit);
MODULE_LICENSE("GPL");
MODULE_AUTHOR("water");
新建文件名为 beep_platform_device.c
#include <linux/types.h>
#include <linux/kernel.h>
#include <linux/delay.h>
#include <linux/ide.h>
#include <linux/init.h>
#include <linux/module.h>
#include <linux/errno.h>
#include <linux/gpio.h>
#include <linux/cdev.h>
#include <linux/device.h>
#include <linux/of_gpio.h>
#include <linux/semaphore.h>
#include <linux/timer.h>
#include <linux/irq.h>
#include <linux/wait.h>
#include <linux/poll.h>
#include <linux/fs.h>
#include <linux/fcntl.h>
#include <linux/platform_device.h>
#include <asm/mach/map.h>
#include <asm/uaccess.h>
#include <asm/io.h>

/***************************************************************
Copyright © OneFuCo., Ltd. 2018-2023. All rights reserved.
文件名		: beep_platform_device.c
作者	  	: water
版本	   	: V1.0
描述	   	: 无设备树platform驱动
其他	   	: 无
日志	   	: 初版V1.0 2023/06/17  water创建
***************************************************************/

/*
 * 寄存器地址定义
 */
#define CCM_CCGR1_BASE				(0X020C406C)
#define SW_MUX_GPIO5_IO01_BASE		(0X0229000C)
#define SW_PAD_GPIO5_IO01_BASE		(0X02290050)
#define GPIO5_DR_BASE				(0X020AC000)
#define GPIO5_GDIR_BASE				(0X020AC004)
#define REGISTER_LENGTH				4

/* @description		: 释放flatform设备模块的时候此函数会执行
 * @param - dev 	: 要释放的设备
 * @return 			: 无
 */
static void	beep_release(struct device *dev)
{
	printk("beep device released!\r\n");
}

/*
 * 设备资源信息,也就是LED0所使用的所有寄存器
 */
static struct resource beep_resources[] = {
	[0] = {
		.start 	= CCM_CCGR1_BASE,
		.end 	= (CCM_CCGR1_BASE + REGISTER_LENGTH - 1),
		.flags 	= IORESOURCE_MEM,
	},
	[1] = {
		.start	= SW_MUX_GPIO5_IO01_BASE,
		.end	= (SW_MUX_GPIO5_IO01_BASE + REGISTER_LENGTH - 1),
		.flags	= IORESOURCE_MEM,
	},
	[2] = {
		.start	= SW_PAD_GPIO5_IO01_BASE,
		.end	= (SW_PAD_GPIO5_IO01_BASE + REGISTER_LENGTH - 1),
		.flags	= IORESOURCE_MEM,
	},
	[3] = {
		.start	= GPIO5_DR_BASE,
		.end	= (GPIO5_DR_BASE + REGISTER_LENGTH - 1),
		.flags	= IORESOURCE_MEM,
	},
	[4] = {
		.start	= GPIO5_GDIR_BASE,
		.end	= (GPIO5_GDIR_BASE + REGISTER_LENGTH - 1),
		.flags	= IORESOURCE_MEM,
	},
};


/*
 * platform设备结构体
 */
static struct platform_device beepdevice = {
	.name = "water-beep",
	.id = -1,
	.dev = {
		.release = &beep_release,
	},
	.num_resources = ARRAY_SIZE(beep_resources),
	.resource = beep_resources,
};

/*
 * @description	: 设备模块加载
 * @param 		: 无
 * @return 		: 无
 */
static int __init beep_device_init(void)
{
	return platform_device_register(&beepdevice);
}

/*
 * @description	: 设备模块注销
 * @param 		: 无
 * @return 		: 无
 */
static void __exit beep_device_exit(void)
{
	platform_device_unregister(&beepdevice);
}

module_init(beep_device_init);
module_exit(beep_device_exit);
MODULE_LICENSE("GPL");
MODULE_AUTHOR("water");
4.3 编写测试app
#include "stdio.h"
#include "unistd.h"
#include "sys/types.h"
#include "sys/stat.h"
#include "fcntl.h"
#include "stdlib.h"
#include "string.h"

/***************************************************************
Copyright © OneFuCo., Ltd. 2018-2023. All rights reserved.
文件名		: platformBeepApp.c
作者	  	: water
版本	   	: V1.0
描述	   	: platform驱动驱测试APP。
其他	   	: 无
使用方法	 :./platformBeepApp /dev/PlatformBeep  0 关闭beep
		     ./platformBeepApp /dev/PlatformBeep  1 打开beep
日志	   	: 初版V1.0 2023/06/17  water创建
***************************************************************/
#define BEEPOFF 	0
#define BEEPON 	1

/*
 * @description		: main主程序
 * @param - argc 	: argv数组元素个数
 * @param - argv 	: 具体参数
 * @return 			: 0 成功;其他 失败
 */
int main(int argc, char *argv[])
{
	int fd, retvalue;
	char *filename;
	unsigned char databuf[2];

	if(argc != 3){
		printf("Error Usage!\r\n");
		return -1;
	}

	filename = argv[1];

	/* 打开 BEEP 驱动 */
	fd = open(filename, O_RDWR);
	if(fd < 0){
		printf("file %s open failed!\r\n", argv[1]);
		return -1;
	}

	databuf[0] = atoi(argv[2]);	/* 要执行的操作:打开或关闭 */
	retvalue = write(fd, databuf, sizeof(databuf));
	if(retvalue < 0){
		printf("BEEP Control Failed!\r\n");
		close(fd);
		return -1;
	}

	retvalue = close(fd); /* 关闭文件 */
	if(retvalue < 0){
		printf("file %s close failed!\r\n", argv[1]);
		return -1;
	}
	return 0;
}
4.4 编译
4.4.1 编写Makefile
RCH=arm
CROSS_COMPILE=arm-linux-gnueabihf-
KERNELDIR := /home/water/imax/NXP/kernel/linux-imx-rel_imx_4.1.15_2.1.0_ga/
CURRENT_PATH := $(shell pwd)
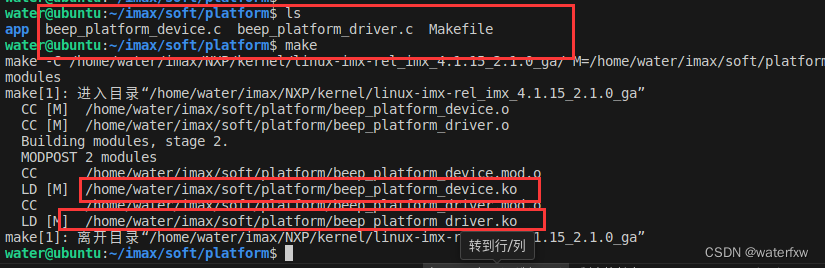
obj-m := beep_platform_device.o beep_platform_driver.o
build: kernel_modules
kernel_modules:
$(MAKE) -C $(KERNELDIR) M=$(CURRENT_PATH) modules
clean:
$(MAKE) -C $(KERNELDIR) M=$(CURRENT_PATH) clean
4.4.2 编译驱动
在Makefile文件同级目录下执行make命令进行编译,如下:
4.4.3 编译测试app
使用命令“arm-linux-gnueabihf-gcc platformBeepApp.c -o platformBeepApp”编译,如下:

4.5 运行验证
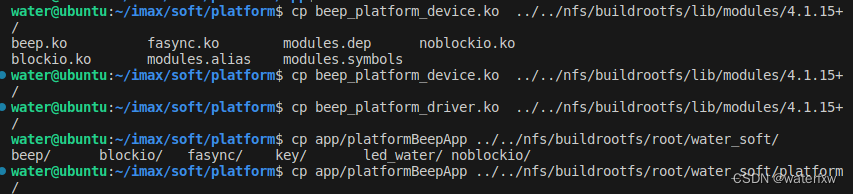
4.5.1 资源文件放入设备
将编译好的ko文件和app复制到设备中,如下:
cp beep_platform_device.ko  ../../nfs/buildrootfs/lib/modules/4.1.15+/
cp beep_platform_driver.ko  ../../nfs/buildrootfs/lib/modules/4.1.15+/
cp app/platformBeepApp ../../nfs/buildrootfs/root/water_soft/platform/
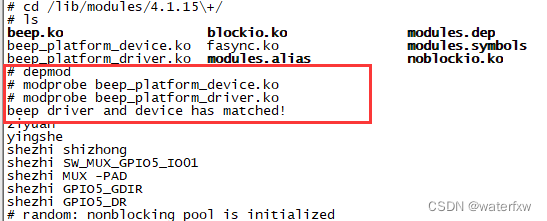
4.5.2 挂载驱动
挂载驱动命令如下:
# depmod
# modprobe beep_platform_device.ko
# modprobe beep_platform_driver.ko
4.5.3 运行测试app
运行测试app命令如下:
开启beep:
./platformBeepApp /dev/PlatformBeep 1
关闭beep:
./platformBeepApp /dev/PlatformBeep 0
执行命令后可听见beep的开启和关闭。
验证符合设计。
接下来我们来看一下依赖设备的情况下是如可编写platform驱动。
五 有设备树platform 驱动编写与验证
5.1 编写设备树驱动硬件信息
设备树具体新增步骤参考<Linux开发>驱动开发 -之-基于pinctrl/gpio子系统的beep驱动。
新增pinctrl节点如下:
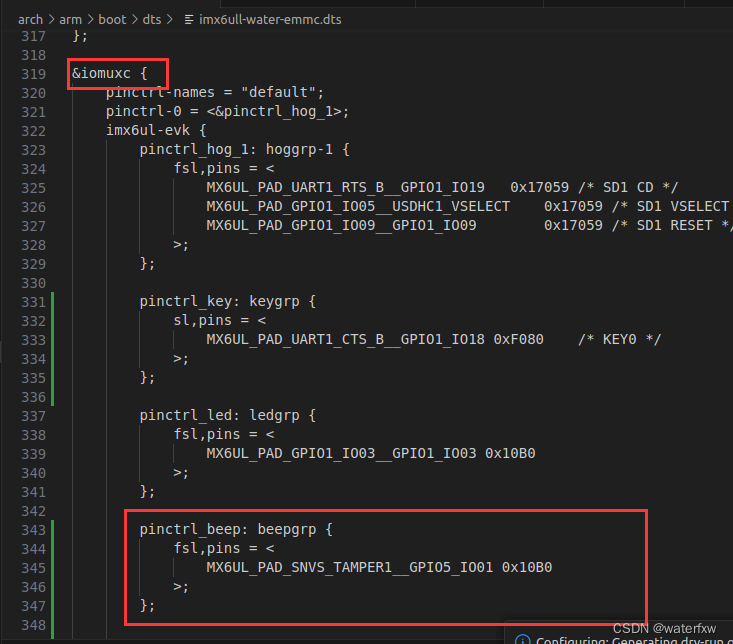
新增beep设备:
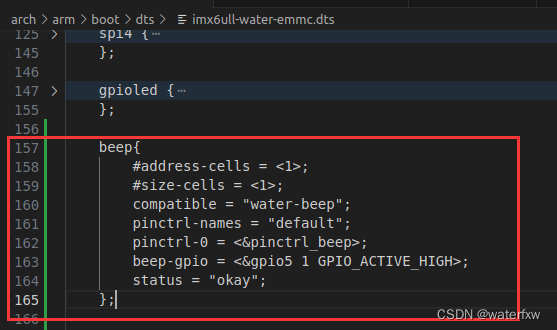
从beep设备树节点我们可以看到 compatible 属性值为“water-beep”,我们需要通过3.1小节讲解的第1种方法进行匹配。
5.2 编写 platform 驱动的时候要注意兼容属性
在使用设备树的时候 platform 驱动会通过 of_match_table 来保存兼容性值,也就是表明此驱动兼容哪些设备。所以,of_match_table 将会尤为重要,比如本例程的 platform 驱动中 platform_driver 就可以按照如下所示设置:
static const struct of_device_id beeps_of_match[] = {
	{ .compatible = "water-beep" }, /* 兼容属性 */
	{ /* Sentinel */ }
};

MODULE_DEVICE_TABLE(of, beeps_of_match);

static struct platform_driver beeps_platform_driver = {
	.driver = {
		.name = "water-beep",
		.of_match_table = beeps_of_match,
	},
	.probe =beeps_probe,
	.remove = beeps_remove,
};
第 1~4 行,of_device_id 表,也就是驱动的兼容表,是一个数组,每个数组元素为 of_device_id类型。每个数组元素都是一个兼容属性,表示兼容的设备,一个驱动可以跟多个设备匹配。这里我们仅仅匹配了一个设备,那就是 5.1小节 中创建的 beep这个设备。第 2 行的 compatible 值为“water-beep”,驱动中的 compatible 属性和设备中的 compatible 属性相匹配,因此驱动中对应的 probe 函数就会执行。注意第 3 行是一个空元素,在编写 of_device_id 的时候最后一个元素一定要为空!
第 6 行,通过 MODULE_DEVICE_TABLE 声明一下beeps_of_match 这个设备匹配表。
第 11 行,设置 platform_driver 中的 of_match_table 匹配表为上面创建的 beeps_of_match,至此我们就设置好了 platform 驱动的匹配表了。
基于设备树的 platform 驱动和第四节无设备树的 platform 驱动基本一样,都是当驱动和设备匹配成功以后就会执行 probe 函数。我们需要在 probe 函数里面执行字符设备驱动那一套,当注销驱动模块的时候 remove 函数就会执行,都是大同小异的。
5.3 编写 platform 驱动
编写驱动如下:
#include <linux/types.h>
#include <linux/kernel.h>
#include <linux/delay.h>
#include <linux/ide.h>
#include <linux/init.h>
#include <linux/module.h>
#include <linux/errno.h>
#include <linux/gpio.h>
#include <linux/cdev.h>
#include <linux/device.h>
#include <linux/of_gpio.h>
#include <linux/semaphore.h>
#include <linux/timer.h>
#include <linux/irq.h>
#include <linux/wait.h>
#include <linux/poll.h>
#include <linux/fs.h>
#include <linux/fcntl.h>
#include <linux/platform_device.h>
#include <asm/mach/map.h>
#include <asm/uaccess.h>
#include <asm/io.h>
/***************************************************************
Copyright © OneFuCo., Ltd. 2018-2023. All rights reserved.
文件名		: beepDts_platform_driver.c
作者	  	: water
版本	   	: V1.0
描述	   	: 有设备树platform驱动
其他	   	: 无
日志	   	: 初版V1.0 2023/06/17  water创建
***************************************************************/

#define BEEPDEV_CNT		1			/* 设备号长度 	*/
#define BEEPDEV_NAME	"DtsPlatformBeep"	/* 设备名字 	*/
#define BEEPOFF 		0
#define BEEPON 			1


/* beepdev设备结构体 */
struct beepdev_dev{
	dev_t devid;			/* 设备号	*/
	struct cdev cdev;		/* cdev		*/
	struct class *class;	/* 类 		*/
	struct device *device;	/* 设备		*/
	int major;				/* 主设备号	*/
    struct device_node *nd; /* 设备节点 */
    int beep_gpio;           /* beep 所使用的 GPIO 编号 */
};

struct beepdev_dev beepdev; 	/* beep 设备 */

/*
 * @description		: 打开设备
 * @param - inode 	: 传递给驱动的inode
 * @param - filp 	: 设备文件,file结构体有个叫做private_data的成员变量
 * 					  一般在open的时候将private_data指向设备结构体。
 * @return 			: 0 成功;其他 失败
 */
static int beep_open(struct inode *inode, struct file *filp)
{
	filp->private_data = &beepdev; /* 设置私有数据  */
	return 0;
}

/*
 * @description		: 向设备写数据
 * @param - filp 	: 设备文件,表示打开的文件描述符
 * @param - buf 	: 要写给设备写入的数据
 * @param - cnt 	: 要写入的数据长度
 * @param - offt 	: 相对于文件首地址的偏移
 * @return 			: 写入的字节数,如果为负值,表示写入失败
 */
static ssize_t beep_write(struct file *filp, const char __user *buf, size_t cnt, loff_t *offt)
{
	int retvalue;
	unsigned char databuf[1];
	unsigned char beepstat;

	retvalue = copy_from_user(databuf, buf, cnt);
	if(retvalue < 0) {
        printk("kernel write failed!\r\n");
		return -EFAULT;
	}

	beepstat = databuf[0];		/* 获取状态值 */
	if(beepstat == BEEPON) {
		gpio_set_value(beepdev.beep_gpio, 0);		/* 打开BEEP */
	}else if(beepstat == BEEPOFF) {
		gpio_set_value(beepdev.beep_gpio, 1);	/* 关闭BEEP */
	}
	return 0;
}

/* 设备操作函数 */
static struct file_operations beep_fops = {
	.owner = THIS_MODULE,
	.open = beep_open,
	.write = beep_write,
};

/*
 * @description		: flatform驱动的probe函数,当驱动与
 * 					  设备匹配以后此函数就会执行
 * @param - dev 	: platform设备
 * @return 			: 0,成功;其他负值,失败
 */
static int beep_probe(struct platform_device *dev)
{
    int ret;

    printk("led driver and device was matched!\r\n");

	/* 注册字符设备驱动 */
	/*1、创建设备号 */
	if (beepdev.major) {		/*  定义了设备号 */
		beepdev.devid = MKDEV(beepdev.major, 0);
		register_chrdev_region(beepdev.devid, BEEPDEV_CNT, BEEPDEV_NAME);
	} else {						/* 没有定义设备号 */
		alloc_chrdev_region(&beepdev.devid, 0, BEEPDEV_CNT, BEEPDEV_NAME);	/* 申请设备号 */
		beepdev.major = MAJOR(beepdev.devid);	/* 获取分配号的主设备号 */
	}

	/* 2、初始化cdev */
	beepdev.cdev.owner = THIS_MODULE;
	cdev_init(&beepdev.cdev, &beep_fops);

	/* 3、添加一个cdev */
	cdev_add(&beepdev.cdev, beepdev.devid, BEEPDEV_CNT);

	/* 4、创建类 */
	beepdev.class = class_create(THIS_MODULE, BEEPDEV_NAME);
	if (IS_ERR(beepdev.class)) {
		return PTR_ERR(beepdev.class);
	}

	/* 5、创建设备 */
	beepdev.device = device_create(beepdev.class, NULL, beepdev.devid, NULL, BEEPDEV_NAME);
	if (IS_ERR(beepdev.device)) {
		return PTR_ERR(beepdev.device);
	}

    /* 设置 beep 所使用的 GPIO */
    /* 1、获取设备节点: beep */
    beepdev.nd = of_find_node_by_path("/beep");
    if(beepdev.nd == NULL) {
        printk("beep node cant not found!\r\n");
        return -EINVAL;
    } else {
        printk("beep node has been found!\r\n");
    }

    /* 2、 获取设备树中的 gpio 属性,得到 beep 所使用的 beep 编号 */
    beepdev.beep_gpio = of_get_named_gpio(beepdev.nd, "beep-gpio", 0);
    if(beepdev.beep_gpio < 0) {
        printk("can't get beep-gpio");
        return -EINVAL;
    }
    printk("beep num = %d\r\n", beepdev.beep_gpio);

    gpio_request(beepdev.beep_gpio, "beep");
    /* 3、设置 GPIO5_IO01 为输出,并且输出低平,默认关闭 beep */
    ret = gpio_direction_output(beepdev.beep_gpio, 1);
    if(ret < 0) {
        printk("can't set gpio!\r\n");
    }


	return 0;
}

/*
 * @description		: platform驱动的remove函数,移除platform驱动的时候此函数会执行
 * @param - dev 	: platform设备
 * @return 			: 0,成功;其他负值,失败
 */
static int beep_remove(struct platform_device *dev)
{
	gpio_set_value(beepdev.beep_gpio, 1); /* 卸载驱动的时候关闭 beep */

	cdev_del(&beepdev.cdev);/*  删除cdev */
	unregister_chrdev_region(beepdev.devid, BEEPDEV_CNT); /* 注销设备号 */
	device_destroy(beepdev.class, beepdev.devid);
	class_destroy(beepdev.class);
	return 0;
}

/* 匹配列表 */
static const struct of_device_id beep_of_match[] = {
    { .compatible = "water-beep" },
    { /* Sentinel */ }
};

/* platform驱动结构体 */
static struct platform_driver beep_driver = {
	.driver		= {
		.name	= "water-beep",			/* 驱动名字,用于和设备匹配 */
        .of_match_table = beep_of_match, /* 设备树匹配表 */
	},
	.probe		= beep_probe,
	.remove		= beep_remove,
};

/*
 * @description	: 驱动模块加载函数
 * @param 		: 无
 * @return 		: 无
 */
static int __init beep_driver_init(void)
{
	return platform_driver_register(&beep_driver);
}

/*
 * @description	: 驱动模块卸载函数
 * @param 		: 无
 * @return 		: 无
 */
static void __exit beep_driver_exit(void)
{
	platform_driver_unregister(&beep_driver);
}

module_init(beep_driver_init);
module_exit(beep_driver_exit);
MODULE_LICENSE("GPL");
MODULE_AUTHOR("water");
5.4 编写测试app
测试app可完全复用 4.3小节使用搞定测试app。
5.5 编译
5.5.1 编写Makefile
编写Makefile内容如下:
RCH=arm
CROSS_COMPILE=arm-linux-gnueabihf-

KERNELDIR := /home/water/imax/NXP/kernel/linux-imx-rel_imx_4.1.15_2.1.0_ga/
CURRENT_PATH := $(shell pwd)

obj-m := beepDts_platform_driver.o

build: kernel_modules

kernel_modules:
	$(MAKE) -C $(KERNELDIR) M=$(CURRENT_PATH) modules

clean:
	$(MAKE) -C $(KERNELDIR) M=$(CURRENT_PATH) clean
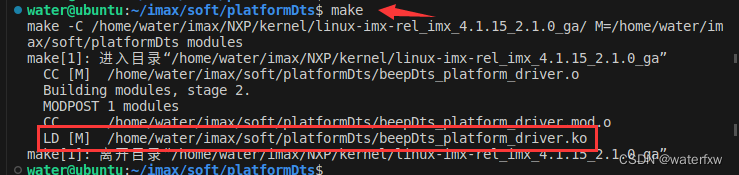
5.5.2 编译驱动
编写好Makefile之后即可在命令行执行“make”命令进行编译如下:
5.5.3 编译测试app
完全复用 4.4.3小节。
5.5.4 资源文件导入设备
cp beepDts_platform_driver.ko ../../nfs/buildrootfs/lib/modules/4.1.15+/

5.5.5 挂载驱动
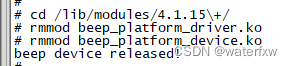
挂载驱动前,需要先把第4节的驱动卸载掉,命令如下:
cd /lib/modules/4.1.15\+/
rmmod beep_platform_driver.ko
rmmod beep_platform_device.ko
挂载驱动命令如下:
# cd /lib/modules/4.1.15\+/
# depmod
# modprobe beepDts_platform_driver.ko
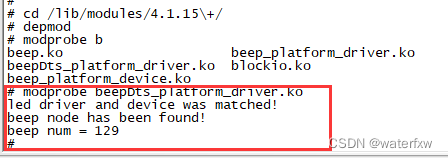
5.5.6 运行测试app
运行测试app命令如下:
开启beep:
./platformBeepApp /dev/DtsPlatformBeep1
关闭beep:
./platformBeepApp /dev/DtsPlatformBeep0
执行命令后可听见beep的开启和关闭。

验证符合设计。
5.5.7 卸载驱动
卸载驱动命令如下:
cd /lib/modules/4.1.15\+/
rmmod beepDts_platform_driver.ko

六 总结
就如前言所说,往后的开发基本都是基于设备树以及平台设备化;所以后续的驱动例程分析,都将以平台化方式实现。


 1万+
1万+


 被折叠的 条评论
为什么被折叠?
被折叠的 条评论
为什么被折叠?
 到【灌水乐园】发言


