


导读
发生死锁时,进程永远不能完成,系统资源被阻碍使用,以致于阻止了其他作业开始执行。在讨论处理死锁问题的各种方法之前,我们首先深入讨论一下死锁特点。 死锁,是指多个线程或者进程在运行过程中因争夺资源而造成的一种僵局,当进程或者线程 处于这种僵持状态,若无外力作用,它们将无法再向前推进。如下图所示,线程 A 想获取线 程 B 的锁,线程 B 想获取线程 C 的锁,线程 C 想获取线程 D 的锁,线程 D 想获取线程 A 的。 锁,从而构建了一个资源获取环。
死锁的存在是因为有资源获取环的存在,所以只要检测出资源获取环,就等同于检测出死锁的存在。
1死锁的构建
pthread_mutex_t mtx1 = PTHREAD_MUTEX_INITIALIZER;
pthread_mutex_t mtx2 = PTHREAD_MUTEX_INITIALIZER;
pthread_mutex_t mtx3 = PTHREAD_MUTEX_INITIALIZER;
pthread_mutex_t mtx4 = PTHREAD_MUTEX_INITIALIZER;
void *thread_route_a(void *arg){
	printf("thread_route_a \n");
	pthread_mutex_lock(&mtx1);
	sleep(1);
	pthread_mutex_lock(&mtx2);
	pthread_mutex_unlock(&mtx2);
	pthread_mutex_unlock(&mtx1);
	printf("thread_route_a exist \n");
}
void *thread_route_b(void *arg){
	printf("thread_route_b \n");
	pthread_mutex_lock(&mtx2);
	sleep(1);
	pthread_mutex_lock(&mtx1);
	pthread_mutex_unlock(&mtx1);
	pthread_mutex_unlock(&mtx2);
	printf("thread_route_b exist \n");
}
int main()
{
	pthread_t tid1,tid2;
	pthread_create(&tid1,NULL,thread_route_a,NULL);
	pthread_create(&tid2,NULL,thread_route_b,NULL);


	pthread_join(tid1,NULL);
	pthread_join(tid2,NULL);

}
如上图代码所示,就形成了如下一个环型死锁状态

2pthread 加锁过程中的hook
首先 要检测死锁问题,就需要知道哪个锁被哪个线程所占有了,所以我们需要封装pthread_mutex_lock()和pthread_mutex_unlock()函数,用自己封装的函数取去代替系统的函数。
所以需要用hook钩子技术。
//hook的初始化,此处的dlsym的作用是获取代码段区的系统函数函数指针,复制给我们 自定义的函数指针,以此来调用 系统函数。
typedef int (*pthread_mutex_lock_t)(pthread_mutex_t *mutex);
pthread_mutex_lock_t pthread_mutex_lock_f;


typedef int (*pthread_mutex_unlock_t)(pthread_mutex_t *mutex);
pthread_mutex_unlock_t pthread_mutex_unlock_f;

static int init_hook() {
	//
	//dlopen();
	pthread_mutex_lock_f = dlsym(RTLD_NEXT, "pthread_mutex_lock");

	pthread_mutex_unlock_f = dlsym(RTLD_NEXT, "pthread_mutex_unlock");
}
int pthread_mutex_lock(pthread_mutex_t *mutex) {

	printf("pthread_mutex_lock selfid %ld, mutex: %p\n", pthread_self(), mutex);

	pthread_mutex_lock_f(mutex);

}
int pthread_mutex_unlock(pthread_mutex_t *mutex) {

	printf("pthread_mutex_unlock\n");

	pthread_mutex_unlock_f(mutex);
}
3 图的构建
死锁的存在是因为有资源获取环的存在,所以只要检测出资源获取环,就等同于检测出死锁的存在,再将问题转换成检测有向图是否有环的的问题。
那么如何构建出有向图

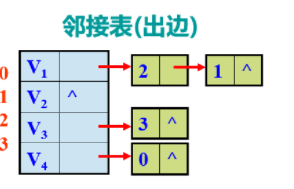
采用有向图的邻接表的逻辑思维,构建图的节点和边
enum Type {PROCESS, RESOURCE};

struct source_type {

	uint64 id;
	enum Type type;

	uint64 lock_id;
	int degress;
};

struct vertex {

	struct source_type s;  //节点中存储的数据信息
	struct vertex *next;  //有向图中的邻接表指向节点的指针

};
//整个图的管理
struct task_graph {

	struct vertex list[MAX];//线程的节点  //图存储的节点结合
	int num;

	struct source_type locklist[MAX];//当前有两个节点在使用
	int lockidx;

	pthread_mutex_t mutex;
};
/*
	创建一个节点
*/
struct vertex *create_vertex(struct source_type type) {

	struct vertex *tex = (struct vertex *)malloc(sizeof(struct vertex ));//再堆中申请一块节点的空间

	tex->s = type;//填充此节点中的数据信息
	tex->next = NULL;//默认该节点的没有指向任意一个节点

	return tex;

}
/*
	传入一个节点的数据,图结构中的节点结合中有没有一个节点有这个数据,有就返回节点的索引,没有返回-1
*/
int search_vertex(struct source_type type) {

	int i = 0;

	for (i = 0;i < tg->num;i ++) {

		if (tg->list[i].s.type == type.type && tg->list[i].s.id == type.id) {
			return i;
		}

	}

	return -1;
}
/*
加入一个节点
*/
void add_vertex(struct source_type type) {

	if (search_vertex(type) == -1) {  //查询图中的节点结合中有没有这个节点若没有,就加入到节点集合中

		tg->list[tg->num].s = type;
		tg->list[tg->num].next = NULL;
		tg->num ++;

	}

}

int add_edge(struct source_type from, struct source_type to) {

	add_vertex(from);
	add_vertex(to);

	struct vertex *v = &(tg->list[search_vertex(from)]);

	while (v->next != NULL) {
		v = v->next;
	}

	v->next = create_vertex(to);
	//form节点后面指向一个to节点

}
//确定带有数据i的节点是不是指向了带有数据j的节点,有就返回1,没有就返回0
int verify_edge(struct source_type i, struct source_type j) {

	if (tg->num == 0) return 0;

	int idx = search_vertex(i);
	if (idx == -1) {
		return 0;
	}

	struct vertex *v = &(tg->list[idx]);

	while (v != NULL) {

		if (v->s.id == j.id) return 1;

		v = v->next;

	}

	return 0;

}
//删除从form指向to的这一条边
int remove_edge(struct source_type from, struct source_type to) {

	int idxi = search_vertex(from);
	int idxj = search_vertex(to);

	if (idxi != -1 && idxj != -1) {

		struct vertex *v = &tg->list[idxi];
		struct vertex *remove;

		while (v->next != NULL) {

			if (v->next->s.id == to.id) {

				remove = v->next;
				v->next = v->next->next;

				free(remove);
				break;

			}

			v = v->next;
		}

	}

}
4 三个原语操作
分别是beforloack/afterlock/afterunlock //加锁之前 加锁之后,解锁之后。这三个函数,
此时已经是将死锁检测的问题带入到有向图中了。
用有向图的问题去解决死锁检测的实际问题
void beforelock(uint64 threadid, uint64 mutex) { //在加锁之前执行这个函数

	int idx = 0; //lockidx  sum
	for (idx = 0;idx < tg->lockidx;idx ++) { // 遍历锁的集合
		    //self             thid
		if (mutex == tg->locklist[idx].lock_id) { //如果将要加的锁在这个图结构的锁集合中,说明此时此刻这个锁被被别的线程给占有了

			//self --> thid
			struct source_type from;
			from.id = threadid;
			add_vertex(from);//线程id作为节点

			struct source_type to;
			to.id = tg->locklist[idx].id;//找到吧这个要加的锁占有的线程id
			tg->locklist[idx].degress++;

			add_vertex(to);//用这个线程id创建创建一个节点

			if (!verify_edge(from, to)) {  //如果代表当前这个线程id的节点已经指向已经占有了这个锁的节点,就返回退出。
				add_edge(from, to);//否则就两个节点就构成一个边。由当前线程的节点指向当前占有这个锁的线程节点。
			}

		}

	}

}
//此函数是在加锁之后调用的函数
void afterlock(uint64 threadid, uint64 mutex) {

	int idx = 0;
	if (-1 == (idx = search_lock(mutex))) { //判断这个锁被此线程占用之前有没有被别的线程占用过
		//如果没有就在locklist中找一个空闲的位置给这个锁,然后这个锁和这个线程的id就绑定在一起
		int emp_idx = search_empty_lock(mutex);
		tg->locklist[emp_idx].id = threadid;
		tg->locklist[emp_idx].lock_id = mutex;

		tg->lockidx ++; //atomic    //这个++操作可以用封装汇编的原子操作执行会更好一些

	} else {
		//如果之前就被占用过
		struct source_type from;
		from.id = threadid;
		add_vertex(from);

		struct source_type to;
		to.id = tg->locklist[idx].id;
		tg->locklist[idx].degress--;
		add_vertex(to);

		if (!verify_edge(from, to)) {  //判断一下这个 此线程id节点和之前占用这个锁的线程节点之间有没有构成边的关系,如果由就删除这一条边
			remove_edge(from, to);
		}

		tg->locklist[idx].id = threadid;//然后将此线程的id和所绑定在一起。
	}


}
//此函数是在释放锁之后执行这个函数
void afterunlock(uint64 threadid, uint64 mutex) {

	int idx = search_lock(mutex); //搜索这个锁在图结构中的索引位置

	if (tg->locklist[idx].degress == 0) {  //如果说这个锁的度,也就是想要获取这一把锁的线程数量

		tg->locklist[idx].id = 0;    //就把这个锁从图结构中的锁集合中给清除掉
		tg->locklist[idx].lock_id = 0;

	}

}
这三个原语函数的具体讲解,看上代码段的注释**
6手撕死锁检测代码
死锁检测工具代码地址:
https://github.com/xiaoyeyihao/xioayeyihao.github.io/blob/master/deadlock_success.c


 747
747


 被折叠的 条评论
为什么被折叠?
被折叠的 条评论
为什么被折叠?
 到【灌水乐园】发言


