


文章目录
1.什么是注解
(1)注解是代码特殊标记,格式:@注解名称(属性名称=属性值, 属性名称=属性值…)
(2)使用注解,注解作用在类上面,方法上面,属性上面
(3)使用注解目的:简化 xml 配置
2.Spring 针对 Bean 管理中创建对象提供的注解
(1)@Component
(2)@Service
(3)@Controller
(4)@Repository
上面四个注解功能是一样的,都可以用来创建 bean 实例的注解(创建对象的注解)
3.基于注解方式实现对象创建
Spring中可以运用组件扫描结合注解标记达到自动注入bean对象的功能,该方式可以让原先大量的bean配置得以简化。演示如下:
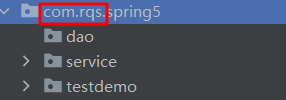
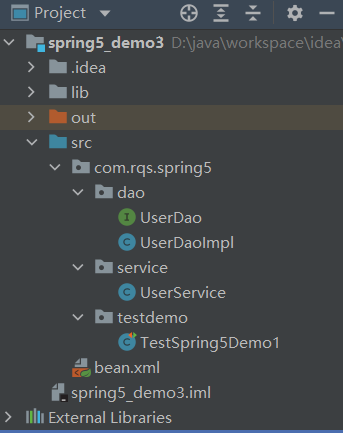
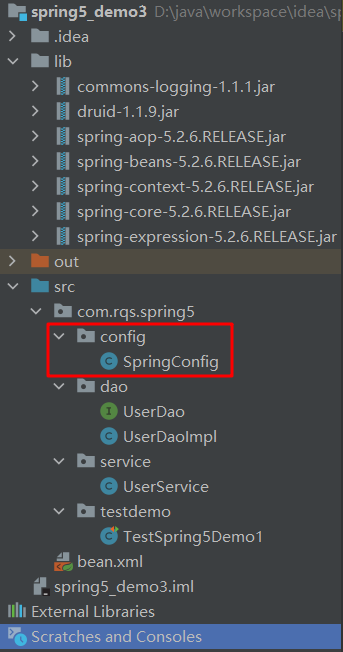
创建一个java工程:
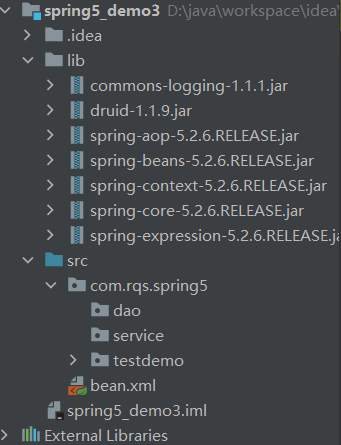
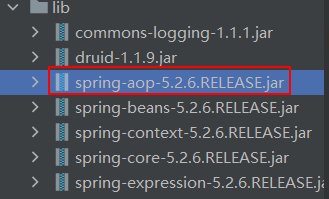
引入的依赖:
这个依赖文件在资料的spring-framework-5.2.6.RELEASE\libs中
链接:https://pan.baidu.com/s/1IO1XbRL0qseMYep_ErQgig
提取码:rx75
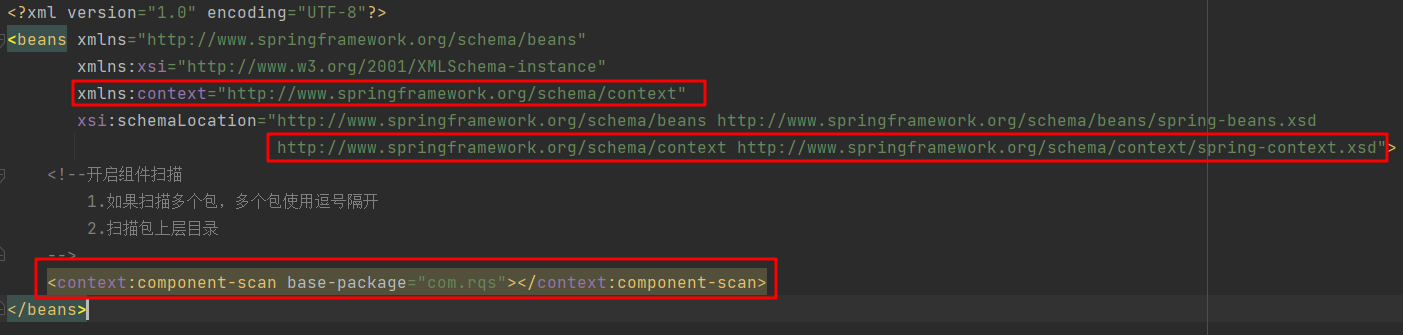
开启组件扫描:
先在Spring配置文件bean.xml中引入名称空间,然后开启组件扫描,如果是扫描多个包,多个包用逗号隔开
<?xml version="1.0" encoding="UTF-8"?>
<beans xmlns="http://www.springframework.org/schema/beans"
       xmlns:xsi="http://www.w3.org/2001/XMLSchema-instance"
       xmlns:context="http://www.springframework.org/schema/context"
       xsi:schemaLocation="http://www.springframework.org/schema/beans http://www.springframework.org/schema/beans/spring-beans.xsd
                           http://www.springframework.org/schema/context http://www.springframework.org/schema/context/spring-context.xsd">
    <!--开启组件扫描
        1.如果扫描多个包,多个包使用逗号隔开
    -->
    <context:component-scan base-package="com.rqs.spring5.dao,com.rqs.spring5.service"></context:component-scan>
</beans>
也可以直接引入上层目录来扫描目录下的所有包,如下所示:
<?xml version="1.0" encoding="UTF-8"?>
<beans xmlns="http://www.springframework.org/schema/beans"
       xmlns:xsi="http://www.w3.org/2001/XMLSchema-instance"
       xmlns:context="http://www.springframework.org/schema/context"
       xsi:schemaLocation="http://www.springframework.org/schema/beans http://www.springframework.org/schema/beans/spring-beans.xsd
                           http://www.springframework.org/schema/context http://www.springframework.org/schema/context/spring-context.xsd">
    <!--开启组件扫描
        1.如果扫描多个包,多个包使用逗号隔开
        2.扫描包上层目录
    -->
    <context:component-scan base-package="com.rqs"></context:component-scan>
</beans>
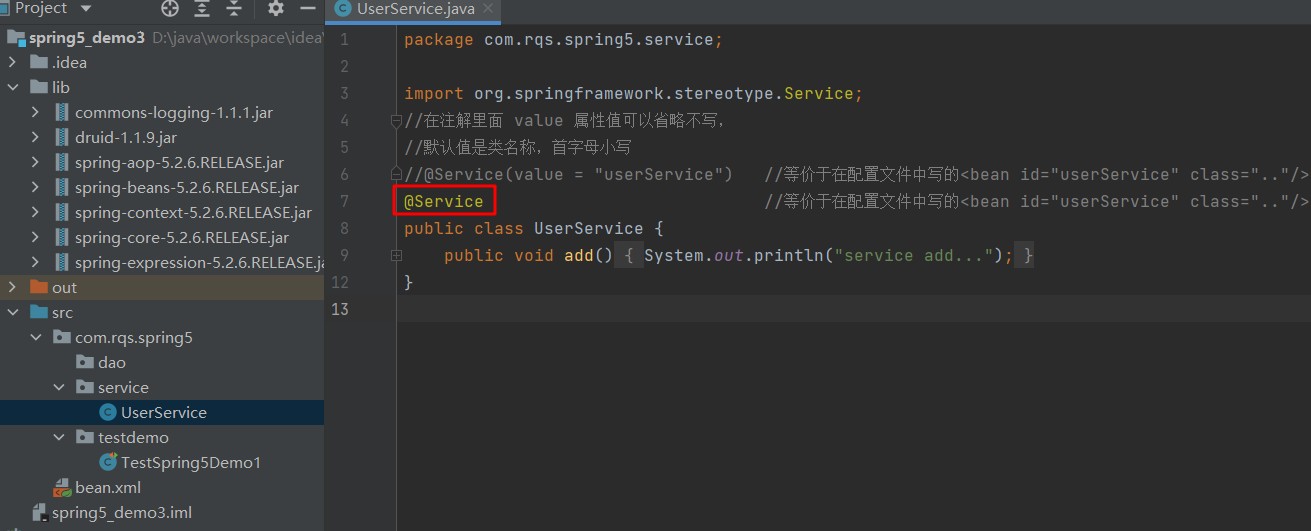
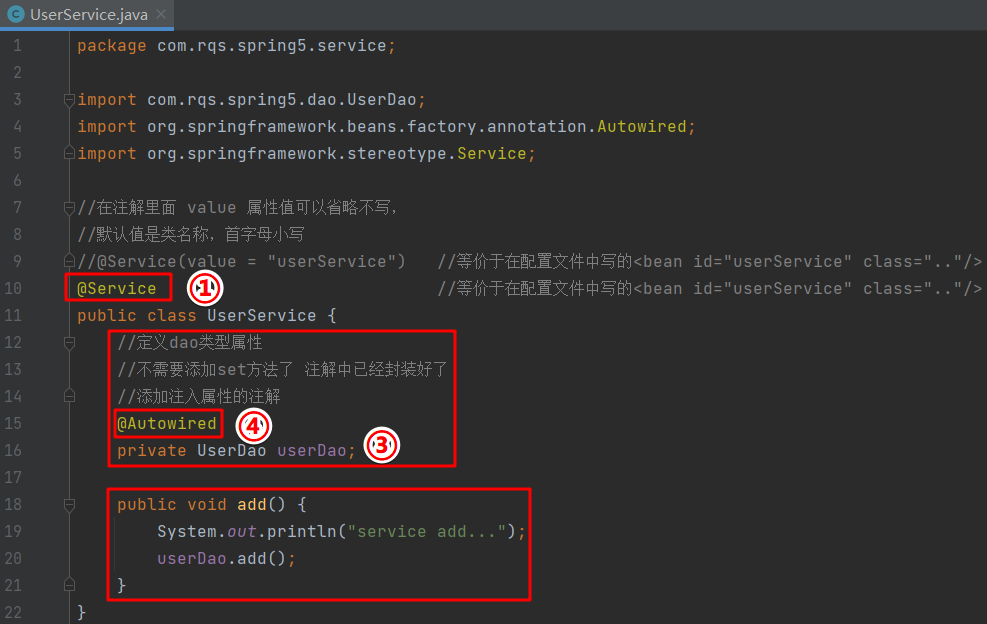
在service包中创建UserService类,在类上面添加创建对象注解
package com.rqs.spring5.service;

import org.springframework.stereotype.Service;
//在注解里面 value 属性值可以省略不写,
//默认值是类名称,首字母小写
//@Service(value = "userService")   //等价于在配置文件中写的<bean id="userService" class=".."/>
@Service                            //等价于在配置文件中写的<bean id="userService" class=".."/>
public class UserService {
    public void add() {
        System.out.println("service add...");
    }
}
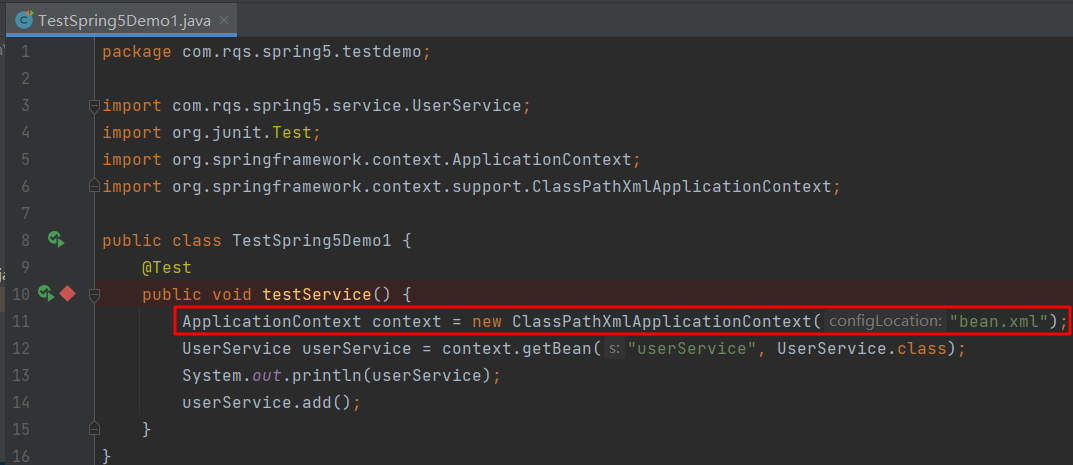
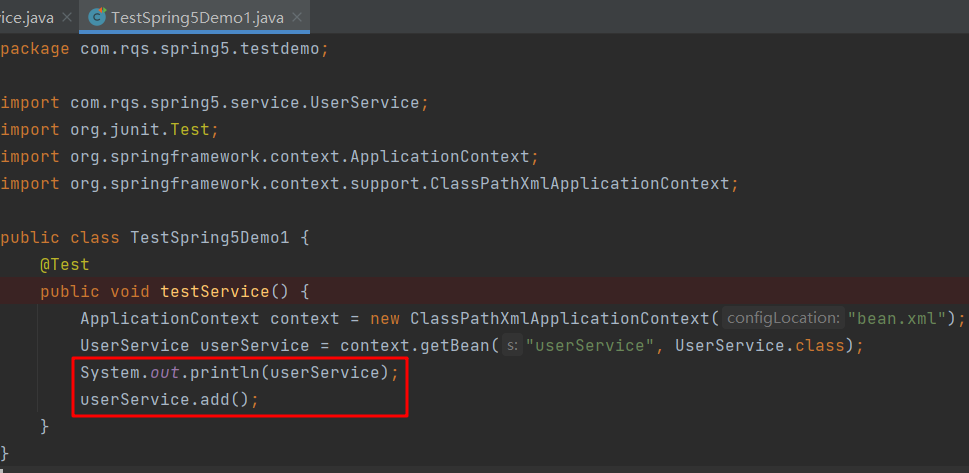
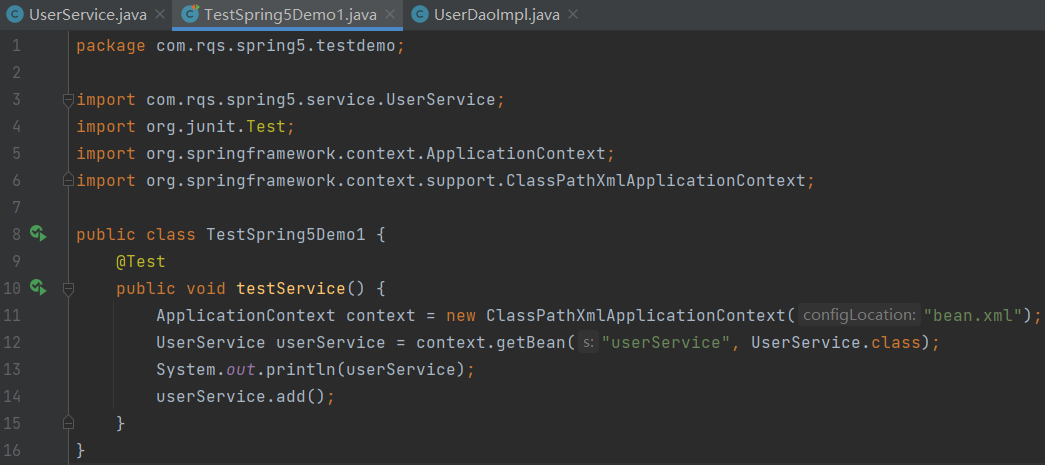
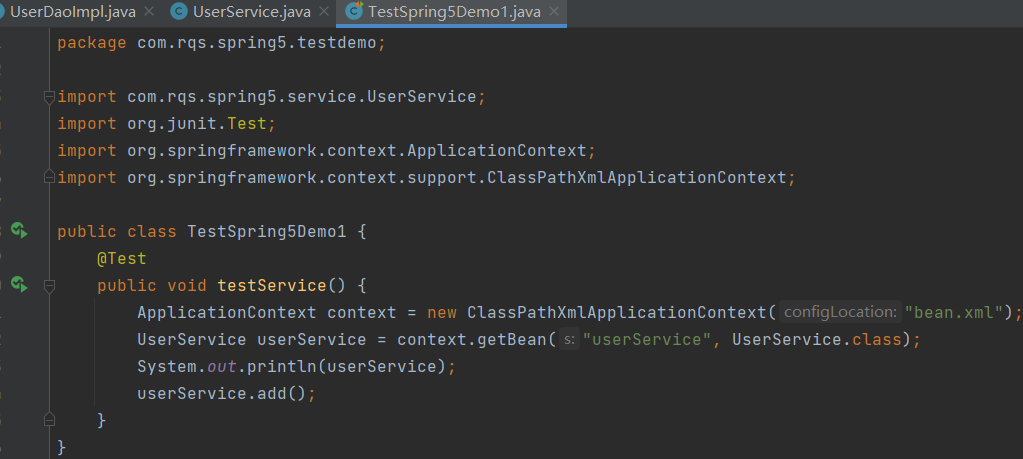
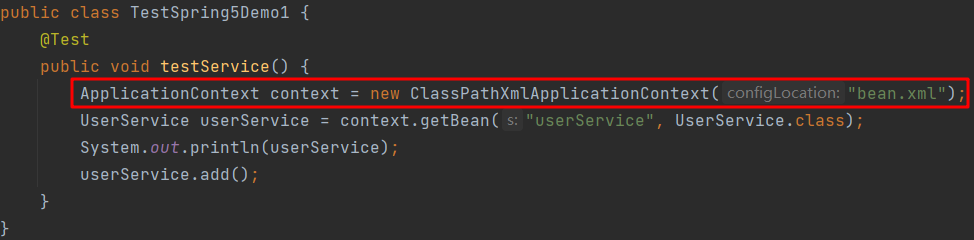
测试方法:
package com.rqs.spring5.testdemo;

import com.rqs.spring5.service.UserService;
import org.junit.Test;
import org.springframework.context.ApplicationContext;
import org.springframework.context.support.ClassPathXmlApplicationContext;

public class TestSpring5Demo1 {
    @Test
    public void testService() {
        ApplicationContext context = new ClassPathXmlApplicationContext("bean.xml");
        UserService userService = context.getBean("userService", UserService.class);
        System.out.println(userService);
        userService.add();
    }
}
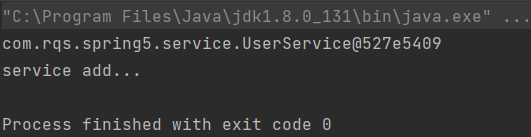
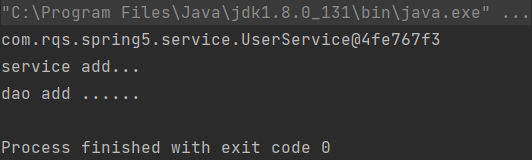
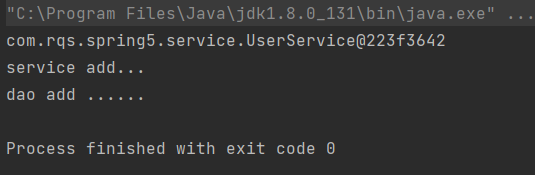
测试结果:
3.1.执行流程介绍
-
加载配置文件
-
配置文件中开启了组件扫描
-
通过配置文件中的context标签中的base-package属性,得知需要扫描的位置,扫描包中的所有类
-
如果类中有相关注解,则根据注解创建对象
-
创建对象之后便可以进行后续操作,比如输出对象或者调用其方法
4.开启组件扫描配置的细节问题
给两个示例,可以看懂就行
<?xml version="1.0" encoding="UTF-8"?>
<beans xmlns="http://www.springframework.org/schema/beans"
      xmlns:xsi="http://www.w3.org/2001/XMLSchema-instance"
      xmlns:context="http://www.springframework.org/schema/context"
      xsi:schemaLocation="http://www.springframework.org/schema/beans http://www.springframework.org/schema/beans/spring-beans.xsd
                          http://www.springframework.org/schema/context http://www.springframework.org/schema/context/spring-context.xsd">
   <!--开启组件扫描
       1.如果扫描多个包,多个包使用逗号隔开
       2.扫描包上层目录
   -->
   <context:component-scan base-package="com.rqs"></context:component-scan>

   <!--示例 1
   use-default-filters="false" 表示现在不使用默认 filter,不会扫描包中的所有类,需要自己来配置 filter
   而context:include-filter ,就可以设置扫描哪些内容

   示例1作用:【到了com.rqs之后,并不是扫描所有的类,只扫描带了“Controller”注解的类,其他类型的不会扫描】

   -->
   <context:component-scan base-package="com.rqs" use-default-filters="false">
   <context:include-filter type="annotation"
                           expression="org.springframework.stereotype.Controller"/>
   </context:component-scan>

   <!--示例 2
   下面配置扫描包所有内容
   context:exclude-filter: 设置哪些内容不进行扫描,与上面include-filter的作用相反
   -->
   <context:component-scan base-package="com.rqs">
   <context:exclude-filter type="annotation"
                           expression="org.springframework.stereotype.Controller"/>
   </context:component-scan>

</beans>
5.基于注解方式实现属性注入
演示在service中注入dao对象
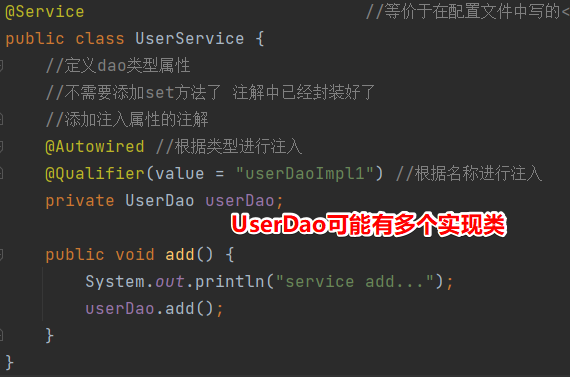
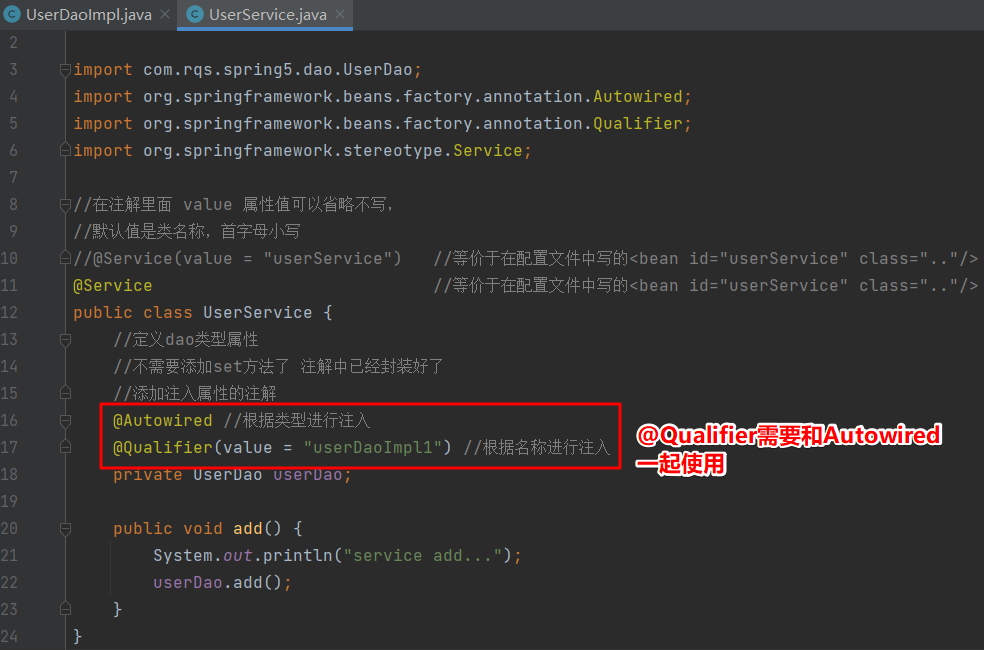
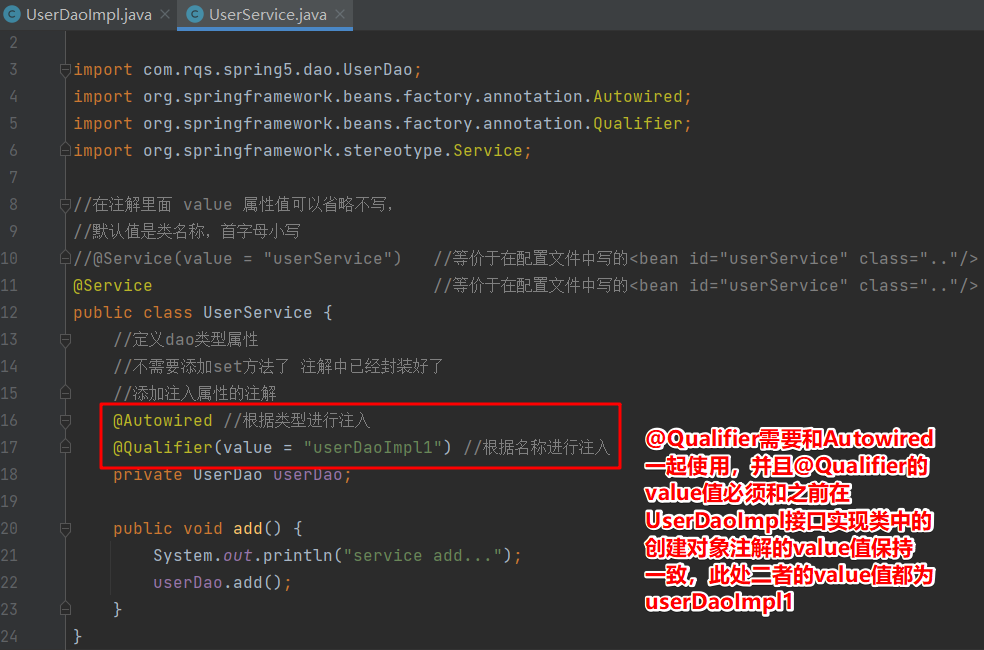
-
@Autowired:根据属性类型进行自动装配
第一步 把 service 和 dao 对象创建,在 service 和 dao 类添加创建对象注解(见下图中的①②)
第二步 在 service 注入 dao 对象。在 service 类中定义 dao 类型属性(见下图③),在属性上面使用注解(见下图④)
UserService类:
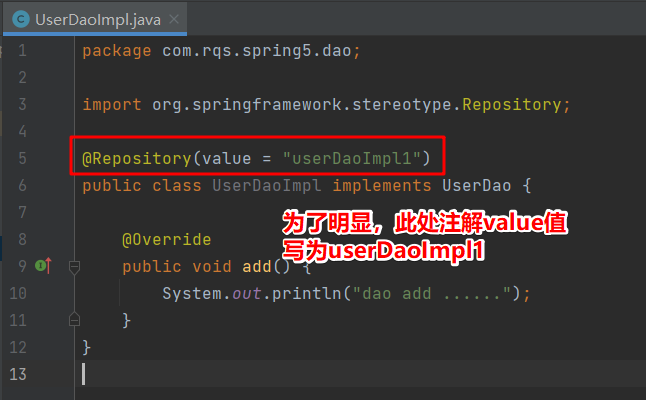
UserDaoImpl类:

执行测试类:
测试结果:
2. @Qualifier:根据名称进行注入
第一步 把 service 和 dao 对象创建,在 service 和 dao 类添加创建对象注解
第二步 在 service 注入 dao 对象。在 service 类中定义 dao 类型属性,在属性上面使用注解
注意这个@Qualifier 注解的使用,需要和@Autowired 一起使用。备注:如果只根据类型来进行注入,一个接口中可能会存在多个实现类,那么根据类型来注入就不知道需要向哪个实现类中注入,所以可以根据名称来确定是向哪一个实现类中注入
测试方法:
测试结果:
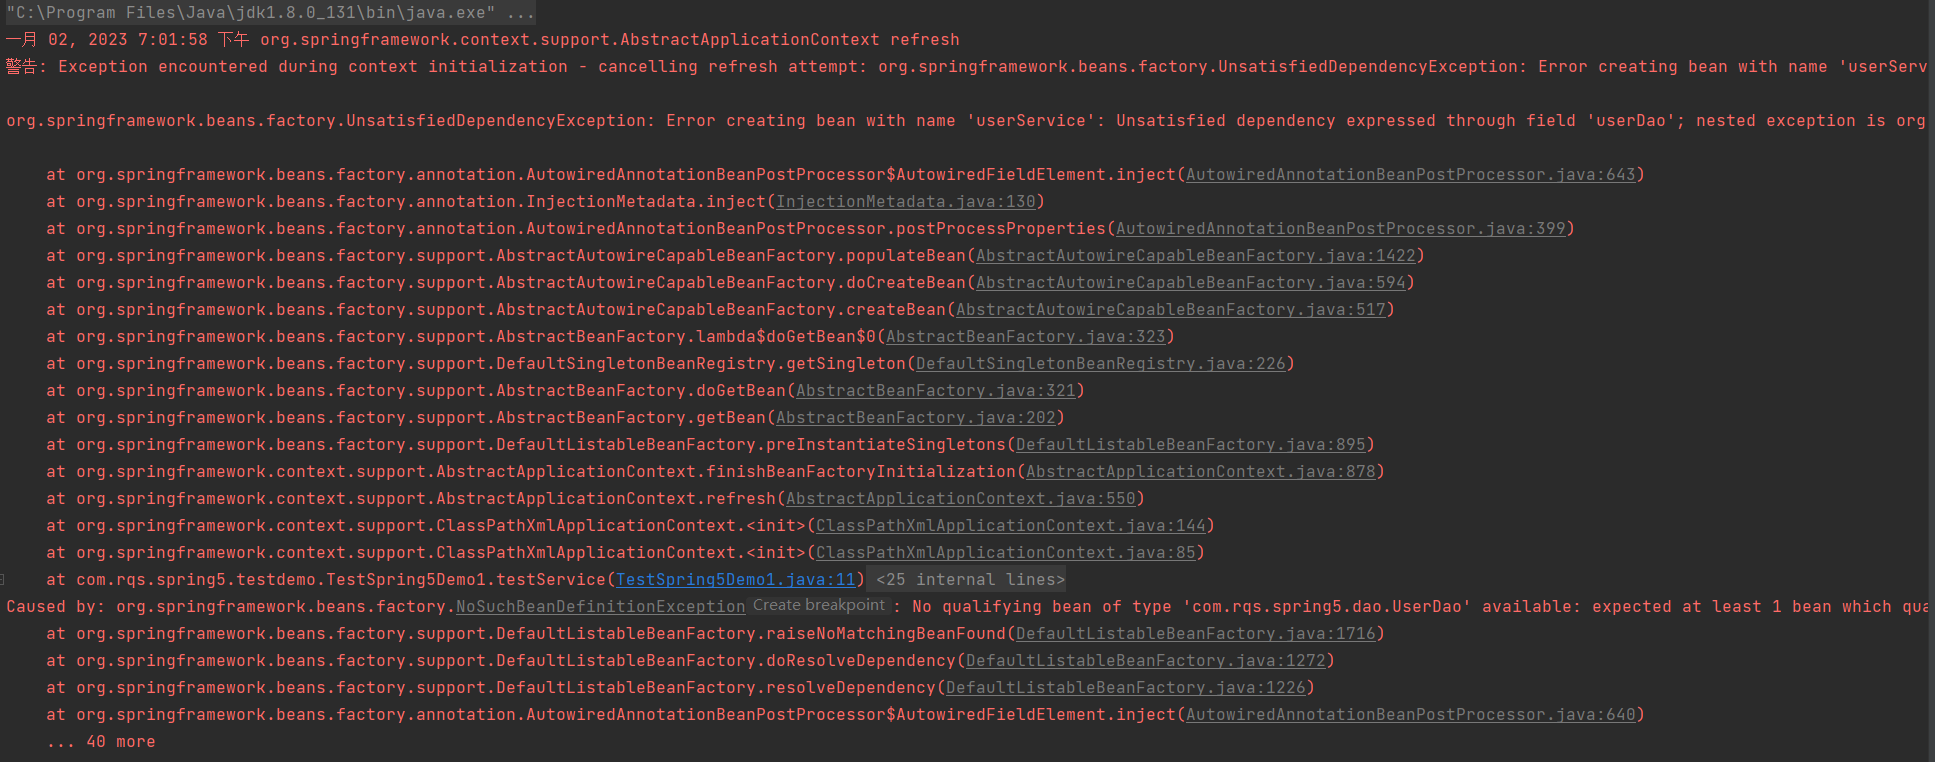
另外,如果@Qualifier的value值和之前在UserDaoImpl接口实现类中的创建对象注解的value值不一致,就会导致测试结果报错,报错如下所示
-
@Resource:可以根据类型注入,可以根据名称注入
如下图所示,如果是类似@Autowired的写法,只是把@Autowired换成@Resource,则是根据类型进行注入。
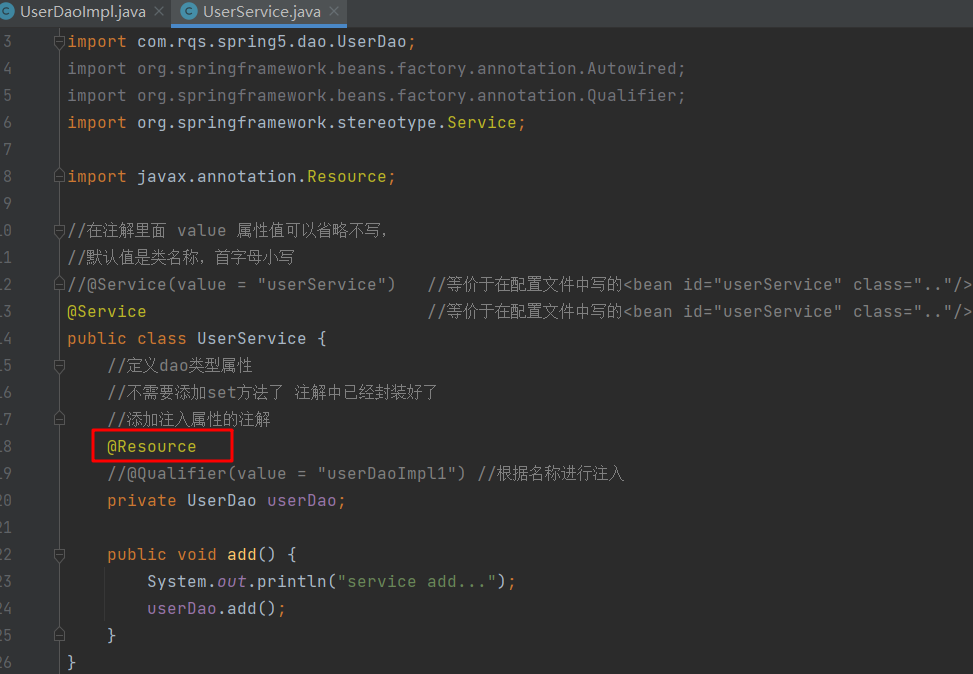
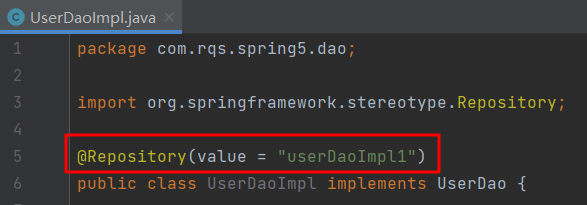
如下图所示,如果@Resource的属性值name(注意是name,不是value)写入了UserDaoImpl接口实现类中创建对象注解@Repository的value值“UserDaoImpl1”,则是根据名称进行注入。
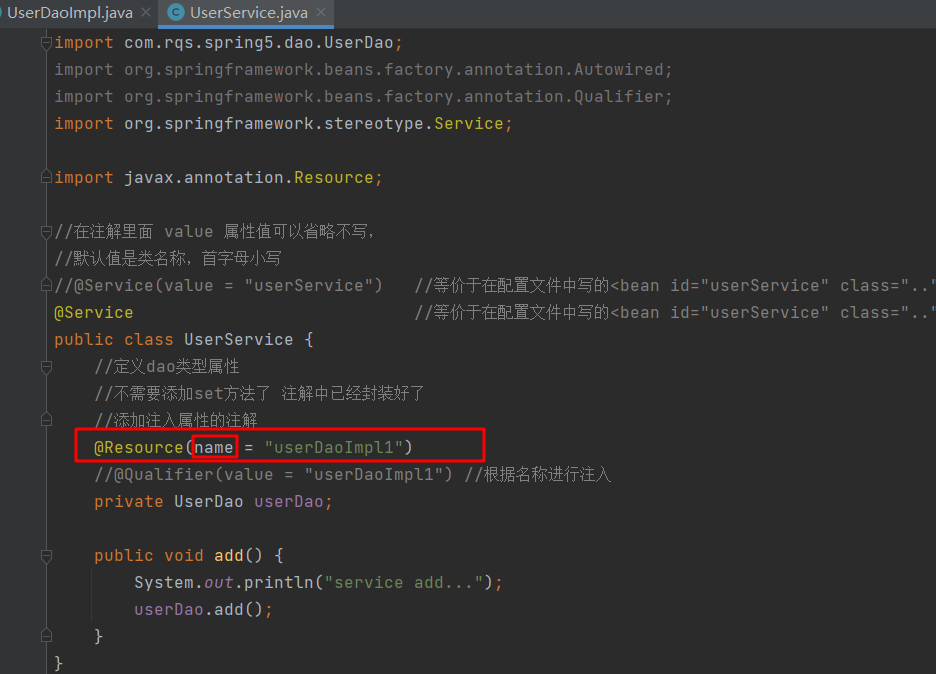
备注:需要注意,@Resource注解是javax拓展包中的注解
,而之前的是Spring框架中的注解


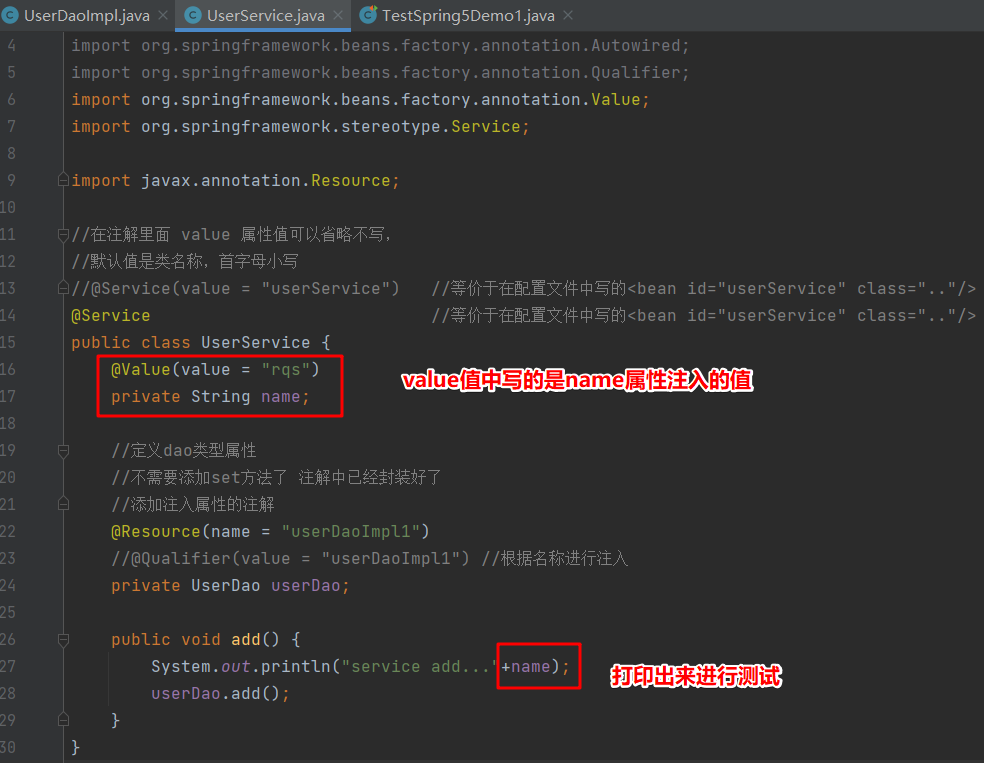
- @Value:注入普通类型属性
上面的三个注解都是注入对象类型的属性,而@Value是注入普通类型属性
例如,在UserService中定义一个普通属性并打印进行是否注入的测试
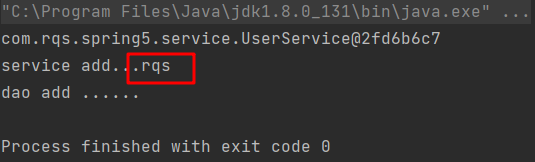
测试发现可以注入:
6.完全注解开发
纯注解开发,连配置文件都去掉
第一步:创建配置类,替代xml配置文件。
第二步:在配置类中加上@Configuration注解,再加上开启组件扫描的注解@ComponentScan,为其添加basePackages属性,属性在大括号中写入包的路径,并用引号引起来。
SpringConfig类:
package com.rqs.spring5.config;

import org.springframework.context.annotation.ComponentScan;
import org.springframework.context.annotation.Configuration;

@Configuration//作为配置类,替代xml配置文件
@ComponentScan(basePackages ={"com.rqs"} )//等价于xml配置文件中的<context:component-scan base-package="com.rqs"></context:component-scan>
public class SpringConfig {

}
第三步:测试类的写法不能依照下图所示来写了,需要加载配置类,而不是配置文件。加载配置类时用的是AnnotationConfigApplicationContext(配置类.class)这个对象。
测试类:
package com.rqs.spring5.testdemo;

import com.rqs.spring5.config.SpringConfig;
import com.rqs.spring5.service.UserService;
import org.junit.Test;
import org.springframework.context.ApplicationContext;
import org.springframework.context.annotation.AnnotationConfigApplicationContext;
import org.springframework.context.support.ClassPathXmlApplicationContext;

public class TestSpring5Demo1 {
    @Test
    public void testService() {
        ApplicationContext context = new AnnotationConfigApplicationContext(SpringConfig.class);
        UserService userService = context.getBean("userService", UserService.class);
        System.out.println(userService);
        userService.add();
    }
}


 1059
1059


 被折叠的 条评论
为什么被折叠?
被折叠的 条评论
为什么被折叠?
 到【灌水乐园】发言


