


0. 设备环境
ubuntu–20.10
GPU–3080
cuda–11.0
torch–1.7.0
mmcv–1.3.8
mmdetection–2.11.0
所有的git的项目,都可以用 GitHub Proxy 代理加速 (ghproxy.com) 转链,尤其是swin transformer的权重文件,又大下载的又慢,转完链后就飞快了。
1. 创建环境
conda create -n swin python=3.7
conda activate swin
2. 安装pytorch(利用国内源)
open-mmlab/mmcv: OpenMMLab Computer Vision Foundation (github.com)
在上边的网址中看好要装那个pytorch版本,例如我是cuda11.0,就只支持pytorch1.7,所以我就去安装pytorch1.7。只需要去下边网址找到对应的把下边-c前边给替换掉就行了。
pytorch所有版本安装网址:Previous PyTorch Versions | PyTorch
conda install pytorch==1.10.0 torchvision torchaudio cudatoolkit=11.3 -c https://mirrors.tuna.tsinghua.edu.cn/anaconda/cloud/pytorch/linux-64/
校验是否安装成功:
import torch
print(torch.cuda.is_available())
#cuda是否可用;
print(torch.__version__)
# 返回 torch 版本
print(torch.backends.cudnn.version())
# 返回 cudnn 版本
print(torch.version.cuda)
# 返回 cuda 版本
print(torch.cuda.device_count())
# 返回 gpu 数量;
print(torch.cuda.get_device_name(0))
# 返回 gpu 名字,设备索引默认从0开始;
print(torch.cuda.current_device())
# 返回当前设备索引
print(torch.rand(3,3).cuda())

device1 = torch.device("cuda:1")
data = torch.randn(1, 3, 224, 224)
data = data.to(device1)
model = models.vgg16()
model=model.to(device1)
res = model(data)
print(res)
3. 安装其他依赖包
用源非常快
pip install cython matplotlib opencv-python termcolor==1.1.0 yacs==0.1.8 -i https://pypi.mirrors.ustc.edu.cn/simple
4. 安装mmcv和Swin-Transformer-Object-Detection
mmcv要安装指定版本,不要装最新版!!!【2022/4/13记载】
# 安装mmcv
pip install mmcv-full==1.3.17 -f https://download.openmmlab.com/mmcv/dist/cu113/torch1.10.0/index.html

# 安装SwinTransformer
git clone https://github.com/SwinTransformer/Swin-Transformer-Object-Detection.git
pip install -r requirements/build.txt
python setup.py develop
5. 安装apex
下载地址:https://github.com/NVIDIA/apex
git clone https://github.com/NVIDIA/apex.git
cd apex
# pip install -v --disable-pip-version-check --no-cache-dir --global-option="--cpp_ext" --global-option="--cuda_ext" ./			# 我用这个安装报错,不过网上大部分是这个
python setup.py develop		# 用这个安装就可以
提醒Successfully installed apex-0.1就是安装成功了。
检验是否安装成功:导入不报错就成功
from apex import amp
6. 下载权重:
将要下载的权重链接复制到 GitHub Proxy 代理加速 (ghproxy.com) 中,利用新网址加速下载。
权重下载网址:https://github.com/SwinTransformer/Swin-Transformer-Object-Detection
所用demo权重:https://github.com/SwinTransformer/storage/releases/download/v1.0.2/mask_rcnn_swin_tiny_patch4_window7.pth
在Swin-Transformer-Object-Detection/目录下新建一个checkpoints,将权重文件下载到里边。
mkdir checkpoints
cd checkpoints
wget https://github.com/SwinTransformer/storage/releases/download/v1.0.2/mask_rcnn_swin_tiny_patch4_window7.pth
7. 运行demo
回到Swin-Transformer-Object-Detection/目录下
python demo/image_demo.py demo/demo.jpg configs/swin/cascade_mask_rcnn_swin_base_patch4_window7_mstrain_480-800_giou_4conv1f_adamw_3x_coco.py checkpoints/cascade_mask_rcnn_swin_base_patch4_window7.pth
8. 训练swin
单gpu训练
python tools/train.py configs/swin/mask_rcnn_swin_tiny_patch4_window7_mstrain_480-800_adamw_3x_coco.py --cfg-options model.pretrained=mask_rcnn_swin_tiny_patch4_window7.pth
多gpu训练
./tools/dist_train.sh configs/LogDet/swinb_3x_bigsize_anchor_bs2x8.py 8

./tools/dist_test.sh configs/LogDet/swinb_3x_bigsize_anchor_bs2x8.py work_dirs/LogDet/swinb_3x_bigsize_anchor_bs2x8/latest.pth 8 --format-only --options "jsonfile_prefix=work_dirs/LogDet/swinb_3x_bigsize_anchor_bs2x8"
9.可视化检测结果
可视化在测试集上生成的结果
python tools/test.py work_dirs/tood/train2/config.py work_dirs/tood/train2/best_bbox_mAP_epoch_13.pth --show-dir work_dirs/tood/train2/visiual/
测试集可视化每一类实例的mAP,得有真实标签才可以。
./tools/dist_test.sh work_dirs/swin_small_3x/train9/config.py work_dirs/swin_small_3x/train9/epoch_36.pth 4 --eval bbox --options "classwise=True"
10.生成json文件:
生成bbox和segm的json无结果,然后测试bbox mAP
python tools/test.py work_dirs/config.py work_dirs/best.pth --format-only --eval bbox --options "jsonfile_prefix=work_dirs/eva"
4GPU测试
./tools/dist_test.sh work_dirs/config.py work_dirs/best.pth 4 --format-only --options "jsonfile_prefix=workdir/eva"
11.绘制指标曲线
python tools/analysis_tools/analyze_logs.py plot_curve work_dirs/swin_tiny_3x/train1/20220418_182809.logplot.json --keys bbox_mAP segm_mAP
12. 杀死僵尸程序
查看端口:然后杀死kill -9 pid号
netstat -nltp

第二种方法:
sudo fuser -v /dev/nvidia*
查看每个显卡运行的程序后,
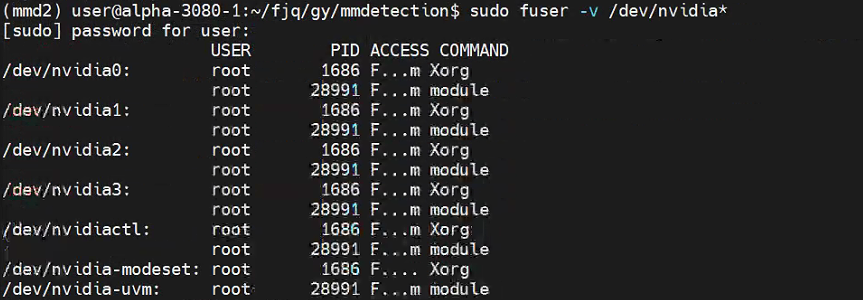
kill -9 COMMAND是python的程序,图中这两个别kill


 994
994


 被折叠的 条评论
为什么被折叠?
被折叠的 条评论
为什么被折叠?
 到【灌水乐园】发言


