


 本文详述了一次使用Docker搭建环境,通过Python实现V*N服务器及客户端的实验过程。实验涵盖了证书生成、Docker配置、多用户支持等功能。服务器端程序实现了TUN接口创建、加密隧道、用户认证;客户端则包含登录认证和数据传输。通过ping和telnet测试验证了系统的正确性。
本文为 SEED Labs 2.0 - Virtual Private Network (V*N) Lab 的实验记录。
受到 CSDN 编辑器限制,部分内容无法更好展示。可以移步我的博客查看。同时,我很少上 CSDN,因此只会解答博客评论区的内容。
0. 实验目标
本实验要求完成 V*N 的实现。其应当支持 TUN 建立、隧道加密、服务器认证、客户端登录、多用户等功能。
本实验的实验手册使用多虚拟机与 C 语言完成,而我们希望直接使用 docker 和 Python。我们一步到位完成了所有程序的编写,下面描述我们的具体步骤。
1. 生成证书
创建 CA
$ mkdir demoCA
$ cd demoCA
$ mkdir certs crl newcerts
$ touch index.txt serial
$ echo 1000 > serial
$ cd ..
$ cp /usr/lib/ssl/openssl.cnf myCA_openssl.cnf
$ openssl req -x509 -newkey rsa:4096 -sha256 -days 3650 -keyout ca.key -out ca.crt -subj "/CN=www.modelCA.com/O=Model CA LTD./C=US/ST=New York/L=Syracuse" -passout pass:dees
创建并签发服务器使用的证书。
$ openssl req -newkey rsa:2048 -sha256 -keyout vpn.key -out vpn.csr -subj "/CN=vpnlabserver.com/O=Model CA LTD./C=US/ST=New York/L=Syracuse" -passout pass:dees
$ openssl ca -config myCA_openssl.cnf -policy policy_anything -md sha256 -days 3650 -in vpn.csr -out vpn.crt -batch -cert ca.crt -keyfile ca.key
v*n.crt 和 v*n.key,放入 server-certs 文件夹中。
将 ca.crt 放入 client-certs 文件夹中,并建立软链接:
$ openssl x509 -in ca.crt -noout -subject_hash
eaa14a05
$ ln -s ca.crt eaa14a05.0
2. 设置 Docker
编写 docker-compose.yml
version: "3"

services:
    VPN_Client1:
        image: handsonsecurity/seed-ubuntu:large
        container_name: client-10.0.2.5
        tty: true
        cap_add:
                - ALL
        extra_hosts:
                - "vpnlabserver.com:10.0.2.8"
        devices:
                - "/dev/net/tun:/dev/net/tun"
        volumes:
                - ./volumes:/volumes
        networks:
            net-10.0.2.0:
                ipv4_address: 10.0.2.5
        command: bash -c "tail -f /dev/null"

    VPN_Client2:
        image: handsonsecurity/seed-ubuntu:large
        container_name: client-10.0.2.6
        tty: true
        cap_add:
                - ALL
        extra_hosts:
                - "vpnlabserver.com:10.0.2.8"
        devices:
                - "/dev/net/tun:/dev/net/tun"
        volumes:
                - ./volumes:/volumes
        networks:
            net-10.0.2.0:
                ipv4_address: 10.0.2.6
        command: bash -c "tail -f /dev/null"

    VPN_Client3:
        image: handsonsecurity/seed-ubuntu:large
        container_name: client-10.0.2.7
        tty: true
        cap_add:
                - ALL
        extra_hosts:
                - "vpnlabserver.com:10.0.2.8"
        devices:
                - "/dev/net/tun:/dev/net/tun"
        volumes:
                - ./volumes:/volumes
        networks:
            net-10.0.2.0:
                ipv4_address: 10.0.2.7
        command: bash -c "tail -f /dev/null"

    Host_V:
        image: handsonsecurity/seed-ubuntu:large
        container_name: host-192.168.60.101
        tty: true
        cap_add:
                - ALL
        volumes:
                - ./volumes:/volumes
        networks:
            net-192.168.60.0:
                ipv4_address: 192.168.60.101
        command: bash -c "ip route del default  &&
                          ip route add default via 192.168.60.1  &&
                          /etc/init.d/openbsd-inetd start &&
                          tail -f /dev/null"

    Router:
        image: handsonsecurity/seed-ubuntu:large
        container_name: server-10.0.2.8-192.168.60.1
        tty: true
        cap_add:
                - ALL
        devices:
                - "/dev/net/tun:/dev/net/tun"
        sysctls:
                - net.ipv4.ip_forward=1
        volumes:
                - ./volumes:/volumes
        networks:
            net-10.0.2.0:
                ipv4_address: 10.0.2.8
            net-192.168.60.0:
                ipv4_address: 192.168.60.1
        command: bash -c "ip route del default  &&
                          ip route add default via 10.0.2.1 &&
                          tail -f /dev/null"

    MITM:
        image: handsonsecurity/seed-ubuntu:large
        container_name: mitm-10.0.2.9-192.168.60.2
        tty: true
        cap_add:
                - ALL
        devices:
                - "/dev/net/tun:/dev/net/tun"
        sysctls:
                - net.ipv4.ip_forward=1
        volumes:
                - ./volumes:/volumes
        networks:
            net-10.0.2.0:
                ipv4_address: 10.0.2.9
            net-192.168.60.0:
                ipv4_address: 192.168.60.2
        command: bash -c "ip route del default  &&
                          ip route add default via 10.0.2.1 &&
                          tail -f /dev/null"

networks:
    net-192.168.60.0:
        name: net-192.168.60.0
        ipam:
            config:
                - subnet: 192.168.60.0/24
                  gateway: 192.168.60.100

    net-10.0.2.0:
        name: net-10.0.2.0
        ipam:
            config:
                - subnet: 10.0.2.0/24
                  gateway: 10.0.2.1
其中:
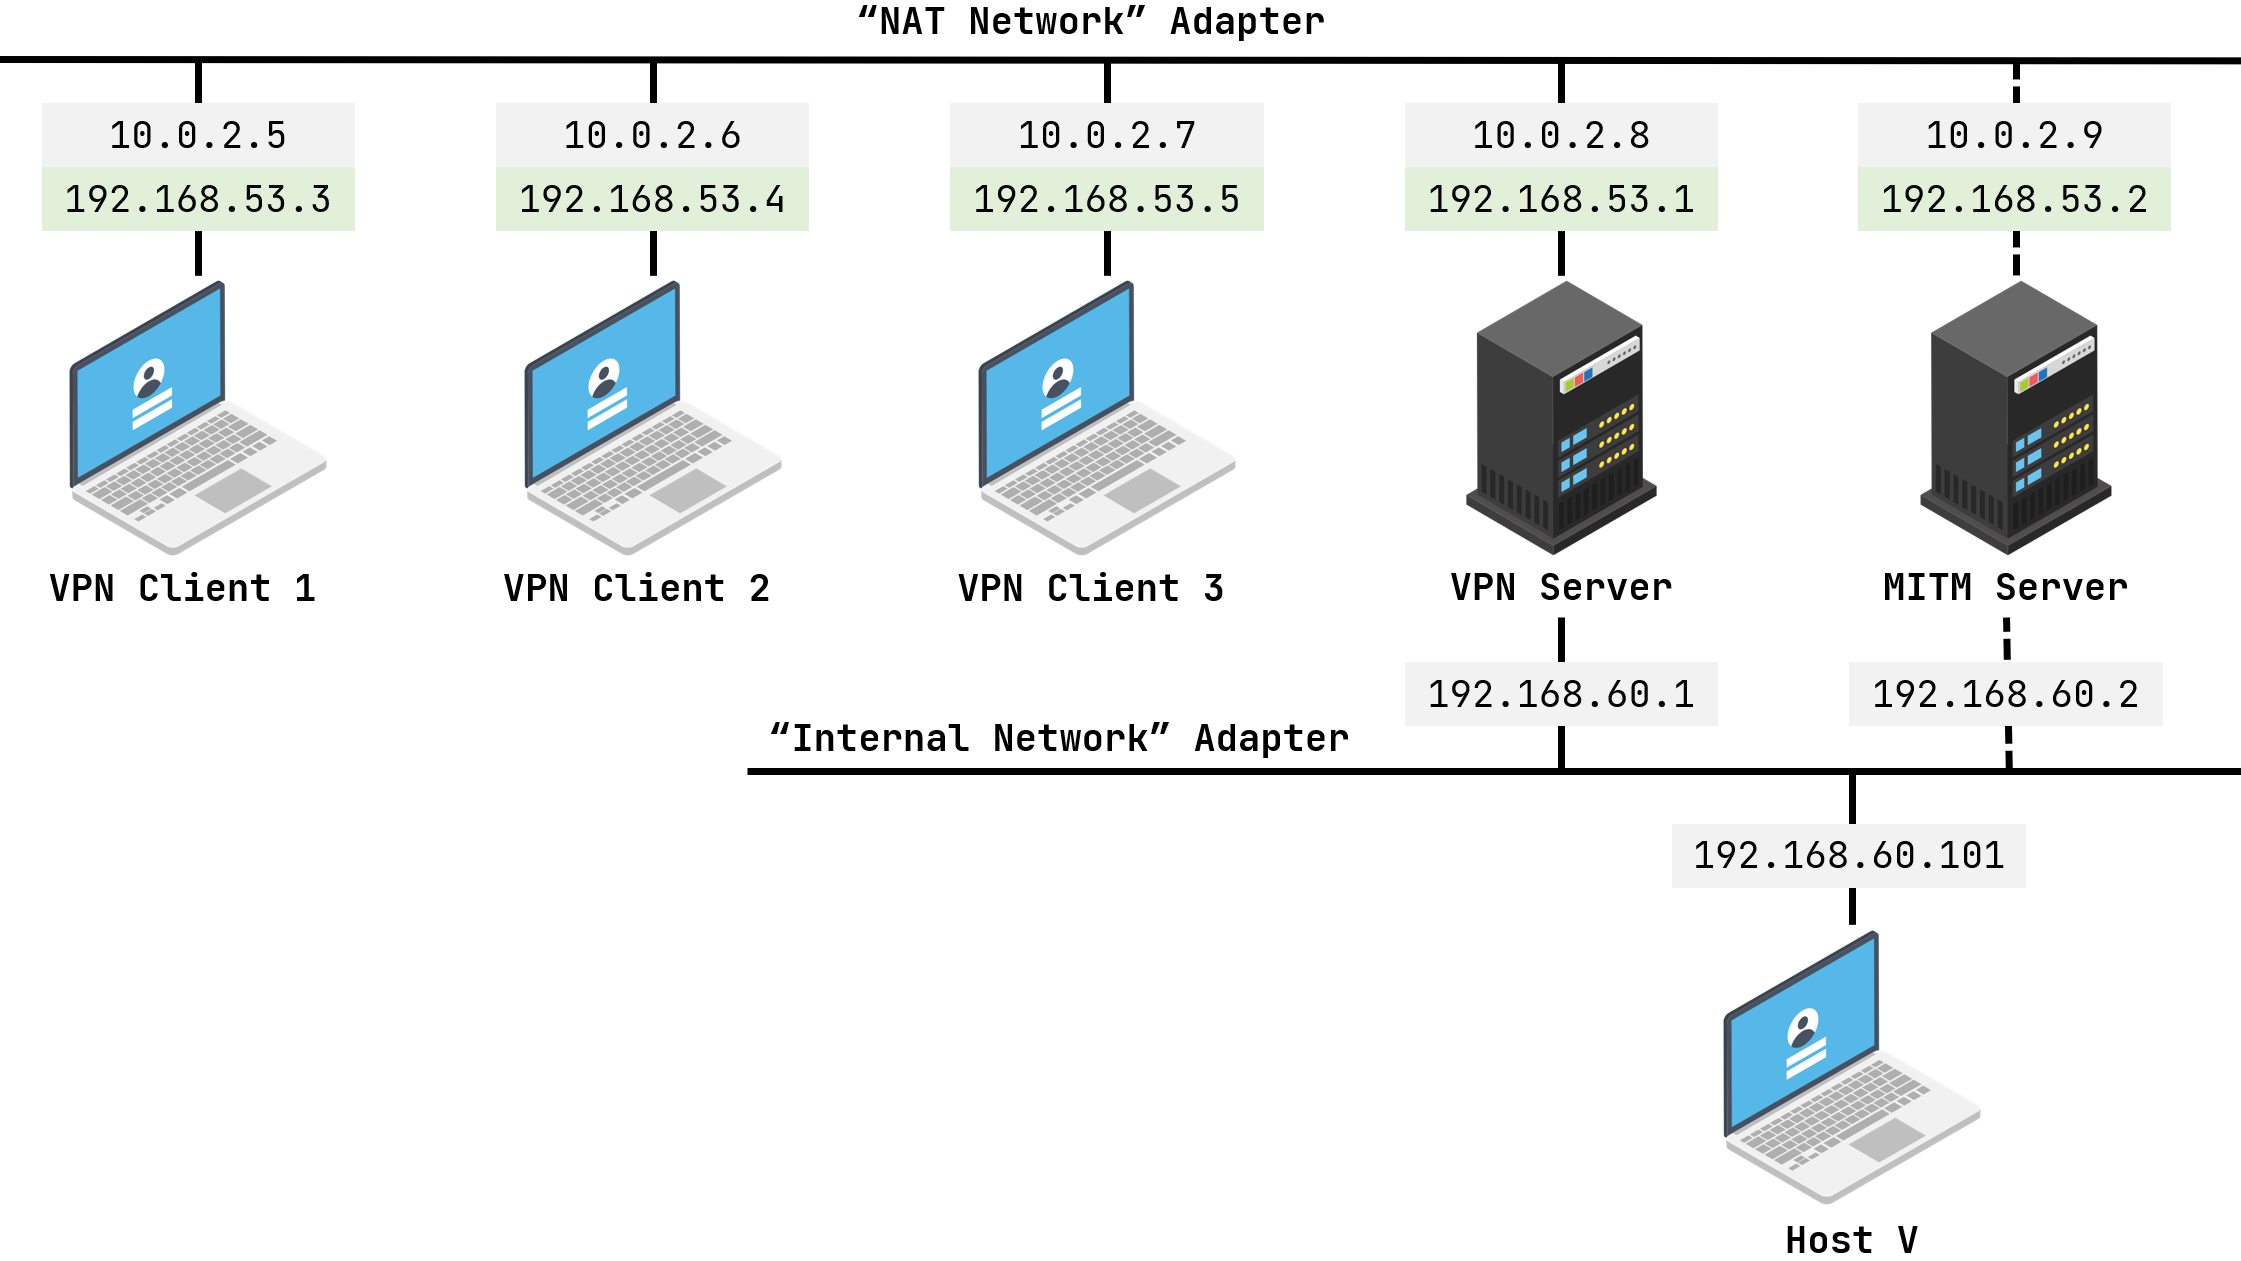
V*N_Client1、V*N_Client2、V*N_Client3为 3 个客户端Host_V为一台主机Router为 V*N 服务器MITM为中间人攻击使用的服务器
它们的 IP 和连接关系如下图所示
设置完成后,我们启动 docker
$ dcbuild
$ dcup
3. 编写程序
编写 V*N 服务器和中间人攻击服务器使用的 v*nserver.py
#!/usr/bin/env python3
import fcntl
import struct
import os
import ssl
import spwd
import crypt
from scapy.all import *

TUNSETIFF = 0x400454ca  # ioctl request code
IFF_TUN = 0x0001  # create a tunnel
IFF_TAP = 0x0002  # create a tap device
IFF_NO_PI = 0x1000  # don't pass on packet info

'''
Create the tun interface
'''
tun = os.open("/dev/net/tun", os.O_RDWR)  # open the tun device
# create the control block
ifr = struct.pack('16sH', b'tun%d', IFF_TUN | IFF_NO_PI)
ifname_bytes = fcntl.ioctl(tun, TUNSETIFF, ifr)  # create the interface

'''
Get the interface name
'''
ifname = ifname_bytes.decode(
    'UTF-8')[:16].strip("\x00")  # get the interface name
print("Interface Name: {}".format(ifname))  # print the interface name

'''
Set route
'''
os.system("ip addr add 192.168.53.1/24 dev {}".format(ifname))  # set the route
os.system("ip link set dev {} up".format(ifname))  # set the interface up

'''
Get certs
'''
SERVER_CERT = "/volumes/crt/server-certs/vpn.crt"  # server certificate
SERVER_PRIVATE = "/volumes/crt/server-certs/vpn.key"  # server private key

'''
Set SSL
'''
context_srv = ssl.SSLContext(ssl.PROTOCOL_TLS_SERVER)  # create the SSL context
context_srv.num_tickets = 0  # disable session tickets
# load the server certificate
context_srv.load_cert_chain(SERVER_CERT, SERVER_PRIVATE)

'''
Set sock
'''
sock = socket.socket(socket.AF_INET, socket.SOCK_STREAM,
                     0)  # create the socket
sock.bind(("0.0.0.0", 443))  # bind the socket to the port
sock.listen(5)  # listen for connections
print(">>> Preparation done.")

'''
Initialization
'''
inputs = [sock, tun]  # create the input list
con_dict = {}  # create the connection dictionary
ip_dict = {}  # create the IP dictionary

'''
Main loop
'''
while True:
    ready, _, _ = select.select(inputs, [], [])  # select the ready inputs

    for fd in ready:  # for each ready input
        if fd is sock:  # if the input is the socket
            '''
            Acceppt a new connection and set up the connection
            '''
            con, addr = sock.accept()  # accept the connection
            IPa, _ = addr  # get the IP address
            # wrap the connection with SSL
            con = context_srv.wrap_socket(con, server_side=True)
            con.setblocking(0)  # set the socket to non-blocking

            print(">>> {} new connection".format(IPa))

            '''
            Receive the username and password.
            If they are all correct, add the connection to the listening list.
            '''
            usrname = b''  # create the username
            passwd = b''  # create the password

            re_client_auth = IP()  # create the packet to reply the client authentication
            re_client_auth.src = '192.168.53.1'  # set the source IP address

            while (usrname == b'') or (passwd == b''):  # while some data is not received
                # select the connection inputs
                ready, _, _ = select.select([con], [], [])
                for fd in ready:  # for each ready input
                    data = fd.recv(2048)  # receive the data
                    pkt = IP(data)  # create the packet
                    re_client_auth.dst = pkt.src  # set the destination IP address
                    if usrname == b'':  # if the username is not received
                        usrname = pkt[Raw].load  # get the username
                    else:  # if the username is received but the password is not received
                        passwd = pkt[Raw].load  # get the password

            try:
                # get the password
                pw1 = spwd.getspnam(usrname.decode()).sp_pwd
                # get the encrypted password
                pw2 = crypt.crypt(passwd.decode(), pw1)
            except KeyError:  # if the username is not found
                # message to the client
                con.sendall(bytes(re_client_auth/b'0'))
                con.close()  # close the connection
                print(">>> {} login failed - WRONG USERNAME".format(IPa))
            else:  # if the username is found
                if pw1 != pw2:  # if the password is not correct
                    # message to the client
                    con.sendall(bytes(re_client_auth/b'0'))
                    con.close()  # close the connection
                    print(">>> {} login failed - WRONG PASSWORD".format(IPa))
                else:  # if the password is correct
                    # message to the client
                    con.sendall(bytes(re_client_auth/b'1'))
                    inputs.append(con)  # add the connection to the input list
                    print(">>> {} login succeed".format(IPa))

        elif fd is tun:  # if the input is the tun interface
            packet = os.read(tun, 2048)  # read the packet
            pkt = IP(packet)  # create the packet
            print("=== TUN:\t{}\t-->\t{}\t===".format(pkt.src, pkt.dst))
            # send the packet to the destination
            con_dict[pkt.dst].sendall(packet)
        else:  # if the input is the connection
            data = fd.recv(2048)  # receive the data
            if data != b'':  # if the data is not empty
                pkt = IP(data)  # create the packet
                print("=== SOCKET:\t{}\t-->\t{}\t===".format(pkt.src, pkt.dst))
                if pkt.src not in con_dict:  # if the source IP is not in the dictionary
                    # add the connection to the dictionary
                    con_dict[pkt.src] = fd
                    # add the IP address to the IP dictionary
                    ip_dict[fd] = pkt.src
                # write the packet to the tun interface
                os.write(tun, bytes(pkt))
            else:  # if the data is empty
                print(">>> {} connection closed.".format(ip_dict[fd]))
                inputs.remove(fd)  # remove the connection from the input list
                # remove the IP from the connection dictionary
                del con_dict[ip_dict[fd]]
                del ip_dict[fd]  # remove the connection from the IP dictionary
                fd.close()  # close the connection
对于该程序,需要注意的是,我们使用了 TCP 而不是 UDP,所以最一开始建立的 sock 只会被用来和新客户端建立连接,而通信使用的是新建立的连接。
我们通过类似 ip route 的方式实现了文件描述符的选择,但由于在本案中连接数较少,我们没有使用多进程与管道——也就是说,在一条消息杯转发前,系统是阻塞的。经过测试,在 3 个客户端时,所有客户端都能正常通信,几乎不会有延迟。如果后期需要更多的客户端,我们再考虑增加多进程。
编写 V*N_Client1 使用的 v*nclient1.py
#!/usr/bin/env python3

import fcntl
import struct
import os
import socket
import ssl
import getpass
from scapy.all import *

TUNSETIFF = 0x400454ca # ioctl request code
IFF_TUN = 0x0001 # create a tunnel
IFF_TAP = 0x0002 # create a tap device
IFF_NO_PI = 0x1000 # don't pass on packet info

hostname = 'vpnlabserver.com' # hostname of the server
port = 443 # port of the server
cadir = '/volumes/crt/client-certs' # directory of the client certificates

'''
Set up the TLS context
'''
context = ssl.SSLContext(ssl.PROTOCOL_TLS_CLIENT) # create the SSL context

context.load_verify_locations(capath=cadir) # load the client certificates
context.verify_mode = ssl.CERT_REQUIRED # verify the client certificates
context.check_hostname = True # check the hostname of the server

'''
Create TCP connection
'''
sock = socket.socket(socket.AF_INET, socket.SOCK_STREAM) # create the socket
sock.connect((hostname, port)) # connect to the server

'''
Add the TLS
'''
try:
    ssock = context.wrap_socket( # wrap the socket with TLS
        sock, server_hostname=hostname, do_handshake_on_connect=False)
    ssock.do_handshake() # do the TLS handshake
except: # if the TLS handshake fails
    print(">>> Certificate failed") # print error message
    ssock.shutdown(socket.SHUT_RDWR) # shutdown the socket
    ssock.close() # close the socket
    exit() # exit the program
print("Server hostname: {}".format(ssock.server_hostname)) # print the server hostname

'''
Create the tun interface
'''
tun = os.open("/dev/net/tun", os.O_RDWR) # open the tun device
ifr = struct.pack('16sH', b'tun%d', IFF_TUN | IFF_NO_PI) # create the control block
ifname_bytes = fcntl.ioctl(tun, TUNSETIFF, ifr) # create the interface

'''
Get the interface name
'''
ifname = ifname_bytes.decode('UTF-8')[:16].strip("\x00") # get the interface name
print("Interface Name: {}".format(ifname)) # print the interface name

os.system("ip addr add 192.168.53.3/24 dev {}".format(ifname)) # set the route
os.system("ip link set dev {} up".format(ifname)) # set the interface up
os.system("ip route add 192.168.60.0/24 dev {} via 192.168.53.3".format(ifname)) # set the route

print(">>> Preparation done.")

'''
Login
'''
usrname = input("Input username: ") # input the username
passwd = getpass.getpass("Input password: ") # input the password
client_auth = IP()
client_auth.src = '192.168.53.3' # set the source IP address
client_auth.dst = '192.168.53.1' # set the destination IP address
ssock.send(bytes(client_auth/bytes(usrname.encode()))) # send the username
ssock.send(bytes(client_auth/bytes(passwd.encode()))) # send the password

ready, _, _ = select.select([ssock, tun], [], []) # wait for the server to send
for fd in ready:
    data = ssock.recv(2048) # receive the data
    pkt = IP(data) # create the packet
    client_auth_result = pkt[Raw].load # get the result
    if client_auth_result == b'0': # if the result is 0
        print(">>> Login failed") # print error message
        print(">>> Server closed")
        ssock.shutdown(socket.SHUT_RDWR) # shutdown the socket
        ssock.close() # close the socket
        exit() # exit the program
print(">>> Login succeed")

'''
Main loop
'''
while True:
    ready, _, _ = select.select([ssock, tun], [], []) # wait for the server to send

    for fd in ready: # for each file descriptor
        if fd is tun: # if the file descriptor is the tun device
            packet = os.read(tun, 2048) # read the packet
            pkt = IP(packet) # create the packet
            print("=== TUN:\t{}\t-->\t{}\t===".format(pkt.src, pkt.dst))
            ssock.send(packet) # send the packet
        if fd is ssock: # if the file descriptor is the socket
            data = ssock.recv(2048) # receive the data
            if data != b'': # if the data is not empty
                # print (">>> Receive {} from {}".format(data, fd.getpeername()))
                pkt = IP(data) # create the packet
                print("=== SOCKET:\t{}\t-->\t{}\t===".format(pkt.src, pkt.dst))
                os.write(tun, bytes(pkt)) # send the packet to the tun device
            else: # if the data is empty
                print(">>> Server closed")
                ssock.shutdown(socket.SHUT_RDWR) # shutdown the socket
                ssock.close() # close the socket
                exit() # exit the program
v*nserver2.py、v*nserver3.py 同理,只需要修改对应的 IP 地址即可。
以上程序实现了 **TUN 建立、隧道加密、服务器认证、客户端登录、多用户(无多进程)**的功能。程序的每一行都有详细的注释,在此不再赘述各个功能是如何实现的。
到目前为止,所有准备工作均已经完成,文件夹内结构如下所示:
.
├── docker-compose.yml
└── volumes
    ├── crt
    │   ├── ca.key
    │   ├── client-certs
    │   │   ├── eaa14a05.0
    │   │   └── ca.crt
    │   ├── demoCA
    │   ├── myCA_openssl.cnf
    │   ├── server-certs
    │   │   ├── vpn.crt
    │   │   └── vpn.key
    │   └── vpn.csr
    ├── vpnclient1.py
    ├── vpnclient2.py
    ├── vpnclient3.py
    └── vpnserver.py
4. 测试
相关命令几乎全是简单的 ping 和 telnet,此处不再赘述。
5. 总结
本实验较为简单。


 4214
4214

 被折叠的 条评论
为什么被折叠?
被折叠的 条评论
为什么被折叠?
 到【灌水乐园】发言


