


桥接模式
桥接模式(Bridge Pattern)也称为桥梁模式、接口(Interfce)模式或柄体(Handle and Body)模 式,是将抽象部分与它的具体实现部分分离,使它们都可以独立地变化,属于结构型模式。
原文∶Decouple an abstraction from its implementation so that the two can vary independently.
解释∶解耦抽象和实现,使得两者可以独立的变化。
桥接模式主要目的是通过组合的方式建立两个类之间的联系,而不是继承。但又类似于多重继承方 案 ,但是多重继承方案往往违背了类得单一职责原则,其复用性比较差,桥接模式是比多重继承更好的 替代方案。桥接模式的核心在于解耦抽象和实现。
注∶此处的抽象并不是指抽象类或接口这种高层概念,实现也不是继承或接口实现。抽象与实现其实指的是两种独立变化的维度。其中,抽象包含实现,因此,一个抽象类的变化可能涉及到多种维度的变化导致的。
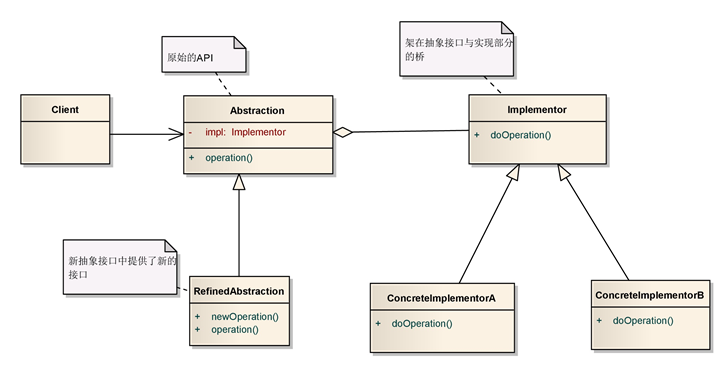
我们来看下桥接模式的通用UML类图∶
IDEA中:

角色:
- Abstraction:定义抽象接口,对外提供api;自身维护一个Implementor(桥)的引用,使用Implementor的操作来完成自身接口功能,如operation方法通过impl.doOperation()来实现;
- RefinedAbstraction:扩展Abstraction的抽象接口;
- Implementor:架在抽象接口与不同实现方式之间的桥,且自身的接口不必与Abstraction完全相同;
- ConcreteImplementorA:实现Implementor(桥)的接口,针对Implementor(桥)中的接口doOperation提供特色化的实现;
- Client:用户类。
协作:
- Client调用Abstraction提供的接口,而Abstraction将Client的调用通过Implementor来实现。
// 桥
public interface IImplementor {

    void doOperation();
}
// 具体实现
public class ConcreteImplementorA implements IImplementor {
public void doOperation() {
System.out.println("I'm ConcreteImplementor A");
}
}// 具体实现
public class ConcreteImplementorB implements IImplementor {
public void doOperation() {
System.out.println("I'm ConcreteImplementor B");
}
}// 抽象
public abstract class Abstraction {
protected IImplementor mImplementor;
public Abstraction(IImplementor implementor) {
this.mImplementor = implementor;
}
public void operation() {
this.mImplementor.doOperation();
}
}// 修正抽象
public class RefinedAbstraction extends Abstraction {
public RefinedAbstraction(IImplementor implementor) {
super(implementor);
}
@Override
public void operation() {
super.operation();
System.out.println("refined operation");
}
}public class Client {
public static void main(String[] args) {
// 来一个实现化角色
IImplementor imp = new ConcreteImplementorA();
// 来一个抽象化角色,聚合实现
Abstraction abs = new RefinedAbstraction(imp);
// 执行操作
abs.operation();
}
}public class Client {
public static void main(String[] args) {
Abstraction concreteImplementorA = new RefinedAbstraction(new ConcreteImplementorA());
Abstraction concreteImplementorB = new RefinedAbstraction(new ConcreteImplementorB());
// 执行操作
concreteImplementorA.operation();
concreteImplementorB.operation();
}
}桥接模式在业务场景中的应用
举个例子,我们平时办公的时候经常通过发邮件消息、短信消息或者系统内消息和同事进行沟通。
尤其是在走一些审批流程的时候,我们需要记录这些过程以备查。我们根据消息的类别来划分的话,可以分为邮件消息、短信消息和系统内消息。但是,根据消息的紧急程度来划分的话,可以分为普通消息、紧急消息和特急消息。显然,整个消息体统可以划分为两个维度,如下图∶

如果,我们用继承的话情况就复杂了,而且也不利于扩展。邮件信息可以是普通的 ,也可以是紧急的;短信消息可以是普通的,也可以是紧急的。下面我们用桥接模式来解决这个问题∶
首先创建一个IMessage 接口担任桥接的角色∶
public interface IMessage {

    void send(String message, String from, String to);
}
创建邮件消息实现 EmailMessage类∶
public class EmailMessage implements IMessage {
    public void send(String message, String from, String to) {
        System.out.println(from + "使用邮件消息发送" + message + "给" + to);
    }
}
创建手机短信实现 SmsMessage类∶
public class SmsMessage implements IMessage {

    public void send(String message, String from, String to) {
        System.out.println(from + "使用短信消息发送" + message + "给" + to);
    }
}
然后,再创建桥接抽象角色 AbstractMessage类∶
public abstract class AbastractMessage {
    private IMessage message;

    public AbastractMessage(IMessage message) {
        this.message = message;
    }

    void sendMessage(String message, String from, String to) {
        this.message.send(message, from, to);
    }
}
创建具体实现普通消息 NomalMessage类∶
public class NomalMessage extends AbastractMessage {
    public NomalMessage(IMessage message) {
        super(message);
    }
}
创建具体实现紧急消息UrgencyMessage类∶
public class UrgencyMessage extends AbastractMessage {
    public UrgencyMessage(IMessage message) {
        super(message);
    }

    void sendMessage(String message, String from, String to) {
        message = "【加急】" + message;
        super.sendMessage(message, from, to);
    }

    public Object watch(String messageId) {
        return null;
    }
}
编写客户端测试代码∶
public class Client {
    public static void main(String[] args) {

        AbastractMessage nomalSmsMessage = new NomalMessage(new SmsMessage());
        AbastractMessage nomalEmailMessage = new NomalMessage(new EmailMessage());

        nomalSmsMessage.sendMessage("加班申请", "某某", "Leader");
        nomalEmailMessage.sendMessage("加班申请", "某某", "Leader");


        AbastractMessage urgencySmsMessage = new UrgencyMessage(new SmsMessage());
        AbastractMessage urgencyEmailMessage = new UrgencyMessage(new EmailMessage());

        urgencySmsMessage.sendMessage("版本发布", "某某", "Leader");
        urgencyEmailMessage.sendMessage("版本发布", "某某", "Leader");
    }

}
运行结果如下∶

上面的案例中,我们采用桥接模式解耦了"消息类型"和"消息紧急程度"这两个独立变化的维度。后续如果有更多的消息类型,比如微信、钉钉等,那么直接新建一个类继承 IMessage 即可;如果是紧急程度需要新增,那么同样只需新建一个类实现 AbstractMessage 类即可。
桥接模式在源码中的应用
大家非常熟悉的 JDBC API,其中有一个 Driver 类就是桥接对象。我们都知道,我们在使用的时候
通过 Class.forName()方法可以动态加载各个数据库厂商实现的 Driver类。具体客户端应用代码如下,
public class JDBCTest {
    public static void main(String[] args) {
        try {
            // 1.加载驱动
            // 反射机制加载驱动类
            Class.forName("com.mysql.jdbc.Driver");
            // 2.获取连接Connection
            // 主机:端口号/数据库名
            Connection conn = DriverManager.getConnection("jdbc:mysql://localhost:3306/test", "root", "root");
            // 3.得到执行sql语句的对象Statement
            Statement stmt = conn.createStatement();
            // 4.执行sql语句,并返回结果
            ResultSet rs = stmt.executeQuery("select * from table");
        } catch (Exception e) {
            e.printStackTrace();
        }
    }
}
首先,我们来看一下Driver 接口的定义∶
public interface Driver {


    Connection connect(String url, java.util.Properties info)
        throws SQLException;


    boolean acceptsURL(String url) throws SQLException;


    DriverPropertyInfo[] getPropertyInfo(String url, java.util.Properties info)
                         throws SQLException;


    int getMajorVersion();


    int getMinorVersion();


    boolean jdbcCompliant();

    //------------------------- JDBC 4.1 -----------------------------------

    public Logger getParentLogger() throws SQLFeatureNotSupportedException;
}
Driver 在JDBC中并没有做仔何实现,具体的功能实现由各厂商完成,我们以MySOL的实现为例
public class Driver extends NonRegisteringDriver implements java.sql.Driver {
    public Driver() throws SQLException {
    }

    static {
        try {
            DriverManager.registerDriver(new Driver());
        } catch (SQLException var1) {
            throw new RuntimeException("Can't register driver!");
        }
    }
}
当我们执行Class.forName("com.mysql.jdbc.Driver")方法的时候,就会执com.mysql.jdbc.Driver这个类的静态块中的代码。而静态块中的代码只是调用了一下 DriverManager的registerDriver()方法,然后将 Driver 对象注册到 DriverManager 中。我们可以继续跟进到 DriverManager 这个类中,来看相关的代码∶
public class DriverManager {

     ...

     public static synchronized void registerDriver(java.sql.Driver driver)
        throws SQLException {

        registerDriver(driver, null);
    }


    ...

    public static synchronized void registerDriver(java.sql.Driver driver,
            DriverAction da)
        throws SQLException {

        /* Register the driver if it has not already been added to our list */
        if(driver != null) {
            registeredDrivers.addIfAbsent(new DriverInfo(driver, da));
        } else {
            // This is for compatibility with the original DriverManager
            throw new NullPointerException();
        }

        println("registerDriver: " + driver);

    }

    ...

}
在注册之前,将传过来的 Driver 对象,封装成了一个Driverlnfo 对象。接下来继续执行客户端代码的第二步,调用 DriverManager 的 getConnection()方法获取连接对象,我们跟进源码∶
public class DriverManager {
...
public static Connection getConnection(String url,
String user, String password) throws SQLException {
java.util.Properties info = new java.util.Properties();
if (user != null) {
info.put("user", user);
}
if (password != null) {
info.put("password", password);
}
return (getConnection(url, info, Reflection.getCallerClass()));
}
...
private static Connection getConnection(
String url, java.util.Properties info, Class<?> caller) throws SQLException {
/*
* When callerCl is null, we should check the application's
* (which is invoking this class indirectly)
* classloader, so that the JDBC driver class outside rt.jar
* can be loaded from here.
*/
ClassLoader callerCL = caller != null ? caller.getClassLoader() : null;
synchronized(DriverManager.class) {
// synchronize loading of the correct classloader.
if (callerCL == null) {
callerCL = Thread.currentThread().getContextClassLoader();
}
}
if(url == null) {
throw new SQLException("The url cannot be null", "08001");
}
println("DriverManager.getConnection(\"" + url + "\")");
// Walk through the loaded registeredDrivers attempting to make a connection.
// Remember the first exception that gets raised so we can reraise it.
SQLException reason = null;
for(DriverInfo aDriver : registeredDrivers) {
// If the caller does not have permission to load the driver then
// skip it.
if(isDriverAllowed(aDriver.driver, callerCL)) {
try {
println(" trying " + aDriver.driver.getClass().getName());
Connection con = aDriver.driver.connect(url, info);
if (con != null) {
// Success!
println("getConnection returning " + aDriver.driver.getClass().getName());
return (con);
}
} catch (SQLException ex) {
if (reason == null) {
reason = ex;
}
}
} else {
println(" skipping: " + aDriver.getClass().getName());
}
}
// if we got here nobody could connect.
if (reason != null) {
println("getConnection failed: " + reason);
throw reason;
}
println("getConnection: no suitable driver found for "+ url);
throw new SQLException("No suitable driver found for "+ url, "08001");
}
...
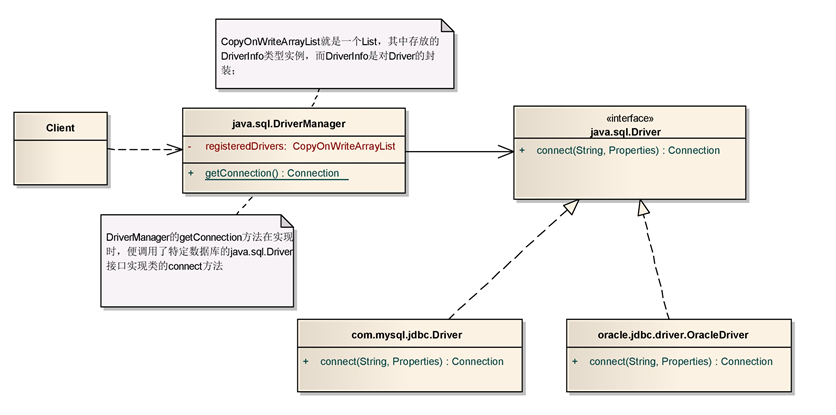
}在 getConnection()中就又会调用各自厂商实现的 Driver 的 connect()方法获得连接对象。这样的话,就巧妙地避开了使用继承,为不同的数据库提供了相同的接口。JDBC API中DriverManager引用了桥DriverInfo的引用,DriverInfo是对Driver的封装,如下图所示∶

适用性:
- 当不希望抽象接口和实现部分采用固定的绑定关系时;
特点:
- 桥接模式良好地实现了开闭原则:通常应用桥接模式的地方,抽象接口和具体实现部分都是可以变化的,且抽象接口与实现耦合度低;
- 桥接模式将类继承关系转换成了对象组合关系,实现了类的复用,减少了类的个数。


 268
268


 被折叠的 条评论
为什么被折叠?
被折叠的 条评论
为什么被折叠?
 到【灌水乐园】发言


