


系列文章
SpringBoot 01 —— HelloSpringBoot、yaml配置、数据校验、多环境切换
SpringBoot 02 —— Web简单探究、员工管理系统
SpringBoot 03 —— Spring Security
SpringBoot 04 —— Shiro
SpringBoot 05 —— Swagger
SpringBoot 06 —— 异步任务、邮件任务、定时任务
SpringBoot 07 —— 分布式:Dubbo+Zookeeper
文章目录
八、SpringBoot Web探究
8.1、加载静态资源
之前我们的Spring项目中添加了Web支持后,会有webapp,而我们的SpringBoot项目中却没有这种目录,那么我们的静态资源CSS、JS等文件在SpringBoot中如何处理呢?
在项目中按两下Shift建,输入WebMvcAutoConfiguration,可以找到SpringMVC的配置类,在这里面有一个 addResourceHandlers的方法,用于添加资源处理。
可以发现源码中,关于webjars配置表明, 所有的 /webjars/** , 都需要去 classpath:/META-INF/resources/webjars/ 找对应的资源;
@Override
public void addResourceHandlers(ResourceHandlerRegistry registry) {
    //判断是否我们自己添加了映射,如果没添加,则打印日志,默认资源处理被禁用
    if (!this.resourceProperties.isAddMappings()) {
        logger.debug("Default resource handling disabled");
        return;
    }
    //缓存控制
    Duration cachePeriod = this.resourceProperties.getCache().getPeriod();
    CacheControl cacheControl = this.resourceProperties.getCache().getCachecontrol().toHttpCacheControl();

    //webjars配置
    if (!registry.hasMappingForPattern("/webjars/**")) {
        customizeResourceHandlerRegistration(registry.addResourceHandler("/webjars/**")
                                             .addResourceLocations("classpath:/META-INF/resources/webjars/")
                                             .setCachePeriod(getSeconds(cachePeriod)).setCacheControl(cacheControl));
    }

    //静态资源配置
    String staticPathPattern = this.mvcProperties.getStaticPathPattern();
    if (!registry.hasMappingForPattern(staticPathPattern)) {
        customizeResourceHandlerRegistration(registry.addResourceHandler(staticPathPattern)
                                             .addResourceLocations(getResourceLocations(this.resourceProperties.getStaticLocations()))
                                             .setCachePeriod(getSeconds(cachePeriod)).setCacheControl(cacheControl));
    }
}
什么是webjars?
webjars的本质就是以jar包的方式引入我们的静态资源,以前我们导入静态资源文件只需直接导入,而在SpringBoot中要用webjars。例如,我们现在要使用jQuery,只需要导入对应的依赖,而以前我们需要手动导入其文件。(官网:https://www.webjars.org/)
<dependency>
    <groupId>org.webjars</groupId>
    <artifactId>jquery</artifactId>
    <version>3.5.1</version>
</dependency>
这里的路径对应于前面代码中webjars配置的路径:/META-INF/resources/webjars/

而我们要访问时,也是输入对应的路径。

导入自己静态资源
在WebMvcAutoConfigurationAdapter类上有一个注解
@EnableConfigurationProperties({ WebMvcProperties.class, ResourceProperties.class })
于是我们点进ResourceProperties.class查看
@ConfigurationProperties(prefix = "spring.resources", ignoreUnknownFields = false)
public class ResourceProperties {

	private static final String[] CLASSPATH_RESOURCE_LOCATIONS = {
        "classpath:/META-INF/resources/",
		"classpath:/resources/",
        "classpath:/static/",
        "classpath:/public/" };
    ...
}
可以得出结论,下面四个目录存放的静态资源可以被识别:
"classpath:/META-INF/resources/"
"classpath:/resources/"
"classpath:/static/",static目录放图片之类的
"classpath:/public/",一般public目录用来放公共资源
我们也可以在自定义静态资源路径,在application.yaml中配置:
spring:
  resources:
    static-locations: /myStatic/
一旦自己定义了静态文件夹的路径,原来的自动配置就都会失效了!
8.2、首页和图标定制
可以在WelomePageHandlerMapping类中看见,静态资源文件夹下的index.html被/**映射。
final class WelcomePageHandlerMapping extends AbstractUrlHandlerMapping {

	...

	WelcomePageHandlerMapping(TemplateAvailabilityProviders templateAvailabilityProviders,
			ApplicationContext applicationContext, Optional<Resource> welcomePage, String staticPathPattern) {
		if (welcomePage.isPresent() && "/**".equals(staticPathPattern)) {
			logger.info("Adding welcome page: " + welcomePage.get());
			setRootViewName("forward:index.html");
		}
		else if (welcomeTemplateExists(templateAvailabilityProviders, applicationContext)) {
			logger.info("Adding welcome page template: index");
			setRootViewName("index");
		}
	}
    ...
}
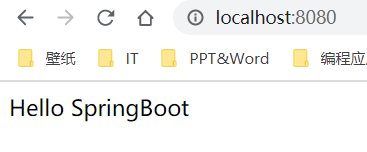
现在我们可以在static里新建一个index.html,然后在浏览器访问 http://localhost:8080
8.3、Thymeleaf模板引擎
1、什么是模板引擎
前端给我们的页面一般都是HTML,而在我们之前的开发中都是用的JSP,所以一般需要我们把HTML转为JSP,因为JSP不仅能轻松实现数据显示、交互,还能写Java代码。但是SpringBoot的项目打包是jar而不是war(我们以前都是用war),其次SpringBoot还是用的嵌入式Tomcat,因此SpringBoot默认是不支持JSP的。
JSP其实也是一个模板引擎,其他还有freemarker、Theymeleaf,它们的思想都是一样的!
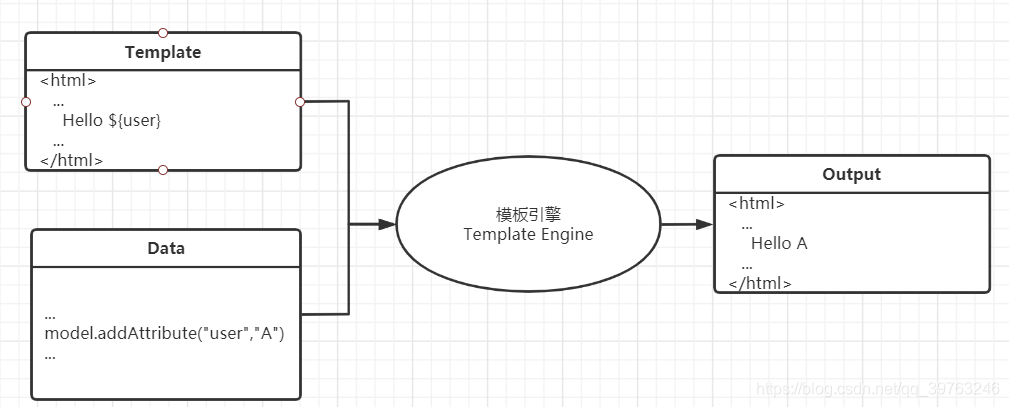
就像上面这幅图,我们写好一个模板(页面),里面有一个数据user是需要我们后端动态加入,模板引擎的作用就是将数据填充到指定的位置。
2、引入Themeleaf
Thymeleaf 官网:https://www.thymeleaf.org/
Thymeleaf 在Github 的主页:https://github.com/thymeleaf/thymeleaf
Spring官方文档:找到我们对应的版本
https://docs.spring.io/spring-boot/docs/2.3.7.RELEASE/reference/htmlsingle/#using-boot-starter
找到pom依赖
<!--thymeleaf-->
<dependency>
    <groupId>org.springframework.boot</groupId>
    <artifactId>spring-boot-starter-thymeleaf</artifactId>
</dependency>

根据源码:我们使用Thymleaf模板引擎,将html放在templates就能读取。
@ConfigurationProperties(prefix = "spring.thymeleaf")
public class ThymeleafProperties {

	private static final Charset DEFAULT_ENCODING = StandardCharsets.UTF_8;

	public static final String DEFAULT_PREFIX = "classpath:/templates/";

	public static final String DEFAULT_SUFFIX = ".html";
    ....
}
3、Thymeleaf语法
要学习语法,还是得参考官方文档,这里做个简单练习,查出数据然后显示,后面的实践中会逐渐讲解。
官方文档:https://www.thymeleaf.org/doc/tutorials/3.0/usingthymeleaf.html#what-is-thymeleaf
-
编写Controller类
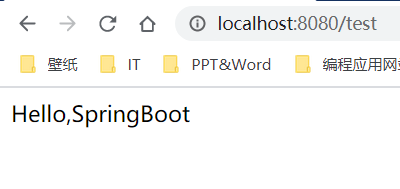
package com.zcy.controller; import org.springframework.stereotype.Controller; import org.springframework.ui.Model; import org.springframework.web.bind.annotation.RequestMapping; @Controller public class IndexController { @RequestMapping("/test") public String test(Model model){ model.addAttribute("msg","Hello,SpringBoot"); return "test"; } } -
编写前端 test.html(在templates目录下)
要使用thymeleaf需要导入命名空间约束:xmlns:th="http://www.thymeleaf.org“
<!DOCTYPE html> <!-- 约束 --> <html lang="en" xmlns:th="http://www.thymeleaf.org"> <head> <meta charset="UTF-8"> <title>Title</title> </head> <body> <!-- th:text就是将div中的内容设置为它指定的值 --> <div th:text="${msg}"></div> </body> </html> -
启动测试
我们可以使用任意的th:attr来替换HTML中原生的属性值

Controller新增方法
@RequestMapping("/test2")
public String test2(Map<String, Object> map){
    map.put("msg","<h1>Hdllo</h1>");
    map.put("users", Arrays.asList("小白", "小红"));
    return "test2";
}
前端 test2.html
<!DOCTYPE html>
<html lang="en" xmlns:th="http://www.thymeleaf.org">
<head>
    <meta charset="UTF-8">
    <title>Title</title>
</head>
<body>
    <!-- 转义:会将<h1>原样输出-->
    <div th:text="${msg}"></div>
    <!-- 不转义:会将<h1>作为标签 -->
    <div th:utext="${msg}"></div>

    <!-- 遍历数据:将users 的每个值都放在user,再将user作为h4的内容 -->
    <h4 th:each="user:${users}" th:text="${user}"></h4>
</body>
</html>
结果:

8.4、MVC自动配置原理
九、员工管理系统
静态资源和项目源码: https://pan.baidu.com/s/15e9spS72qmO6jvuBOc_8rQ 提取码: s9cf
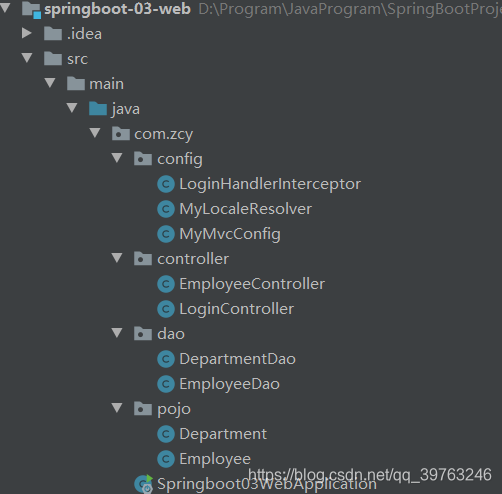
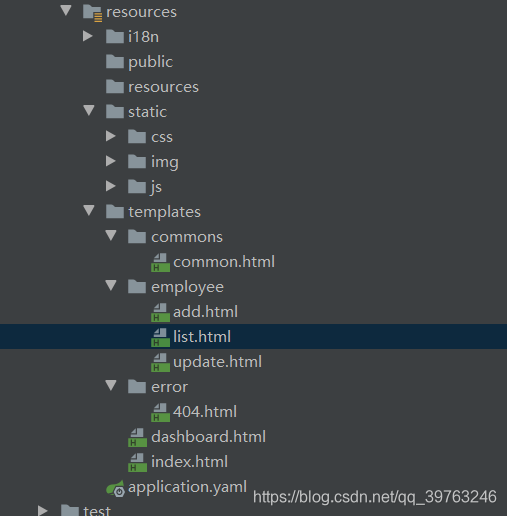
项目的目录结构:
效果图:
-
登录页面

-
英文界面

-
登录首页

-
员工页面

-
增加员工

-
编辑员工

-
删除员工

-
注销后输入首页URL

9.1、准备工作
配置文件application.yaml
#关闭模板引擎缓存
spring:
  thymeleaf:
    cache: false
  messages:
    basename: i18n.login #告诉SpringBoot我们配置文件的真实位置
  mvc:
    format:
      date: yyyy-MM-dd #更改默认的SpringBoot Data格式
  datasource:
    username: root
    password: 123456
    url: jdbc:mysql://localhost:3306/springboot?serverTimezone=Asia/Shanghai&useUnicode=true&characterEncoding=UTF-8&useSSL=true
    driver-class-name: com.mysql.cj.jdbc.Driver


#像Tomcat那样增加虚拟目录,访问首页就是http://localhost:8080/springboot
server:
  servlet:
    context-path: /springboot

#整合MyBatis
mybatis:
  type-aliases-package: com.zcy.pojo
  mapper-locations: classpath:mybatis/mapper/*.xml
  #开启实体类驼峰命名与数据库表的映射(即departmentId可以映射为department_id)
  configuration:
    map-underscore-to-camel-case: true
目前数据库方面没有整合MyBatis,用Map来模拟数据库。 现在整合了MyBatis。
1、先构建部门和员工的实体类(这里都使用了lombok,省去get\set\toString)
@Data
@AllArgsConstructor
@NoArgsConstructor
public class Department {
    private int id;//部门ID
    private String name;//部门名称
}


@Data
@NoArgsConstructor
public class Employee {
    private int id;
    private String name;
    private String email;
    private int gender;//女0,男1
    private Department department;
    private Date birthday;
}
2、部门和员工的Dao,这里模拟了数据库的数据。后面整合了MyBatis,因此有dao层和service层。
部门:
DepartmentMapper.java
//dao层 接口
@Mapper
@Repository
public interface DepartmentMapper {

    //获得所有部门信息
    public List<Department> queryAllDepartment();
    //通过ID得到部门
    public Department queryDepartmentById(int id);
}
DepartmentMapper.xml
<?xml version="1.0" encoding="UTF-8" ?>
<!DOCTYPE mapper
        PUBLIC "-//mybatis.org//DTD Mapper 3.0//EN"
        "http://mybatis.org/dtd/mybatis-3-mapper.dtd">
<mapper namespace="com.zcy.dao.DepartmentMapper">
    <select id="queryAllDepartment" resultType="department">
        select * from department;
    </select>

    <select id="queryDepartmentById" resultType="department" parameterType="_int">
        select * from id=#{id}
    </select>
</mapper>
DepartmentService和实现类
//接口
public interface DepartmentService {
    //获得所有部门信息
    public List<Department> queryAllDepartment();
    //通过ID得到部门
    public Department queryDepartmentById(int id);
}
//实现类
@Service
public class DepartmentServiceImpl implements DepartmentService {

    @Autowired
    private DepartmentMapper departmentMapper;

    @Override
    public List<Department> queryAllDepartment() {
        return departmentMapper.queryAllDepartment();
    }

    @Override
    public Department queryDepartmentById(int id) {
        return departmentMapper.queryDepartmentById(id);
    }
}
员工:
//dao层
@Mapper
@Repository
public interface EmployeeMapper {
    //增加一个员工
    void addEmployee(Employee employee);
    //查询全部员工信息
    List<Employee> queryAllEmployee();
    //通过id查询员工
    Employee queryEmployeeById(int id);
    //通过id删除员工
    void deleteEmployee(int id);
    //通过id更新员工
    void updateEmployee(Employee employee);
}
EmployeeMapper.mapper
<?xml version="1.0" encoding="UTF-8" ?>
<!DOCTYPE mapper
        PUBLIC "-//mybatis.org//DTD Mapper 3.0//EN"
        "http://mybatis.org/dtd/mybatis-3-mapper.dtd">
<mapper namespace="com.zcy.dao.EmployeeMapper">
    <select id="queryAllEmployee" resultType="employee">
        select
        a.id, a.name, a.email, a.gender,
        b.id "department.id",
        b.name "department.name",
        birthday
        from employee a
        inner join department b
        where a.department_id = b.id;
    </select>

    <select id="queryEmployeeById" resultType="employee" parameterType="_int">
        select
        a.id, a.name, a.email, a.gender,
        b.id "department.id",
        b.name "department.name",
        birthday
        from employee a
        inner join department b
        where a.department_id = b.id and a.id=#{id};
    </select>

    <insert id="addEmployee" parameterType="employee">
        insert into employee (name, email, gender, department_id)
        values(#{name}, #{email},#{gender}, #{department.id})
    </insert>

    <delete id="deleteEmployee" parameterType="_int">
        delete from employee where id=#{id}
    </delete>

    <update id="updateEmployee" parameterType="employee">
        update employee
        set name=#{name},email=#{email},gender=#{gender},department_id=#{department.id},birthday=#{birthday}
        where id=#{id}
    </update>
</mapper>
EmployeeService和实现类
//接口
public interface EmployeeService {
    //增加一个员工
    void addEmployee(Employee employee);
    //查询全部员工信息
    List<Employee> queryAllEmployee();
    //通过id查询员工
    Employee queryEmployeeById(int id);
    //通过id删除员工
    void deleteEmployee(int id);
    //更新员工
    void updateEmployee(Employee employee);
}


//实现类
@Service
public class EmployeeServiceImpl implements EmployeeService {

    @Autowired
    private EmployeeMapper employeeMapper;

    @Override
    public void addEmployee(Employee employee) {
        employeeMapper.addEmployee(employee);
    }

    @Override
    public List<Employee> queryAllEmployee() {
        return employeeMapper.queryAllEmployee();
    }

    @Override
    public Employee queryEmployeeById(int id) {
        return employeeMapper.queryEmployeeById(id);
    }

    @Override
    public void deleteEmployee(int id) {
        employeeMapper.deleteEmployee(id);
    }

    @Override
    public void updateEmployee(Employee employee) {
        employeeMapper.updateEmployee(employee);
    }
}
9.2、设置首页
1、在config目录下新建MyMvcConfig.java,实现接口WebMvcConfigurer
//表明这是SpringBoot配置类
@Configuration
public class MyMvcConfig implements WebMvcConfigurer {
    @Override
    public void addViewControllers(ViewControllerRegistry registry) {
        //添加视图控制器,将/和/index.html都映射到首页
        registry.addViewController("/").setViewName("index");
        registry.addViewController("/index.html").setViewName("index");

        //添加映射,如果是访问/main.html,则跳转dashboard页面
        registry.addViewController("/main.html").setViewName("dashboard");
    }
    //添加地区解析器到容器(使其能被SpringBoot扫描到)
    @Bean
    public LocaleResolver localeResolver(){
        return new MyLocaleResolver();
    }
    //添加EmployeeDao到容器
    @Bean
    public EmployeeDao employeeDao(){
        return new EmployeeDao();
    }
    //添加DepartmentDao到容器
    @Bean
    public DepartmentDao departmentDao(){
        return new DepartmentDao();
    }
    //添加自己的拦截器
    @Override
    public void addInterceptors(InterceptorRegistry registry) {
        //要拦截 /**(代表项目目录下所有请求),除了首页/index.html和/、登录和注销/user/**,静态资源/static/**
        registry.addInterceptor(new LoginHandlerInterceptor())
                .addPathPatterns("/**").
                excludePathPatterns("/index.html","/","/user/*", "/static/**");
    }
}
2、首页index.html
代码:这里使用了BootStrap,不懂前端没有关系,看懂里面的部分必要代码即可,后面是注释+说明。
<!DOCTYPE html>
<!--注意:添加命名空间xmlns-->
<html lang="en" xmlns:th="http://www.thymeleaf.org">
<head>
<meta http-equiv="Content-Type" content="text/html; charset=UTF-8">
<meta name="viewport" content="width=device-width, initial-scale=1, shrink-to-fit=no">
<title>员工管理系统</title>
<!-- 导入CSS样式1 -->
<link th:href="@{/css/bootstrap.min.css}" rel="stylesheet">
<!-- 导入CSS样式2 -->
<link th:href="@{/css/signin.css}" rel="stylesheet">
</head>
<body class="text-center">
<form class="form-signin" th:action="@{/user/login}" method="post">
<!-- 导入图片 -->
<img class="mb-4" th:src="@{/img/bootstrap-solid.svg}" alt="" width="72" height="72">
<!-- 注意:login.tip是取国际化的值 -->
<h1 class="h3 mb-3 font-weight-normal" th:text="#{login.tip}"></h1>
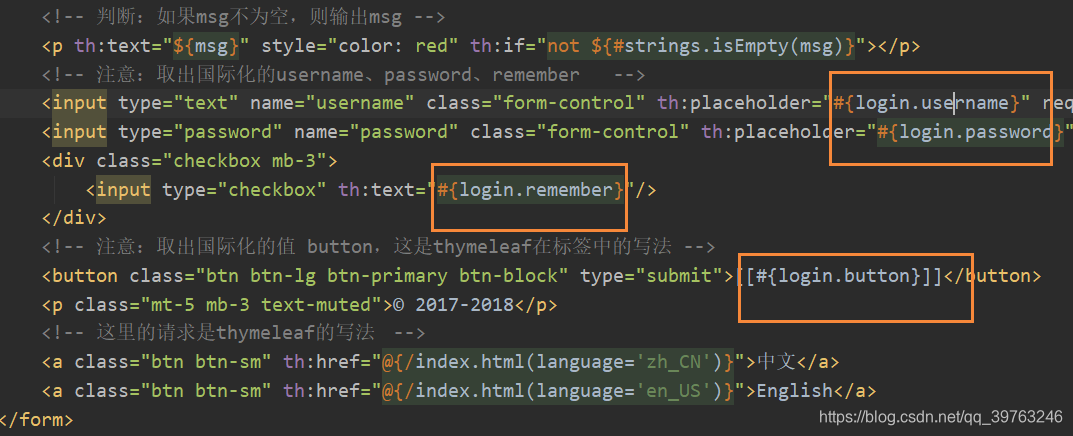
<!-- 判断:如果msg不为空,则输出msg -->
<p th:text="${msg}" style="color: red" th:if="not ${#strings.isEmpty(msg)}"></p>
<!-- 注意:取出国际化的username、password、remember -->
<input type="text" name="username" class="form-control" th:placeholder="#{login.username}" required="" autofocus="">
<input type="password" name="password" class="form-control" th:placeholder="#{login.password}" required="">
<div class="checkbox mb-3">
<input type="checkbox" th:text="#{login.remember}"/>
</div>
<!-- 注意:取出国际化的值 button,这是thymeleaf在标签中的写法 -->
<button class="btn btn-lg btn-primary btn-block" type="submit">[[#{login.button}]]</button>
<p class="mt-5 mb-3 text-muted">© 2017-2018</p>
<!-- 这里的请求是thymeleaf的写法 -->
<a class="btn btn-sm" th:href="@{/index.html(language='zh_CN')}">中文</a>
<a class="btn btn-sm" th:href="@{/index.html(language='en_US')}">English</a>
</form>
</body>
</html>
说明:本次SpringBoot项目的前端用到了Thymeleaf,这里简单讲解一下用法,具体请看文档。
- 前端标签中某些属性,有前缀th:的,表示该属性由Thymeleaf接管,该属性可用Thymeleaf语法。
- 例如:
- th:placeholder=“xxx”,th:value=“xxx”,表示原来的属性value和placeholder,只是里面可以用Thymeleaf的表达式。
- 这里会用到的表达式有:${xx}表示取xx的值、@{xx}表示xx是一个链接
- 较为特殊的:
- th:each="a:${b}"是一个迭代器,遍历b,将每个值赋给a;
- th:fragment=“b”,表示该HTML标签及其内部元素能作为一个名为b的模块,可被其他HTML导入。
- th:replace=“a/b::c(d=e)”,表示将a目录下的b.html文件中的c导入,并传入参数值为e的d。
- 可通过${a?b:c}来使用表达式
- 使用${#dates.format(值, ‘yyyy-MM-dd’)}来格式化一个Date类型
9.3、国际化
即实现页面语种转换,例如中文网页转为英文网页。
1、编写MyLocaleResolver.java,处理国际化的请求
public class MyLocaleResolver implements LocaleResolver {

    //处理请求
    @Override
    public Locale resolveLocale(HttpServletRequest request) {
        String language = request.getParameter("language");
        //如果没有,就使用默认的
        Locale locale = Locale.getDefault();
        //如果有就分割传入地区和国家:zh  CN
        if (language != null){
            String[] split = language.split("_");
            locale = new Locale(split[0], split[1]);
        }
        return locale;
    }

    @Override
    public void setLocale(HttpServletRequest request, HttpServletResponse response, Locale locale) {

    }
}
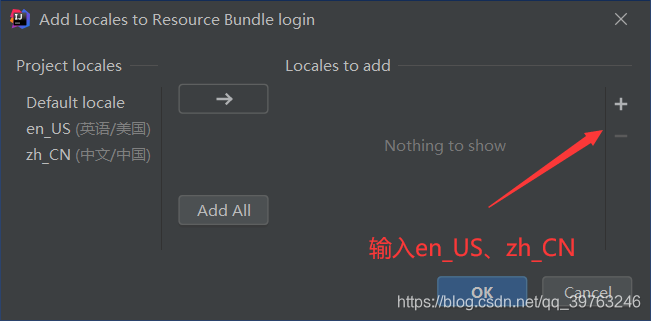
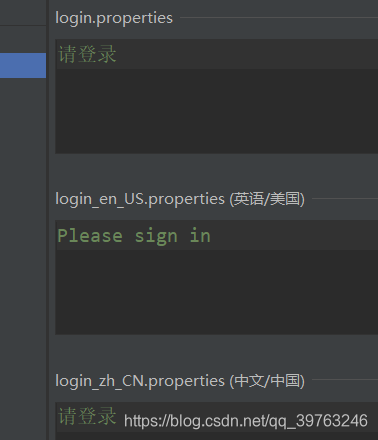
2、创建目录i18n(internationalization缩写,18个字母),添加login.properties。

对着Resource Bundle ‘login’右键,添加新地区。
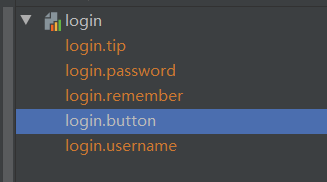
3、针对前端首页的五个位置,需要国际化,
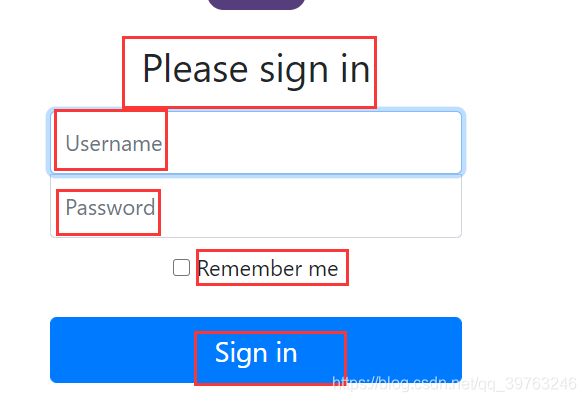
在login.properties添加键值对
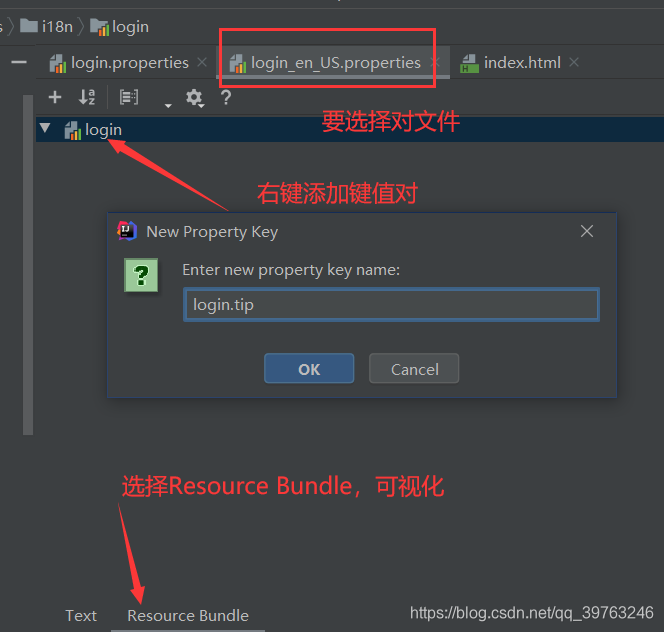
在右边写好中英文,第一个login.properties里是默认值,如此完成上面五个位置的国际化。

4、前端中已经设置好国际化了
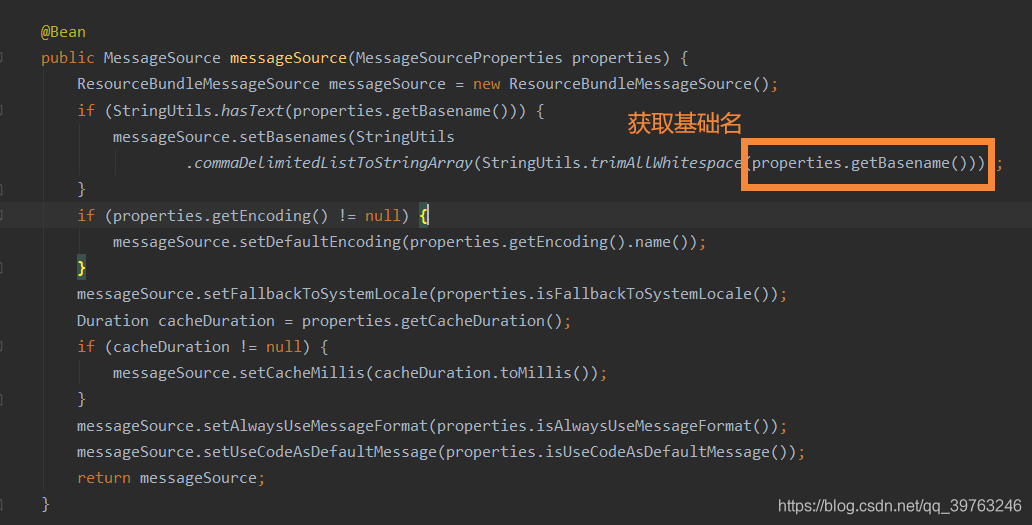
为什么application.yaml要设置basename?
SpringBoot对国际化的自动配置涉及到一个类MessageSourceAutoConfiguration,里面有一个方法,这里发现SpringBoot已经自动配置好了管理我们国际化资源文件(login.properties)的组件ResourceBundleMessageSource。
9.4、登录和注销
1、写LoginController.java,实现后端功能。
@Controller
public class LoginController {
    //index.html以Post方式提交的表单,提交到/user/login
    @PostMapping("/user/login")
    public String login(
            @RequestParam("username") String username,
            @RequestParam("password") String password,
            Model model, HttpSession session){
        //这里登录验证随便写的,主要是设置session,让浏览器记住这个用户登陆过
        if (!StringUtils.isEmpty(username) && password.equals("123456"))
        {
            session.setAttribute("loginUser", username);
            return "redirect:/main.html";//重定向(main.html映射到dashboard.html)
        }
        else{
            //index.html在<p>标签显示该信息
            model.addAttribute("msg", "用户名或密码错误");
            return "index";
        }
    }
    //注销只需要移除用户session,然后重定向到index.html
    @GetMapping("/user/logout")
    public String logout(Model model, HttpSession session){
        session.removeAttribute("loginUser");
        return "redirect:/";//在配置类中,设置了/映射到index.html
    }
}
2、拦截器LoginHandlerInterceptor
public class LoginHandlerInterceptor implements HandlerInterceptor {
    @Override
    public boolean preHandle(
            HttpServletRequest request, HttpServletResponse response, Object handler
                            ) throws Exception {
        //用户成功登录后会向Session放属性
        Object loginUser = request.getSession().getAttribute("loginUser");
        //如果Session中loginUser属性不存在,表明目前用户未登录(可能是注销)
        if (loginUser == null){
            request.setAttribute("msg", "没有权限,请先登录");
            //转发请求到index.html,拦截成功
            request.getRequestDispatcher("/index.html").forward(request,response);
            return false;
        }
        //用户已登录,则放行
        return true;
    }
}
9.6、员工增删改查
1、员工的Controller
@Controller
public class EmployeeController {
    @Autowired
    private EmployeeServiceImpl employeeService;

    @Autowired
    private DepartmentServiceImpl departmentService;

    @RequestMapping("/emps")
    public String getAllEmployee(Model model){
        List<Employee> allEmployee = employeeService.queryAllEmployee();
        model.addAttribute("employees", allEmployee);

        return "employee/list";
    }

    @GetMapping("/toAdd")
    public String toAddPage(Model model){
        List<Department> allDepartment = departmentService.queryAllDepartment();
        model.addAttribute("allDepartment", allDepartment);
        return "/employee/add";
    }
    @PostMapping("/add")
    public String addEmployee(Employee employee){
        //添加的操作(此时的employee的department成员只有id属性,
        // 即没有部门名称,但数据库的表也刚好只需要id)
        employeeService.addEmployee(employee);
        return "redirect:/emps";
    }

    @GetMapping("/toUpdate/{id}")
    public String toUpdatePage(@PathVariable("id") Integer id, Model model){
        //查出原来的数据
        Employee employee = employeeService.queryEmployeeById(id);
        model.addAttribute("employee",employee);
        List<Department> allDepartment = departmentService.queryAllDepartment();
        model.addAttribute("allDepartment", allDepartment);
        return "/employee/update";
    }

    @PostMapping("/update")
    public String updateEmployee(Employee employee){
        employeeService.updateEmployee(employee);
        return "redirect:/emps";
    }

    @GetMapping("/delete/{id}")
    public String deleteEmployee(@PathVariable("id") Integer id){
        employeeService.deleteEmployee(id);
        return "redirect:/emps";
    }
}
2、这里由于页面的顶部和侧边栏是通用的,所以提取到公共html—common.html
<!DOCTYPE html>
<!--注意:用到了thymeleaf,需要xmlns命名空间-->
<html lang="en" xmlns:th="http://www.thymeleaf.org">

<!--顶部栏-->
<nav class="navbar navbar-dark sticky-top bg-dark flex-md-nowrap p-0" th:fragment="topbar">
    <a class="navbar-brand col-sm-3 col-md-2 mr-0" href="http://getbootstrap.com/docs/4.0/examples/dashboard/#">[[${session.loginUser}]]</a>
    <input class="form-control form-control-dark w-100" type="text" placeholder="Search" aria-label="Search">
    <ul class="navbar-nav px-3">
        <li class="nav-item text-nowrap">
            <!-- Thymeleaf接管  -->
            <a class="nav-link" th:href="@{/user/logout}">注 销</a>
        </li>
    </ul>
</nav>

<!--侧边栏-->
<nav class="col-md-2 d-none d-md-block bg-light sidebar" th:fragment="sidebar">
    <div class="sidebar-sticky">
        <ul class="nav flex-column">
            <li class="nav-item">
                <!-- Thymeleaf接管,根据其他页面传入的参数,判断是否需要高亮激活 active  -->
                <a th:class="${active=='dashboad.html'?'nav-link active':'nav-link'}" th:href="@{/index.html}">
                    <svg xmlns="http://www.w3.org/2000/svg" width="24" height="24" viewBox="0 0 24 24" fill="none" stroke="currentColor" stroke-width="2" stroke-linecap="round" stroke-linejoin="round" class="feather feather-home">
                        <path d="M3 9l9-7 9 7v11a2 2 0 0 1-2 2H5a2 2 0 0 1-2-2z"></path>
                        <polyline points="9 22 9 12 15 12 15 22"></polyline>
                    </svg>
                    主页 <span class="sr-only">(current)</span>
                </a>
            </li>
            <li class="nav-item">
                <!-- Thymeleaf接管,根据其他页面传入的参数,判断是否需要高亮激活 active  -->
                <a th:class="${active=='list.html'?'nav-link active':'nav-link'}" th:href="@{/emps}">
                    <svg xmlns="http://www.w3.org/2000/svg" width="24" height="24" viewBox="0 0 24 24" fill="none" stroke="currentColor" stroke-width="2" stroke-linecap="round" stroke-linejoin="round" class="feather feather-users">
                        <path d="M17 21v-2a4 4 0 0 0-4-4H5a4 4 0 0 0-4 4v2"></path>
                        <circle cx="9" cy="7" r="4"></circle>
                        <path d="M23 21v-2a4 4 0 0 0-3-3.87"></path>
                        <path d="M16 3.13a4 4 0 0 1 0 7.75"></path>
                    </svg>
                    员工
                </a>
            </li>
        </ul>
    </div>
</nav>
</html>
3、登录成功的主页dashboard.html
<!DOCTYPE html>
<!-- saved from url=(0052)http://getbootstrap.com/docs/4.0/examples/dashboard/ -->
<html lang="en" xmlns:th="http://www.thymeleaf.org">
	<head>
		<meta http-equiv="Content-Type" content="text/html; charset=UTF-8">
		<meta name="viewport" content="width=device-width, initial-scale=1, shrink-to-fit=no">
		<meta name="description" content="">
		<meta name="author" content="">

		<title>Dashboard Template for Bootstrap</title>

		<link th:href="@{/css/bootstrap.min.css}" rel="stylesheet">
		<link th:href="@{/css/dashboard.css}" rel="stylesheet">
	</head>

	<body>
		<!-- 导入顶部栏	-->
		<div th:replace="commons/common::topbar"></div>

		<div class="container-fluid">
			<div class="row">
				<!-- 导入侧边栏,并传入参数,用以高亮员工侧边栏	-->
				<div th:replace="commons/common::sidebar(active='dashboad.html')"></div>

				<main role="main" class="col-md-9 ml-sm-auto col-lg-10 pt-3 px-4">
					<h1>首页</h1>
				</main>
			</div>
		</div>
	</body>
</html>
4、员工列表 list.html(只有main里面和dashboard.html不一样)
<main role="main" class="col-md-9 ml-sm-auto col-lg-10 pt-3 px-4">
    <h2><a class="btn btn-sm btn-success" th:href="@{/toAdd}">添加员工</a> </h2>
    <div class="table-responsive">
        <!-- 表格 -->
        <table class="table table-striped table-sm">
            <thead>
                <tr>
                    <th>ID</th>
                    <th>姓名</th>
                    <th>邮箱</th>
                    <th>性别</th>
                    <th>部门</th>
                    <th>生日</th>
                </tr>
            </thead>
            <tbody>
                <!-- 利用迭代器,输出所有员工,employee是后端Model传递的值	-->
                <tr th:each="employee:${employees}">
                    <td th:text="${employee.getId()}"/>
                    <td th:text="${employee.getName()}"/>
                    <td th:text="${employee.getEmail()}"/>
                    <td th:text="${employee.getGender()==0?'女':'男'}"/>
                    <td th:text="${employee.getDepartment().getName()}"/>
                    <!-- 设置日期格式 -->
                    <td th:text="${#dates.format(employee.getBirthday(), 'yyyy-MM-dd')}"/>
                    <td>
                        <!-- 这是两个链接按钮,无论是添加还是编辑都需要员工编号	-->
                        <a class="btn btn-sm btn-primary" th:href="@{/toUpdate/}+${employee.getId()}">编辑</a>
                        <a class="btn btn-sm btn-danger" th:href="@{/delete/}+${employee.getId()}">删除</a>
                    </td>
                </tr>
            </tbody>
        </table>
    </div>
</main>
5、添加 add.html(只有main里面和dashboard.html不一样)
<main role="main" class="col-md-9 ml-sm-auto col-lg-10 pt-3 px-4">
					<h2>添加 员工</h2>
					<form th:action="@{/add}" method="post">
						<div class="form-group">
							<label>Name</label>
							<input type="text" name="name" required="" class="form-control" placeholder="哆啦A梦">
						</div>
						<div class="form-group">
							<label>Email</label>
							<input type="email" name="email" class="form-control" placeholder="111111111@qq.com">
						</div>
						<div class="form-group">
							<label>Gender</label><br>
							<div class="form-check form-check-inline">
								<input class="form-check-input" type="radio" name="gender" value="1">
								<label class="form-check-label">男</label>
							</div>
							<div class="form-check form-check-inline">
								<input class="form-check-input" type="radio" name="gender" value="0">
								<label class="form-check-label">女</label>
							</div>
						</div>
						<div class="form-group">
							<label>department</label>
							<select class="form-control" name="department.id">
								<option th:each="dept:${allDepartment}" th:text="${dept.getName()}" th:value="${dept.getId()}"></option>
							</select>
						</div>
						<div class="form-group">
							<label>Birth</label>
							<input type="text" name="birthday" class="form-control" th:placeholder="${#dates.format(#dates.createNow(), 'yyyy-MM-dd')}">
						</div>
						<button type="submit" class="btn btn-primary">添加</button>
					</form>
				</main>
6、更新员工(只有main里面和dashboard.html不一样)
<main role="main" class="col-md-9 ml-sm-auto col-lg-10 pt-3 px-4">
    <h2>更新 员工</h2>
    <form th:action="@{/update}" method="post">
        <input th:value="${employee.getId()}" type="hidden" name="id">
        <div class="form-group">
            <label>Name</label>
            <input th:value="${employee.getName()}" type="text" name="name" class="form-control" placeholder="哆啦A梦">
        </div>
        <div class="form-group">
            <label>Email</label>
            <input th:value="${employee.getEmail()}" type="email" name="email" class="form-control" placeholder="111111111@qq.com">
        </div>
        <div class="form-group">
            <label>Gender</label><br>
            <div class="form-check form-check-inline">
                <input th:checked="${employee.getGender()==1}" class="form-check-input"  type="radio" name="gender" value="1">
                <label class="form-check-label">男</label>
            </div>
            <div class="form-check form-check-inline">
                <input th:checked="${employee.getGender()==0}" class="form-check-input" type="radio" name="gender" value="0">
                <label class="form-check-label">女</label>
            </div>
        </div>
        <div class="form-group">
            <label>department</label>
            <select class="form-control" name="department.id">
                <option th:selected="${dept.getId()==employee.getDepartment().getId()}"
                        th:each="dept:${allDepartment}"
                        th:text="${dept.getName()}"
                        th:value="${dept.getId()}"></option>
            </select>
        </div>
        <div class="form-group">
            <label>Birth</label>
            <input type="text" th:value="${#dates.format(employee.getBirthday(), 'yyyy-MM-dd')}" name="birthday" class="form-control">
        </div>
        <button type="submit" class="btn btn-primary">更新</button>
    </form>
</main>
7、404.html
<!DOCTYPE html>
<!-- saved from url=(0052)http://getbootstrap.com/docs/4.0/examples/dashboard/ -->
<html lang="en" xmlns:th="http://www.thymeleaf.org">
    <head>
        <meta http-equiv="Content-Type" content="text/html; charset=UTF-8">
        <meta name="viewport" content="width=device-width, initial-scale=1, shrink-to-fit=no">
        <meta name="description" content="">
        <meta name="author" content="">

        <title>Dashboard Template for Bootstrap</title>
        <link th:href="@{/css/bootstrap.min.css}" rel="stylesheet">
        <link th:href="@{/css/dashboard.css}" rel="stylesheet">
    </head>

    <body>
        <div th:replace="~{commons/common::topbar}"></div>

        <div class="container-fluid">
            <div class="row">
                <div th:replace="~{commons/common::sidebar}"></div>

                <main role="main" class="col-md-9 ml-sm-auto col-lg-10 pt-3 px-4">
                    <h1>404</h1>
                </main>
            </div>
        </div>
    </body>
</html>


 525
525


 被折叠的 条评论
为什么被折叠?
被折叠的 条评论
为什么被折叠?
 到【灌水乐园】发言


