


使用数据集以及运行源代码:
PyTorch 图像分类与图像分割中使用 CutMix.
概述
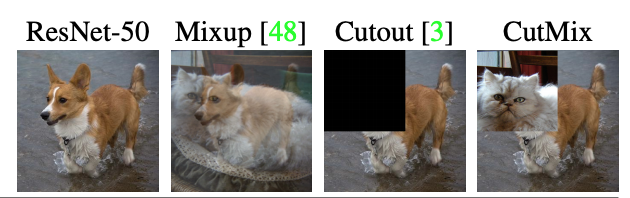
CutMix 是效果比较好的一类数据增强,常混迹于各大视觉比赛。
那么有小伙伴问了, CutMix 是什么呢?混砍?这我知道,我最近看的扫黑风暴里就有。。。也太暴力了。

我说的是 CutMix: Regularization Strategy to Train Strong Classifierswith Localizable Features 这篇论文!
CutMix增强策略:
- 在训练图像中剪切和粘贴补丁,其中真实标签的混合与补丁的面积成正比。
这次借2021年江苏大数据开发与应用大赛(华录杯)的医疗赛道数据集来做一个对比实验,也是我初赛的方案,分享给大家,也请大佬指正错误。
这次比赛的目标是:
- 针对胃癌病理切片,对发生癌症病变的区域进行像素级预测并对癌症类别进行分类。
- 标签 0、1、2 分别对应正常、管状腺癌、粘液腺癌。
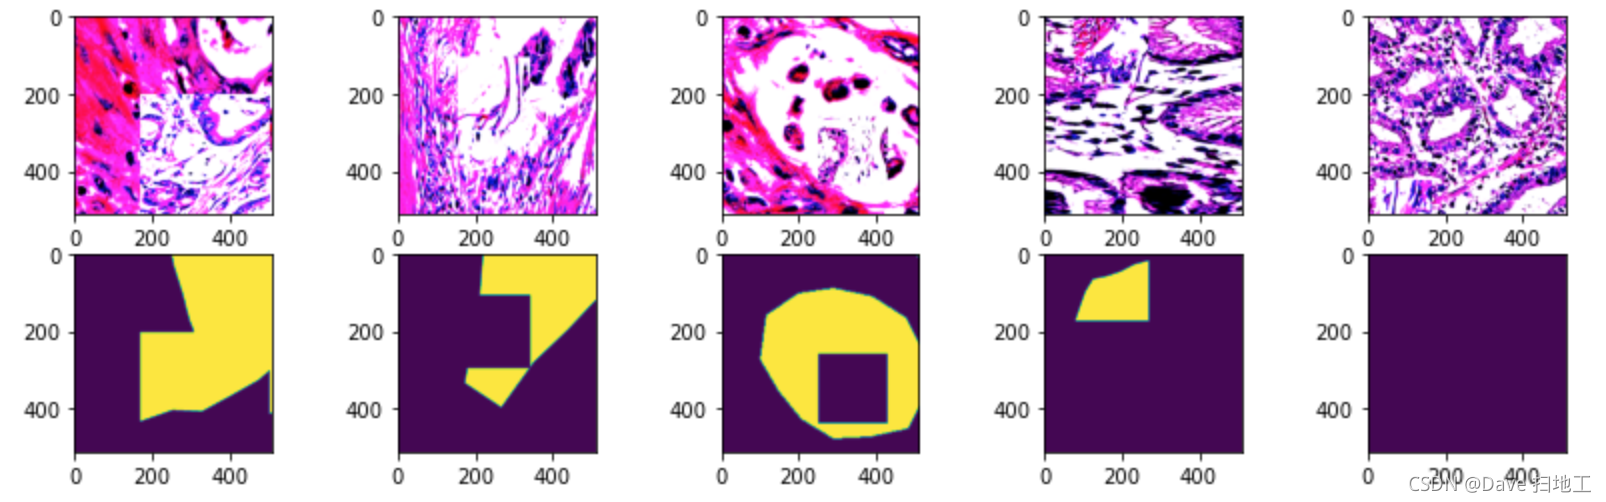
- 同时还需要对病灶区域进行分割,如下图:
![[外链图片转存失败,源站可能有防盗链机制,建议将图片保存下来直接上传(img-zYp1bUfp-1632303136774)(attachment:12892f7a-0c03-410e-a4d3-aea44d2e798d.png)]](https://img-blog.csdnimg.cn/07283e97e9394b66ac7078854e38143b.png?x-oss-process=image/watermark,type_ZHJvaWRzYW5zZmFsbGJhY2s,shadow_50,text_Q1NETiBARGF2ZSDmiavlnLDlt6U=,size_20,color_FFFFFF,t_70,g_se,x_16)
#  CutMix 的切块功能
def rand_bbox(size, lam):
    if len(size) == 4:
        W = size[2]
        H = size[3]
    elif len(size) == 3:
        W = size[0]
        H = size[1]
    else:
        raise Exception

    cut_rat = np.sqrt(1. - lam)
    cut_w = np.int(W * cut_rat)
    cut_h = np.int(H * cut_rat)

    # uniform
    cx = np.random.randint(W)
    cy = np.random.randint(H)

    bbx1 = np.clip(cx - cut_w // 2, 0, W)
    bby1 = np.clip(cy - cut_h // 2, 0, H)
    bbx2 = np.clip(cx + cut_w // 2, 0, W)
    bby2 = np.clip(cy + cut_h // 2, 0, H)

    return bbx1, bby1, bbx2, bby2

#  一些比较基础的数据增广,包括水平翻转、垂直翻转等
def make_transforms(phase,mean=(0.485, 0.456, 0.406), std=(0.229, 0.224, 0.225)):
    if phase == 'train':
        transforms = albu.Compose(
            [
                albu.OneOf([
                    albu.HorizontalFlip(p=0.5),
                    albu.VerticalFlip(p=0.5),
                    albu.Transpose(p=0.5)
                ]),
                albu.Resize(image_size,image_size, p=1),
                albu.Normalize(mean=mean, std=std, p=1),
                ToTensorV2(),
            ]
        )
    else:
        transforms = albu.Compose(
            [
                albu.Resize(image_size, image_size, p=1),
                albu.Normalize(mean=mean, std=std, p=1),
                ToTensorV2(),
            ]
        )
    return transforms
定义 PyTorch 的 Dataset
class JSHDataset(Dataset):

    def __init__(self, df, transforms, train=False):
        self.df = df
        self.transforms = transforms
        self.train = train

    def __getitem__(self, idx):
        row = self.df.iloc[idx]
        fn = row.image_name
        # 读取图片数据
        image = cv2.imread(os.path.join(row['image_path'], fn))
        image = cv2.cvtColor(image, cv2.COLOR_BGR2RGB)
        image = cv2.resize(image, (1024, 1024), interpolation=cv2.INTER_LINEAR)
        # 读取 mask 数据
        masks = cv2.imread(os.path.join(row['mask_path'], fn), cv2.IMREAD_GRAYSCALE)/255
        masks = cv2.resize(masks, (1024, 1024), interpolation=cv2.INTER_LINEAR)
        # 读取 label
        label = torch.zeros(3)
        label[row.label] = 1
        # ------------------------------  CutMix  ------------------------------------------
        prob = 20  # 将 prob 设置为 0 即可关闭 CutMix
        if random.randint(0, 99) < prob and self.train:
            rand_index = random.randint(0, len(self.df) - 1)

            rand_row = self.df.iloc[rand_index]
            rand_fn = rand_row.image_name

            rand_image = cv2.imread(os.path.join(rand_row['image_path'], rand_fn))
            rand_image = cv2.cvtColor(rand_image, cv2.COLOR_BGR2RGB)
            rand_image = cv2.resize(rand_image, (1024, 1024), interpolation=cv2.INTER_LINEAR)

            rand_masks = cv2.imread(os.path.join(rand_row['mask_path'], rand_fn), cv2.IMREAD_GRAYSCALE)/255
            rand_masks = cv2.resize(rand_masks, (1024, 1024), interpolation=cv2.INTER_LINEAR)

            lam = np.random.beta(1,1)
            bbx1, bby1, bbx2, bby2 = rand_bbox(image.shape, lam)

            image[bbx1:bbx2, bby1:bby2, :] = rand_image[bbx1:bbx2, bby1:bby2, :]
            masks[bbx1:bbx2, bby1:bby2] = rand_masks[bbx1:bbx2, bby1:bby2]

            lam = 1 - ((bbx2 - bbx1) * (bby2 - bby1) / (image.shape[1] * image.shape[0]))

            rand_label = torch.zeros(3)
            rand_label[rand_row.label] = 1

            label = label * lam + rand_label * (1. - lam)
        # ---------------------------------  CutMix  ---------------------------------------
        # 应用之前我们定义的各种数据增广
        augmented = self.transforms(image=image, mask=masks)
        img, mask = augmented['image'], augmented['mask']
        return img, label, mask.unsqueeze(0)

    def __len__(self):
        return len(self.df)
使用 PyTorch 的 Dataloader 创建数据的生成器
trainset = JSHDataset(train_df, make_transforms('train'), train=True)
valset = JSHDataset(val_df, make_transforms('val'))

train_loader = DataLoader(
    trainset,
    batch_size=batch_size,
    num_workers=8,
    shuffle=True,  # shuffle 是比较简单的打乱数据,如果在处理数据不均衡的数据集可以使用 sampler
    pin_memory=True
)
val_loader = DataLoader(
    valset,
    batch_size=batch_size,
    num_workers=8,
    pin_memory=True
)
可视化
下面对原始数据和进行了 CutMix 操作的数据分别进行可视化。
random_list = [random.randint(0, len(trainset)-1) for i in range(5)]
f, ax = plt.subplots(2, 5, figsize=(14,4))
for i in range(5):
    img, _, mask = trainset.__getitem__(random_list[i])
    ax[0][i].imshow(
        torch.clip(img.permute(1,2,0), 0, 1)
    );
    ax[1][i].imshow(
        torch.clip(mask.permute(1,2,0), 0, 1)
    );

# 使用了 CutMix 之后的数据进行可视化,可以明显的看到数据中的“补丁”
random_list = [random.randint(0, len(trainset)-1) for i in range(5)]
f, ax = plt.subplots(2, 5, figsize=(14,4))
for i in range(5):
    img, _, mask = trainset.__getitem__(random_list[i])
    ax[0][i].imshow(
        torch.clip(img.permute(1,2,0), 0, 1)
    );
    ax[1][i].imshow(
        torch.clip(mask.permute(1,2,0), 0, 1)
    );
模型配置
ENCODER_WEIGHTS = ‘imagenet’
ACTIVATION = None
DEVICE = ‘cuda’
n_class = 1
创建分类的 head
aux_params=dict(
    pooling='avg',             # one of 'avg', 'max'
    activation=None,           # activation function, default is None
    classes=3,                 # define number of output labels
)
创建分割的 head 同时载入模型预训练权重
model = smp.FPN(
    ENCODER,
    classes=n_class,
    encoder_weights=ENCODER_WEIGHTS,
    activation=ACTIVATION,
    aux_params=aux_params
).cuda()
学习率、优化器
learning_rate = 3e-5
optimizer = torch.optim.AdamW(model.parameters(), lr=learning_rate, betas=(0.9, 0.999), eps=1e-08, amsgrad=False)
创建前向传播
bce_loss = torch.nn.BCEWithLogitsLoss().cuda()

def forward_fn(trainer, data):
    images, labels, masks = data
    images, labels, masks = images.cuda(), labels.cuda(), masks.cuda()

    mask, label = model(images)

    loss = bce_loss(label, labels) + 3*bce_loss(mask, masks)

    return (label, mask), loss
训练器的配置
# 训练器的配置
miner = minetorch.Miner(
   code=os.getenv('CODE', f'fold-{fold}'),
   alchemistic_directory=os.getenv('ALCHEMISTIC_DIRECTORY', f'{Folder}{ENCODER}-cutmix-{image_size}'),
   model=model,
   forward=forward_fn,
   optimizer=optimizer,
   train_dataloader=train_loader,
   val_dataloader=val_loader,
   max_epochs=100,
   in_notebook=True,
   loss_func=None,
   amp=True,
   plugins=[MultiClassesSegmentationMetricWithLogic()],
   trival=False,
   resume=False
)
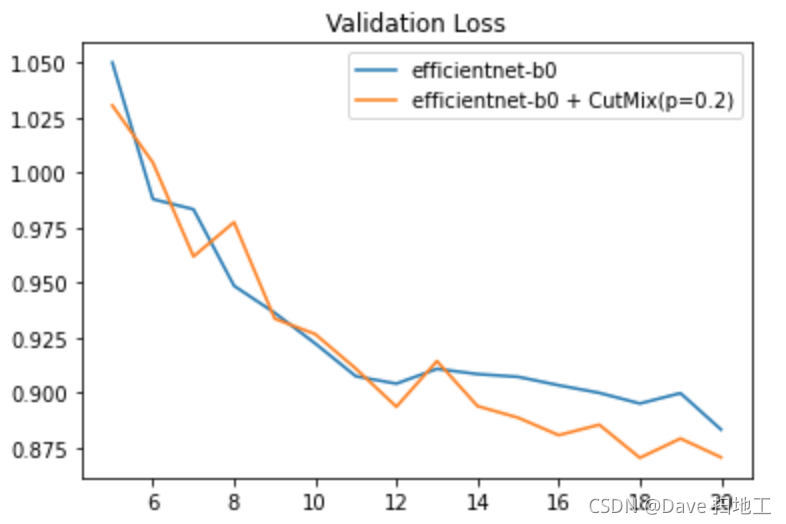
把两个实验的 Loss 画到一张图上来对比一下。
可以清楚的看到 CutMix 操作在同样训练参数的情况下对 Validation 的 Loss 效果更优。
以上就是 CutMix 在图像分类以及分割当中的应用,请小伙伴们参考,如有错误也请大佬指正。


 5811
5811


 被折叠的 条评论
为什么被折叠?
被折叠的 条评论
为什么被折叠?
 到【灌水乐园】发言


