


实验: 混合精度训练对比 (GTX 3090 VS TESLA V100-SXM2)
经常有小伙伴问我 TESLA V100 显存 16GB 比 GTX 3090 的 24GB 少了 8GB,价格还一样,为啥要用 V100 呢?

使用精度低于 32 位浮点数的数字格式有很多好处。首先,它们需要 更少的内存,从而能够训练和部署更大的神经网络。其次,它们需要 更少的内存带宽,从而加快数据传输操作。第三,数学运算在降低精度的情况下 运行得更快,尤其是在具有 Tensor Core 支持该精度的 GPU 上。混合精度训练实现了所有这些好处,同时确保与全精度训练相比不会丢失特定于任务的准确性。
使用混合精度训练需要以下两个步骤:
- 移植模型以使用 FP16 数据类型。
- 添加损失缩放以保留较小的梯度值。
下载数据集
!featurize dataset download 12d20991-7d1a-4722-bf42-b3933bf34689
以下两个包如果自己环境没有的同学请去掉注释运行
#!pip install nvidia-ml-py3 timm
import torch
import timm
import cv2
import os
import nvidia_smi
import random

import pandas as pd
import numpy as np
import matplotlib.pyplot as plt
import seaborn as sns

from datetime import datetime

sns.set_theme(style="whitegrid")

df = pd.read_csv('/home/featurize/data/FMY/train.csv')
df.head(2)

定义 PyTorch 的 Dataset
class Dataset(torch.utils.data.Dataset):

    def __init__(self, df: pd.DataFrame):
        self.df = df

    def __getitem__(self, index: int):
        row = self.df.iloc[index]
        fn = row.image
        # 读取数据
        image = cv2.imread(os.path.join(row.path, fn))
        image = cv2.cvtColor(image, cv2.COLOR_BGR2RGB)

        # 统一数据尺寸
        image = cv2.resize(image, (384, 512), interpolation=cv2.INTER_LINEAR)
        image = image.transpose(2, 0, 1)

        label = np.array([row.label])

        return torch.from_numpy(image).float(), torch.from_numpy(label).float()

    def __len__(self):
        return len(self.df)
创建 PyTorch 的 Dataloader
train_dataset = Dataset(df)
train_dataloader = torch.utils.data.DataLoader(
    train_dataset,
    batch_size=32,
    num_workers=8,
    shuffle=True,
    pin_memory=True
)
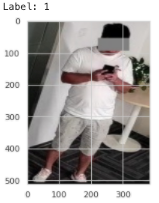
生成随机的样本看一看
image, label = train_dataset.__getitem__(random.randint(0, len(train_dataset)-1))
plt.imshow(image.int().permute(1, 2, 0));
print('Label:', label.int().item())
创建模型、优化器、损失函数
model = timm.create_model('tf_efficientnet_b0', num_classes=1).cuda()
optimizer = torch.optim.SGD(model.parameters(), lr=1e-3, momentum=0.9)
criterion = torch.nn.BCEWithLogitsLoss()
上面的这些都是为实验作准备,选择的都是较小的 b0 模型和基础的损失函数,接下来的 4 个 Cell 分别对比了
GTX 3090
- 单精度
- 混合精度
V100
- 单精度
- 混合精度
所占用的 GPU 显存以及计算速度。更重要的是让小伙伴了解如何使用 PyTorch 半精度进行训练。
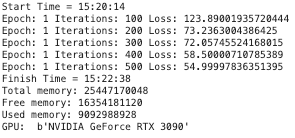
实验一 GTX 3090 VS V100 (单精度)
now = datetime.now()
start_time = now.strftime("%H:%M:%S")
print("Start Time =", start_time)

for epoch in range(1):

    running_loss = 0.0
    for i, data in enumerate(train_dataloader):
        # get the inputs; data is a list of [inputs, labels]
        inputs, labels = data
        inputs, labels = inputs.cuda(), labels.cuda()

        optimizer.zero_grad()

        outputs = model(inputs)
        loss = criterion(outputs, labels)
        loss.backward()
        optimizer.step()

        running_loss += loss.item()
        if i % 100 == 99:    # print every 100 mini-batches
            print(f'Epoch: {epoch + 1} Iterations: {i + 1} Loss: {running_loss}')
            running_loss = 0.0

print('Finished Training')

now = datetime.now()
finish_time = now.strftime("%H:%M:%S")
print("Finish Time =", finish_time)

nvidia_smi.nvmlInit()
handle = nvidia_smi.nvmlDeviceGetHandleByIndex(0)
info = nvidia_smi.nvmlDeviceGetMemoryInfo(handle)

print("Total memory:", info.total)
print("Free memory:", info.free)
print("Used memory:", info.used)
print("GPU: ", nvidia_smi.nvmlDeviceGetName(handle))

nvidia_smi.nvmlShutdown()
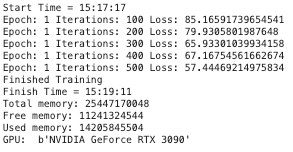
now = datetime.now()
start_time = now.strftime("%H:%M:%S")
print("Start Time =", start_time)
for epoch in range(1):
running_loss = 0.0
for i, data in enumerate(train_dataloader):
# get the inputs; data is a list of [inputs, labels]
inputs, labels = data
inputs, labels = inputs.cuda(), labels.cuda()
optimizer.zero_grad()
outputs = model(inputs)
loss = criterion(outputs, labels)
loss.backward()
optimizer.step()
running_loss += loss.item()
if i % 100 == 99: # print every 100 mini-batches
print(f'Epoch: {epoch + 1} Iterations: {i + 1} Loss: {running_loss}')
running_loss = 0.0
print('Finished Training')
now = datetime.now()
finish_time = now.strftime("%H:%M:%S")
print("Finish Time =", finish_time)
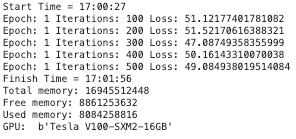
nvidia_smi.nvmlInit()
handle = nvidia_smi.nvmlDeviceGetHandleByIndex(0)
info = nvidia_smi.nvmlDeviceGetMemoryInfo(handle)
print("Total memory:", info.total)
print("Free memory:", info.free)
print("Used memory:", info.used)
print("GPU: ", nvidia_smi.nvmlDeviceGetName(handle))
nvidia_smi.nvmlShutdown()
上面的训练可以看到
GTX 3090
- 显存占用:14205845504
- 计算耗时:114 秒
V100
- 显存占用:13943701504
- 计算耗时:122 秒
V100 单精度计算略慢于 GTX 3090
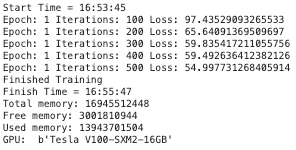
实验二 GTX 3090 VS V100 (半精度)
scaler = torch.cuda.amp.GradScaler()
autocast = torch.cuda.amp.autocast

now = datetime.now()
current_time = now.strftime("%H:%M:%S")
print("Start Time =", current_time)

for epoch in range(1):
    running_loss = 0.0
    for i, data in enumerate(train_dataloader):
        inputs, labels = data
        inputs, labels = inputs.cuda(), labels.cuda()

        optimizer.zero_grad()

        with autocast():
            outputs = model(inputs)
            loss = criterion(outputs, labels)

        scaler.scale(loss).backward()

        scaler.step(optimizer)

        scaler.update()
        running_loss += loss.item()
        if i % 100 == 99:    # print every 100 mini-batches
            print(f'Epoch: {epoch + 1} Iterations: {i + 1} Loss: {running_loss}')
            running_loss = 0.0

now = datetime.now()
current_time = now.strftime("%H:%M:%S")
print("Finish Time =", current_time)

nvidia_smi.nvmlInit()
handle = nvidia_smi.nvmlDeviceGetHandleByIndex(0)
info = nvidia_smi.nvmlDeviceGetMemoryInfo(handle)

print("Total memory:", info.total)
print("Free memory:", info.free)
print("Used memory:", info.used)
print("GPU: ", nvidia_smi.nvmlDeviceGetName(handle))

nvidia_smi.nvmlShutdown()
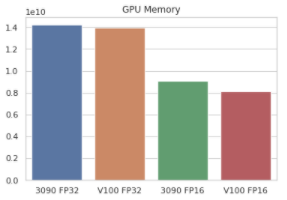
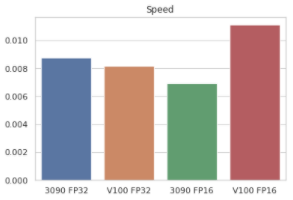
这次的训练可以看到
GTX 3090
- 显存占用:9092988928
- 计算耗时:144 秒
V100
- 显存占用:8084258816
- 计算耗时:90 秒
V100 半精度远高于 GTX 3090 的半精度计算
🎉 半精度训练极大得节约了 GPU 显存,显存占用从之前的 14 GB 左右降低到了 8-9 GB 🎉
sns.barplot(
    x=[
        '3090 FP32',
        'V100 FP32',
        '3090 FP16',
        'V100 FP16'],
    y=[
        14205845504,
        13954187264,
        9092988928,
        8084258816]
).set_title('GPU Memory');
sns.barplot(
    x=[
        '3090 FP32',
        'V100 FP32',
        '3090 FP16',
        'V100 FP16'
    ],
    y=[
        1/114,
        1/122,
        1/144,
        1/90
    ]
).set_title('Speed');
还不会混合精度训练的的同学尽早试一试哦,告别显存吃紧的训练。


 3293
3293

 被折叠的 条评论
为什么被折叠?
被折叠的 条评论
为什么被折叠?
 到【灌水乐园】发言


