


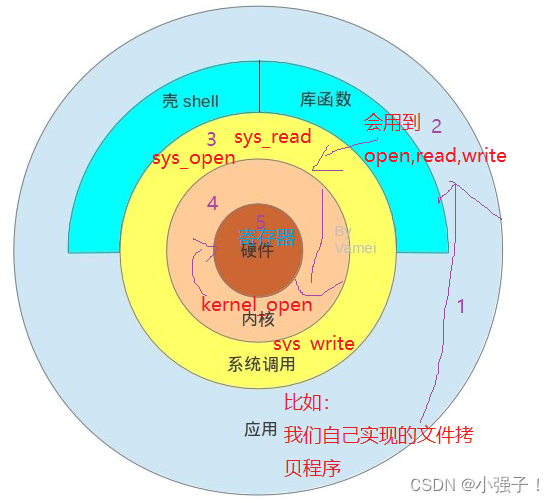
全志H6(ARM-Linux)
1. 部分操作指令
查看 ip 地址ifconfig 或者 ip addr show wlan0
使用指令vimdiff来比对两个文件的差异vimdiff file1 file2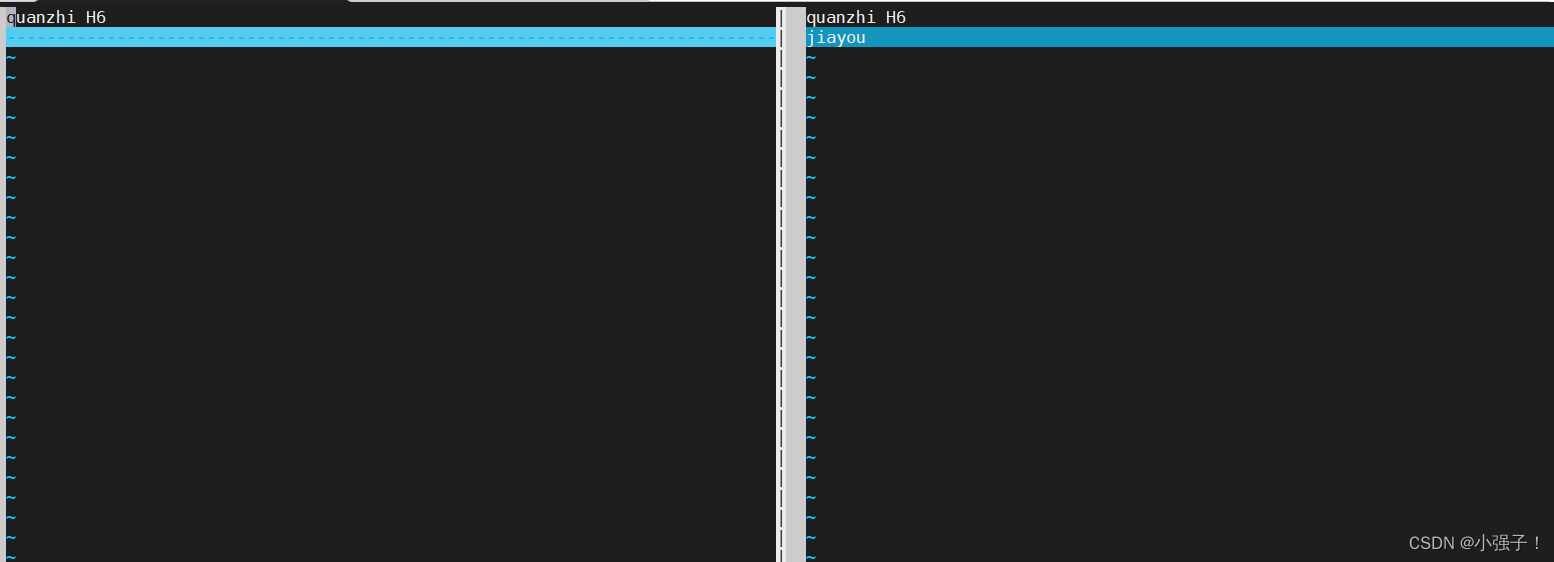
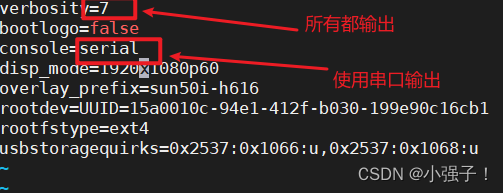
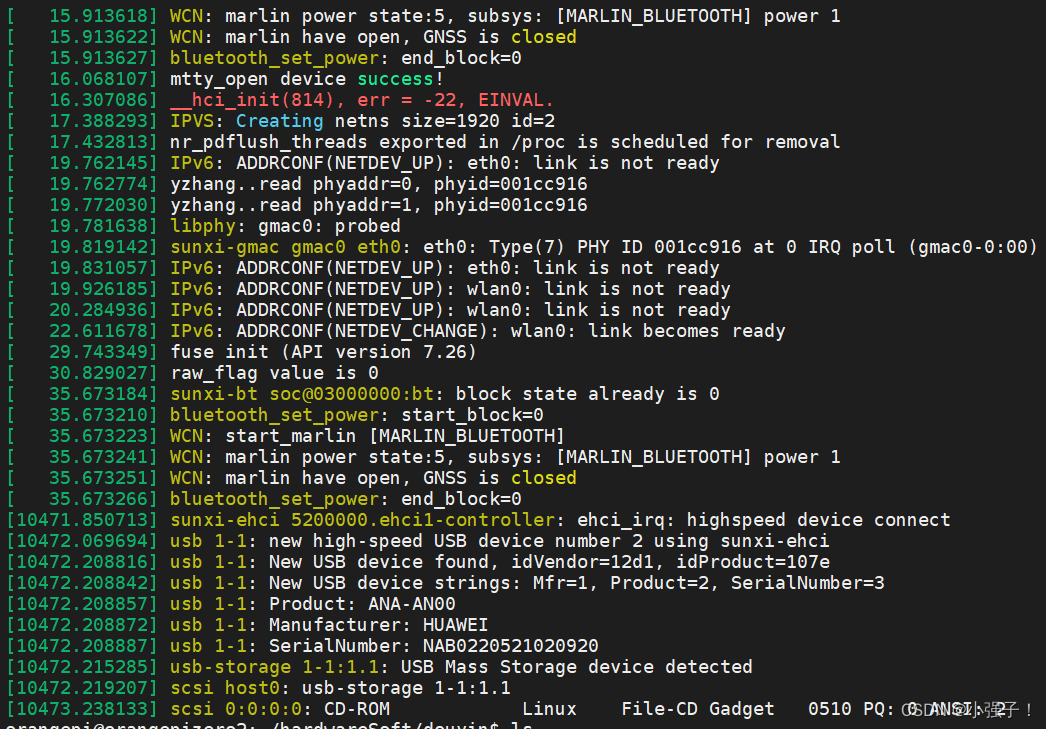
修改开发板内核启动日志级别sudo vi /boot/orangepiEnv.txt
解压压缩包指令:unzip
查看阵脚及功能:gpio readall
首先,我们对全志H6安装外设SDK
git clone https://github.com/orangepi-xunlong/wiringOP //下载源码
cd wiringOP //进入文件夹
sudo ./build clean //清除编译信息
sudo ./build //编译
或者采用外部下载
通过windows浏览器打开https://github.com/orangepi-xunlong/wiringOP
下载压缩包
把压缩包通过xterm传到开发板
解压 unzip xxx.zip
cd xxx
sudo ./build
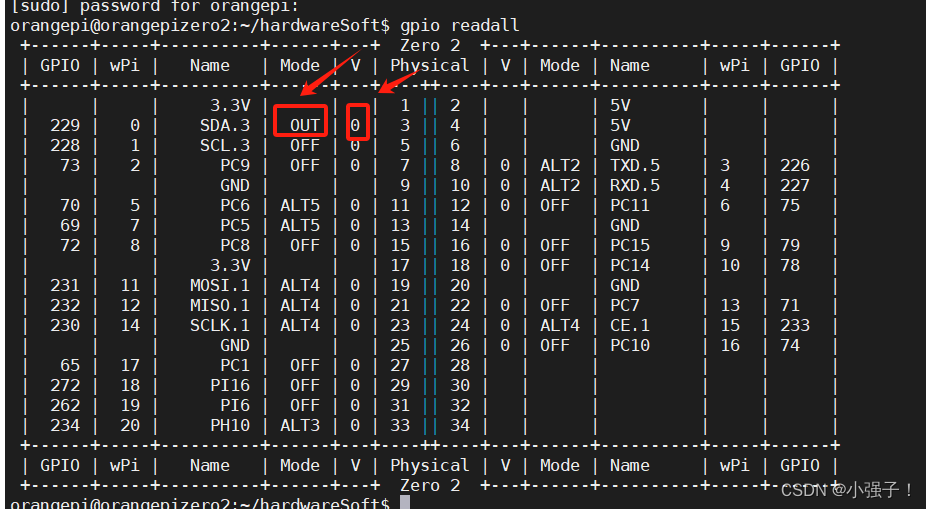
gpio readall
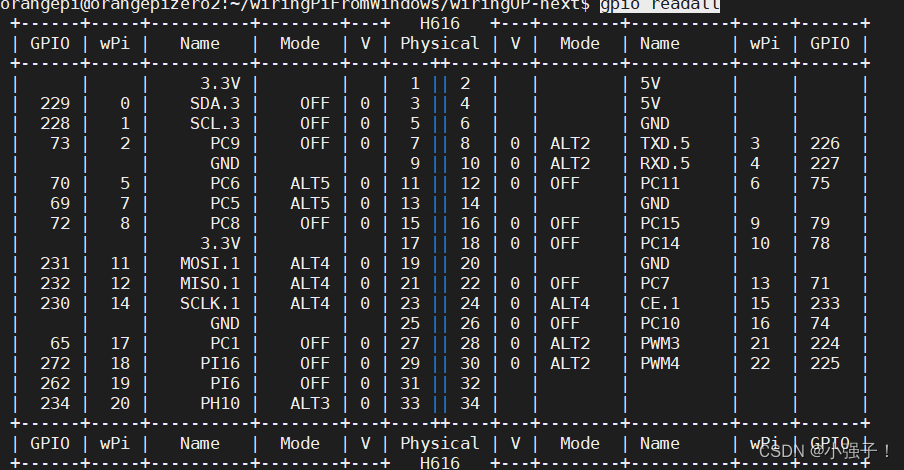
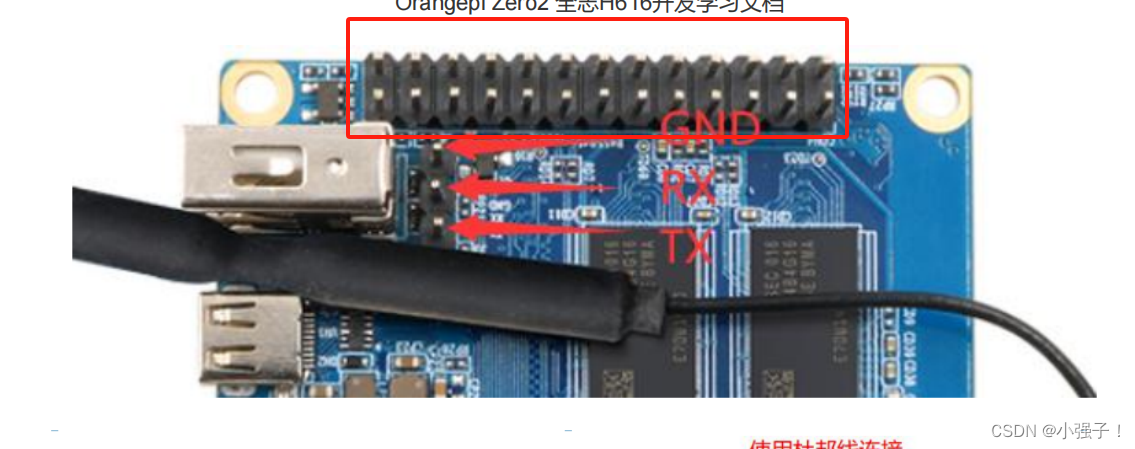
这一排引脚对应上面的端口
2. 蜂鸣器响起来
在解压的压缩包中,有很多部件使用代码,我们使用他们的代码进行更改:cp ../wiringPiFromWindows/wiringOP-master/examples/blink.c .
  1 #include <stdio.h>
  2 #include <wiringPi.h>
  3
  4 #define BEEP 0   //设置针脚0为蜂鸣器的控制引脚
  5
  6 int main (void)
  7 {
  8
  9     wiringPiSetup () ;//配置初始化wiringPi库
 10
 11     pinMode (BEEP, OUTPUT) ;//设置IO口的输入输出,输出
 12
 13     digitalWrite (BEEP, LOW) ;  // 设置IO口输出低电平,蜂鸣器响
 14
 15     return 0;
 16 }
当我们正常编译 blink.c 时报错的,是需要其他东西才能编译
输入相关指令查看需要额外添加的指令:vi ../wiringPiFromWindows/wiringOP-master/examples/Makefile
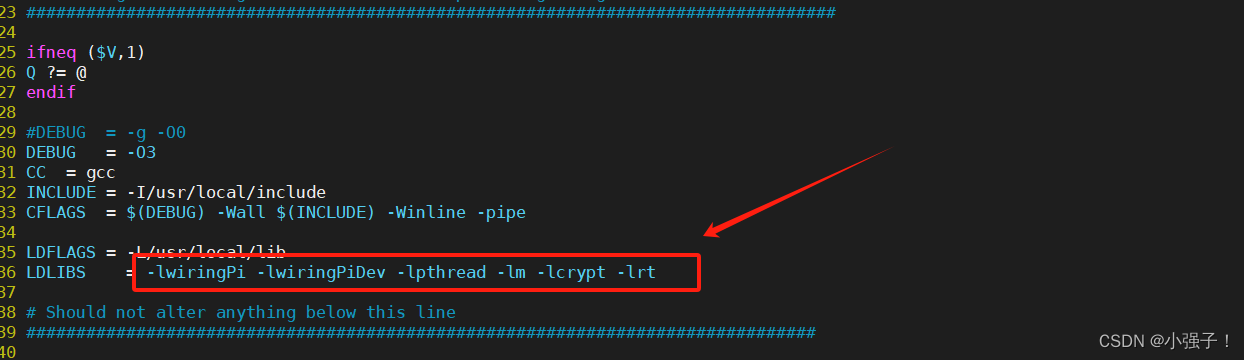
即是我们所需,复制其内容: gcc blink.c -lwiringPi -lwiringPiDev -lpthread -lm -lcrypt -lrt
but 我们不能每回都丝毫不差的记住这么多的后缀,那么我们来编写一个脚本吧:vi build.sh
//build.sh
gcc blink.c -lwiringPi -lwiringPiDev -lpthread -lm -lcrypt -lrt

当对a.out运行时,需要超级用户的权限,sudo ./a.out
更改一下,让蜂鸣器输出高电平
1 #include <stdio.h>
2 #include <wiringPi.h>
3
4 #define BEEP 0 //设置针脚0为蜂鸣器的控制引脚
5
6 int main (void)
7 {
8
9 wiringPiSetup () ;//配置初始化wiringPi库
10
11 pinMode (BEEP, OUTPUT) ;//设置IO口的输入输出,输出
12
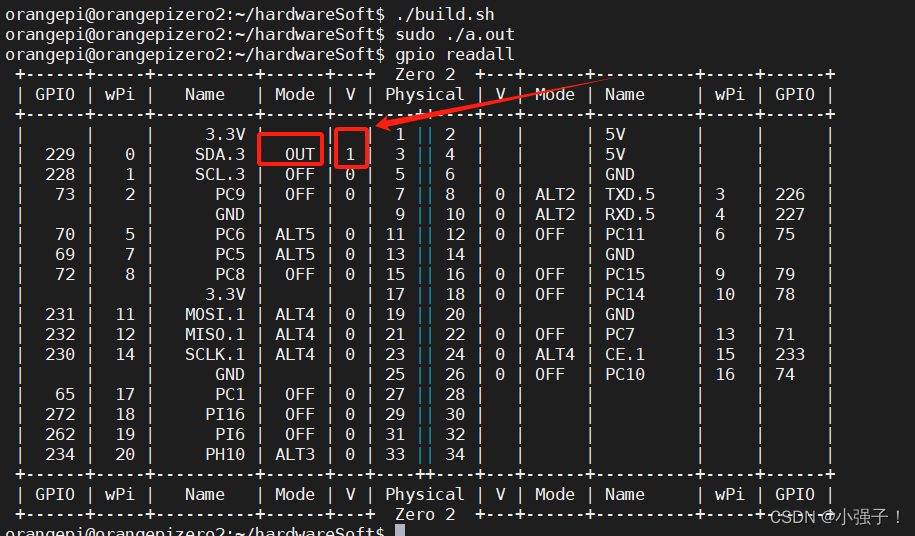
13 digitalWrite (BEEP, HIGH) ; // 设置IO口输出低电平,蜂鸣器响
14
15 return 0;
16 }
并运行脚本./build.sh
接下来,我们让蜂鸣器循环响起
  1 #include <stdio.h>
  2 #include <wiringPi.h>
  3 #include <unistd.h>
  4
  5 #define BEEP 0   //设置针脚0为蜂鸣器的控制引脚
  6
  7 int main (void)
  8 {
  9     wiringPiSetup () ;//配置初始化wiringPi库
 10
 11     pinMode (BEEP, OUTPUT) ;//设置IO口的输入输出,输出
 12     while(1){
 13         //sleep(1);
 14         usleep(500000);//500ms
 15         digitalWrite (BEEP, HIGH) ; // 设置IO口输出低电平,蜂鸣器响
 16         //sleep(1);
 17         usleep(500000);//500ms
 18         digitalWrite (BEEP, LOW) ;  // 设置IO口输出低电平,蜂鸣器响
 19     }
 20     return 0;
 21 }
对于脚本 build.sh 只能内部指定文件,那么我们进行修改:
gcc $1 -lwiringPi -lwiringPiDev -lpthread -lm -lcrypt -lrt
以后编译文件只需要执行:./build.sh xxx
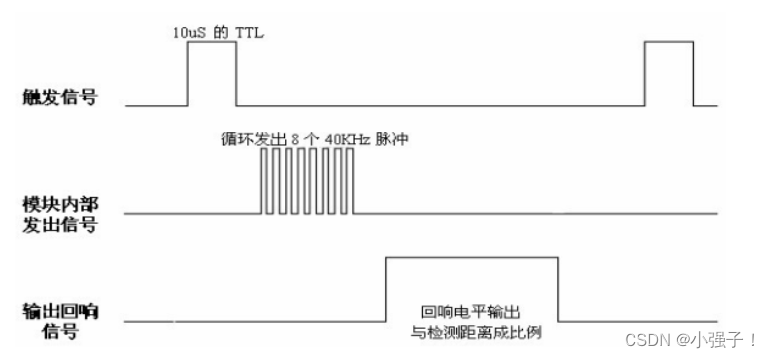
3. 超声波测距
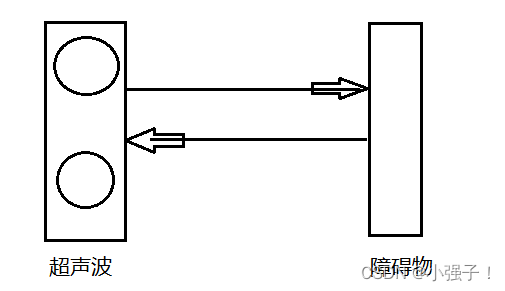
- 怎么让它发波
Trig,给Trig端口至少10us的高电平 - 怎么知道开始发了
Echo信号,由低电平跳转到高电平,表示开始发送波 - 怎么知道接收了返回波
Echo,由高电平跳转回低电平,表示波回来了 - 怎么算时间
Echo引脚维持高电平的时间!
波发出去的那一下,开始启动定时器
波回来的拿一下,我们开始停止定时器,计算出中间经过多少时间 - 怎么算距离
距离=速度(340m/s)*时间/2
3.1 时间函数
#include<sys/time.h>
int gettimeofday(struct timeval *tv,struct timezone *tz )
gettimeofday()会把目前的时间用tv 结构体返回,当地时区的信息则放到tz所指的结构中

struct timeval
{
	long tv_sec;/*秒*/
	long tv_usec;/*微妙*/
};
3.2 测试代码
  1 #include<sys/time.h>
  2 #include <stdio.h>
  3
  4 int main()
  5 {
  6     //int gettimeofday(struct timeval *tv,struct timezone *tz )
  7     struct timeval tv;
  8     gettimeofday(&tv,NULL);
  9
 10     printf("sec=%ld,usec=%ld\n",tv.tv_sec,tv.tv_usec);
 11
 12     return 0;
 13 }

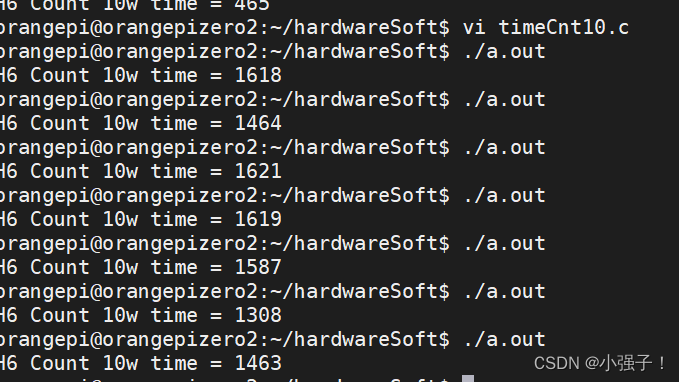
我们计算一下全志H6 数10w次 消耗时间:
  1 #include<sys/time.h>
  2 #include <stdio.h>
  3
  4 void cntTest()
  5 {
  6     int i,j;
  7     for(i=0;i<100;i++)
  8         for(j=0;j<1000;j++);
  9 }
 10
 11 int main()
 12 {
 13     //int gettimeofday(struct timeval *tv,struct timezone *tz )
 14     struct timeval timeStart;
 15     struct timeval timeStop;
 16
 17     gettimeofday(&timeStart,NULL);//时间计时点
 18     cntTest();
 19     gettimeofday(&timeStop,NULL);//时间结束点
 20
 21     long diffTime = 1000000*(timeStop.tv_sec - timeStart.tv_sec) + (timeStop.tv_usec - timeStart.tv_usec);
 22
 24     printf("H6 Count 10w time = %ld\n",diffTime);
 25
 26     return 0;
 27 }
3.3 超声波代码实现
  1 #include <stdio.h>
  2 #include <sys/time.h>
  3 #include <wiringPi.h>
  4 #include <stdlib.h>
  5 #include <unistd.h>
  6
  7 #define Trig 0
  8 #define Echo 1
  9
 10 double getDistance()
 11 {
 12     double dis;
 13
 14     struct timeval timeStart;
 15     struct timeval timeStop;
 16
 17     pinMode(Trig,OUTPUT);
 18     pinMode(Echo,INPUT);
 19
 20     digitalWrite(Trig,LOW);
 21     usleep(5);
 22
 23     digitalWrite(Trig,HIGH);
 24     usleep(10);
 25     digitalWrite(Trig,LOW);
 26     /* above init CSB*/
 27
 28     while(!digitalRead(Echo));
 29     gettimeofday(&timeStart,NULL);
 30     while(digitalRead(Echo));
 31     gettimeofday(&timeStop,NULL);
 32
 33     long diffTime = 1000000*(timeStop.tv_sec - timeStart.tv_sec) + (timeStop.tv_usec - timeStart.tv_usec);
 34     printf("diffTime=%ld\n",diffTime);
 35     dis =(double)diffTime/1000000 * 34000 / 2;
 36
 37     return dis;
 38 }
 39
 40 int main()
 41 {
 42     double dis;
 43
 44     if(wiringPiSetup() == -1){
 45         fprintf(stderr,"%s","initWiringPi error");
 46         exit(-1);
 47     }
 48
 49     while(1){
 50         printf("超声波开始测距:\n");
 51         dis = getDistance();
 52         printf("dis = %lf\n",dis);
 53         usleep(500000);
 54     }
 55
 56     return 0;
 57 }
4. SG90舵机开发
| 高电平持续时间 | 低电平持续时间 | 波形图 | 角度 |
|---|---|---|---|
| 0.5ms | 19.5ms | 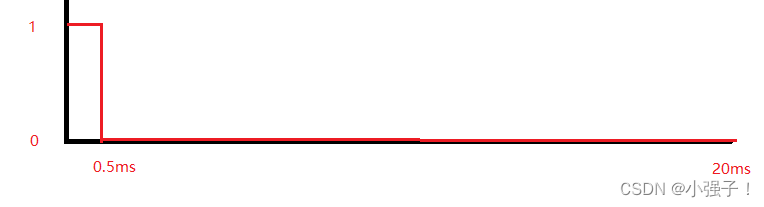 | 0 |
| 1.0ms | 19ms |  | 45 |
| 1.5ms | 18.5ms |  | 90 |
| 2.0ms | 18ms | 如上图推理 | 135 |
| 2.5ms | 17.5ms | 如上图推理 | 180 |
4.1 Linux定时器
struct timeval
{
	__time_t tv_sec; /* Seconds. */
	__suseconds_t tv_usec; /* Microseconds. */
};

struct itimerval
{
	/* Value to put into `it_value' when the timer expires. */
	struct timeval it_interval;
	/* Time to the next timer expiration. */
	struct timeval it_value;
};
it_interval:计时器的初始值,一般基于这个初始值来加或者来减,看控制函数的参数配置
it_value:程序跑到这之后,多久启动定时器

int setitimer (__itimer_which_t __which,
				const struct itimerval *__restrict __new,
				struct itimerval *__restrict __old)
setitimer()将value指向的结构体设为计时器的当前值,如果ovalue不是NULL,将返回计时器原有值。
which:三种类型
ITIMER_REAL //数值为0,计时器的值实时递减,发送的信号是 SIGALRM。
ITIMER_VIRTUAL //数值为1,进程执行时递减计时器的值,发送的信号是SIGVTALRM。
ITIMER_PROF //数值为2,进程和系统执行时都递减计时器的值,发送的信号是SIGPROF。
很明显,这边需要捕获对应的信号进行逻辑相关处理 signal(SIGALRM,signal_handler);
返回说明:成功执行时,返回0。失败返回-1
开始编程实战:每隔1s输出一个hello
  1 #include "stdio.h"
  2 #include "sys/time.h"
  3 #include "stdlib.h"
  4 #include "signal.h"
  5
  6 static int i;
  7
  8 void signal_handler(int signum)
  9 {
 10     i++;
 11     if(i == 2000){
 12         printf("hello\n");
 13         i = 0;
 14     }
 15 }
 16
 17 int main()
 18 {
 19     struct itimerval itv;
 20     /*
 21     struct timeval
 22     {
 23         __time_t tv_sec; // Seconds. 秒
 24         __suseconds_t tv_usec; // Microseconds. 微妙
 25     };
 26
 27     struct itimerval
 28     {
 29         //it_interval:计时器的初始值,一般基于这个初始值来加或者来减,看控制函数的参数配置
 30         struct timeval it_interval;
 31         //it_value:程序跑到这之后,多久启动定时器
 32         struct timeval it_value;
 33     };
 34     */
 35     //设定定时时间 --0.5ms
 36     itv.it_interval.tv_sec = 0;
 37     itv.it_interval.tv_usec = 500;
 38     //设定开始生效,启动定时器的时间
 39     itv.it_value.tv_sec = 1;
 40     itv.it_value.tv_usec = 0;
 41     //设定定时方式
 42     /*
 43      int setitimer (__itimer_which_t __which,
 44                 const struct itimerval *__restrict __new,
 45                 struct itimerval *__restrict __old)
 46      */
 47     if(setitimer(ITIMER_REAL , &itv , NULL) == -1){
 48         perror("error");
 49         exit(-1);
 50     }
 51     //信号处理
 52     signal(SIGALRM,signal_handler);
 53
 54     while(1);
 55
 56     return 0;
 57 }
4.2 SG90舵机控制
   1 #include <stdio.h>
  2 #include <sys/time.h>
  3 #include <stdlib.h>
  4 #include <signal.h>
  5 #include <wiringPi.h>
  6
  7 #define SG90Pin 5
  8
  9 int jd = 2;
 10 static int i = 0;
 11 void signal_handler(int signum)
 12   {
 13       if(i <= jd){
 14           digitalWrite(SG90Pin,HIGH);
 15       }else{
 16           digitalWrite(SG90Pin,LOW);
 17       }
 18       if(i == 40){//1s打印
 19           i = 0;
 20         }
 21      i++;
 22 }
 23
 24 int main()
 25 {
 26     struct itimerval itv;
 27     jd = 0;
 28     wiringPiSetup();
 29     pinMode(SG90Pin,OUTPUT);
 30     /*
 31     struct timeval
 32     {
 33         __time_t tv_sec; // Seconds. 秒
 34         __suseconds_t tv_usec; // Microseconds. 微妙
 35     };
 36
 37     struct itimerval
 38     {
 39         //it_interval:计时器的初始值,一般基于这个初始值来加或者来减,看控制函数的参数配置
 40         struct timeval it_interval;
 41         //it_value:程序跑到这之后,多久启动定时器
 42         struct timeval it_value;
 43     };
 44     */
 45     //设定定时时间 --0.5ms
 46     itv.it_interval.tv_sec = 0;
 47     itv.it_interval.tv_usec = 500;
 48     //设定开始生效,启动定时器的时间
 49     itv.it_value.tv_sec = 1;
 50     itv.it_value.tv_usec = 0;
 51     //设定定时方式
 52     /*
 53      int setitimer (__itimer_which_t __which,
 54                 const struct itimerval *__restrict __new,
 55                 struct itimerval *__restrict __old)
 56      */
 57     if(setitimer(ITIMER_REAL , &itv , NULL) == -1){
 58         perror("error");
 59         exit(-1);
 60     }
 61     //信号处理
 62     signal(SIGALRM,signal_handler);
 63
 64     while(1){
 65         printf("input jd: 1-0 2-45 3-90 4-135\n");
 66         scanf("%d",&jd);
 67     }
 68
 69     return 0;
 70 }
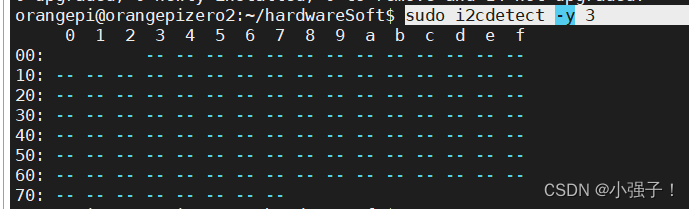
5. IIC接口OLED屏幕
安装I2c-tools:sudo apt-get install i2c-tools 并使用指令:sudo i2cdetect -y 3来查看
复制官方的OLED代码到自己的文件下:cp ../wiringPiFromWindows/wiringOP-master/examples/oled_demo.c .
编译并运行:./build.sh oled_demo.c /dev/i2c-3 | sudo ./a.out /dev/i2c-3
 12 #include <errno.h>
 13 #include <string.h>
 14 #include <stdio.h>
 15 #include <stdlib.h>
 16 #include <time.h>
 17 #include <stdint.h>
 18
 19 #include "oled.h"
 20 #include "font.h"
 21
 22 int oled_show(struct display_info *disp) {
 23     int i;
 24     char buf[100];
 25
 26     //void oled_putstrto(struct display_info *disp, uint8_t x, uint8_t y, char *str)
 27     oled_putstrto(disp, 0, 9+1, "Welcome to My HomeAssitant");
 28     disp->font = font1;
 29     oled_putstrto(disp, 0, 20, "        Mr.qiang");
 30     disp->font = font2;
 31
 32     oled_send_buffer(disp);
 33
 34     return 0;
 35 }
 36
 37 void show_error(int err, int add) {
 38     //const gchar* errmsg;
 39     //errmsg = g_strerror(errno);
 40     printf("\nERROR: %i, %i\n\n", err, add);
 41     //printf("\nERROR\n");
 42 }
 43
 44 void show_usage(char *progname) {
 45     printf("\nUsage:\n%s <I2C bus device node >\n", progname);
 46 }
 47
 48 int main(int argc, char **argv) {
 49     int e;
 50     char filename[32];
 51     struct display_info disp;
 52
 53     if (argc < 2) {
 54         show_usage(argv[0]);
 55
 56         return -1;
 57     }
 58
 59     memset(&disp, 0, sizeof(disp));
 60     sprintf(filename, "%s", argv[1]);
 61     disp.address = OLED_I2C_ADDR;
 62     disp.font = font2;
 63
 64     e = oled_open(&disp, filename);
 65     e = oled_init(&disp);
 66
 67     oled_show(&disp);
 68     return 0;
 69 }
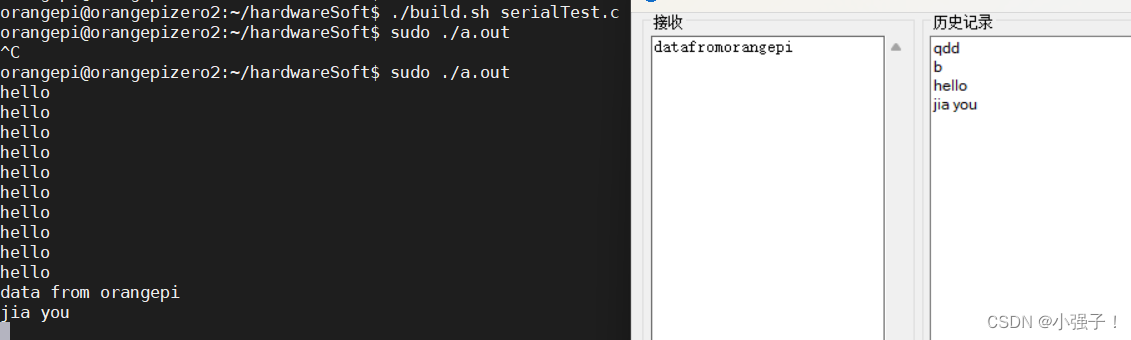
6. 串口开发
官网代码中有其对应的代码:cp ../wiringPiFromWindows/wiringOP-master/examples/serialTest.c .

  5 #include <stdio.h>
  6 #include <string.h>
  7 #include <errno.h>
  8 #include <pthread.h>
  9 #include <wiringPi.h>
 10 #include <wiringSerial.h>
 11 #include <stdlib.h>
 12
 13 int fd;
 14
 15 void* Sendhandler()
 16 {
 17     char *sendBuf = (char *)malloc(32*sizeof(32));
 18     while(1){
 19         memset(sendBuf,'\0',32);
 20         scanf("%s",sendBuf);
 21         while(*sendBuf){
 22             serialPutchar (fd, *sendBuf++);
 23         }
 24     }
 25 }
 26
 27 void* Revhandler()
 28 {
 29     while(1){
 30         while (serialDataAvail (fd))
 31         {
 32             printf ("%c", serialGetchar (fd)) ;
 33             fflush (stdout) ;
 34         }
 35     }
 36 }
 37
 38 int main ()
 39 {
 40     int count ;
 41     unsigned int nextTime ;
 42
 43     pthread_t idSend;
 44     pthread_t idRev;
 45
 46     if ((fd = serialOpen ("/dev/ttyS5", 115200)) < 0)
 47     {
 48         fprintf (stderr, "Unable to open serial device: %s\n", strerror (errno)) ;
 49         return 1 ;
 50     }
 51
 52     pthread_create(&idSend,NULL,Sendhandler,NULL);
 53     pthread_create(&idRev,NULL,Revhandler,NULL);
 54
 55     if (wiringPiSetup () == -1)
 56     {
 57         fprintf (stdout, "Unable to start wiringPi: %s\n", strerror (errno)) ;
 58         return 1 ;
 59     }
 60
 61     while(1) sleep(10);
 62
 63     printf ("\n") ;
 64     return 0 ;
 65 }
此处涉及线程部分知识点,请查看:线程 进行查漏补缺!
  1 #include <stdio.h>
  2 #include <stdlib.h>
  3 #include <stdint.h>
  4 #include <stdarg.h>
  5 #include <string.h>
  6 #include <termios.h>
  7 #include <unistd.h>
  8 #include <fcntl.h>
  9 #include <sys/ioctl.h>
 10 #include <sys/types.h>
 11 #include <sys/stat.h>
 12
 13 #include "wiringSerial.h"
 14
 15 int myserialOpen (const char *device, const int baud)
 16 {
 17     struct termios options ;
 18     speed_t myBaud ;
 19     int     status, fd ;
 20     switch (baud){
 21         case    9600:   myBaud =    B9600 ; break ;
 22         case  115200:   myBaud =  B115200 ; break ;
 23     }
 24     if ((fd = open (device, O_RDWR | O_NOCTTY | O_NDELAY | O_NONBLOCK)) == -1)
 25         return -1 ;
 26     fcntl (fd, F_SETFL, O_RDWR) ;
 27
 28 // Get and modify current options:
 29
 30     tcgetattr (fd, &options) ;
 31
 32     cfmakeraw   (&options) ;
 33     cfsetispeed (&options, myBaud) ;
 34     cfsetospeed (&options, myBaud) ;
 35
 36     options.c_cflag |= (CLOCAL | CREAD) ;
 37     options.c_cflag &= ~PARENB ;
 38     options.c_cflag &= ~CSTOPB ;
 39     options.c_cflag &= ~CSIZE ;
 40     options.c_cflag |= CS8 ;
 41     options.c_lflag &= ~(ICANON | ECHO | ECHOE | ISIG) ;
 42     options.c_oflag &= ~OPOST ;
 43
 44     options.c_cc [VMIN]  =   0 ;
 45     options.c_cc [VTIME] = 100 ;    // Ten seconds (100 deciseconds)
 46
 47     tcsetattr (fd, TCSANOW, &options) ;
 48
 49     ioctl (fd, TIOCMGET, &status);
 50
 51     status |= TIOCM_DTR ;
 52     status |= TIOCM_RTS ;
 53
 54     ioctl (fd, TIOCMSET, &status);
 55
 56     usleep (10000) ;    // 10mS
 57
 58     return fd ;
 59 }
 60
 61 void myseralSendstring (const int fd, const char *s)
 62 {
 63     int ret;
 64     ret = write (fd, s, strlen (s));
 65     if (ret < 0)
 66         printf("Serial Puts Error\n");
 67 }
 68
 69 int serialGetstring (const int fd,char *buffer)
 70 {
 71     int n_read;
 72     n_read = read(fd,buffer,32);
 73     return n_read;
 74 }
  1 #include <stdio.h>
  2 #include <stdlib.h>
  3 #include <stdint.h>
  4 #include <stdarg.h>
  5 #include <string.h>
  6 #include <termios.h>
  7 #include <unistd.h>
  8 #include <fcntl.h>
  9 #include <sys/ioctl.h>
 10 #include <sys/types.h>
 11 #include <sys/stat.h>
 12 #include <pthread.h>
 13 #include <unistd.h>
 14 #include "uartTool.h"

 15 int fd;
 16
 17 void* readSerial()
 18 {
 19     char buffer[32];
 20     while(1){
 21         memset(buffer,'\0',sizeof(buffer));
 22         serialGetstring(fd,buffer);
 23         printf("GET->%s\n",buffer);
 24     }
 25 }
 26
 27 void* sendSerial()
 28 {
 29     char buffer[32];
 30     while(1){
 31         memset(buffer,'\0',sizeof(buffer));
 32         scanf("%s",buffer);
 33         myseralSendstring(fd,buffer);
 34     }
 35 }
 36
 37 int main(int argc,char **argv)
 38 {
 39     char deviceName[32] = {'\0'};
 40		//定义两个线程--读和写
 41     pthread_t readt;
 42     pthread_t sendt;
 43
 44     if(argc < 2){
 45         printf("uage:%s /dev/ttyS?\n",argv[0]);
 46         return -1;
 47     }
 48
 49     strcpy(deviceName,argv[1]);//把传输进来的argv[1]拷贝到deviceName
 50
 51     if((fd = myserialOpen(deviceName,115200)) == -1){
 52         printf("open %s error\n",deviceName);
 53         return -1;
 54     }
 55
 56     //启动线程
 57     pthread_create(&readt,NULL,readSerial,NULL);
 58     pthread_create(&sendt,NULL,sendSerial,NULL);
 59
 60     while(1) sleep(10);
 61
 62     return 0;
 63 }
运行程序:gcc uartTest.c uartTool.c -lpthread
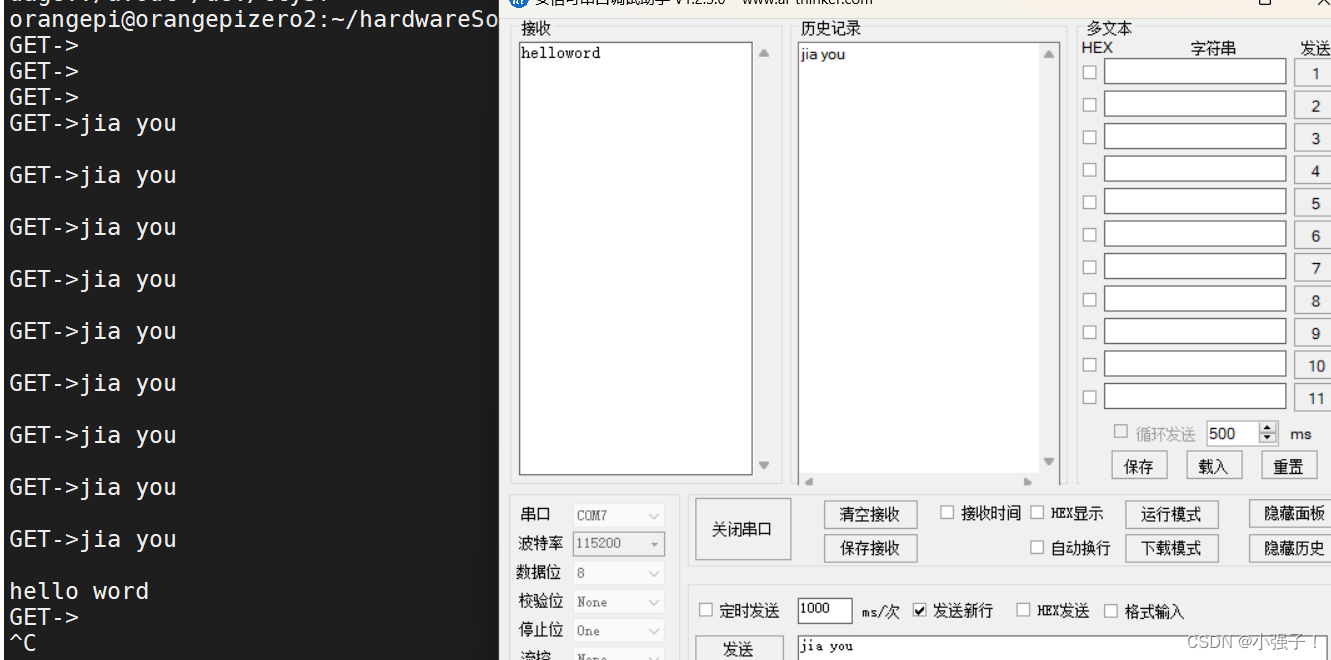
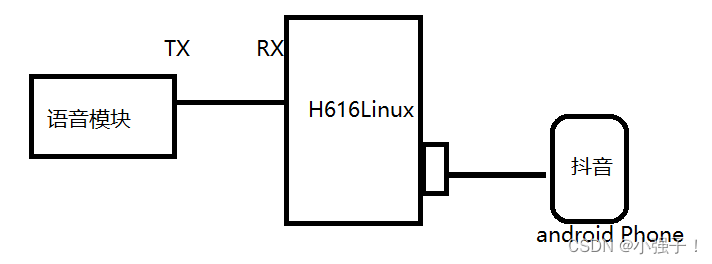
7. 串口应用-语音模块数据交互
语言控制刷抖音
7.1 前期操作
//uartTool.c
  1 #include <stdio.h>
  2 #include <stdlib.h>
  3 #include <stdint.h>
  4 #include <stdarg.h>
  5 #include <string.h>
  6 #include <termios.h>
  7 #include <unistd.h>
  8 #include <fcntl.h>
  9 #include <sys/ioctl.h>
 10 #include <sys/types.h>
 11 #include <sys/stat.h>
 12
 13 #include "wiringSerial.h"
 14
 15 char myserialGetchar (const int fd)
 16 {
 17   char x ;
 18
 19   if (read (fd, &x, 1) != 1)
 20     return -1 ;
 21
 22   return x ;
 23 }
 24
 25 int myserialOpen (const char *device, const int baud)
 26 {
 27     struct termios options ;
 28     speed_t myBaud ;
 29     int     status, fd ;
 30     switch (baud){
 31         case    9600:   myBaud =    B9600 ; break ;
 32         case  115200:   myBaud =  B115200 ; break ;
 33     }
 34     if ((fd = open (device, O_RDWR | O_NOCTTY | O_NDELAY | O_NONBLOCK)) == -1)
 35         return -1 ;
 36     fcntl (fd, F_SETFL, O_RDWR) ;
 37
 38 // Get and modify current options:
 39
 40     tcgetattr (fd, &options) ;
 41
 42     cfmakeraw   (&options) ;
 43     cfsetispeed (&options, myBaud) ;
 44     cfsetospeed (&options, myBaud) ;
 45
 46     options.c_cflag |= (CLOCAL | CREAD) ;
 47     options.c_cflag &= ~PARENB ;
 48     options.c_cflag &= ~CSTOPB ;
 49     options.c_cflag &= ~CSIZE ;
 50     options.c_cflag |= CS8 ;
 51     options.c_lflag &= ~(ICANON | ECHO | ECHOE | ISIG) ;
 52     options.c_oflag &= ~OPOST ;
 53
 54     options.c_cc [VMIN]  =   0 ;
 55     options.c_cc [VTIME] = 100 ;    // Ten seconds (100 deciseconds)
 56
 57     tcsetattr (fd, TCSANOW, &options) ;
 58
 59     ioctl (fd, TIOCMGET, &status);
 60
 61     status |= TIOCM_DTR ;
 62     status |= TIOCM_RTS ;
 63
 64     ioctl (fd, TIOCMSET, &status);
 65
 66     usleep (10000) ;    // 10mS
 67
 68     return fd ;
 69 }
 70
 71 void myseralSendstring (const int fd, const char *s)
 72 {
 73     int ret;
 74     ret = write (fd, s, strlen (s));
 75     if (ret < 0)
 76         printf("Serial Puts Error\n");
 77 }
 78
 79 int serialGetstring (const int fd,char *buffer)
 80 {
 81     int n_read;
 82     n_read = read(fd,buffer,32);
 83     return n_read;
 84 }
//uartTest.c
  1 #include <stdio.h>
  2 #include <stdlib.h>
  3 #include <stdint.h>
  4 #include <stdarg.h>
  5 #include <string.h>
  6 #include <termios.h>
  7 #include <unistd.h>
  8 #include <fcntl.h>
  9 #include <sys/ioctl.h>
 10 #include <sys/types.h>
 11 #include <sys/stat.h>
 12 #include <pthread.h>
 13 #include <unistd.h>
 14 #include "uartTool.h"
 15
 16 int fd;
 17
 18 void* readSerial()
 19 {
 20     char cmd;
 21     while(1){
 22         cmd = myserialGetchar(fd);
 23         printf("GET->0x%c\n",cmd);
 24         switch(cmd){
 25             case 'N':
 26                 printf("next\n");
 27                 break;
 28             case 'P':
 29                 printf("pre\n");
 30                 break;
 31             case 'Z':
 32                 printf("zan\n");
 33                 break;
 34             case 'Q':
 35                 printf("quxiao\n");
 36                 break;
 37
 38         }
 39     }
 40 }
 41
 42 int main(int argc,char **argv)
 43 {
 44     char deviceName[32] = {'\0'};
 45
 46     pthread_t readt;
 47
 48     if(argc < 2){
 49         printf("uage:%s /dev/ttyS?\n",argv[0]);
 50         return -1;
 51     }
 52
 53     strcpy(deviceName,argv[1]);//把传输进来的argv[1]拷贝到deviceName
 54
 55     if((fd = myserialOpen(deviceName,115200)) == -1){
 56         printf("open %s error\n",deviceName);
 57         return -1;
 58     }
 59
 60     //启动线程
 61     pthread_create(&readt,NULL,readSerial,NULL);
 62
 63     while(1) sleep(10);
 64
 65     return 0;
 66 }
把手机与香橙派连接并可使用指令进行查看信息:dmesg
使用adb指令:sudo apt-get install adb 注意当使用上述指令无序号时

需要手机端打开USB调试

7.2 用shell指令来操作手机屏幕,模拟手动滑屏幕
adb shell input swipe 540 1300 540 500 100 向下滑动540是水平的,1300是竖直方向,下 是
500
adb shell input swipe 540 500 540 1300 100 向上滑动
adb shell "seq 3 | while read i;do input tap 350 1050 & input tap 350 1050 & sleep 0.01;done;" 点赞
adb shell input keyevent 26 锁屏
7.3 总体程序
  1 #include <stdio.h>
  2 #include <stdlib.h>
  3 #include <stdint.h>
  4 #include <stdarg.h>
  5 #include <string.h>
  6 #include <termios.h>
  7 #include <unistd.h>
  8 #include <fcntl.h>
  9 #include <sys/ioctl.h>
 10 #include <sys/types.h>
 11 #include <sys/stat.h>
 12 #include <pthread.h>
 13 #include <unistd.h>
 14 #include "uartTool.h"
 15
 16 int fd;
 17
 18 void* readSerial()
 19 {
 20     char cmd;
 21     while(1){
 22         cmd = myserialGetchar(fd);
 23         printf("GET->0x%c\n",cmd);
 24         switch(cmd){
 25             case 'N':
 26                 printf("next\n");
 27                 system("adb shell input swipe 540 1300 540 500 100");
 28                 break;
 29             case 'P':
 30                 printf("pre\n");
 31                 system("adb shell input swipe 540 500 540 1300 100");
 32                 break;
 33             case 'Z':
 34                 printf("zan\n");
 35                 system("adb shell \"seq 3 | while read i;do input tap 350 1050 & input tap 350 1050 & sleep 0.01;done;\"");
 36                 break;
 37             case 'Q':
 38                 printf("quxiao\n");
 39                 system("adb shell input keyevent 26");
 40                 break;
 41
 42         }
 43     }
 44 }
 45
 46 int main(int argc,char **argv)
 47 {
 48     char deviceName[32] = {'\0'};
 49
 50     pthread_t readt;
 51
 52     if(argc < 2){
 53         printf("uage:%s /dev/ttyS?\n",argv[0]);
 54         return -1;
 55     }
 56
 57     strcpy(deviceName,argv[1]);//把传输进来的argv[1]拷贝到deviceName
 58
 59     if((fd = myserialOpen(deviceName,115200)) == -1){
 60         printf("open %s error\n",deviceName);
 61         return -1;
 62     }
 63
 64     //启动线程
 65     pthread_create(&readt,NULL,readSerial,NULL);
 66
 67     while(1) sleep(10);
 68
 69     return 0;
 70 }
8. Linux的热拔插UDEV机制
8.1 简介
udev是一个设备管理工具,udev以守护进程的形式运行,通过侦听内核发出来的uevent来管理/dev目录下的设备文件。udev在用户空间运行,而不在内核空间运行。它能够根据系统中的硬件设备的状态动态更新设备文件,包括设备文件的创建,删除等。设备文件通常放在/dev目录下。使用udev后,在/dev目录下就只包含系统中真正存在的设备。
8.2 守护进程
Linux Daemon(守护进程)是运行在后台的一种特殊进程。它独立于控制终端并且周期性地执行某种任务或等待处理某些发生的事件。它不需要用户输入就能运行而且提供某种服务,不是对整个系统就是对某个用户程序提供服务。Linux系统的大多数服务器就是通过守护进程实现的。常见的守护进程包括系统日志进程syslogd、 web服务器httpd、邮件服务器sendmail和数据库服务器mysqld等。守护进程的名称通常以d结尾
守护进程与终端无关,随系统启动而启动
UDEV守护进程,它能够根据系统中的硬件设备的状态动态更新设备文件,包括设备文件的创建,删除等
基本特点
- 生存周期长[非必须],一般操作系统启动的时候就启动,关闭的时候关闭。
- 守护进程和终端无关联,也就是他们没有控制终端,所以当控制终端退出,也不会导致守护进程退出
- 守护进程是在后台运行,不会占着终端,终端可以执行其他命令
- 一个守护进程的父进程是init进程,因为它真正的父进程在fork出子进程后就先于子进程exit退出了,所以它是一个由init继承的孤儿进程
可使用指令:ps -efj来查看
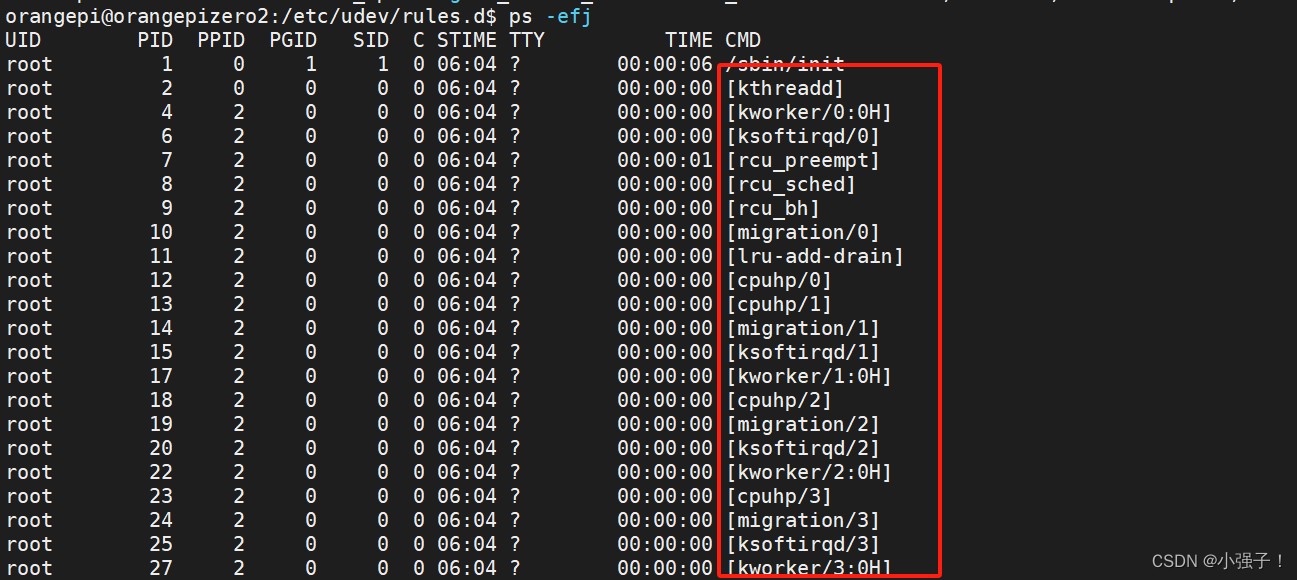
ppid = 0:内核进程,跟随系统启动而启动,生命周期贯穿整个系统。
cmd列名带[ ]这种,叫内核守护进程
老祖init:也是系统守护进程,它负责启动各运行层次特定的系统服务;所以很多进程的PPID是init,也负责收养孤儿进程。
cmd列中名字不带[]的普通守护进程(用户集守护进程)
8.3 守护进程开发
借助damon()函数完成
#include <unistd.h>
int daemon(int nochdir, int noclose);
函数参数:
	nochdir:为0时表示将当前目录更改至“/”
	noclose:为0时表示将标准输入、标准输出、标准错误重定向至“/dev/null”
返回值:
	成功则返回0,失败返回-1
下面代码涉及信号携带信息量相关知识点,若不理解请查看博文:进程间通信
  1 #include <unistd.h>
  2 #include <signal.h>
  3 #include <stdlib.h>
  4 #include <string.h>
  5 #include <fcntl.h>
  6 #include <sys/stat.h>
  7 #include <time.h>
  8 #include <stdio.h>
  9 #include <stdbool.h>
 10 //C 库函数 char *asctime(const struct tm *timeptr) 返回一个指向字符串的指针,它代表了结构 struct timeptr 的日期和时间。
 11 //C 库函数 struct tm *localtime(const time_t *timer) 使用 timer 的值来填充 tm 结构。
 12 //timer 的值被分解为 tm 结构,并用本地时区表示。
 13 /*
 14    struct tm {
 15    int tm_sec; 秒,范围从 0 到 59
 16    int tm_min; 分,范围从 0 到 59int tm_hour; 小时,范围从 0 到 23
 17    int tm_mday; 一月中的第几天,范围从 1 到 31
 18    int tm_mon; 月份,范围从 0 到 11
 19    int tm_year; 自 1900 起的年数
 20    int tm_wday; 一周中的第几天,范围从 0 到 6
 21    int tm_yday; 一年中的第几天,范围从 0 到 365
 22    int tm_isdst; 夏令时
 23    };
 24    */
 25 static bool flag = true;
 26
 27 void handler(int sig)
 28 {
 29     printf("I got a signal %d\nI'm quitting.\n", sig);
 30     flag = false;
 31 }
 32
 33 int main()
 34 {
 35     time_t t;
 36     int fd;
 37     //创建守护进程
 38     if(-1 == daemon(0, 0))
 39     {
 40         printf("daemon error\n");
 41         exit(1);
 42     }
 43
 44     //设置信号处理函数
 45     struct sigaction act;
 46     act.sa_handler = handler;
 47     sigemptyset(&act.sa_mask);
 48     act.sa_flags = 0;
 49     //若调用sigaction成功则返回非正数
 50     if(sigaction(SIGQUIT, &act, NULL))
 51     {
 52         printf("sigaction error.\n");
 53         exit(0);
 54     }
 55     //进程工作内容
 56     while(flag)
 57     {
 58         fd = open("/home/orangepi/daemon.log", O_WRONLY | O_CREAT | O_APPEND,0644);
 59         if(fd == -1)
 60         {
 61             printf("open error\n");
 62         }
 63         t= time(0);
 64 //C 库函数 char *asctime(const struct tm *timeptr) 返回一个指向字符串的指针,它代表了结构 struct timeptr 的日期和时间。
 65 //C 库函数 struct tm *localtime(const time_t *timer) 使用 timer 的值来填充 tm 结构。
 66         char *buf = asctime(localtime(&t));
 67         write(fd, buf, strlen(buf));
 68         close(fd);
 69         sleep(10);
 70     }
 71     return 0;
 72 }
运行指令:gcc timedaemon.c ./a.out
发现无任何反应

但是守护进程其实一直在运行了,使用指令查看:ps -ef|grep a.out


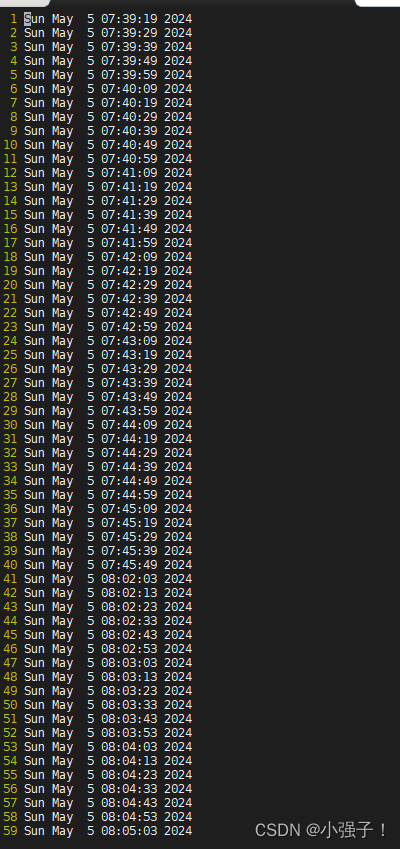
daemon.log的内容,每10s获取数据
那么我们尝试运行一下守护进程sigaction内部程序
查看pid号:ps -ef|grep a.out
查看signal各种序号:kill -l
使用代码中的sigquit来操作:sudo kill -3 14234

开机自启动
我们可以设置守护进程在开机时自动启动
先查看编写的守护进程程序的位置:
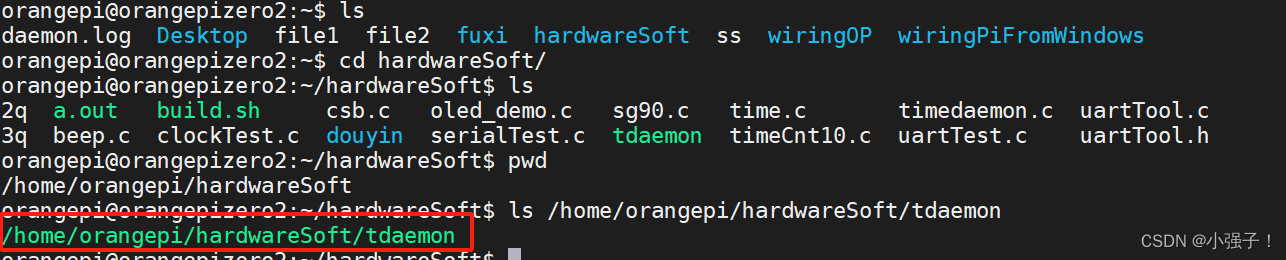
之后添加到:sudo vi /etc/rc.local
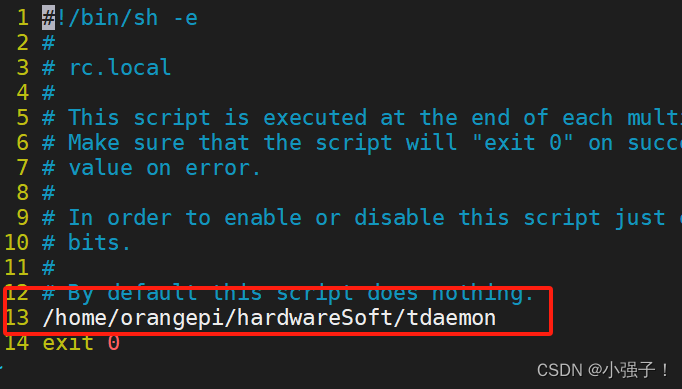
之后重启查看是否设置成功:sudo reboot
使用指令:ps -ef |grep tdaemon

设置成功!!!
8.4 守护进程应用
需求:要求语音刷手机的程序一直保持运行,防止应用程序崩溃意外


编写判断某进程是否在运行的程序(下面程序涉及popen linux进程):
  1 #include <stdio.h>
  2
  3 int main()
  4 {
  5     FILE *file;
  6     char buffer[128] = {'\0'};
  7
  8     char *cmd = "ps -elf | grep douyin";
  9		//会执行cmd指令,并获取执行指令后的回复
 10     file = popen(cmd,"r");
 11
 12     fgets(buffer,128,file);
 13
 14     printf("%s\n",buffer);
 15
 16     return 0;
 17 }

完善程序:
  1 #include <stdio.h>
  2 #include <string.h>
  3
  4 int main()
  5 {
  6     FILE *file;
  7     char buffer[128] = {'\0'};
  8
  9     char *cmd = "ps -elf | grep douyin | grep -v grep";
 10
 11     file = popen(cmd,"r");
 12
 13     fgets(buffer,128,file);
 14
 15     if(strstr(buffer,"douyin") != NULL){
 16         printf("douyinPro is running\n");
 17     }else{
 18         printf("douyinPro isn't running\n");
 19     }
 20
 21     printf("%s\n",buffer);
 22
 23     return 0;
 24 }

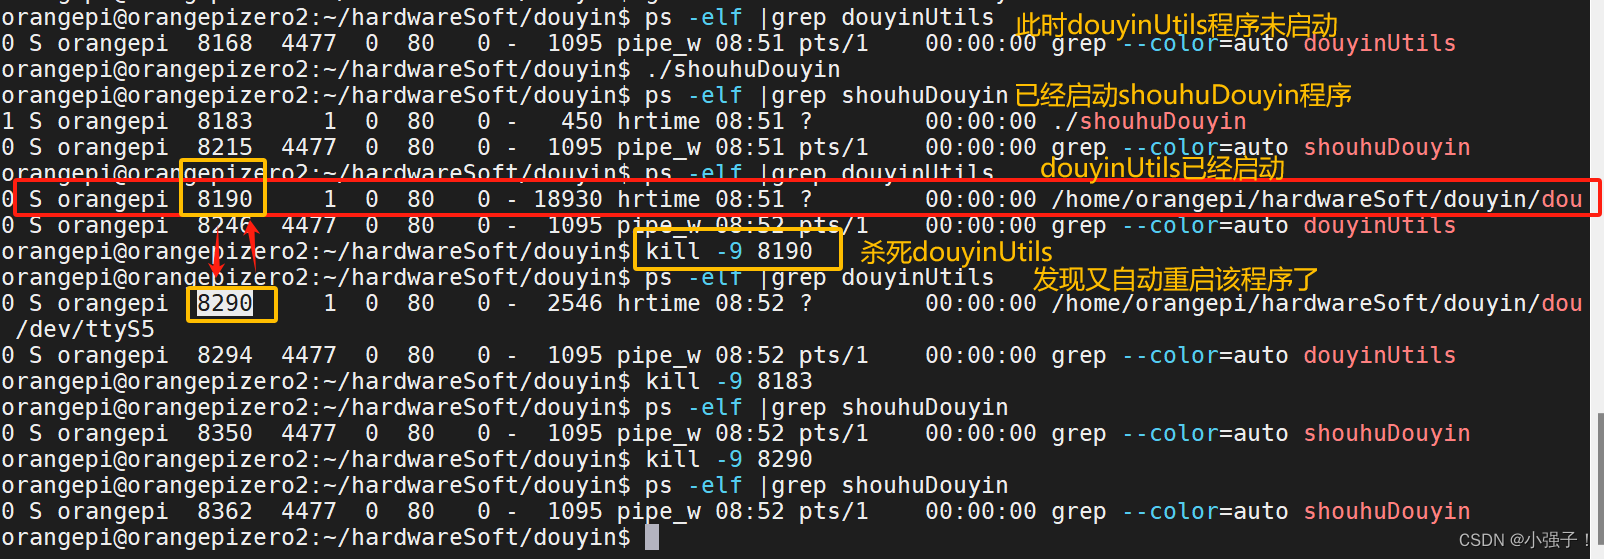
我们关闭该程序

与刷抖音程序相结合(当刷抖音程序关闭,守护进程强制启动该程序,重新启动)
  1 #include <unistd.h>
  2 #include <signal.h>
  3 #include <stdlib.h>
  4 #include <string.h>
  5 #include <fcntl.h>
  6 #include <sys/stat.h>
  7 #include <time.h>
  8 #include <stdio.h>
  9 #include <stdbool.h>
 10 #include <string.h>
 11
 12 static bool flag = true;
 13
 14 void handler(int sig)
 15 {
 16     printf("I got a signal %d\nI'm quitting.\n", sig);
 17     flag = false;
 18 }
 19
 20 int judMent()
 21 {
 22
 23     FILE *file;
 24     char buffer[128] = {'\0'};
 25
 26     char *cmd = "ps -elf | grep douyinUtils | grep -v grep";
 27
 28     file = popen(cmd,"r");
 29
 30     fgets(buffer,128,file);
 31
 32     if(strstr(buffer,"douyinUtils") != NULL){
 33         return 0;
 34     }else{
 35         return -1;
 36     }
 37
 38     printf("buffer:%s\n",buffer);
 39
 40     return 0;
 41
 42 }
 43
 44 int main()
 45 {
 46     time_t t;
 47     int fd;
 48     //创建守护进程
 49     if(-1 == daemon(0, 0))
 50     {
 51         printf("daemon error\n");
 52         exit(1);
 53     }
 54
 55     //设置信号处理函数
 56     struct sigaction act;
 57     act.sa_handler = handler;
 58     sigemptyset(&act.sa_mask);
 59     act.sa_flags = 0;
 60     //若调用sigaction成功则返回非正数
 61     if(sigaction(SIGQUIT, &act, NULL))
 62     {
 63         printf("sigaction error.\n");
 64         exit(0);
 65     }
 66     //进程工作内容
 67     while(flag)
 68     {
 69         if(judMent() == -1){
 70             system("/home/orangepi/hardwareSoft/douyin/douyinUtils /dev/ttyS5 &");//&--后台程序
 71         }
 72         sleep(2);
 73     }
 74     return 0;
 75 }
编译程序:gcc shouhu.c -o shouhuDouyin
若想其开机自启动该程序:
/home/orangepi/hardwareSoft/douyin/douyinUtils
/home/orangepi/hardwareSoft/douyin/shouhuDouyin
加入到启动的配置文件中即可
8.5 UDEV的rules编写
规则文件是 udev 里最重要的部分,默认是存放在 /etc/udev/rule.d/ 下。所有的规则文件必须以".rules为后缀名。
KERNEL=="sda", NAME="my_root_disk", MODE="0660"
KERNEL 是匹配键,NAME 和 MODE 是赋值键。这条规则的意思是:如果有一个设备的内核名称为
sda,则该条件生效,执行后面的赋值:在 /dev 下产生一个名为my_root_disk 的设备文件,并把设文
件的权限设为 0660。
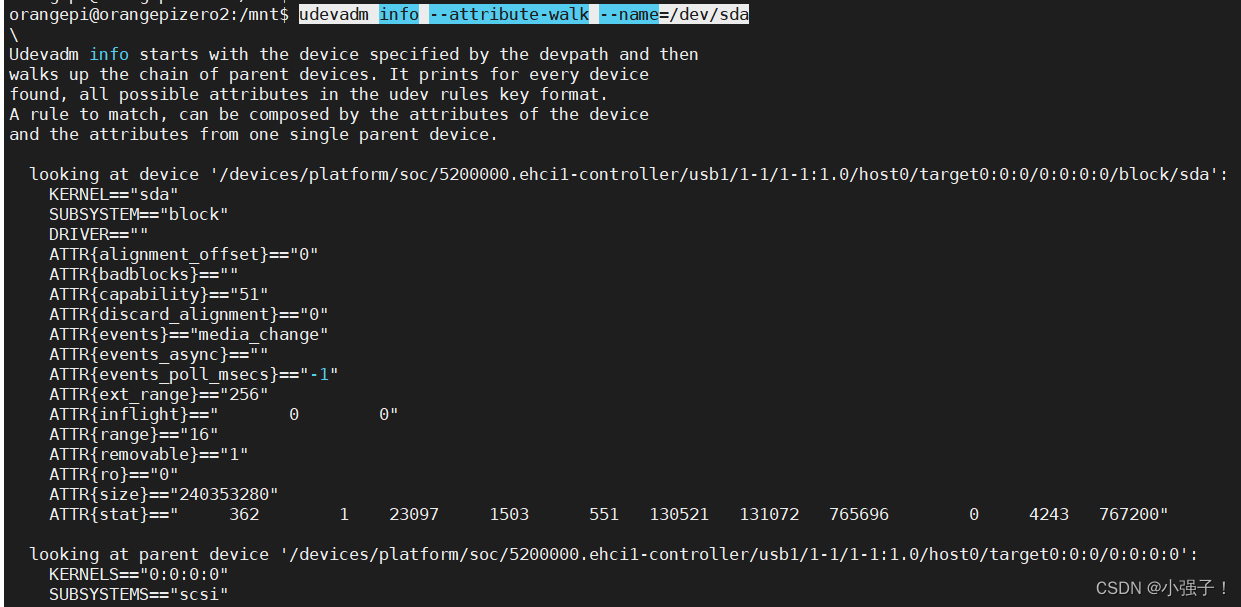
可使用指令:udevadm info --attribute-walk --name=/dev/设备名字查看信息,帮助进行规则的匹配
先使用指令查看设备:ls /dev/bus/usb/001

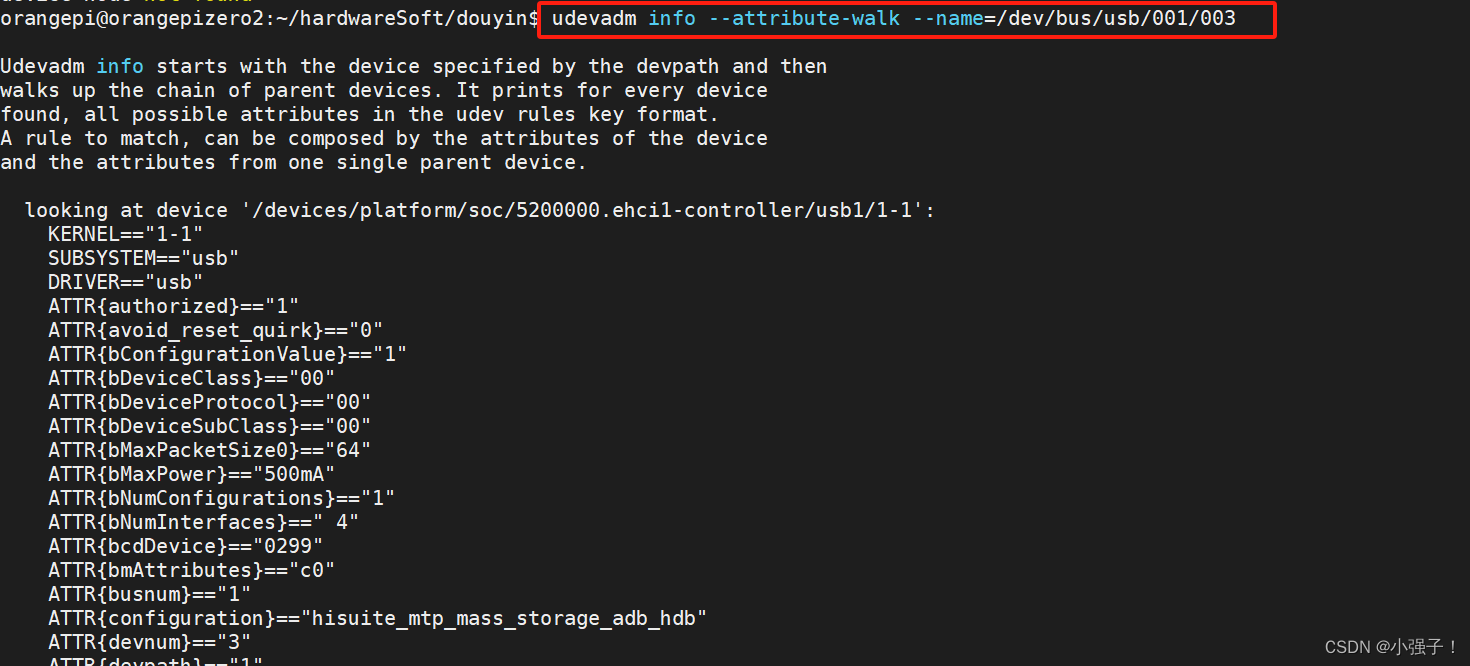
更换之前的指令:sudo vi Huawei-android.rules


有个004,通过新写的规则匹配手机,仍可访问手机
8.6 挂载U盘
当我们插入U盘时,使用指令:dmesg
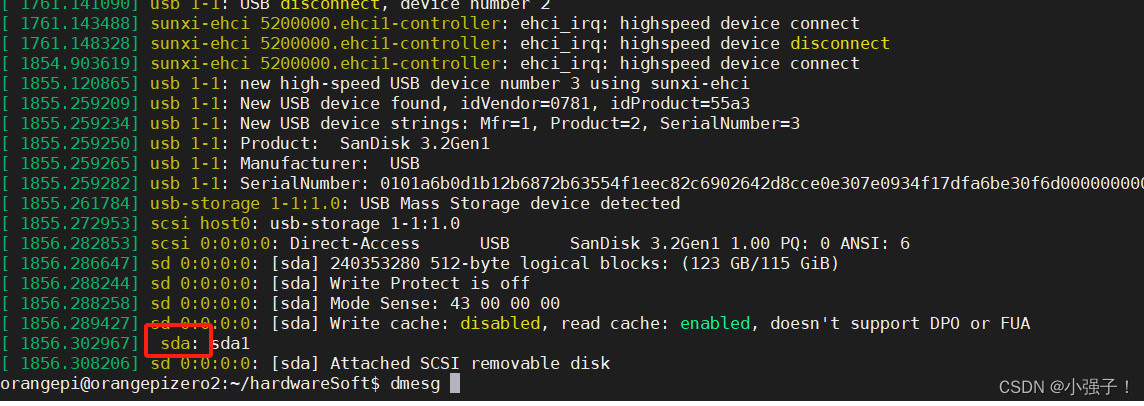 但是我们看不到U盘里面的数据

想要看到数据只能人为的操作:sudo mount /dev/sda1 /mnt/ 、 cd /mnt、 ls

使用指令查看相关U盘信息:udevadm info --attribute-walk --name=/dev/sda 其中sda具体得看设备是sda还是sdb进行操作
当想要把U盘重启可以使用:sudo service udev restart
让其自动挂载U盘

新建一个文件 subblock.rules 并写入:ACTION=="add", SUBSYSTEMS=="usb", SUBSYSTEM=="block",RUN{program}+="/bin/mkdir /media/%k" ,RUN{program}+="/usr/bin/systemd-mount --no-block --collect $devnode /media/%k"

我们进入程序自动建立的medir文件内,发现已经自动挂载,可使用指令tree /media/查看U盘具体数据

9. SQLite数据库
9.1 SQLite简介
轻量化,易用的嵌入式数据库,用于设备端的数据管理,可以理解成单点的数据库。传统服务器型数据库用于管理多端设备,更加复杂。
SQLite是一个无服务器的数据库,是自包含的。
这也称为嵌入式数据库,这意味着数据库引擎作为应用程序的一部分运行。
MySQL需要运行服务器,MySQL将需要客户端和服务器架构通过网络进行交互。
9.2 SQLite安装
官网:https://www.sqlite.org/download.html
- 把下载的文件sqlite-autoconf-xxxxxxx.tar.gz上传到开发板
- tar xvf sqlite-autoconf-3390000.tar.gz 解压
- cd sqlite-autoconf-3390000 进入文件夹
- ./configure --prefix=/usr/local 配置安装路径在/usr/local
- make 编译//比较久10分钟
- sudo make install 安装
9.3 SQLite 指令使用
9.3.1 创建一个数据库
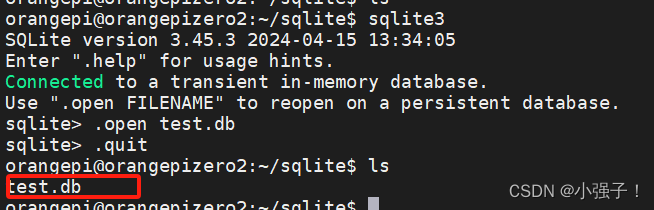
方式一:
1. sqlite3 进入数据库
2. .open test.db
3. .quit
数据库退出后在命令当前路径创建数据库test.db
方式二:
qlite3 test.db //在命令运行当前窗口创建数据库test.db
在数据库命令下
.databases 列出当前打开的数据库
.quit 退出
9.3.2 创建一张表格
create table stu(id Integer,name char,score Integer);
其中:Integer == int   stu相当于结构体的名字
9.3.3 插入一条记录
insert into stu values(18130106,'huang',99);
insert into stu2 values(18130101,"gang",100); ''和""都行
insert into stu(name,score) values('huanggang',98); 插入部分字段内容
9.3.4 查看数据库的记录
select * from stu; //查询所有字段的结果
select name,score from stu; //查询数据库中部分字段的内容
9.3.5 删除一条记录
delete from stu where id = 18130101;
9.3.6 更改一条记录
update stu set name = 'huangg' where id = 18130106;
9.3.7 删除一张表
drop table stu;
9.3.8 增加一列
alter table stu add column sex char;
9.4 SQLite的编程操作
9.4.1 打开/创建数据库的C接口
下面的 C 代码段显示了如何连接到一个现有的数据库。如果数据库不存在,那么它就会被创建,最后将返回一个数据库对象。
sqlite3_open(const char *filename, sqlite3 **ppDb)
**ppDb为句柄
该例程打开一个指向 SQLite 数据库文件的连接,返回一个用于其他 SQLite 程序的数据库**连接对象**。
sqlite3_close(sqlite3*)
该例程关闭之前调用 sqlite3_open() 打开的数据库连接。所有与连接相关的语句都应在连接关闭之前完成。
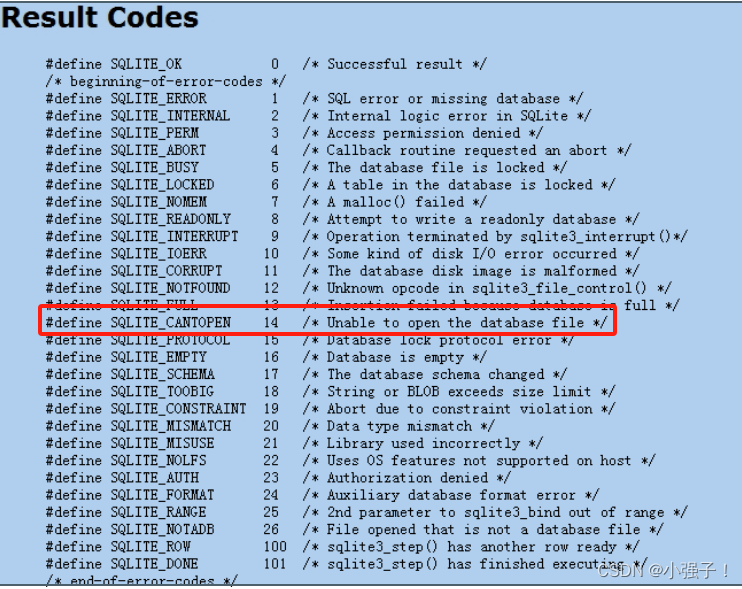
如果还有查询没有完成,sqlite3_close() 将返回 SQLITE_BUSY 禁止关闭的错误消息。
const char *sqlite3_errmsg(sqlite3*);通常用来获取最近调用的API接口返回的错误代码.
  1 #include <stdio.h>
  2 #include <sqlite3.h>
  3
  4 int main(int argc,char **argv)
  5 {
  6     sqlite3 *db;
  7     int ret;
  8
  9     if(argc < 2){
 10         printf("Usage:%s xxx.db\n",argv[0]);
 11         return -1;
 12     }
 13     if((ret = sqlite3_open(argv[1],&db)) == SQLITE_OK){
 14         printf("open %s success\n",argv[1]);
 15     }else{
 16         printf("error:%s",sqlite3_errmsg(db));
 			return -1;
 17     }
 18     sqlite3_close(db);
 19     printf("done\n");
 20
 21     return 0;
 22 }
若无new.db数据库,则会创建新的数据库。
我们更改new.db的权限,去除读权限
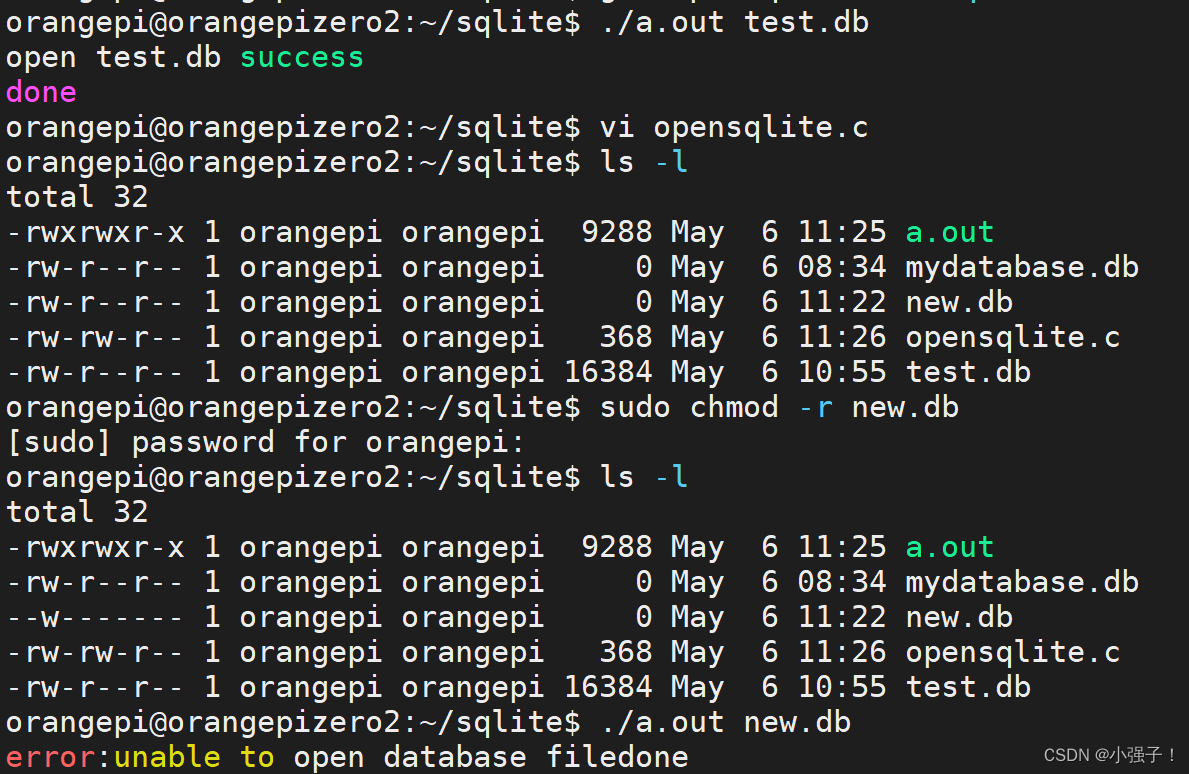
继续优化代码
  2 #include <sqlite3.h>
  3
  4 int main(int argc,char **argv)
  5 {
  6     sqlite3 *db;
  7     int ret;
  8
  9     if(argc < 2){
 10         printf("Usage:%s xxx.db\n",argv[0]);
 11         return -1;
 12     }
 13     if((ret = sqlite3_open(argv[1],&db)) == SQLITE_OK){
 14         printf("open %s success\n",argv[1]);
 15     }else{
 16         printf("error:%s,%d\n",sqlite3_errmsg(db),ret);
 17         if(ret == SQLITE_PERM){
 18             printf("permission den");
 19         }
 20         return -1;
 21     }
 22     sqlite3_close(db);
 23     printf("done\n");
 24
 25     return 0;
 26 }

  1 #include "stdio.h"
  2 #include "sqlite3.h"
  3 int main(char argc , char **argv)
  4 {
  5     sqlite3 *db;
  6     int ret;
  7
  8     if(argc < 2){
  9         printf("Usage: %s xxx.db\n",argv[0]);
 10         return -1;
 11     }
 12
 13     //sqlite3_open(const char *filename, sqlite3 **ppDb)
 14     if((ret = sqlite3_open(argv[1] , &db)) == SQLITE_OK){
 15         printf("open %s success\n",argv[1]);
 16     }else{
 17         printf("error:%s,%d\n",sqlite3_errmsg(db),ret);
 18         if(ret == 14){
 19             printf("permission den\n");
 20         }
 21         return -1;
 22     }
 23     sqlite3_close(db);
 24     printf("done\n");
 25
 26     return 0;
 27 }
9.4.2 C执行sql语句
下面的 C 代码段将用于在先前创建的数据库中创建一个表:
sqlite3_exec(sqlite3* ,  const char *sql ,  sqlite_callback ,  void *data ,  char**errmsg)
该例程提供了一个执行 SQL 命令的快捷方式,SQL 命令由 sql 参数提供,可以由多个 SQL 命令组成。
参数分析:
sqlite3 是打开的数据库对象
sqlite_callback 是一个回调函数
data 作为其第一个参数
errmsg 将被返回用来获取程序生成的任何错误
sqlite3_exec() 程序解析并执行由 sql 参数所给的每个命令,直到字符串结束或者遇到错误为止。

int callback(void *arg ,  int column_size ,  char *column_value[] ,  char *column_name[])
参数分析:
void *arg:是sqlite3_exec函数的第四个参数
column_size:数据库的字段数
column_value[]:列的值
column_name:字段名字
   1 #include <stdio.h>
  2 #include <sqlite3.h>
  3
  4 int callback(void *arg, int column_size, char *column_value[], char *column_name[])
  5 {
  6     printf("%d\n",column_size);
  7     return 0;
  8 }
  9
 10 int main(int argc,char **argv)
 11 {
 12     sqlite3 *db;
 13     int ret;
 14
 15     if(argc < 2){
 16         printf("Usage:%s xxx.db\n",argv[0]);
 17         return -1;
 18     }
 19     if((ret = sqlite3_open(argv[1],&db)) == SQLITE_OK){
 20         printf("open %s success\n",argv[1]);
 21     }else{
 22         printf("error:%s,%d\n",sqlite3_errmsg(db),ret);
 23         if(ret == SQLITE_PERM){
 24             printf("permission den");
 25         }
 26         return -1;
 27     }
 28
 29     //sqlite3_exec(sqlite3*, const char *sql, sqlite_callback, void *data, char**errmsg)
 30     sqlite3_exec(db,"select * from stu;",callback,NULL,NULL);
 31
 32
 33     sqlite3_close(db);
 34     printf("done\n");
 35
 36     return 0;
 37 }
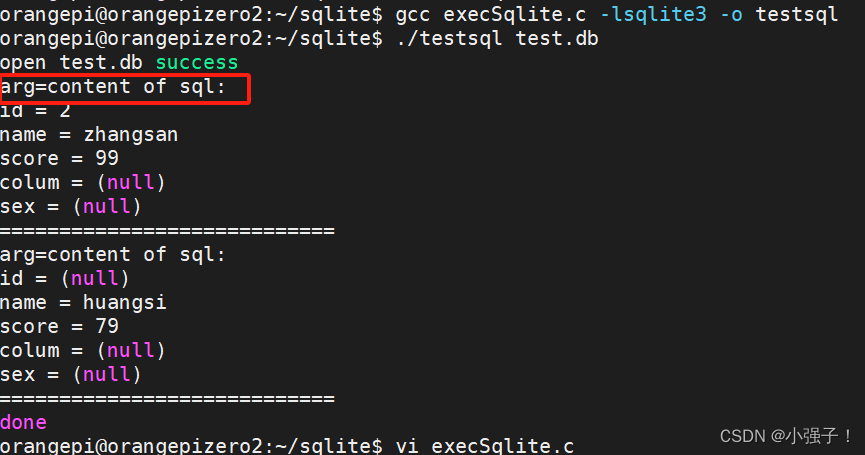
首先通过sqlite3_open()来打开数据库并把db作为连接对象,相当于db就是我们要打开的数据库
并对指定数据库能否打开做判断
之后调用sqlite3_exec()函数,使用指令:select * from stu,来查看数据,列表stu中有两条记录,所以调用了两次callback(),column_size返回每个记录的字段数(姓名、学号、分数、性别)

优化代码:
  1 #include <stdio.h>
  2 #include <sqlite3.h>
  3
  4 int callback(void *arg, int column_size, char *column_value[], char *column_name[])
  5 {
  6     int i;
  7     for(i=0;i<column_size;i++){
  8         printf("%s = %s\n",column_name[i],column_value[i]);
  9     }
 10     printf("============================\n");
 11     return 0;//必须返回0,这样数据库有多少条数据,这个回调函数就会被调用多少次
 12 }
 13
 14 int main(int argc,char **argv)
 15 {
 16     sqlite3 *db;
 17     int ret;
 18
 19     if(argc < 2){
 20         printf("Usage:%s xxx.db\n",argv[0]);
 21         return -1;
 22     }
 23     if((ret = sqlite3_open(argv[1],&db)) == SQLITE_OK){
 24         printf("open %s success\n",argv[1]);
 25     }else{
 26         printf("error:%s,%d\n",sqlite3_errmsg(db),ret);
 27         if(ret == SQLITE_PERM){
 28             printf("permission den");
 29         }
 30         return -1;
 31     }
 32
 33     //sqlite3_exec(sqlite3*, const char *sql, sqlite_callback, void *data, char**errmsg)
 34     sqlite3_exec(db,"select * from stu;",callback,NULL,NULL);
 35
 36
 37     sqlite3_close(db);
 38     printf("done\n");
 39
 40     return 0;
 41 }

继续优化:
  1 #include <stdio.h>
  2 #include <sqlite3.h>
  3
  4 int callback(void *arg, int column_size, char *column_value[], char *column_name[])
  5 {
  6     int i;
  7     printf("arg=%s\n",(char *)arg);
  8     for(i=0;i<column_size;i++){
  9         printf("%s = %s\n",column_name[i],column_value[i]);
 10     }
 11     printf("============================\n");
 12     return 0;//必须返回0,这样数据库有多少条数据,这个回调函数就会被调用多少次
 13 }
 14
 15 int main(int argc,char **argv)
 16 {
 17     sqlite3 *db;
 18     int ret;
 19
 20     if(argc < 2){
 21         printf("Usage:%s xxx.db\n",argv[0]);
 22         return -1;
 23     }
 24     if((ret = sqlite3_open(argv[1],&db)) == SQLITE_OK){
 25         printf("open %s success\n",argv[1]);
 26     }else{
 27         printf("error:%s,%d\n",sqlite3_errmsg(db),ret);
 28         if(ret == SQLITE_PERM){
 29             printf("permission den");
 30         }
 31         return -1;
 32     }
 33
 34     //sqlite3_exec(sqlite3*, const char *sql, sqlite_callback, void *data, char**errmsg)
 35     sqlite3_exec(db,"select * from stu;",callback,"content of sql:",NULL);
 36
 37
 38     sqlite3_close(db);
 39     printf("done\n");
 40
 41     return 0;
 42 }
  1 #include <stdio.h>
  2 #include <sqlite3.h>
  3
  4 int callback(void *arg, int column_size, char *column_value[], char *column_name[])
  5 {
  6     int i;
  7     printf("arg=%s\n",(char *)arg);
  8     for(i=0;i<column_size;i++){
  9         printf("%s = %s\n",column_name[i],column_value[i]);
 10     }
 11     printf("============================\n");
 12     return 0;//必须返回0,这样数据库有多少条数据,这个回调函数就会被调用多少次
 13 }
 14
 15 int main(int argc,char **argv)
 16 {
 17     sqlite3 *db;
 18     char *errorMes = NULL;
 19     int ret;
 20
 21     if(argc < 2){
 22         printf("Usage:%s xxx.db\n",argv[0]);
 23         return -1;
 24     }
 25     if((ret = sqlite3_open(argv[1],&db)) == SQLITE_OK){
 26         printf("open %s success\n",argv[1]);
 27     }else{
 28         printf("error:%s,%d\n",sqlite3_errmsg(db),ret);
 29         if(ret == SQLITE_PERM){
 30             printf("permission den");
 31         }
 32         return -1;
 33     }
 34
 35     //sqlite3_exec(sqlite3*, const char *sql, sqlite_callback, void *data, char**errmsg)
 36     sqlite3_exec(db,"select * from stu;",callback,"content of sql:",&errorMes);// errorMes may sigment error!
 37
 38
 39     sqlite3_close(db);
 40     printf("done\n");
 41
 42     return 0;
 43 }
10. 使用C语言调用python文件
10.1 调用无参python函数
首先,现新建一个python文件,并写出想要表达出来的代码
 1 #nopara.py文件
  2
  3 import sys
  4
  5 def say_funny():
  6     print('funny')
  7
  8 #print(sys.path);
该python文件想要输出“funny”语句。
编写调用的C语言函数
  1 #if 0
  2 1、包含Python.h头文件,以便使用Python API。
  3 2、使用void Py_Initialize()初始化Python解释器,
  4 3、使用PyObject *PyImport_ImportModule(const char *name)和PyObject*PyObject_GetAttrString(PyObject *o, const char *attr_name)获取sys.path对象,并利用int PyList_Append(PyObject *list, PyObject *item)将当前路径.添加到sys.path中,以便加载当前的Python模块(Python文
    件即python模块)。
  5 4、使用PyObject *PyImport_ImportModule(const char *name)函数导入Python模块,并检查是否有错误。
  6 5、使用PyObject *PyObject_GetAttrString(PyObject *o, const char *attr_name)函数获取Python函数对象,并检查是否可调用。
  7 6、使用PyObject *PyObject_CallObject(PyObject *callable, PyObject *args)函数调用Python函数,并获取返回值。
  8 7、使用void Py_DECREF(PyObject *o)函数释放所有引用的Python对象。
  9 8、结束时调用void Py_Finalize()函数关闭Python解释器。
 10 相关的函数参数说明参考网站(网站左上角输入函数名即可开始搜索):
 11 https://docs.python.org/zh-cn/3/c-api/import.html
 12 #endif
 13
 14 #include <Python.h>
 15
 16 int main()
 17 {
 18     Py_Initialize(); // 初始化
 19
 20     // 将当前路径添加到sys.path中
 21     PyObject *sys = PyImport_ImportModule("sys");
 22     PyObject *path = PyObject_GetAttrString(sys, "path");
 23     PyList_Append(path, PyUnicode_FromString("."));                 //将.加入到sys.path的列表中
 24
 25     // 导入nopara模块
 26     PyObject *pModule = PyImport_ImportModule("nopara");            //相当于from nopara
 27     if (!pModule)
 28     {
 29         PyErr_Print();
 30         printf("ERROR: failed to load nopara.py\n");
 31         //return 1;
 32     }
 33
 34     // 获取say_funny函数对象
 35     PyObject *pFunc = PyObject_GetAttrString(pModule, "say_funny"); //相当于import say_funny
 36     if (!pFunc || !PyCallable_Check(pFunc))
 37     {
 38         PyErr_Print();
 39         printf("ERROR: function say_funny not found or not callable\n");
 40         //return 1;
 41     }
 42
 43     // 调用say_funny函数并获取返回值
 44     PyObject *pValue = PyObject_CallObject(pFunc, NULL);            //调用函数并检测是否有回应(函数是否执行?)
 45     if (!pValue){
 46         PyErr_Print();
 47         printf("ERROR: function call failed\n");
 48         //return 1;
 49     }
 50
 51     // 释放所有引用的Python对象
 52     Py_DECREF(pValue);
 53     Py_DECREF(pFunc);
 54     Py_DECREF(pModule);
 55
 56     // 关闭Python解释器
 57     Py_Finalize();
 58     return 0;
 59 }
10.2 调用有参python函数
其主要区别主要多了两步:
6、使用PyObject *Py_BuildValue(const char *format, ...)函数创建一个Python元组或者对象,作为Python函数的参数,没有参数势不需要调用

 8、使用int PyArg_Parse(PyObject *args, const char *format, ...)函数将返回值转换为C类型,并检查是否有错误,没有返回值时不需要调用。
  1 #para.py文件
  2
  3 import sys
  4
  5 def say_funny(s):
  6     print(s)
  7     return s
  8
  9 #print(sys.path);
  1 #if 0
  2 1、包含Python.h头文件,以便使用Python API。
  3 2、使用void Py_Initialize()初始化Python解释器,
  4 3、使用PyObject *PyImport_ImportModule(const char *name)和PyObject
  5 *PyObject_GetAttrString(PyObject *o, const char *attr_name)获取sys.path对象,并利用int PyList_Append(PyObject *list, PyObject *item)将当前路径.添加到sys.path中,以便加载当前的Python模块(Python文件即python模块)。
  6 4、使用PyObject *PyImport_ImportModule(const char *name)函数导入Python模块,并检查是否有错误。
  7 5、使用PyObject *PyObject_GetAttrString(PyObject *o, const char *attr_name)函数获取Python函数对象,并检查是否可调用。
  8 6、使用PyObject *Py_BuildValue(const char *format, ...)函数将C类型的数据结构转换成P ython对象,作为Python函数的参数,没有参数不需要调用
  9 7、使用PyObject *PyObject_CallObject(PyObject *callable, PyObject *args)函数调用Python函数,并获取返回值。
 10 8、使用int PyArg_Parse(PyObject *args, const char *format, ...)函数将返回值转换为C类型,并检查是否有错误,没有返回值时不需要调用。
 11 9、使用void Py_DECREF(PyObject *o)函数释放所有引用的Python对象。
 12 10、结束时调用void Py_Finalize()函数关闭Python解释器。
 13 相关的函数参数说明参考网站(网站左上角输入函数名即可开始搜索):
 14 https://docs.python.org/zh-cn/3/c-api/import.html
 15 #endif
 16
 17 #include <Python.h>
 18
 19 int main()
 20 {
 21     Py_Initialize(); // 初始化
 22
 23     // 将当前路径添加到sys.path中
 24     PyObject *sys = PyImport_ImportModule("sys");
 25     PyObject *path = PyObject_GetAttrString(sys, "path");
 26     PyList_Append(path, PyUnicode_FromString("."));                 //将.加入到sys.path的列表中
 27
 28     // 导入para模块
 29     PyObject *pModule = PyImport_ImportModule("para");          //相当于from nopara
 30     if (!pModule)
 31     {
 32         PyErr_Print();
 33         printf("ERROR: failed to load para.py\n");
 34     }
 35
 36     // 获取say_funny函数对象
 37     PyObject *pFunc = PyObject_GetAttrString(pModule, "say_funny"); //相当于import say_funny
 38     if (!pFunc)
 39     {
 40         PyErr_Print();
 41         printf("ERROR: function say_funny not found \n");
 42     }
 43
 44     //将C类型的数据结构转换成Python对象,作为Python函数的参数
 45     char *category = "comedy";
 46     PyObject *pArgs = Py_BuildValue("(s)" , category);              //必须有() 表示元组字符串
 47
 48     // 调用say_funny函数并获取返回值
 49     PyObject *pValue = PyObject_CallObject(pFunc, pArgs);           //调用函数并检测是否有回应(函数是否执行?)
 50     if (!pValue){
 51         PyErr_Print();
 52         printf("ERROR: function call failed\n");
 53     }
 54
 55     //将python类型的返回值转化为C语言类型的
 56     char *result = NULL;
 57     if(!PyArg_Parse(pValue , "s" ,&result)){
 58         PyErr_Print();
 59         printf("ERROR: parse failed\n");
 60     }
 61
 62     printf("result:%s\n",result);
 63
 64     // 释放所有引用的Python对象
 65     Py_DECREF(pValue);
 66     Py_DECREF(pFunc);
 67     Py_DECREF(pModule);
 68
 69     // 关闭Python解释器
 70     Py_Finalize();
 71     return 0;
 72 }


 3117
3117

 被折叠的 条评论
为什么被折叠?
被折叠的 条评论
为什么被折叠?
 到【灌水乐园】发言


