


1,我们常用的链表是将数据域和指针域放在一起的,因为这样我我们很方便的就可以操作数据,但是我们不能改变数据域,这就成了普通链表的局限,所以我们在内核中为了避免这种情况,我们只定义指针域,而数据域让开发者自己去操作,所以我们来看看内核链表的定义和其简单的增删改:
数据的定义:用双向链表
struct my_list
{
	struct my_list* pre;
	struct my_list* next;
};
链表的初始化以及增删改实现如下:
//链表初始化
static inline void  init_my_list(struct my_list* list)
{
	list->pre = list;
	list->next = list;
}

//链表的增 前插 需要添加到那两个链表中间,我这个是将add_list加到list_pre和list_next中间
static inline void add_list_to_mylist(struct my_list* list_pre,struct my_list* list_next,struct my_list* add_list)
{
	list_next->pre = add_list;
	add_list->next = list_next;
	add_list->pre = list_pre;
	list_pre->next = add_list;
}

//前插
static inline void add_list_pre(struct my_list* head,struct my_list* new)
{
	add_list_to_mylist(head,head->next,new);
}

//尾插
static inline void add_list_tail(struct my_list* head,struct my_list* new)
{
	add_list_to_mylist(head->pre,head,new);
}

//链表的删
static inline void _delete_list(struct my_list* list_pre,struct my_list* list_next)
{
	list_next->pre = list_pre;
	list_pre->next = list_next;
}

static inline void delete_list(struct my_list* list)
{
	_delete_list(list->pre,list->next);
	list->next = LIST_POISON1;
	list->pre = LIST_POISON2;
}

//链表的改
static inline void _update_mylist(struct my_list* list_new,struct my_list* list_old)
{
	list_new->next = list_old->next;
	list_new->pre = list_old->pre;
	list_old->next->pre = list_new;
	list_old->pre->next = list_new;
}

static inline void update_mylist(struct my_list* list_new,struct my_list* list_old)
{
	_update_mylist(list_new,list_old);
	init_my_list(list_old);
}
而在数据的遍历是我们需要学习的重点:首先我们来看看这个简单的举例:
定义数据:
struct stu
{
	//int num;
	//char name[20];
	struct my_list list;
	int num;

};
打印函数的说明:
list_for_each(pos,&st1.list)
{
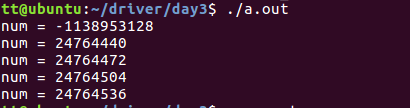
printf("num = %d\n",((struct stu*)pos)->num); //什么时候会打印乱码
}list_for_each的实现:
#define list_for_each(pos,head)\
	for(pos = (head)->next;pos!= (head);pos = pos->next)
我们使用打印可以看到如下:
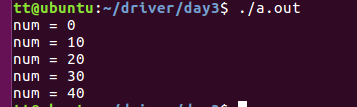
但是当我们定义结构体数据域在首地址时,我们用强制类型转换访问到的是数据域了,我们就得到我们想要的结果了:
struct stu
{
	int num;
	struct my_list list;

};
为了解决这个问题,Linux内核的开发者引入了一个重要的宏定义contatiner_of和offset_off宏:
首先我们看看offset_of这个宏定义:
#define offsetof(type,MEMBER) ((size_t) & ((type*)0)->MEMBER) //找到TYPE结构体里面MEMBER的偏移量,说明:其中的 &是取地址,size_t是强制类型转换,所以我们重点看后面这个 (type*)0)->MEMBER,这个表达式表示的是在type类型结构体里面的MEMBER成员的偏移量,这么说我们也许不在明白,现在我举例来说明一下:
#include<stdio.h>

struct stu
{
	int num;
	char name[20];
	struct stu* next;
};

void get_adress(struct stu* s)
{
	printf("num_adress = %p,name_adress = %p,next_adress = %p\n",&s->num,&s->name,&s->next);
}

int main()
{
	struct stu s1;
	get_adress(&s1);

	get_adress((struct stu*)NULL);//等价于 &((struct stu*)0)->num, &((struct stu*)0)->name, &(struct stu*)0)->next
}
所以我们可以看到 ((type*)0 )->member是找member在type里面的偏移地址:
container_of的实现:
#define contatiner_of(ptr,type,member)({\
	const typeof( ((type*)0)->member) * _mptr = ptr;\
	(type*)((char*)_mptr - offsetof(type,member));})
用__mptr强制转换成char *类型 减去member在type中的偏移量,得到结果就是容器type结构体的地址,这也就是该宏的作用。
所以返回值就是type结构体的地址
这样我们用这种方法来遍历结构体:
//list_entry的实现
#define list_entry(ptr,type,member) contatiner_of(ptr,type,member)  //member一般指的是结构体里面链表list,type指的是结构体,ptr是轮询遍历的链表指针
//返回值就是链表在结构体里面的首地址
引用代码说明:
list__for_each(pos,&st1.list)
{
	temp = list_entry(pos,struct stu,list);
	//此时有问题,删除和更新有问题,所以引出了list_for_each_entry

	if(temp->num == 20)
	{
	    delete_list(&st1.list);
	    continue;
	}
}
此是代码出现段错误:
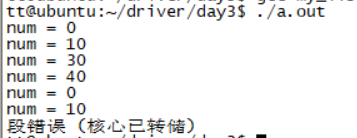
所以接下来我们引入另一个遍历函数:list_for_each_entry
//list_for_each_entry的实现,head必须要有括号
#define list_for_each_entry(pos,head,member)\
	for(pos = list_entry((head)->next,typeof(*pos),member);\
		&pos->member != head; pos = list_entry(pos->member.next,typeof(*pos),member))
我们使用他来打印看看:
list_for_each_entry(pos,&st1.list,list)
{
	if(pos->num == 20)
	{
		delete_list(&pos->list); //出现了段错误
		break;
	}

	printf("list_for_each_entry:num = %d\n",pos->num);
}
我们会发现没有break出现了段错误,所以内核的开发者又定义出了list_for_each_entry_safe
list_for_each_entry_safe(pos_entry,n_entry,&st1.list,list)
{
	if(pos_entry->num == 30)
	{
		new_replace.num = 15;
		//strcpy(new_replace.name,"wuwu");
		update_mylist(&new_replace.list,&pos_entry->list);
		break;
	}
	if(pos_entry->num == 20)
	{
		delete_list(&pos_entry->list);
	}
}

list_for_each_entry(pos_entry,&st1.list,list)
{
	printf("pos_entry->num = %d\n",pos_entry->num);
}
运行结果如下:
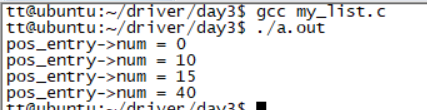
所以我们一般可以用 list_for_each_entry_safe来遍历内核链表
分析完之后现在我们现在来看看内核链表是开发过程中是怎么用的:
新建一个kernel_list.c
/*****************了解内核链表函数

void INIT_LIST_HEAD(strct list_head* list) //初始化链表
void list_add(strct list_head* new ,strct list_head*head) //头插
void list_add_tail(strct list_head* new ,strct list_head*head) //尾插
void list_det(struct list_head* entry) //entry是要删除的节点

提取内核链表数据 list_entry宏函数
#define list_entry(ptr,type,member)  container_of(ptr,type,member)  //
ptr 当前链表节点指针 type 链表中的结构体类型 member在结构体中的list_head名称
返回值:获取数据结构体指针
简言之:通过链表节点指针获取链表中结构体的指针

//遍历链表
#define list_for_each(pos,head) for(pos= head->next;prefetch(pos->next),pos != head;pos=pos->next)

#define list_for_each_safe(pos,head) for(pos= head->next,n=pos->next;pos != head;pos = n,pos=pos->next)
	//pos是遍历的指针

struct list_head
{
	struct list_head* next, *prev;
};
*******************************/

#include<linux/init.h>
#include<linux/module.h>
#include<linux/list.h>
#include<linux/fs.h>
#include<linux/slab.h>

MODULE_LICENSE("Dual BSD/GPL");

#define EMPLOYEE_NUM 10

static struct list_head employee_list;

#define EMPLOYEE_NUM 10

struct employee
{
	int num;
	char name[20];
	int salary;
	struct list_head list;
};


static struct employee* employee_p = NULL;
static struct employee* employee_temp = NULL;
static struct list_head* pos = NULL;
static struct list_head* pos1 = NULL;

static int __init list_init(void)
{
	int i =0;
	printk("FILE = %s,FUN = %s,LINE = %d\n",__FILE__,__FUNCTION__,__LINE__);

	INIT_LIST_HEAD(&employee_list);
	employee_p = (struct employee*)kmalloc(sizeof(struct employee)*EMPLOYEE_NUM,GFP_KERNEL);
	//employee_p = kmalloc(100,GFP_KERNEL);
	if(employee_p == NULL)
	{
		printk(" %s kmalloc space failure\n",__FUNCTION__);
		return -1;
	}

	memset(employee_p,0,sizeof(struct employee)*EMPLOYEE_NUM);
	for(;i<EMPLOYEE_NUM;i++)
	{
		employee_p[i].num = 1000 + i;
		sprintf(employee_p[i].name,"employee%d",i+1000);
		employee_p[i].salary = 5000 + 500 *i;
		list_add_tail(&employee_p[i].list,&employee_list);
	}

	list_for_each(pos,&employee_list)
	{
		employee_temp = list_entry(pos,struct employee,list);
		printk("employee num = %d\t\t employee_name = %s\t\t employee_salary = %d\n",\
		employee_temp->num,employee_temp->name,employee_temp->salary);

	}
	return 0;
}

static void __exit list_exit(void)
{
	//int i = 0;
	printk("FILE = %s,FUN = %s,LINE = %d\n",__FILE__,__FUNCTION__,__LINE__);
	// for(;i<EMPLOYEE_NUM;i++)
	// {
		// list_del(&employee_p[i].list);
	// }

	list_for_each_safe(pos,pos1,&employee_list);
	{
		employee_temp = list_entry(pos,struct employee,list);
		list_del(&(employee_temp->list));
	}
	kfree(employee_p);
	employee_p = NULL;
}

module_init(list_init);
module_exit(list_exit);

MODULE_VERSION("0.0.1");
//Makefile
obj-m+=kernel_list.o
all:
make -C /lib/modules/$(shell uname -r)/build/ M=$(PWD) modules
clean:
make -C /lib/modules/$(shell uname -r)/build/ M=$(PWD) clean编译结果如下:


 684
684


 被折叠的 条评论
为什么被折叠?
被折叠的 条评论
为什么被折叠?
 到【灌水乐园】发言


