


Vue 3 的 diff 算法相较于 Vue 2 有了一些改进和优化,主要是为了应对更复杂的组件结构和更高的性能需求。
以下是 Vue 3 diff 算法在处理列表更新时的大致步骤:
-
头头比较:首先,比较新旧列表的头节点(即第一个节点)。如果它们相同(基于 key 判断),则复用该节点,并移动两个列表的头指针到下一个节点。
-
尾尾比较:然后,比较新旧列表的尾节点(即最后一个节点)。如果它们相同,也复用该节点,并移动两个列表的尾指针到前一个节点。
-
移动或创建节点:如果头头比较和尾尾比较都没有找到可复用的节点,Vue 会尝试在旧列表中查找与新节点匹配的节点。如果找到了,则移动该节点到正确的位置;如果没有找到,则创建一个新节点。
-
删除节点:最后,检查旧列表中是否有剩余的节点没有被复用或移动。如果有,说明这些节点在新列表中不再需要,因此将它们从 DOM 中删除。
前置节点后置节点比对:

前置节点(头头比较):
比较新旧列表的头节点(即第一个节点)。如果它们相同(基于 key 判断),则复用该节点,并移动两个列表的头指针到下一个节点。
   // 1. sync from start
    // (a b) c
    // (a b) d e
    // 处理相同的前置节点
    while (i <= e1 && i <= e2) {
      // 获取索引为 i 的 新老节点 n1 和 n2
      const n1 = c1[i]
      const n2 = (c2[i] = optimized
        ? cloneIfMounted(c2[i] as VNode)
        : normalizeVNode(c2[i]))
      // 判断n1和n2新老节点相同的话,进行节点的更新操作
      if (isSameVNodeType(n1, n2)) {
        patch(
          n1,
          n2,
          container,
          null,
          parentComponent,
          parentSuspense,
          namespace,
          slotScopeIds,
          optimized,
        )
      } else {
        // n1 和 n2 不是相同节点话,前置节点的处理结束
        break
      }
      // 循环比对下一对前置节点
      i++
    }
后置节点(尾尾比较):
比较新旧列表的尾节点(即最后一个节点)。如果它们相同,也复用该节点,并移动两个列表的尾指针到前一个节点。
// 2. sync from end
    // a (b c)
    // d e (b c)
    // 处理相同的后置节点
    while (i <= e1 && i <= e2) {
      // 从最后的节点开始查找,获取的相关节点n1 和 n2
      const n1 = c1[e1]
      const n2 = (c2[e2] = optimized
        ? cloneIfMounted(c2[e2] as VNode)
        : normalizeVNode(c2[e2]))
      // 如果 n1 和 n2 是相同类型节点的话,则进行节点的更新操作
      if (isSameVNodeType(n1, n2)) {
        patch(
          n1,
          n2,
          container,
          null,
          parentComponent,
          parentSuspense,
          namespace,
          slotScopeIds,
          optimized,
        )
      } else {
        // 当n1 和 n2 两个新老节点不相同时,处理结束
        break
      }
      e1--
      e2--
    }
当比对完前置节点和后置节点后,记录e1、e2、i这三个值,后面需要用到;
仅有新增节点:
在第一步和第二步处理完前后置节点,如果新节点中是仅有新增节点;

源码解析:
根据上图,当 i > e1 并且 i <= e2 就是仅有新增节点
 // 仅有新增节点: 当新节点和旧节点对比时,发现新节点仅有新增节点,只需要将新的节点遍历挂载到新的节点树上
    if (i > e1) {
      if (i <= e2) {
        const nextPos = e2 + 1
        const anchor = nextPos < l2 ? (c2[nextPos] as VNode).el : parentAnchor
        while (i <= e2) {
          patch(
            null,
            (c2[i] = optimized
              ? cloneIfMounted(c2[i] as VNode)
              : normalizeVNode(c2[i])),
            container,
            anchor,
            parentComponent,
            parentSuspense,
            namespace,
            slotScopeIds,
            optimized,
          )
          i++
        }
      }
    }
仅有卸载节点:
在第一步和第二步处理完前后置节点,如果新节点中是仅有卸载节点;

源码解析:
根据上图,当 i > e2 并且 i <= e1 就是仅有卸载节点
     // 仅有卸载节点:
    else if (i > e2) {
      while (i <= e1) {
        unmount(c1[i], parentComponent, parentSuspense, true)
        i++
      }
    }
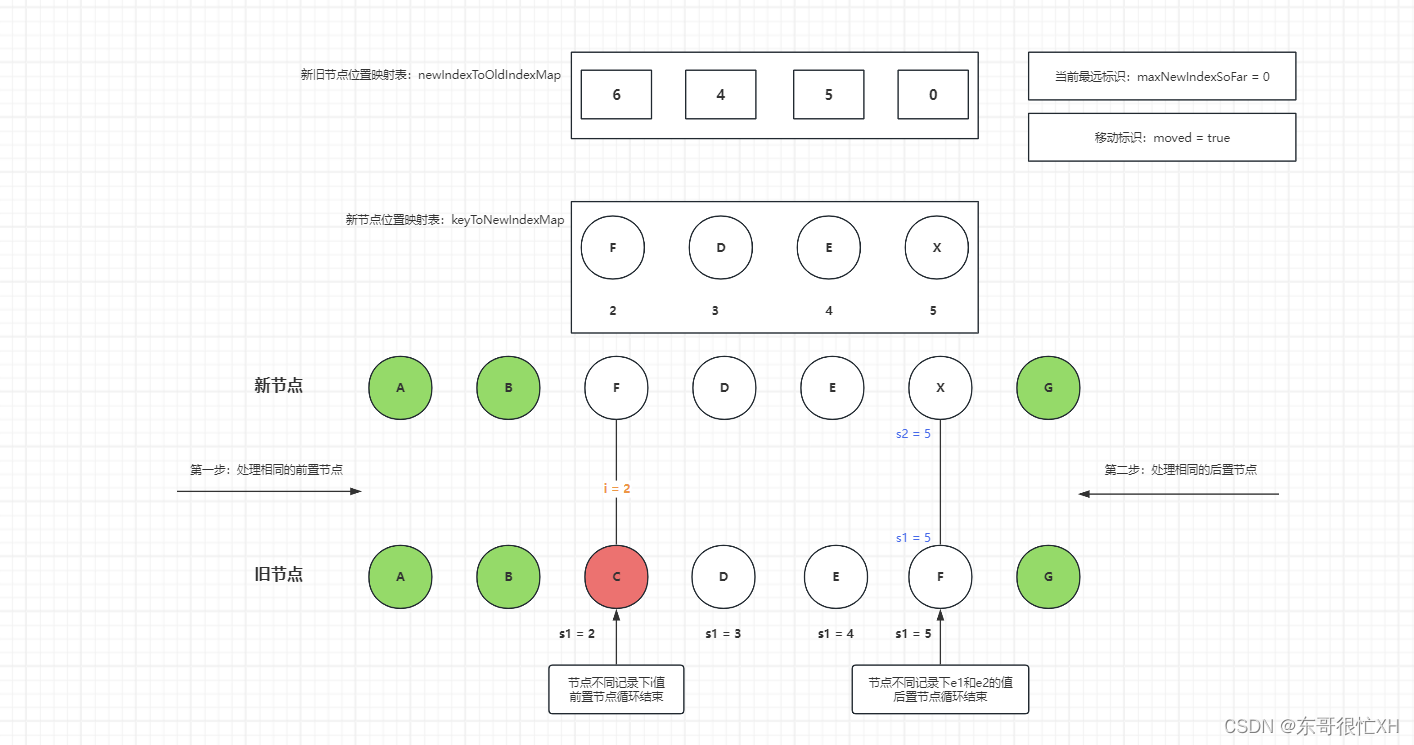
乱序的节点:
源码解析:
else {
      const s1 = i // prev starting index 旧节点索引
      const s2 = i // next starting index 新节点索引

      // 5.1 build key:index map for newChildren
      // 新节点位置映射表, 在前后置节点比较完的中间其余节点都拿出来,放在这个表中
      const keyToNewIndexMap: Map<string | number | symbol, number> = new Map()
      for (i = s2; i <= e2; i++) {
        const nextChild = (c2[i] = optimized
          ? cloneIfMounted(c2[i] as VNode)
          : normalizeVNode(c2[i]))
        if (nextChild.key != null) {
          if (__DEV__ && keyToNewIndexMap.has(nextChild.key)) {
            warn(
              `Duplicate keys found during update:`,
              JSON.stringify(nextChild.key),
              `Make sure keys are unique.`,
            )
          }
          keyToNewIndexMap.set(nextChild.key, i)
        }
      }

      // 5.2 loop through old children left to be patched and try to patch
      // matching nodes & remove nodes that are no longer present
      let j

      let patched = 0
      // 新节点与旧节点对比后,需要变更的数量
      const toBePatched = e2 - s2 + 1
      // 移动标识
      let moved = false
      // used to track whether any node has moved
      // 当前最远位置
      let maxNewIndexSoFar = 0
      // works as Map<newIndex, oldIndex>
      // Note that oldIndex is offset by +1
      // and oldIndex = 0 is a special value indicating the new node has
      // no corresponding old node.
      // used for determining longest stable subsequence
      // 新旧节点位置映射表,默认值:新节点需要处理的个数
      const newIndexToOldIndexMap = new Array(toBePatched)
      for (i = 0; i < toBePatched; i++) newIndexToOldIndexMap[i] = 0

      for (i = s1; i <= e1; i++) {
        const prevChild = c1[i]
        if (patched >= toBePatched) {
          // all new children have been patched so this can only be a removal
          unmount(prevChild, parentComponent, parentSuspense, true)
          continue
        }
        let newIndex
        if (prevChild.key != null) {
          // 从新节点位置映射表中找旧节点映射值
          newIndex = keyToNewIndexMap.get(prevChild.key)
        } else {
          // key-less node, try to locate a key-less node of the same type
          for (j = s2; j <= e2; j++) {
            if (
              newIndexToOldIndexMap[j - s2] === 0 &&
              isSameVNodeType(prevChild, c2[j] as VNode)
            ) {
              newIndex = j
              break
            }
          }
        }
        if (newIndex === undefined) {
          // 当旧节点在新节点位置映射表中没有找到,直接卸载
          unmount(prevChild, parentComponent, parentSuspense, true)
        } else {
          // 当旧节点在新节点位置映射表中找到,更改新旧节点映射表中的值
          newIndexToOldIndexMap[newIndex - s2] = i + 1
          //
          if (newIndex >= maxNewIndexSoFar) {
            maxNewIndexSoFar = newIndex
          } else {
            moved = true
          }
          patch(
            prevChild,
            c2[newIndex] as VNode,
            container,
            null,
            parentComponent,
            parentSuspense,
            namespace,
            slotScopeIds,
            optimized,
          )
          patched++
        }
      }

      // 5.3 move and mount
      // generate longest stable subsequence only when nodes have moved
      const increasingNewIndexSequence = moved
        ? getSequence(newIndexToOldIndexMap)
        : EMPTY_ARR
      j = increasingNewIndexSequence.length - 1
      // looping backwards so that we can use last patched node as anchor
      for (i = toBePatched - 1; i >= 0; i--) {
        const nextIndex = s2 + i
        const nextChild = c2[nextIndex] as VNode
        const anchor =
          nextIndex + 1 < l2 ? (c2[nextIndex + 1] as VNode).el : parentAnchor
        if (newIndexToOldIndexMap[i] === 0) {
          // mount new
          patch(
            null,
            nextChild,
            container,
            anchor,
            parentComponent,
            parentSuspense,
            namespace,
            slotScopeIds,
            optimized,
          )
        } else if (moved) {
          // move if:
          // There is no stable subsequence (e.g. a reverse)
          // OR current node is not among the stable sequence
          if (j < 0 || i !== increasingNewIndexSequence[j]) {
            move(nextChild, container, anchor, MoveType.REORDER)
          } else {
            j--
          }
        }
      }
    }


 2866
2866


 被折叠的 条评论
为什么被折叠?
被折叠的 条评论
为什么被折叠?
 到【灌水乐园】发言


